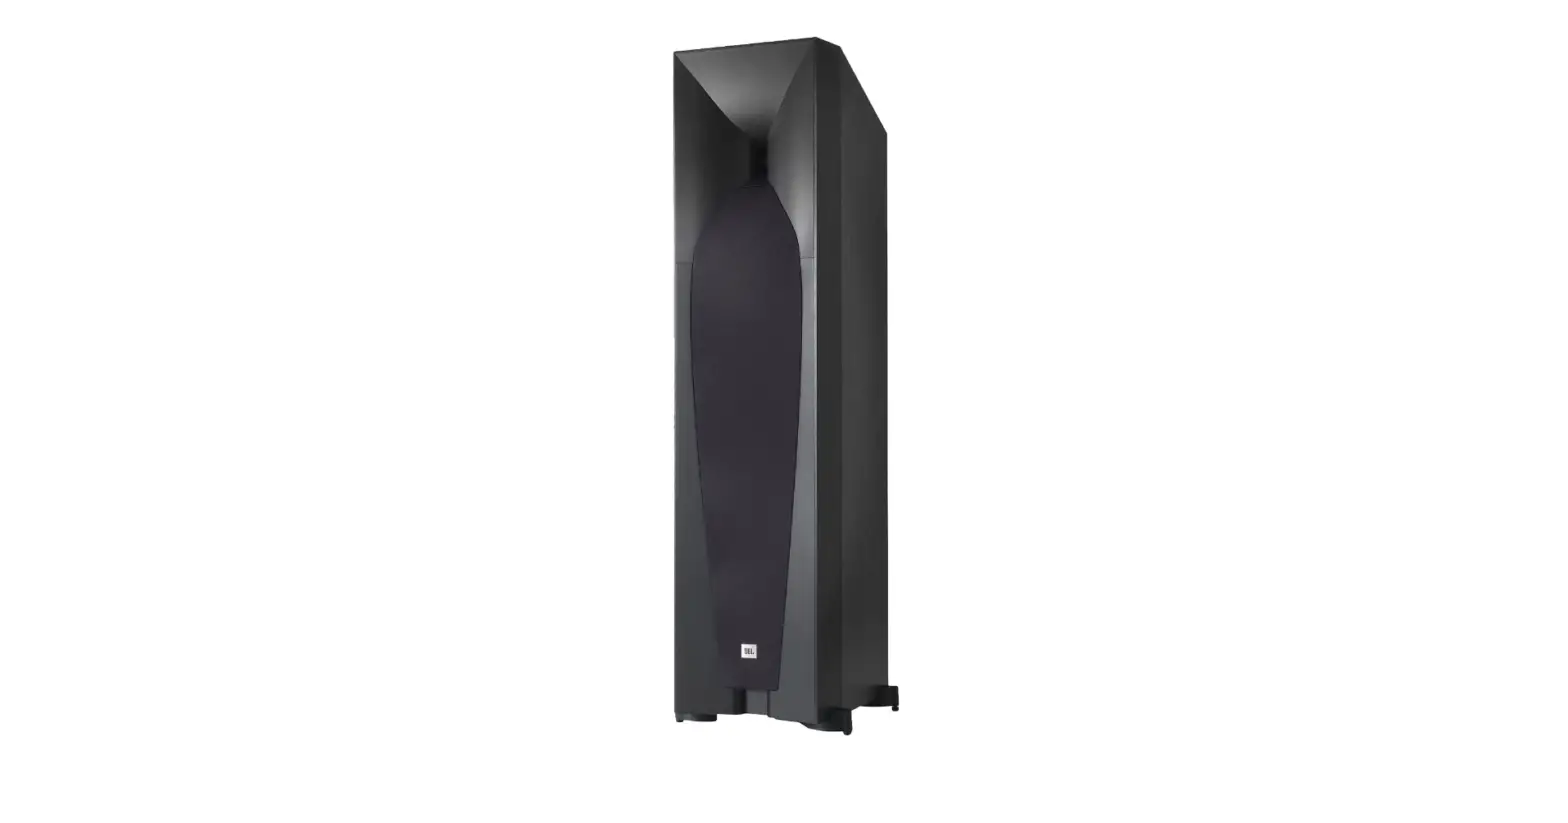

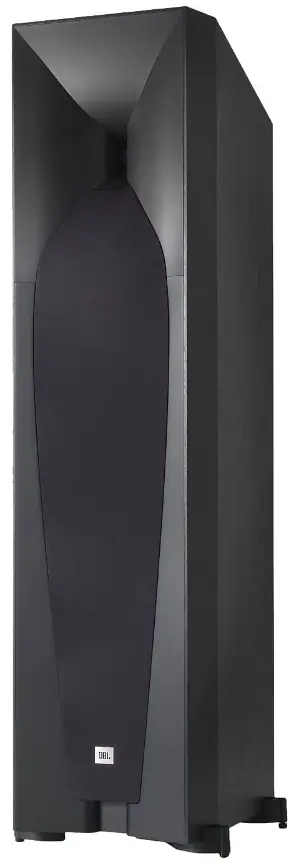
JBL 570 Floorstanding Loudspeaker
Specifications
- SPEAKER TYPE: 2-way dual-woofer, floorstanding
- LOW-FREQUENCY TRANSDUCER: Two 5-1/4″ (130mm) PolyPlas cones with Symmetrical Field Geometry™ magnet structures, cast frames and rubber surrounds, magnetically shielded
- HIGH-FREQUENCY TRANSDUCER: 1″ (25mm) compression driver with neodymium magnet and one-piece Teonex® diaphragm on a glass-filled ABS Bi-Radial® horn, magnetically shielded
- RECOMMENDED AMPLIFIER POWER: 150 watts
- FREQUENCY RESPONSE: 45Hz – 40kHz (–6dB)
- NOMINAL IMPEDANCE: 6 ohms
- SENSITIVITY (2.83V/1M): 88dB
- CROSSOVER FREQUENCIES:5kHz
- ENCLOSURE TYPE: Ported
- CONNECTOR TYPE: Dual gold-plated binding posts (bi-wire capable)
- AVAILABLE FINISHES: Black or cherry
- DIMENSIONS (H X W X D): 34-1/16″ x 8-7/16″ x 11-3/16″ (896mm x 214mm x 284mm)
- WEIGHT:4 lb. (15.6kg)
Introduction
Long a defining feature of JBL Professional loudspeakers, large vertical arrays of constant-directivity horns can be found high overhead at big concert events or concealed behind the screen of your preferred movie theatre. It’s how they provide the enormously detailed sound and live music experience that sizable audiences want. High-frequency horns are paired with potent low-frequency drivers in the most modern JBL home loudspeakers, such as the Everest DD66000, K2, and Project Array, to create the highest levels of dynamic realism and dimensional precision. The famous JBL chief engineer Greg Timbers’ new Studio 5 Series speakers carry on this performance-proven history.
THANK YOU FOR CHOOSING THIS JBL® PRODUCT
For more than 60 years, JBL® engineers have been involved in every aspect of music and film recording and reproduction, from live performances to the recordings you play on the go and in your home, car or office.
We’re confident that the JBL system you have chosen will provide every note of enjoyment you expect – and that when you think about purchasing additional audio equipment for your home, car or office, you will once again choose JBL products.
Please take a moment to register your new product on our Web site, www.jbl.com. Registering enables us to keep you posted on our latest advancements and helps us to understand our customers and build products that meet their needs.
INCLUDED ITEMS

PLACEMENT
STUDIO 590/STUDIO 580/STUDIO 570/STUDIO 530 – LEFT AND RIGHT CHANNELS
For the best results, place the speakers 6 – 10 feet (1.8m – 3m) apart. Angling the speakers toward the listening position can improve the stereo imaging. The speakers will produce the most accurate stereo soundstage when the angle between the listener and the speakers is between 40 and 60 degrees.
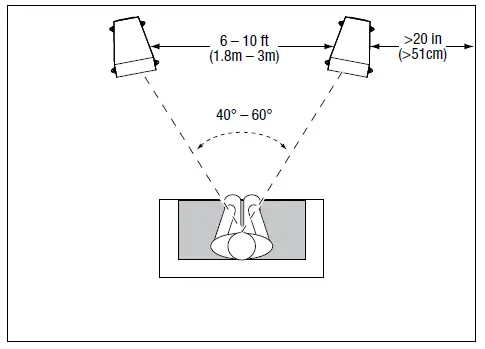
Generally, bass output will increase as the speaker is moved closer to a wall or corner.
For the best performance, we recommend that you place the speakers at least 20 inches (51cm) away from the side walls.
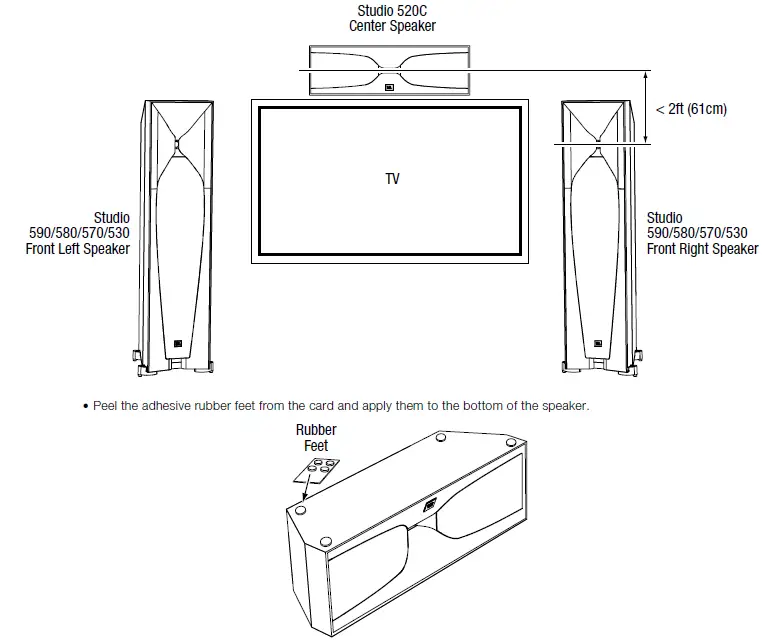
- Position Studio 530 bookshelf speakers so that the centers of their horns are approximately at ear level. Peel the adhesive rubber feet from the card and apply them to the bottoms of the speakers.
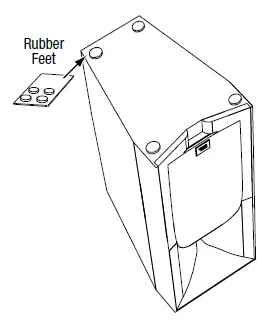
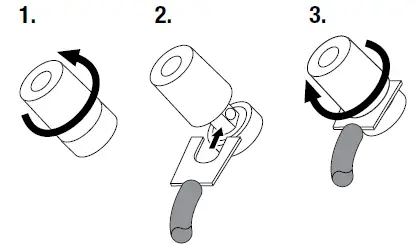
USING THE SUPPLIED SPIKES (STUDIO 590/STUDIO 580/STUDIO 570)
Four metal spikes are supplied for use when you place the speaker on a carpeted surface. Using the spikes decouples the speaker from the floor and prevents unwanted acoustic damping.
To insert the spikes:
- Gently lay the speaker on its side (not its front or back) on a soft, nonabrasive surface.
- Unscrew and remove the rubber bumpers from the speaker’s feet.
- Screw each spike into the threaded insert in each foot. Make sure all four spikes are screwed in completely for stability.
Note: NEVER drag the speaker to move it, as this will damage the spikes, the feet and/or the speaker cabinet itself. Always lift the speaker and carry it to its new location.
STUDIO 520C
You should place the 520C center speaker directly above or below the center of your TV screen. The center of the speaker’s horn should be no more than 2 feet (61cm) above or below the centers of the front left and front right speakers’ horns. If your TV set is deep enough, you can set the center speaker on top of the TV, with the speaker’s front edge even with the TV’s front edge.
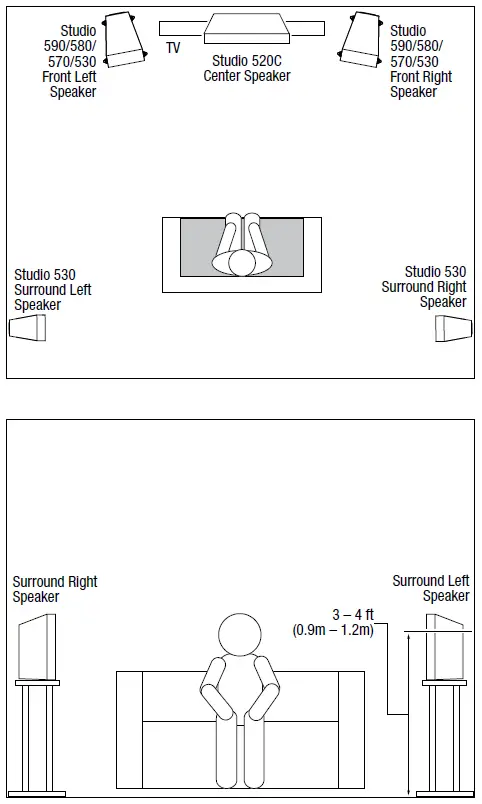
STUDIO 530 – SURROUND CHANNELS (5.1-CHANNEL SYSTEM)
When you use Studio 530 speakers as surround-channel speakers in a 5.1-channel system, place them slightly behind the listening position, facing each other. Ideally, they should be 3 – 4 feet (0.9m – 1.2m) above the floor. An alternate location would be on a wall behind the listening position, facing forward. The surround speakers should not call attention to themselves while they’re playing. Experiment with their placement until you hear a diffuse, ambient sound accompanying the sounds that you hear from the front left, front right and center speakers.
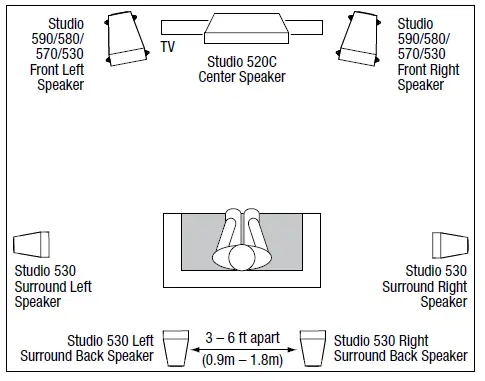
STUDIO 530 – SURROUND CHANNELS (7.1-CHANNEL SYSTEM)
When you use Studio 530 speakers as surround-channel speakers in a 7.1-channel system, place the surround side speakers directly to the sides of the listening position, at least 3 – 4 feet (0.9m – 1.2m) above the floor. Place the surround back speakers on the wall behind the listening position, also at least 3 – 4 feet (0.9m – 1.2m) above the floor and 3 – 6 feet (0.9m – 1.8m) apart.
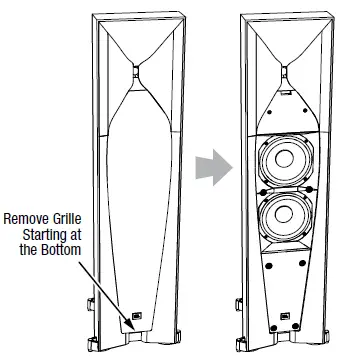
REMOVING THE GRILLES
You can remove the Studio 5 speaker grilles by pulling them away from the enclosure, starting at the bottom.
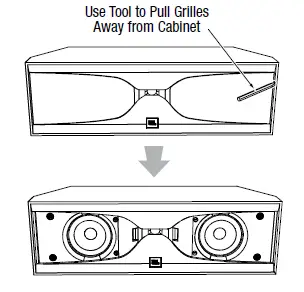
REMOVING STUDIO 520C GRILLES
To remove the Studio 520C grilles, use the provided grille removal tool to pull the grilles away from the enclosure as shown, then remove them the rest of the way by hand.
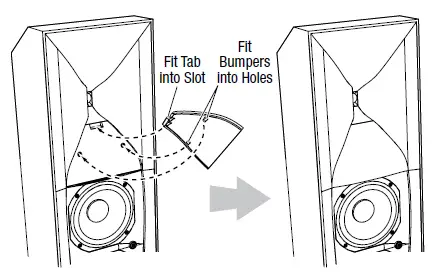
ATTACHING THE HORN COVERS
If you remove the speakers’ grilles, attach the provided horn covers as shown. Make sure that both rubber bumpers on the horn cover fit into the holes in the speaker.
CONNECTIONS
Caution: Make sure that all of the system’s electrical components are turned OFF (and preferably unplugged from their AC outlets) before making any connections.
Speakers and amplifiers have corresponding positive and negative (“+” and “–”) connectors. All Studio 5 series speakers have connectors that are marked “+” and “–” on the terminal-cup assembly. Additionally, the “+” connectors have red markings, while the “–” connectors have black markings.
To ensure proper polarity, connect each “+” connector on the back of the amplifier or receiver to the respective “+” (red) connector on each speaker. Connect the “–” connectors in a similar way. Do not reverse polarities (i.e., “+” to “–” or “–” to “+”) when making connections. Doing so will cause poor stereo imaging and diminished bass performance.
Important: Make sure the “+” and “–” wires or connectors do not touch each other or the other terminal. Touching wires can cause a short circuit that can damage your receiver or amplifier.
The Studio 5 series speakers’ gold-plated speaker connectors can accept a variety of wire connector types: bare wire, pin connectors, spade connectors and banana connectors.
- USING BARE WIRE OR PIN CONNECTORS:

- USING SPADE CONNECTORS:

- USING BANANA CONNECTORS:

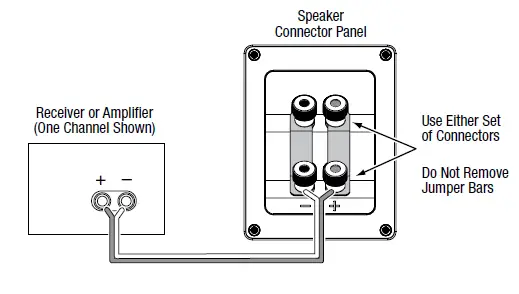
- BASIC SINGLE-WIRE CONNECTION


To connect the speakers using a single wire, connect the amplifier to each speaker as shown in the illustration below. You can use either set of connectors on the connector panel.
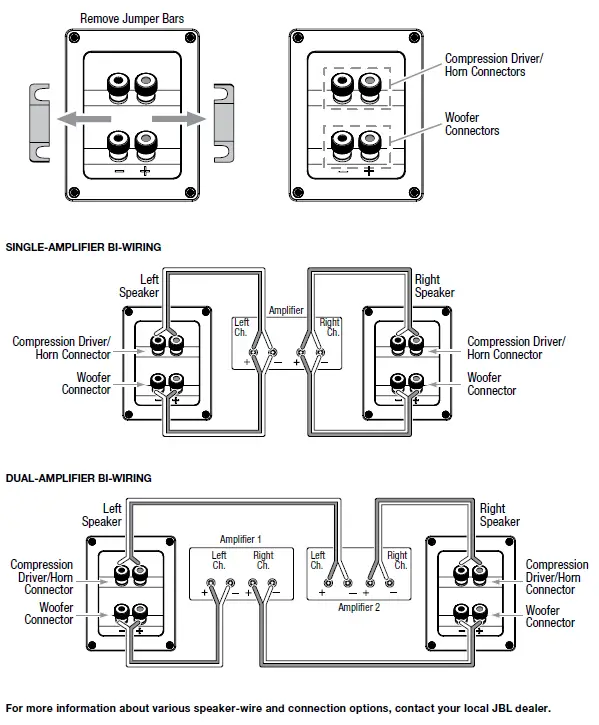
IMPORTANT: Do not remove the metal jumper bars from between the two sets of connectors when connecting the speaker wires.
BI-WIRE CONNECTION
All Studio 5 series speaker connector panels have two sets of input connectors that are joined by metal jumper bars. The upper set of connectors is for the compression-driver/horn assembly, and the lower set of connectors is for the woofer(s). This arrangement allows you to bi-wire the speakers using a single stereo amplifier or using two stereo amplifiers. Bi-wiring can offer performance advantages and more flexibility in power-amplifier selection over a conventional single-wire connection.
Before bi-wiring the speakers, remove the jumper bars.
USING THE PORT TUBE INSERTS (ALL MODELS EXCEPT STUDIO 520C)
If, due to speaker placement or your room’s acoustics, you feel that the speakers produce a bit too much bass output for your taste, you can use the provided port tube inserts to slightly reduce the speakers’ output in the 50Hz – 100Hz region.
Insert the port tube insert about half way into the port tube opening as shown in the illustration. Be careful not to push the insert through the port tube and into the speaker cabinet.
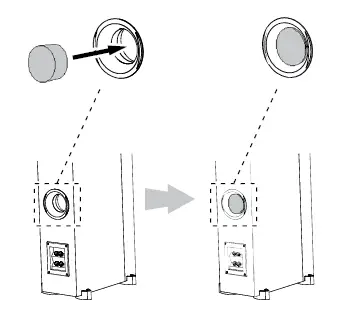
NOTE: The Studio 590 has two port tubes and includes two port tube inserts.
CARING FOR YOUR SPEAKERS
- Wipe the cabinet with a clean, dry cloth to remove dust. Damp cloth may dull the cabinet’s finish. Do not use volatile liquids such as benzene, paint thinner or alcohol on the cabinet.
- Do not spray insecticide near the cabinet.
- To remove dust from the grille fabric, use a vacuum cleaner set to low suction.
- Never apply suction or pressurized air to the horn opening.
- Do not wash the grilles in water, as it may fade the color or make it uneven.
- If the surfaces of the woofer cones become dusty, you can carefully sweep them clean with a soft, dry calligraphy brush or paint brush. Do not use a damp cloth.
FREQUENTLY ASKED QUESTIONS
I recently purchased 580s and the 520c for the front and center speakers, however 530s have received excellent evaluations for use as primary speakers or additional front speakers in a 7.1 arrangement.
Our JBL Studio 570 may be powered by your receiver. However, you could choose a 150W per channel receiver if you wish to increase its power handling.
Having our JBL Studio 590 along with our JBL Studio speaker lineup is preferable. Every brand or model has its own distinctive sound. It is best to use the same brand speaker with your Emotiva T2+.
At -6 dB, the bass is 40 Hz. So, at conventional measure -3 dB, it might be around 50 Hz.
Our JBL Studio 580 Floorstanding Loudspeaker uses two binding posts that are gold-plated (bi-wire capable). This device lacks Bluetooth functionality.
Width 9-7/8
Size 42-1/16
Depth 13-3/4
Studio monitors are “active” or “powered” speakers, meaning the power amplifier is directly integrated into the speaker cabinet, in contrast to home stereo or hi-fi speakers, which are frequently referred to as “passive” speakers because they need an external amplifier.
The classic acoustic performance of JBL serves as inspiration for the JBL Professional 104 Bluetooth Studio monitors.
It is strongly advised to use two studio monitors in stereo if you are mixing and wish to produce music of a high caliber, even though using a single studio monitor speaker can be fine for recreational music listening.
Good recording studios will be acoustically treated using materials in and around the studio walls and surfaces that both absorb and diffuse sound.
The cones of the woofer (bass), midrange, and tweeter (treble) are each powered separately, resulting in a clearer sound.
It entirely depends on what you’re trying to do with audio. A multi-speaker monitoring arrangement with a subwoofer is essentially necessary if you’re mixing sound for TV or movies.
Since they already have amplifiers, you do not need them. They have built-in amplifiers in their cabinet. Devices called studio monitors are made to be precise in the studio.


