![]()
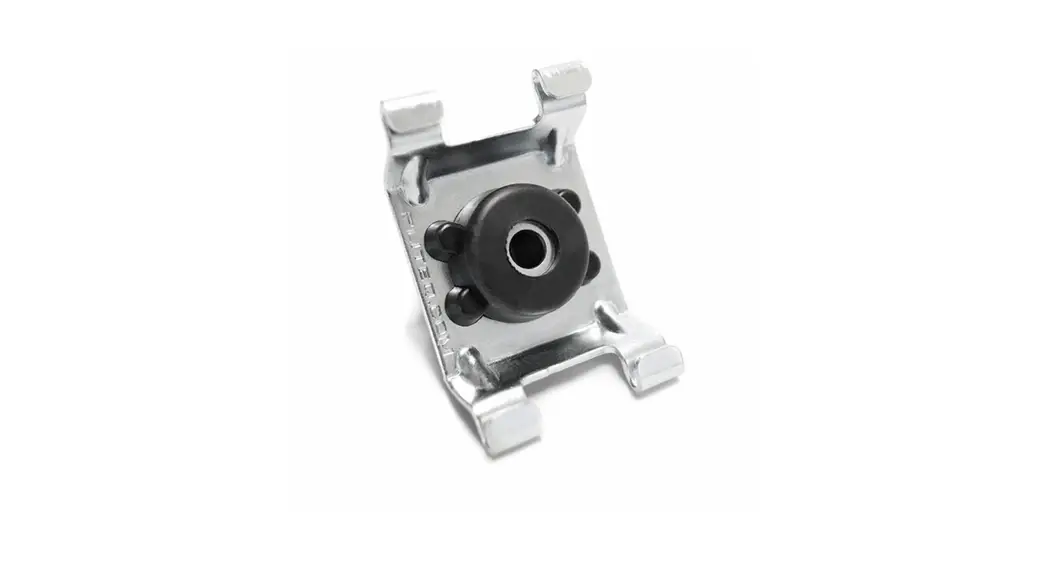
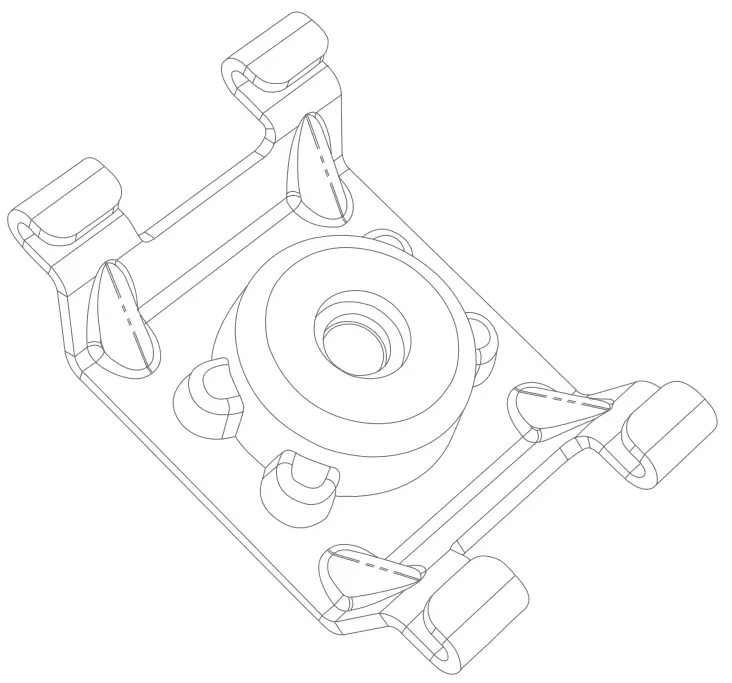
Genieclip RST Resilient Sound Isolation Clip
Instruction Manual
Genieclip RST Resilient Sound Isolation Clip
INSTALLATION INSTRUCTIONS
NOTE If at any time there is a question or concern as to the installation methods please contact Pliteq Inc. or your local representative.
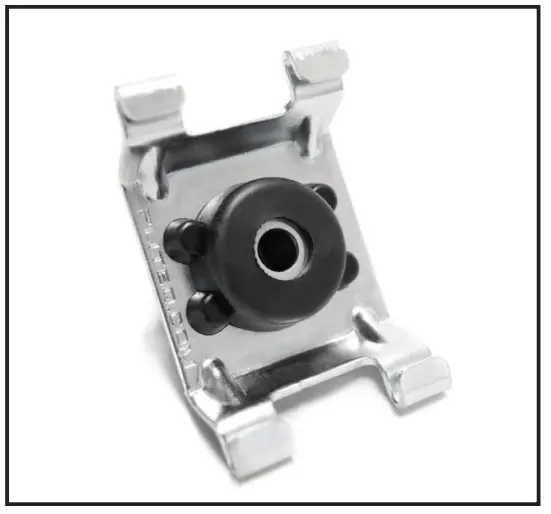
GenieClip ® RST Specifications
| Width | 1”5/8(40 mm) |
| Height | ”15/16( 24 mm) |
| Length | 2 ½”( 63 mm) |
| Weight | 1.25 oz. (40 grams) |
| Max Spacing on Furring Channel | 48 in. on center |
| Max Acoustic Design Load | 36 lbs (16 kilo) |
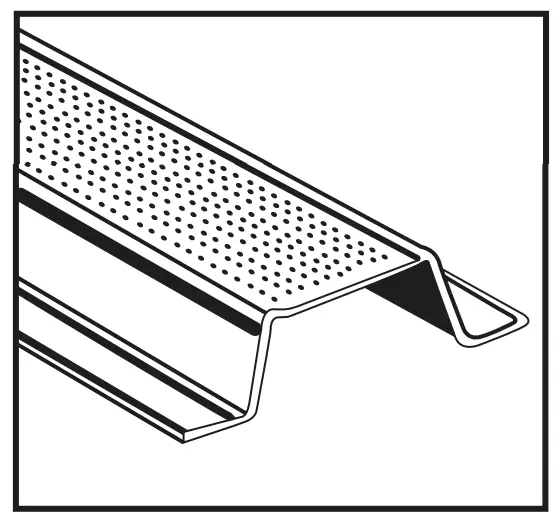
Drywall Furring Channel Specifications (Hat Channel)
| Gage minimum | 25 ga. With hemmed edges |
| Width min at base | 2.5” (63.5 mm) |
| Width max recommended at base | 2.75” (70 mm) |
| Width at top | 1.25” (32 mm) |
| Height standard | 0.78” (22 mm) |
| Max Clip Spacing on Furring Channel | 48 in. on center |
| Max Acoustic Design Load per Clip | 36 lbs (16 kilo) |
NOTE – Splice drywall furring channel with 6” (150 mm) overlaps in mid span between clips. Secure with 18 ga. Wire or (2) two ”7 /16 framing screws. IMPORTANT!!! 25ga. Furring Channels MUST have hemmed edges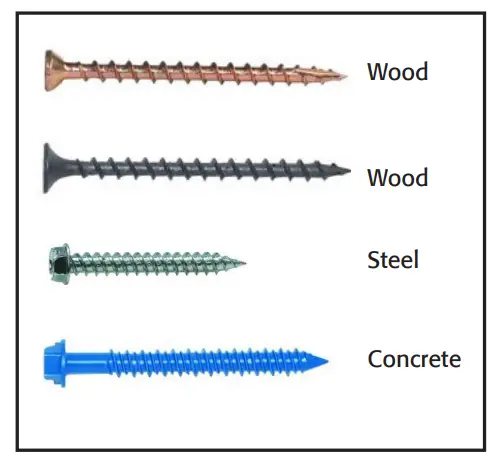 Fasteners for Wood Steel or Concrete
| Wood | Wood #8 x 2 ½ Coarse Threads, or # 8 x 2″, Coarse threadDrywall screws |
| Steel | ”#8, #10 or #12 – 1 5/8Self Tapping , fine thread, Type S |
| Concrete | 3” /16or ¼x” ”2 ¼” long Anchors Screws |
| NOTES | • Use fasteners that will have a minimum of 120 lbs pull out or shear strength in the wood, steel or concrete substrate. • Tighten fasteners until they come into solid contact with the top washer on the GenieClip RST. For best acoustic results DO NOT OVER TIGHTEN |
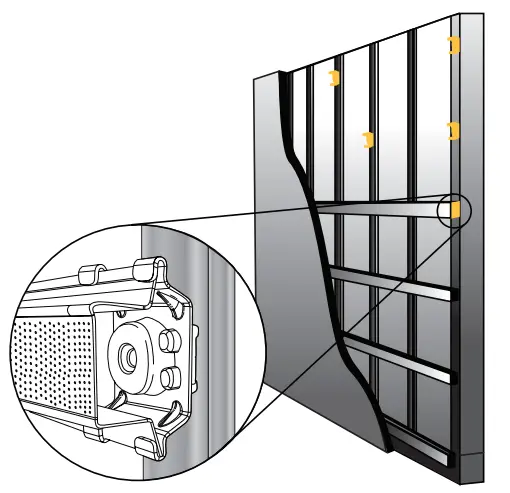
WALL INSTALLATION GUIDE
NOTES One and Two Layers of”5/8 Drywall
- GenieClip ® RST shall not exceed 48” on center. (horizontal)
- Spacing between the furring channels (hat channel) shall not exceed24”. Furring channels are installed perpendicular to the studs.
- Fasten all GenieClip RST to the substrate with a fastener approved for a minimum pull out and shear of 120 lbs.
- Tighten fasteners until they come into solid contact with the top washer on the GenieClip RST. For best acoustic results DO NOT OVER TIGHTEN

- Locate the bottom row of furring channel within 3 to 6” of the floor and install in a pattern roughly as per drawing below.
- Locate the top row of furring channel within 6” of the ceiling.
- Install all other rows of furring channel ensuring maximum spacing between rows does not exceed 24”
- Add additional short rows of furring channel and clips to pick up drywall edges around doors and windows as needed.
- Snap furring channel into the GenieClip RST and make joins between clips with a 6” overlap. Secure with 18 ga. wire or 27/16” framing screws.
- IMPORTANT Before and drywall is applied place 1/4” to 3/8” shims on floor to fully support gypsum board.
- Install gypsum board (drywall) from the bottom up leaving 1/4” spacing (min) around total perimeter.
- ONLY remove the shims after ALL gypsum board is installed and screwed to ALL furring channels. Ensure that every screw is installed according to assembly design in each layer of gypsum board. Shims are critical for best acoustic results.
- For best acoustic results, if there is more than one layer of gypsum board, seams should be staggered.
- Caulk around the entire perimeter of the gypsum board filling the whole space with non hardening acoustic caulk. Use fire and smoke rated caulking sealant where required. Do not install caulking so that it is ‘proud’ of the gypsum board surface.
- After caulking has set,…tape and finish as usual.
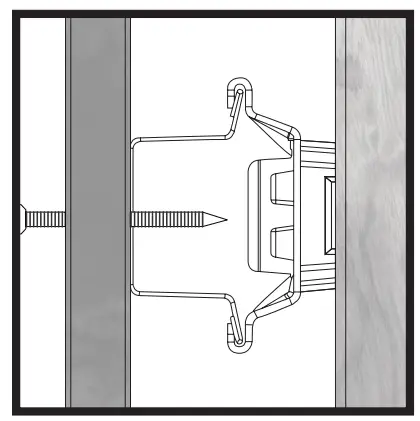 NOTE It is impossible to “short circuit” the GenieClip RST System when the correct screws are used. Should the installer hit a clip location, they will not be able to ‘seat’ the screw. They will be forced to move left or right on the track away from the GenieClip RST.
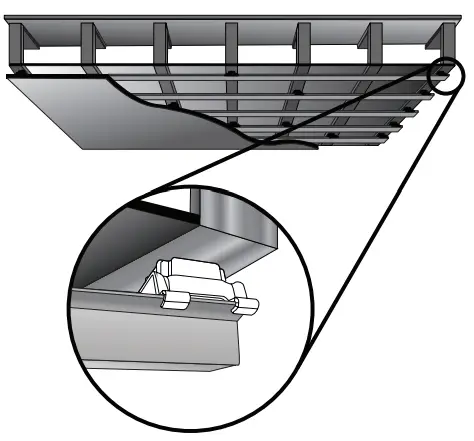
CEILING INSTALLATION GUIDE
NOTES One and Two Layers of”5/8 Drywall
- GenieClip® RST shall not exceed 48” on center. (horizontal)
- Spacing between the furring channels (hat channel) shall not exceed 24”. Furring channels are installed perpendicular to the joists.
- Fasten the GenieClip RST to the substrate with a fastener approved for a minimum pull out and shear of 120 lbs.
- Tighten fasteners until they come into solid contact with the top washer on the GenieClip RST.

- For best acoustic results DO NOT OVER TIGHTEN
- Locate the first row of furring channel within 3 to 6” of the wall edge and install in a pattern roughly as per drawing below.
- Locate the last of furring channel within 3” to 6” of the opposite wall.
- Install all other rows of furring channel ensuring maximum spacing between rows does not exceed 24”.
- IMPORTANT NOTE If the cavity is to have acoustic batt fill some codes require that steel members not exceed 16” on centers. Check with local building and fire codes.
- Furring channel shall not be cantilevered more than 6” beyond the last sound control clip.
- Snap furring channel into the GenieClip RST and make joins between clips with a 6” overlap. Secure with 18 ga. wire or 27/16” framing screws.
- For best acoustic results if there is more than one layer of gypsum board, seams should be staggered.
- Caulk around the entire perimeter of the gypsum board filling the whole space with non hardening acoustic caulk. Use fire and smoke rated caulking sealant where required. Do not install caulking so that it is ‘proud’ of the gypsum board surface.
- After caulking has set,…tape and finish as usual.
General Information
- GenieClip RST and gypsum board shall not carry heavy point loads such as cabinets or book shelves.
- 25 ga. Furring channel must have hemmed edge. Splice furring channel in mid span between clips with 6” overlap, securing with 18 ga. wire or 27/16” framing screws.
- For best acoustic results seal all potential air leaks with non hardening acoustic caulking. Use fire rated caulk where required. Resilient putty pads should be used to seal back of outlet boxes along with acoustic caulk.
- Steel studs shall be a minimum of 20 ga.
WALL AND CEILING INSTALLATION GUIDE FOR WOOD OR STEEL FRAMING WITH FURRING ON 24” CENTERS
Wall or Ceiling Framing at 24” o.c. GenieClip® RST at 48” o.c., furring at 24” o.c. 1 or 2 Layers of” 5/8Gypsum Board 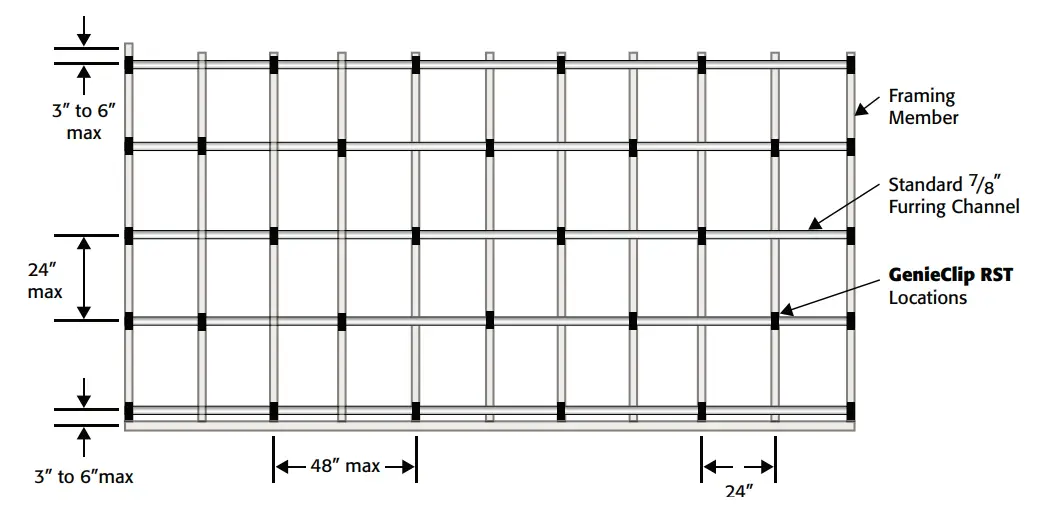 Wall or Ceiling Framing at 16” o.c. GenieClip RST at 48” o.c., furring at 24” o.c. 1 or 2 Layers of” 5/8Gypsum Board
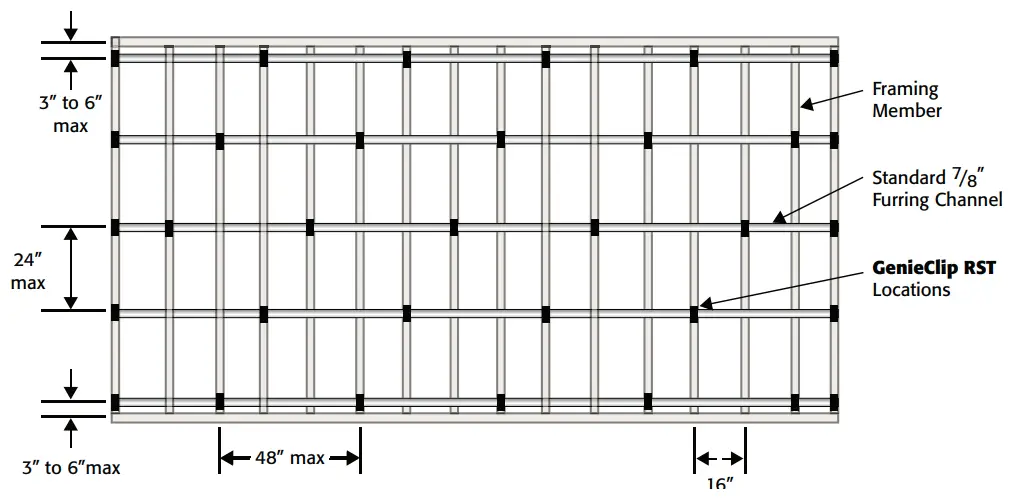
ESTIMATED GENIECLIP® RST USAGE CHART FOR WALLS AND CEILINGS
TEEL OR WOOD FRAMING (GENIECLIP RST IS SPACED 48” o.c. FURRING 24”o.c.) FOR ONE OR TWO LAYERS OF ”5/8GYPSUM BOARD
| 1~4’ | 5-8 | 9 —12 | 13-16 | 17-20 | 21-24 | 25-28 | 29-32 | 33-36 | 37-40 | |
| 1 — 3′ | 4pcs | 6 | 8 | 10 | 12 | 14 | 16 | 18 | 20 | 22 |
| 3 —5 | 6 | 9 | 12 | 15 | 18 | 21 | 24 | 27 | 30 | 33 |
| 5-7 | 8 | 12 | 16 | 20 | 24 | 28 | 32 | 36 | 40 | 44 |
| 7-9 | 10 | 15 | 20 | 25 | 30 | 35 | 40 | 45 | 50 | 55 |
| 9-11 | 12 | 18 | 24 | 30 | 36 | 42 | 48 | 54 | 60 | 66 |
| 11-13 | 14 | 21 | 28 | 35 | 42 | 49 | 56 | 63 | 70 | 77 |
| 13 —15 | 16 | 24 | 32 | 40 | 48 | 56 | 64 | 72 | 80 | 88 |
| 15-17 | 18 | 27 | 36 | 45 | 54 | 63 | 72 | 81 | 90 | 99 |
| 17-19 | 20 | 30 | 40 | 50 | 60 | 70 | 80 | 90 | 100 | 110 |
| 19-21 | 22 | 33 | 44 | 55 | 66 | 77 | 88 | 99 | 110 | 121 |
| 21-23 | 24 | 36 | 48 | 60 | 72 | 84 | 96 | 108 | 120 | 132 |
| 23 —25 | 26 | 39 | 52 | 65 | 78 | 91 | 104 | 117 | 130 | 143 |
| 25-27 | 28 | 42 | 56 | 70 | 84 | 98 | 112 | 126 | 140 | 154 |
| 27-29 | 30 | 45 | 60 | 75 | 90 | 105 | 120 | 135 | 150 | 165 |
| 29-31 | 32 | 48 | 64 | 80 | 96 | 112 | 128 | 144 | 160 | 176 |
| 31-33 | 34 | 51 | 68 | 85 | 102 | 119 | 136 | 153 | 170 | 187 |
| 33 —35 | 36 | 54 | 72 | 90 | 108 | 126 | 144 | 162 | 180 | 198 |
| 35-37 | 38 | 57 | 76 | 95 | 114 | 133 | 152 | 171 | 190 | 209 |
| 37-39 | 40 | 60 | 80 | 100 | 120 | 140 | 160 | 180 | 500 | 220 |
| 39-41 | 42 | 96 | 84 | 105 | 126 | 147 | 168 | 189 | 210 | 231 |
PLEASE NOTE
- It is always best to have a few extra GenieClip RST on hand for non standard room configurations and to fit around windows, doors, bulkheads etc.
Contact Us
For Your Project Specific Questions
T. 416.449.0049
E. [email protected]
09.21
© Pliteq Inc. 2021.
®™ Trademarks of Pliteq Inc. The information provided is accurate to the best of our knowledge at the time of issue.
However, we reserve the right to make changes when necessary without further notification. Suggested application
may need to be modified to conform with local building codes and conditions. We cannot accept responsibility for
products that are not used, or installed, to our specifications. All listed dimensions are nominal.![]()
www.pliteq.com![]() Patents: US 7895803, US 9121469, CA 2552516, AU 2007276677, CN ZL200780034674.1, SG 149449, EPO Patent Pending
Patents: US 7895803, US 9121469, CA 2552516, AU 2007276677, CN ZL200780034674.1, SG 149449, EPO Patent Pending


