AUDIBAX Roma 240 Go PA Systems

Specifications
| Model No. | Roma 240 Go |
| Type | PA System All-in-One Battery Powered |
| Transducer LF | 1 * 6.5″ subwoofer, 1.5″ voice coil |
| Transducer HF | 3 * 2.75″, neodymium magnet, 1″ voice coil |
| Frequency Response (-6dB) | 60 Hz – 18 kHz |
| Max. SPL (1m, free space) | 114 dB |
| Impedance | 4Ohms |
| Amplification | Class D |
| Power Output (RMS) | 120W |
| Number of Mixer Channels | 3 |
| Number of Mic Preamps | 2 |
| EQ | 2-Band Channel EQ |
| Effects | Reverb |
| Inputs | 2 * XLR / 6 .3mm Combo , / 1 * RCA Line in |
| Outputs | 1*XLR line out |
| Bluetooth | Yes, and support the Tws function |
| Enclosure Material | Polypropylene Plastic |
| Mounting Options | 35mm pole mount, Tilt-back, Floor Monitor |
| Power Supply | 110~240V 50/60HZ |
| Battery | Rechargeable Lithium-ion battery 6pcs 2600mAh 18650 |
Please read and keep all safety and use instructions. Important Safety Instructions Refer to the user manual for more information about your Roma 240 Go
- Read these instructions.
- Keep these instructions.
- Heed all warnings.
- Follow all instructions.
- Do not use this apparatus near water.
- Clean only with a dry cloth.
- Do not block any ventilation openings. Install in accordance with the manufacturer’s instructions.
- Do not install near any heat sources such as radiators, heat registers, stoves, or other apparatus (including amplifiers) that produces heat.
- Do not defeat the safety purpose of the polarized or grounding-type plug. A polarized plug has two blades with one wider than the other. A grounding-type plug has two blades and a third grounding prong. The wider blade or third prong is provided for your safety. If the provided plug does not fit in your outlet, consult an electrician for the replacement of the obsolete outlet.
- Protect the power cord from being walked on or pinched, particularly at plugs, convenience receptacles, and the point where it exits from the apparatus.
- Only use attachments/accessories specified by the manufacturer.
- Use only with the cart, stand, tripod, bracket, or table specified by the manufacturer or sold with the apparatus. When a cart is used, use caution when moving the cart/apparatus combination to avoid injury from tip-over.
- Unplug this apparatus during lightning storms or when unused for long periods of time.
- Refer all servicing to qualified personnel. Servicing is required when the apparatus has been damaged in any way such as a power-supply cord or plug is damaged, liquid has been spilled or objects have fallen into the apparatus, the apparatus has been exposed to rain or moisture, does not operate normally, or has been dropped.
WARNINGS/CAUTIONS:
- This symbol on the product means there is uninsulated, dangerous voltage within the product enclosure that may present a risk of electrical shock.
- This symbol on the product means there are important operating and maintenance instructions in this guide.
- Contains small parts which may be a choking hazard. Not suitable for children under age 3.
- This product contains magnetic material. Consult your physician on whether this might affect your implantable medical device.
System Setup Connections and Controls
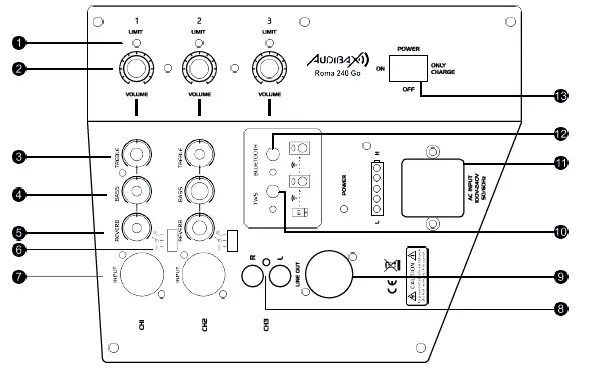
- Signal/Clip Indicator: Displays the input signal status in color.
- Green: Signal present Red: Signal clipping
- Note: Reduce the corresponding volume control to prevent signal clipping.
- Volume Control: Adjust the volume of your microphone, instrument, or audio source.
- Treble Control: Adjust the high-frequency balance of your microphone or instrument.
- Bass Control: Adjust the low-frequency balance of your microphone or instrument.
- Effect Control: Adjust the amount of effect applied to your microphone or instrument.
- Tone Match Switch: Move the switch to the
 preset. or
 position to enable the Tone Match preset.
 - Channel Input: Analog input for connecting microphone (XLR) and instrument (TS unbalanced) cables.
- RCA Left/Right.: Connect another interface such as a cell phone, guitar, computer, and the same device, etc.
- Line Output: Use a ¼c TRS cable to connect the line-level output to the Channel 1 or 2 input of a second Roma 240 Go to create a mono, two-loudspeaker setup.
Note: Line Out is a post mix. - TWS: With BT mode active, press TWS on both speakers to enter TWS mode. LED will flash until the connection is made.
- Once connected press TWS again to disconnect.
- AC Input: 100-240V AC power input.
- Bluetooth: Press BT to activate Bluetooth mode, LED will flash, when Bluetooth mode is active, pressing BT will disconnect.
- ON/OFF/CHARGE ONLY: Press to switch the power ON/OFF. Though the battery will always charge while the unit is connected to AC power, “Charge Only” enables you to charge your battery more quickly.


