![]() P04 4.3 Inch HMI Intelligent IIoT Gateway
P04 4.3 Inch HMI Intelligent IIoT Gateway
Instruction Manual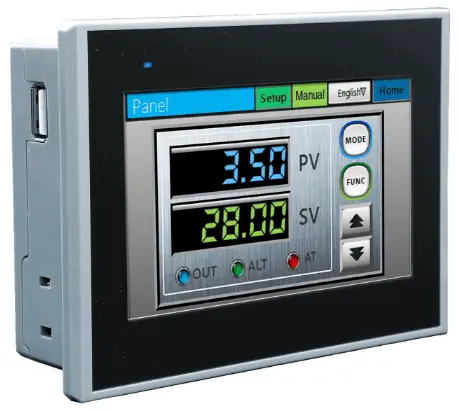 4.3” HMI
Setup Manual
Introduction
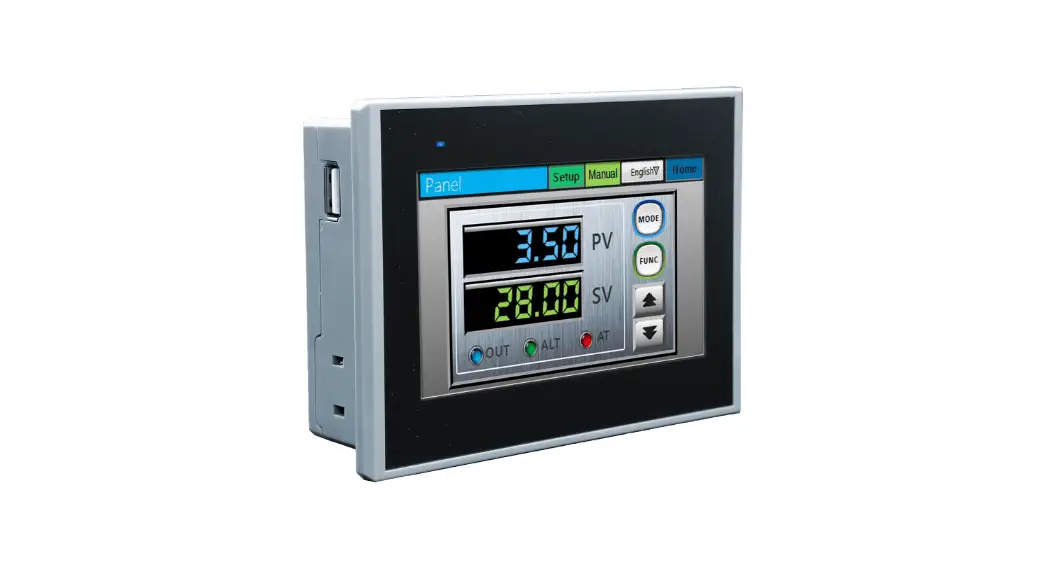
The 4.3” HMI comes with a 480 x 272 high-resolution TFT display module and a IP65 waterproof grade. The elegance in its design coupled with the fiexibility of the iFACE editing software meets user satisfaction in any application requirement.
Warning
Please read this manual before continuing with installation or operation of the device.
General Guide
- Installation and operation of the device must be done by professionally trained staff.
- Installation of the device must follow the instructions as printed in this manual.
- If installation of the device occurs outside the suggested storage temperature range of the device, it may cause the LCD to malfunction.
- If installation of the device occurs outside the suggested storage humidity range of the device, it may cause the touch panel to accumulate moisture which may shorten its
product lifespan. - Installation of the device must be kept away from the risk of any liquid or metal particles getting into the device. Foreign particles may cause internal components to short circuit and thus damage the device or even catch fire.
- The device must be installed on a stable and flat surface.
- Installation of the device must be kept away from the risk of corrosion, explosion, or heavy electronic and magnetic fields. It must also be kept away from high humidity and extreme shifts in temperature.
- The liquid in the LCD screen is very hazardous. If leakage is found, avoid contact with skin. At the chance of accidental contact, please immediately rinse with water. If the material comes in contact with eyes, please use water to rinse out the material and immediately seek medical assistance.
- Nearby equipment must be installed at a safe and appropriate distance with adequate protection to reduce local interference with the device.
Power Supply
- The device is designed with an input power of DC 24V. If the supply voltage is outside of the DC 24V +/- 20% range, it may result in damage or malfunction to the device.
- Therefore, please confirm that the voltage is correct before powering the device on. Please also ensure that the supplied power is stable during device operation.
Installation:
- Please avoid placing communication lines in the same conduit as the power lines and high voltage lines. Isolated lines are suggested to reduce surrounding noise interference.
Operation
- The device should not be used as a main control trigger for any emergency override or safety-related operations.
- Please note that the touch panel on the device is made of standard glass. Do not use forceful pressure or sharp objects to contact or hammer the screen.
Service and Maintenance
- Please do not allow non-trained staff members to perform the maintenance servicing.
- Please ensure that the power is switched off before performing any machine cleaning or repairing.
- When cleaning the front panel, be sure to use a soft cloth and mild detergent to wipe gently, avoiding any forceful pressing or rubbing.
- Please do not use batteries with poor quality.
Waste and Recycling
- Please adhere to local regulations when recycling the device.
- The screen, lithium battery, and capacitors contain hazardous material to individual health and local environment, and must be disposed responsibly.
Grounding
In order to maintain the operational condition and functioning of the HMI hardware components, please ensure proper power grounding.
Please ensure that the cable connecting the FG power terminal to the ground has a cable resistance lower than 100ft.
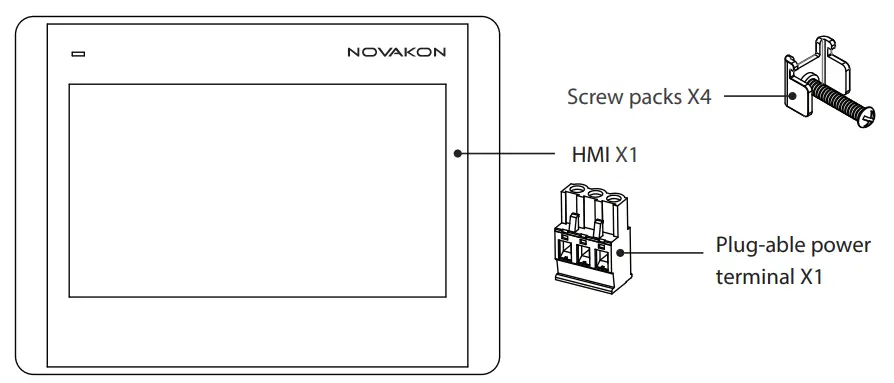
Installation Parts
Housing Type and Cut-Out Dimension
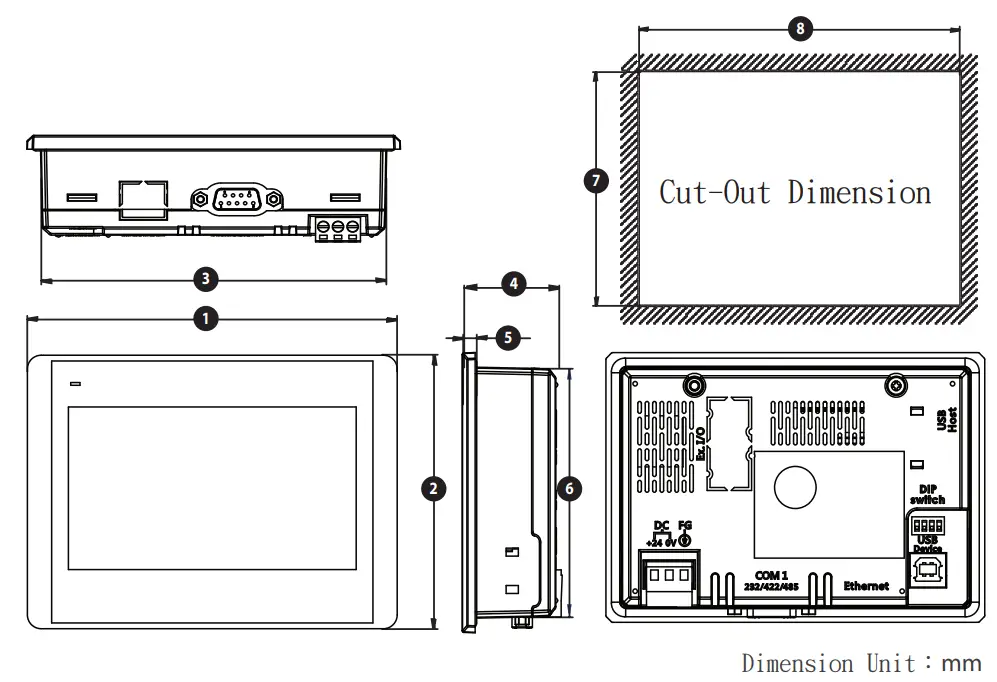
| 1 | 2 | 3 | 4 | 5 | 6 | 7 | 8 | |
| 4.3″ | 127.70 | 89.70 | 118. | 36.70 | 5.00 | 80. | 81.30 | 119.30 |
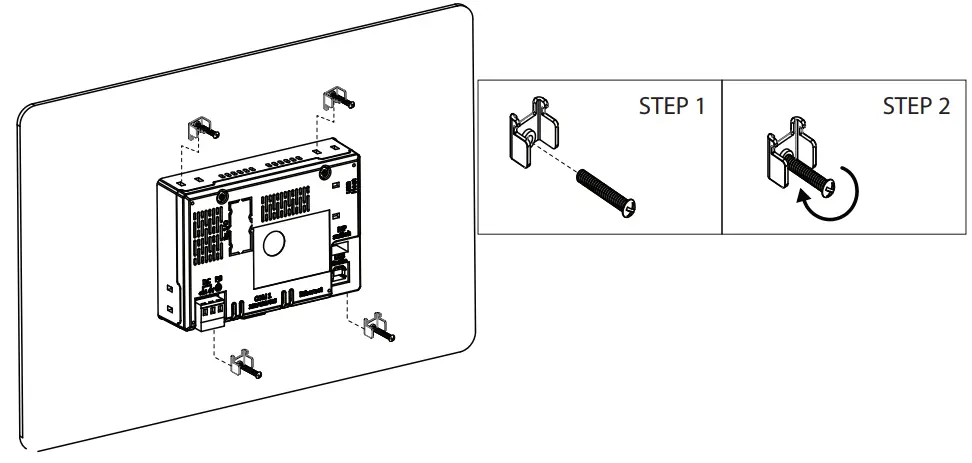
Installing Procedure
- Check the device cut-out size first, then proceed to make the proper cut-out on the setting plate. Lodge the device into the cut-out on the setting plate. (Unit = mm).
- Fasten the device to the setting plate by tightening the screws on the back of the device. Please tighten all screws evenly instead of tightening each screw one by one. If the screws are not tightened evenly, it may cause distortion damage to the device.

Power Connection
The device requires a power voltage of DC 24V (+/-20%). For a power consumption of 6W on the HMI, a power supply of 8W or above is recommended.
Importance Notice
It is recommended that the power plug must be connected to the device power terminal prior to connecting to the power source.
Power-connecting steps
- Remove the power plug from the power terminal of the device.
- Loosen the three screws on the power plug.
- Strip the cable to expose the copper wire to about 7-8mm.
- Insert the exposed copper wire into the three openings on the power plug.
- Retighten the three screws on the power plug.
- Plug the power plug back into the power terminal of the device.
Note
The power plug is included and already plugged into the power terminal of the device.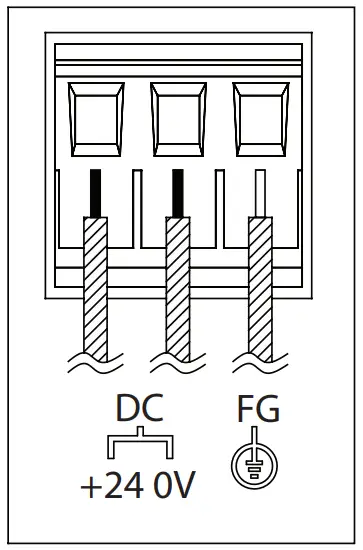
| Power Line Type | Power Line (AWG) | Strip Length | Torque |
| Solid | 28-12 | About 7-8 mm | About 4.5 lb-in |
| Stranded | 30-12 | About 7-8 mm | About 4.5 lb-in |
* with copper conduction wire only.
Instructional Diagram
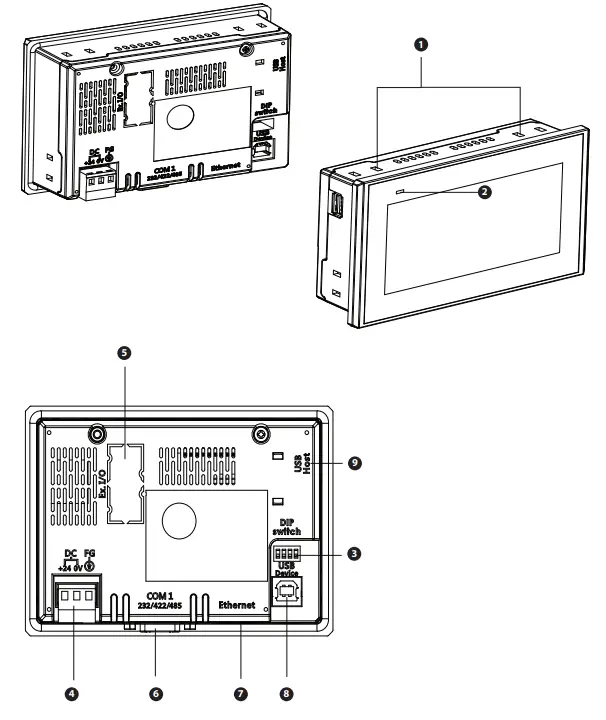
- Lock’s Holes
- Power Indicator
- Dip Switches
- Power Terminal
- Expansion Slot
- COM1 RS232/422/485
- Ethernet Port
- USB Device
- USB Host
Product Specification
| Type | P Series |
| Model | P04 |
| Display Type | 4.3” TFT |
| Resolution | 480×272 pixel |
| Color | 16.7M |
| Backlight Type | LED |
| Brightness | 330 cd/m² |
| Contrast | 500:01:00 |
| CPU | ARM Cortex A8 (1 GHz) |
| Flash Memory | 512M Bytes |
| RAM | 4GB , 8bit eMMC |
| FRAM (non-volatile) | 32K Bytes |
| RTC | Built-in battery CR2032 |
| COM1 | 1 x RS232 1 x RS422/485 , CAN(Option) |
| COM2 | N/A |
| COM3 | N/A |
| Ethernet | 1 x 10/100 Mbit |
| USB | 1 x Host 1x Device |
| Memory Card | N/A |
| Power Supply | 24V ± 20 % DC , lsolated Power |
| Power Consumption | 6 W |
| Operation Temperature | 0 ~ 45 ℃ |
| Storage Temperature | -20 ~ 60 ℃ |
| Operation Humidity | 10 ~ 90RH No Condensation |
| Dimension | 127.7(W) x 89.7(H) x 36.7(D) mm |
| Cut-out Dimension | 119.3(W) x 81.3(H) mm |
| ( Net ) Weight | 0.25 kg |
| Net weight with Packing box | 0.42 kg |
| Touch Panel | 4-wire Resistive |
Power On Test
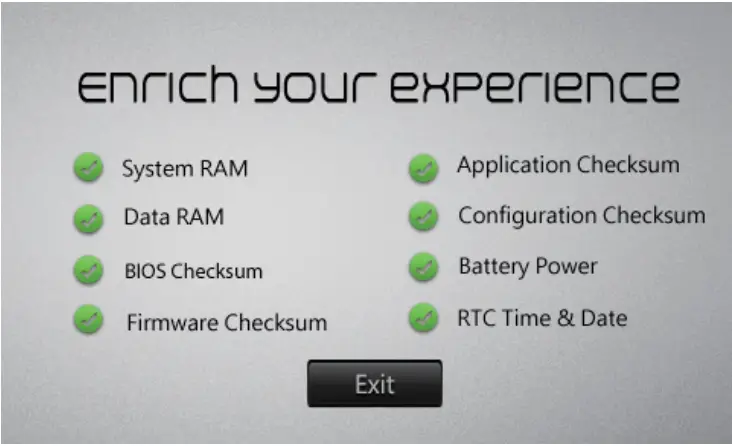 When powered on, the device should automatically perform a system diagnostic test. The diagnostic summary at the end of the test will display
 ![]() a if no issues are detected, and a
a if no issues are detected, and a![]() if an error is detected. Press [Continue] to jump to the System Menu Screen. If there are no errors detected, the “Continue” option will not show.
if an error is detected. Press [Continue] to jump to the System Menu Screen. If there are no errors detected, the “Continue” option will not show.
System Menu Screen
Click [Settings] for all BIOS options which include: [COM Port], [Ethernet], [File Transfer], [Backlight], [Display], [Calibration], [RTC], [Sys. Status], [Misc.] and [USB Device]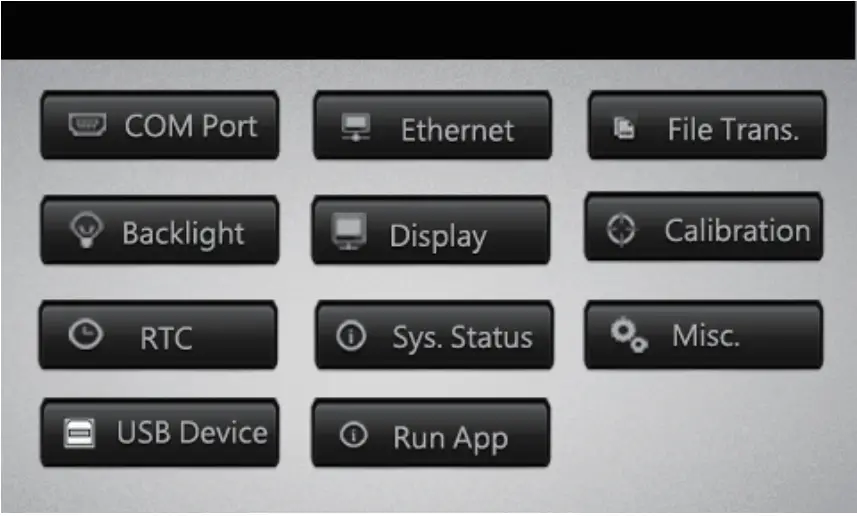 Click [Run App] to start up any applications downloaded to the device.
Ethernet Setting
Ethernet settings include [IP Address], [Gateway], [Netmask], [Port] and [DHCP]. In order to ensure a smooth and stable connection, communication parameters must correspond with the connected controller. Click the IP address field![]() to enter the IP address. The IP address should follow the format: XXX.XXX.XXX.XXX. Each XXX should be less than or equal to “255”. The system will automatically jump to the next set of XXX if values are accepted (if the input value is greater than 255, the system will require users to re-enter values). Press the
to enter the IP address. The IP address should follow the format: XXX.XXX.XXX.XXX. Each XXX should be less than or equal to “255”. The system will automatically jump to the next set of XXX if values are accepted (if the input value is greater than 255, the system will require users to re-enter values). Press the![]() key to jump to the previous set of XXX values and the key to edit the next set.
key to jump to the previous set of XXX values and the key to edit the next set.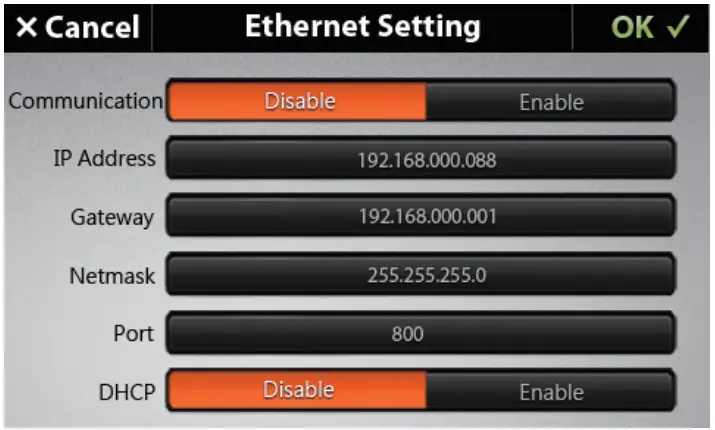
File Transfer
Applications and firmware can be downloaded or uploaded via USB or SD card. Select![]() for the application or firmware to be transferred from the HMI to the memory card. Select
for the application or firmware to be transferred from the HMI to the memory card. Select ![]() for the application or firmware to be transferred from the memory card to the HMI. Click [OK] to begin file transfer.
for the application or firmware to be transferred from the memory card to the HMI. Click [OK] to begin file transfer. 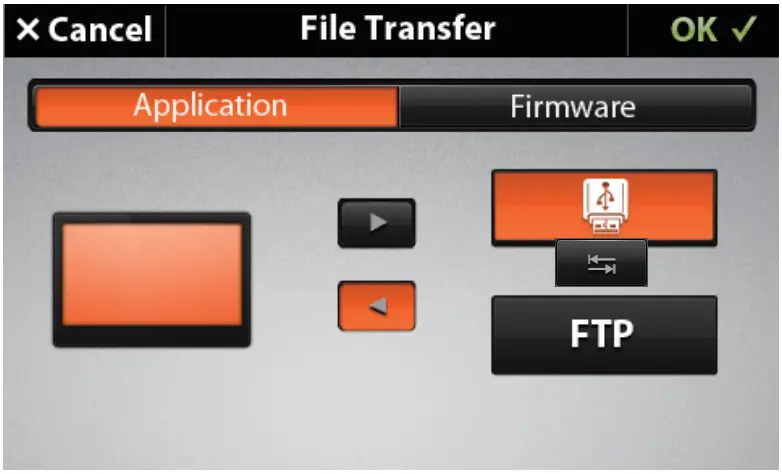 Select the file that is going to be transferred. Click [OK] to begin transfer. Click [Cancel] to abort file transfer process.
Backlight (Brightness) Setting
Click the![]() to adjust backlight brightness of the device. The backlight brightness setting ranges from 0 to 20, 0 being the darkest and 20 being the brightness. Click on the indicator on the meter to edit brightness level.
to adjust backlight brightness of the device. The backlight brightness setting ranges from 0 to 20, 0 being the darkest and 20 being the brightness. Click on the indicator on the meter to edit brightness level. Display Setting
Click [Screen Saver] to set how long the screen will stay lit before the screen saver function is effective. If the touch panel is not touched or if information is not updating automatically, the backlight will turn off according to the specified setting. Screen saver time ranges from 1 to 60 minutes. If the timer is set to 0, the screen saver function will turn of.
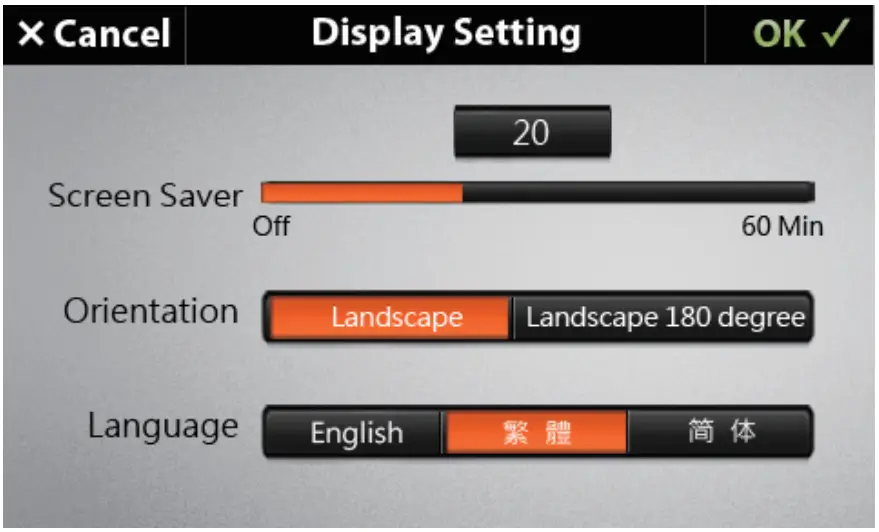 Click [Oriantation ] to set the HMI display orientation.
Click [ Language ] to change the language displayed in BIOS.
Calibration
If touch points deviate from contact point or are unresponsive, click [Calibrate] to reset the device calibration and correct the touch points. A cross-arrow will appear and the system will prompt the user to click on the cross-arrow as it moves across the four corners and to the center of the screen. After completion of these steps, the user can verify a successful calibration by touching the screen and ensuring the cursor follows correctly. Touch the center cross-arrow to accept calibration and the [OK] to save the calibration setting. If the touch point is not corrected, click [Cancel] to restart the calibration process. Note: The touch panel is a high precision electronic product, therefore, during calibration or anytime you press the screen, avoid sharp items that may potentially scratch or hurt the touch panel. This will help remain the lifetime of the product .
RTC Setting
Click [Date Format] to choose the formatting of the date displayed on the HMI. Options include: [Month/Day/Year], [Day/Month/Year], and [Year/Month/Day].
After choosing a format, the user can set the date and time accordingly. 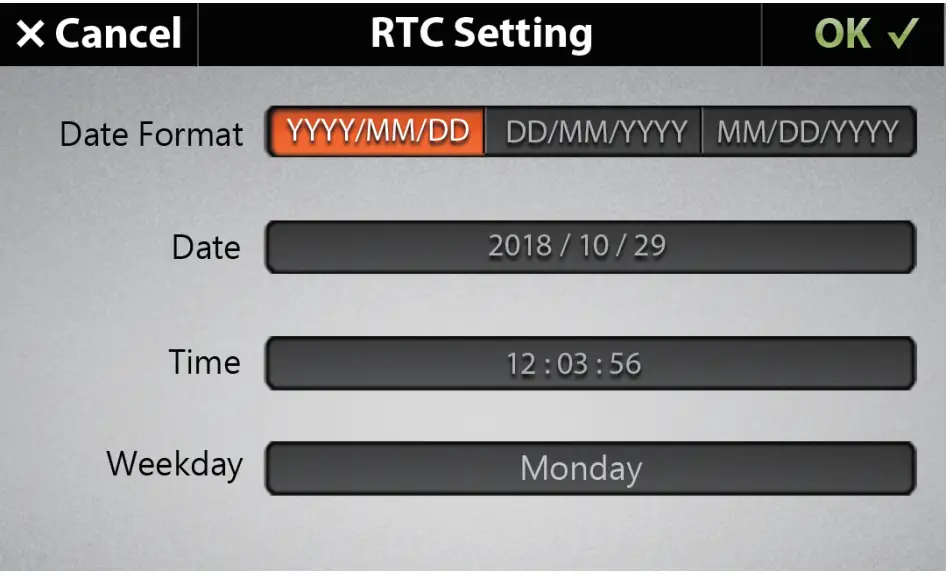 System Status
System Status displays the current status and information of the device, which includes: Applications size and capacity, BIOS, Firmware Version, and etc. Click [DIP Switch] and [COM Port] to display information relating to DIP Switch and COM Port, respectively.
COM Port
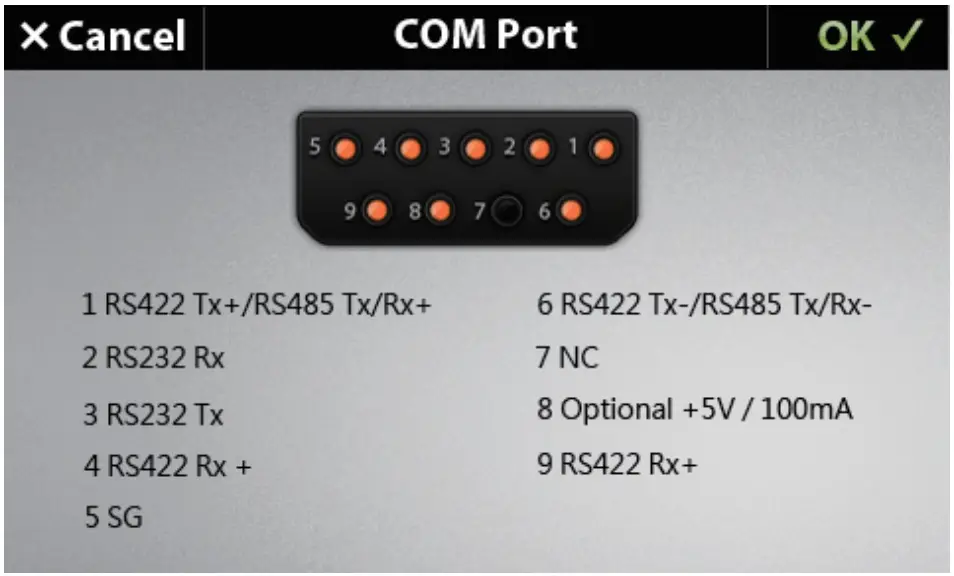
| COM Port (RS232 and RS422/485) | |||
| Pin | RS232 | RS422 | RS485 |
| 1 | TX+ | TX/RX+ | |
| 2 | RX | ||
| 3 | TX | ||
| 4 | RX+ | ||
| 5 | SG | SG | SG |
| 6 | TX- | TX/RX- | |
| 7 | NC | ||
| 8 | Optional + 5V/103mA | ||
| 9 | I RX- | ||
* The assignment of each pin and COM port varies from that of a standard PC. Please refer to the above table for signal connection and pin assignment.
* The number of COM ports varies with HMI model.
Dip Switch 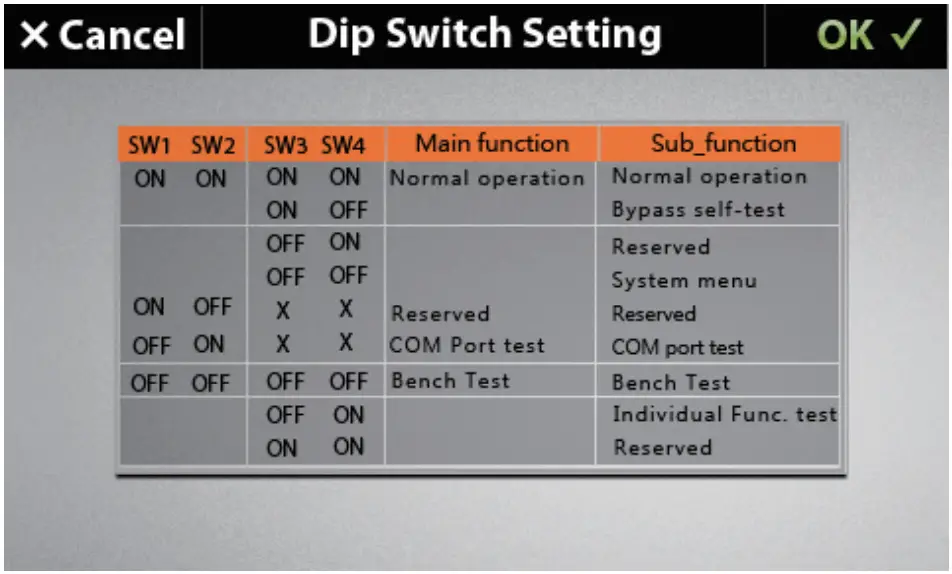
| SW1 | SW2 | SW3 | SW4 | Function description |
| ON | ON | ON | ON | Normal operation |
| ON | ON | ON | OFF | Bypass self – test |
| ON | ON | OFF | OFF ON | ON Reserved |
| ON | ON | OFF | OFF | System menu |
| ON | OFF | x | x | Reserved |
| OFF | ON | x | x | COM port test |
| OFF | OFF | OFF | OFF | Bench Test |
| OFF | OFF | OFF | ON | Individual Function test |
| OFF | OFF OFF | ON | x | Reserved |
MISC Setting
Both BIOS and Application could set the communication parameters of each COM port. Click [Buzzer] to enable or disable beep upon touch. 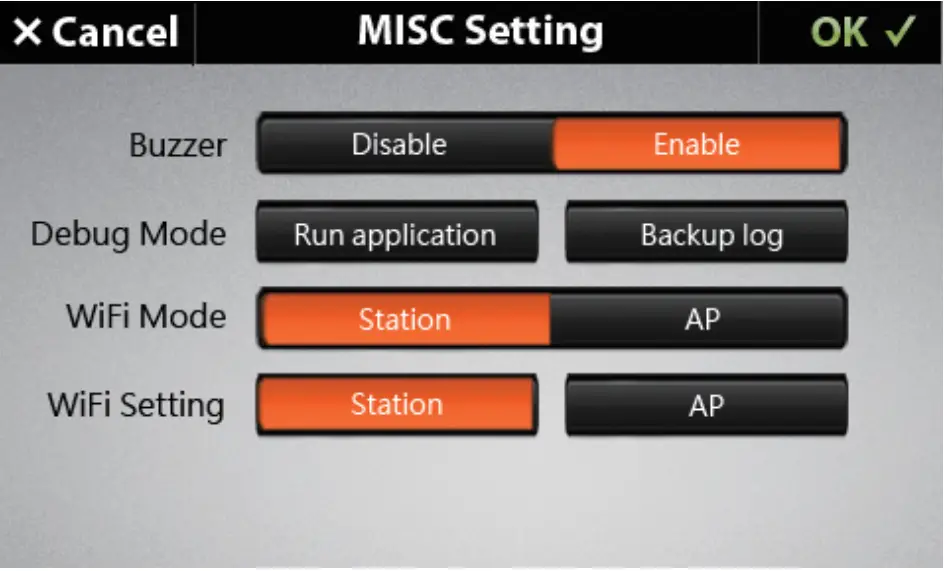 Under [Debug Mode], click [Run application] to run application under debug mode, or click [Backup log] to save log file into USB or SD card when malfunction occurs.
Click [WiFi Setting] to choose HMI either as WiFi [Station] or as WiFi [AP].
Click [OK] to confirm and save all adjustments.
Click [Cancel] to cancel all adjustments.
![]() HMI – Your Intelligent IIoT Gateway Solutions
HMI – Your Intelligent IIoT Gateway Solutions
1306.0015 Rev:1.1


