![]()
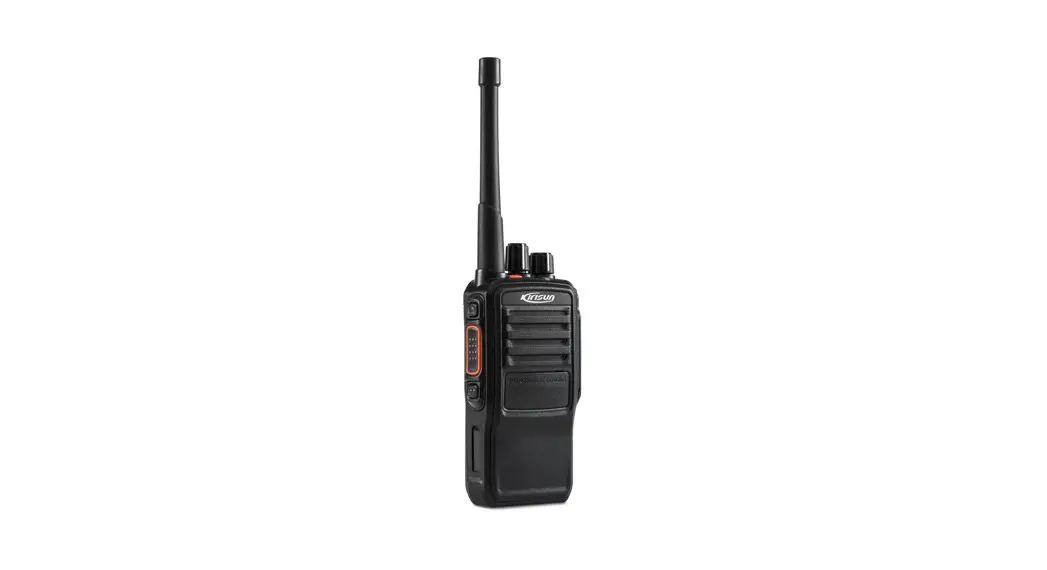
DP810
I.S.Digital Radio
Quick Guide
Please read carefully the Safety Information before using the product.
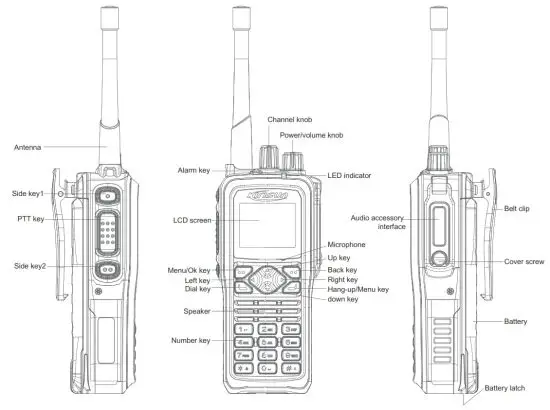
Appearance
Attachments
| No. | Name |
| 1 | Radio |
| 2 | Battery |
| 3 | Antenna |
| 4 | Power adapter |
| 5 | Quick Guide |
| 6 | Safety Information |
| 7 | Explosion protection information |
| 8 | Strap |
| 9 | Desktop charger |
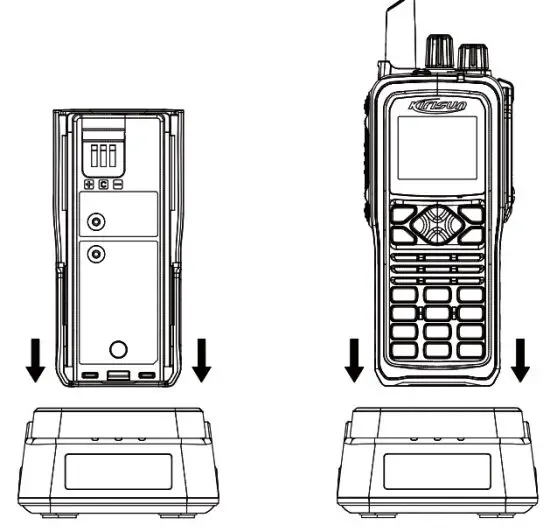
Installing the Battery
- Press gently the upper part of the belt clip so that it springs up. (Figure 1)
- Align the slot on the battery and the aluminum-alloy clip at the back of the radio. (Figure 2)
- Put the battery into the battery holder. ((Figure 3)
- Push the battery latch in place. (Figure 4)

Charging the Battery
- Plug the power adapter into an AC power socket of the required specifications.
- Connect the power adapter to the charger, and green LED indicator light is on.
- Put a battery or the radio installed with a battery into the charger, and make sure the battery contacts well the charging contacts. During charging, red indicator light is on.
- It takes about 5 hours to fully charge the battery, and then the LED indicator light turns green. After this, wait 1 to 2 hours before taking out the battery to achieve the best performance.
- Disconnect the power adapter from the socket.
Note:
- The radio is delivered uncharged. Before using it for the first time, please charge the battery.
- Always use the supplied lithium battery and desktop charger.
- A new battery or one that has been stored for more than 2 months after charging needs to be charged for several times to achieve its normal capacity.
- To maintain service life and performance of the battery, do not charge it if it is fully-charged or before a low-voltage warning. After charging, take the battery out of the charger.

Installing/Uninstalling the Antenna
Insert the threaded end of the antenna into the antenna interface, and rotate the antenna tight clockwise. (Figure 1)
To uninstall the antenna, rotate it counterclockwise. (Figure 2)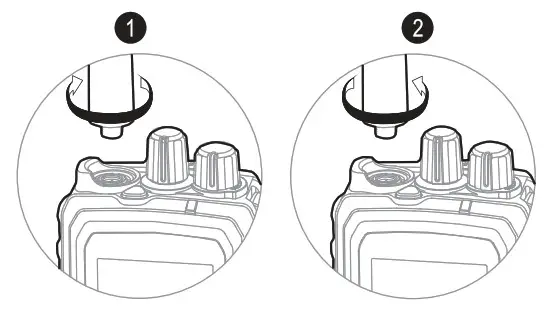
Installing/Uninstalling Belt Clip
Align the two screw holes of the belt clip with the screws holes at the back of the radio, and screw up the screws using a screwdriver.
To uninstall the belt clip, unscrew the screws and take off the belt clip.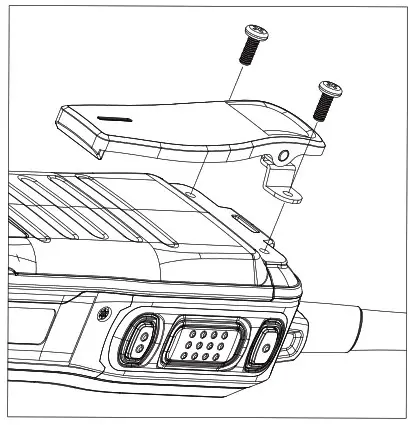
Installing External Audio Parts
Connect an audio accessory to the audio accessory interface, and fasten it using the screw.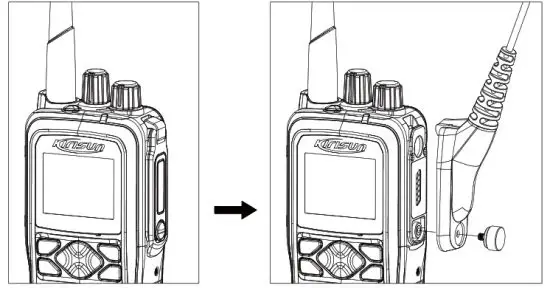
LED Indicator
| Indicator State | Radio State |
| Red light on | Transmitting signals |
| Green light on | Receiving signals, e.g. voice, text message and data, or found traffic on a channel |
| Orange light on | Within call hang time (in digital mode) or auto reset time (in analog mode) |
| Orange light flashing | In emergency state, missed a call, receiving a call alert, or scanning |
| Red light flashing | Low power, receiving emergency alarm, failed startup self-detection, or being programmed |
LCD
| Battery Level The less blank in the icon, the more remaining battery, and vice versa. When the battery is out, the icon turns red. | |
| RSSI The more bars, the stronger the signals, and vice versa. This icon is displayed only when signals are received. | |
| High-power transmission | |
| Low-power transmission | |
| Mute | |
| New message | |
| Status message | |
| Inbox full | |
| Keypad locked | |
| Emergency alarm mode enabled | |
| Encryption mode enabled | |
| Man Down enabled | |
| Voice Operated Transmitting enabled | |
| Initiating a call | |
| Receiving a call | |
| Alarm clock on | |
| Talk-around mode enabled | |
| Roaming enabled | |
| GPS enabled but no GPS data received | |
| GPS data received | |
| Scanning (and the icon rotating) | |
| Dwell on conventional channel during scan | |
| Dwell on priority channel 1 during scan | |
| Dwell on priority channel 2 during scan | |
| ID | |
| (Call type) individual call | |
| (Call type) group call | |
| (Call type) all call | |
| Item selected | |
| Item unselected | |
Basic Operation
- Powering On/Off
To power on the radio, rotate [the Power/Volume knob] clockwise until you a click. The welcome page is displayed, the backlight is on, and there is a “beep” sound.
To power off the radio, rotate [the Power/Volume knob] counterclockwise until you a click. - Selecting a Channel
In standby state, rotate [the Channel knob] to select a channel. Each channel can be set to an analog or a digital channel, and you can switch between analog and digital modes by rotating [the Channel knob]. - Adjusting the Volume
When the radio is on, turn [the Power/Volume knob] clockwise to turn up the volume, or counterclockwise to turn it down.
Note: If you continue to rotate the knob after turning to the minimum volume, the radio will be powered off and you will hear a click. - Making a Call
– Calling a Default Contact
If a default contact is already set for a channel, you can call the contact by holding down [the PTT key].
You may have a default contact set by your dealer for each digital channel.
– Selecting and Calling a Contact
In the menu, select Contact, select a contact from the Contact List, and hold down [the PTT key].
– Dialing to Call a Contact
In the menu, select Contact, select Dial, dial a contact’s ID, and hold down [the PTT key]. - Receiving a Call
When the radio receives a call, green LED indicator light is on, the call type, caller alias or ID, and incoming icon are displayed on the screen, and the received voice is played. During the call hang time and if no more call is received, you can call back by holding down the PTT key.
Note:
To receive a group call, please have the radio set as a group member by your dealer using the CPS. - Emergency Alarm
In emergency, you can send an alarm message and a voice message to a specified group for help. You can send the alarm anytime even when the radio is transmitting traffic. - Call Log
You can check and manage recent outgoing, incoming and missed individual calls. - GPS Positioning
Through this function, you can view the location information of the radio, which can also be updated to a location app server.
Please enable/disable this function via the CPS, and turn it on/off through the menu. - Operating Mode
The radio can operate under conventional, digital trunking and MPT trunking modes. Please select a mode through the menu.
Caution:
Risk of battery explosion.
Charge the battery using the attached charger, and dispose it as instructed.
Do not strike, squeeze, short out or disassemble the battery.
Do not put the battery in a high temperature or throw it into a fire.
Stop using the battery if it is seriously bulged or immersed in water.
Troubleshooting
| SN | Failure Description | Reason and Solution |
| 1 | Power-on failed | R: Low remaining battery capacity. S: Charge or replace the battery. R: Poor contact between the battery and the wiring terminals of the power supply. S: Install the battery again. R: Dirty battery contacts. S: Clean battery contacts. |
| 2 | Rx failed | R: Different frequencies in Rx-Tx frequency pair between both sides. S: Use the same frequency in TX-RX frequency pair between both sides. R: Different CTCSS/CDCSS codes on both sides. S: Set the same CTCSS/CDCSS code on both sides via PC. R: Beyond communication distance. S: Shorten communication distance. |
| 3 | Communication failed | R: Poor antenna contact. S: Install the antenna again. R: Different frequencies in Rx-Tx frequency pair between both sides. S: Use the same frequency in TX-RX frequency pair between both sides. R: Beyond communication distance. S: Shorten communication distance. |
| 4 | GPS positioning failed | R: The antenna is not dual-band. S: Use a dual-band antenna. R: Wrong GPS setting. S: Set GPS again. R: In a shielded environment. S: Go to an open area. |
| 5 | Programming exception | R: Improper connection. S: Connect the radio to a PC properly. R. No USB driver is installed on the PC. S: Install the USB driver on the PC. R: Poor contact of earphone interface board. S: Replace the earphone interface board. |
FCC/IC
- This radio is designed for and classified as “Occupational/Controlled Use Only”, meaning it must be used only during the course of employment by individuals aware of the hazards, and the ways to minimize such hazards; NOT intended for use in an General population/uncontrolled environment
- DO NOT operate the radio without a proper antenna attached, as this may damage the radio and may also cause you to exceed RF exposure limits. A proper antenna is the antenna supplied with this radio by the manufacturer or an antenna specifically authorized by the manufacturer for use with this radio.
- DO NOT transmit for more than 50% of total radio use time, more than 50% of the time can cause RF exposure compliance requirements to be exceeded.
- This transmitter may operate with the antenna(s) documented in this filing in Push-to-Talk and body-worn configurations. RF exposure compliance is limited to the specific belt-clip and accessory configurations as documented in this filing and the separation distance between user and the device or its antenna shall be at least 2.5 cm.
RED
- Frequency:400-480MHz/350-400MHz, TX Power:<2W
- Mandatory requirement
1. Operation temperature range: -20℃~ 55℃
2. RF exposure information: The device complies with RF exposure require when the device used at 25mm form your body.
3. Declaration of conformity: Kirisun hereby declares that DP810 is in compliance with the essential requirements and other relevant provisions of Directive 2014/53/EU.
4. AC adapter
The adapter shall be installed near the equipment and shall be easily accessible.
5. Lithium Battery
Risk of explosion if battery is replaced by an incorrect type, dispose of used battery according to the instructions.
This document is only for reference, and actual product prevails.
Kirisun reserves the right to the final interpretation of this document.
15.19 Labelling requirements.
This device complies with part 15 of the FCC Rules. Operation is subject to the following two conditions:
(1) This device may not cause harmful interference, and
(2) this device must accept any interference received, including interference that may cause undesired operation.
15.21 Information to user.
Any Changes or modifications not expressly approved by the party responsible for compliance could void the user’s authority to operate the equipment.
15.105 Information to user.
This equipment has been tested and found to comply with the limits for a Class B digital device, pursuant to Part 15 of the FCC Rules. These limits are designed to provide reasonable protection against harmful interference in a residential installation. This equipment generates uses and can radiate radio frequency energy and, if not installed and used in accordance with the instructions, may cause harmful interference to radio communications. However, there is no guarantee that interference will not occur in a particular installation. If this equipment does cause harmful interference to radio or television reception, which can be determined by turning the equipment off and on, the user is
encouraged to try to correct the interference by one or more of the following measures:
- Reorient or relocate the receiving antenna.
- Increase the separation between the equipment and receiver.
- Connect the equipment into an outlet on a circuit different from that to which the receiver is connected.
- Consult the dealer or an experienced radio/TV technician for help.

http://www.kirisun.com
Kirisun Communication Co, Ltd
V1.0 167W06000XXX


