FLYINGVOICE FTA5111 1 FXS and FXO VoIP Adapter User Guide
If you are configuring your device for the first time, you will find the steps included in this quick installation guide useful. Once you have configured the device with your settings, you will need to reboot the device for your changes to be applied. If you require additional information, please download the latest product manual from our website at www.flyingvoice.com.
Packaging Contents
The following items are included in your package. Please contact your service provider, if you find anything missing.
- Adapter Power Adapter
- Ethernet Cable
- QC PASS
-
Quick Installation Guide
Start up
Connect the WAN port of your device to your router or switch and the LAN port to your PC., also connect the FXO ports to the PSTN line, and connect the FXS port to your analog phone.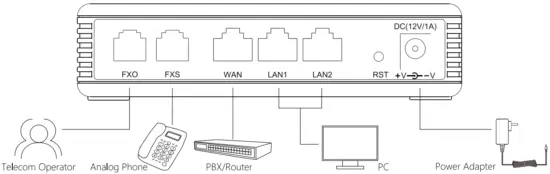
LEDs: After the hardware connections have been completed, check the status of the LED indicators using the following table:
| LED | Status | Description | LED | Status | Description |
| FXO | The port is connected | LAN1/2 | The port is connected | ||
| The data is transmitting | The data is transmitting | ||||
| The port is disconnected | The port is disconnected | ||||
| FXS | Registered successfully or no call | WAN | The port is connected | ||
| Registering or or in a session | The data is transmitting | ||||
| Unregistered | The port is disconnected | ||||
| PWR | The adapter is powered on and running normally | ||||
| The adapter is powered off | |||||
Notice: Do not disconnect the power adapter from the device while configuring or updating the firmware on the device. Ensure that you always use the power adapter included in the package to power your device. Using a different power adapter may damage the device.
Network Configuration
Confirm your network access mode and record relevant information. Generally, there are three ways of network access: DHCP, Static IP, and PPPoE.
- DHCP is the most common method where the ISP automatically configures your Internet connection.
- Choose “Static” if you know the network connection settings. Fill in the IP parameters provided by your ISP.
- If your ISP uses the PPPoE connection, they will provide you a usemame, password, and related instructions.
In the PC that connected to the LAN port of the device, open a browser and type in “http://192.168.1.1” in the address bar, then press the “Enter” key. A Username and Password dialog box will appear. To login as an Administrator enter “admin” as the usemame and “admin” as the password. To log in as a normal user enter “user’ as the username and “user” as the password.
Notice: In the event you are unable to open the page http://192.168.1.1 with your browser, it commonly caused by the IP address conflicts with the WAN IP. In that case, open the page http://192.168.2.1 instead.
Phone Registration
FXO port configuration
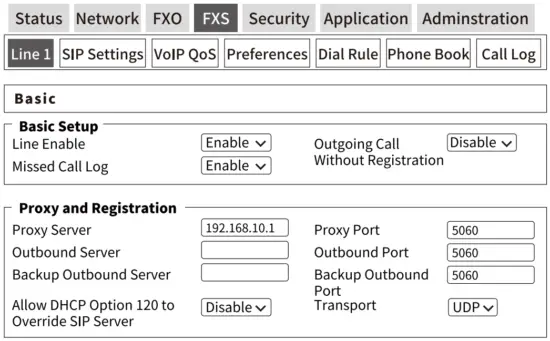
Click the ‘FXO’ tab to configure the SIP account for your device. Select an FXO port to set, set the field ‘Port Enable’ to “Enable”, then enter the SIP registration parameters as shown in the figure below.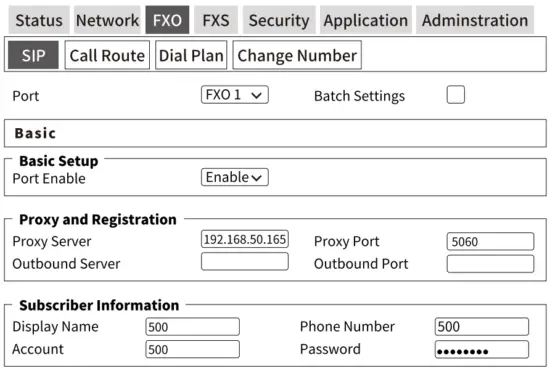
SIP Account Parameter
| Parameters Name | Description | Parameters Name | Description |
| Port | Select an FXO port to configure | Batch Settings | Select multiple ports to configure |
| Port Enable | Enable or disable the Line | Proxy Server | The domain name or IP address of the SIP server |
| Proxy Port | SIP Server’s Service port, default is 5060 | Outbound Server | Outbound Server IP or domain name |
| Outbound Port | Outbound Server’s Service port | Display Name | The display name of the registered account |
| Phone Number | Telephone Number provided by SIP Server | Account | SIP account provided by SIP Server |
| Line Enable | Enable or disable the line | Outgoing Call without Registration | Use to make IP calls, it is disabled by default |
| Password | SIP password provided by SIP Server | ||
Call Route Configuration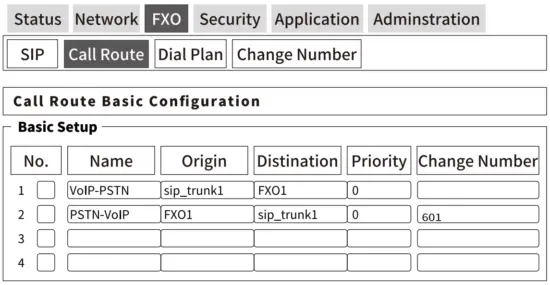
| Parameters Name | Description |
| Name | Give this router a descriptive name |
| Origin | The original address of the call, select SIP trunk or FXO port |
| Destination | The destination address of the call, select SIP trunk or FXO port |
| Priority | The priority of the router, 0 has the highest priority |
| Changed Number | VOIP-PSTN: The route that the phone used when making an outbound call. PSTN-VOIP: The inbound call will be forwarded to this number(601 in the figure) with this route. |
FXS port configuration