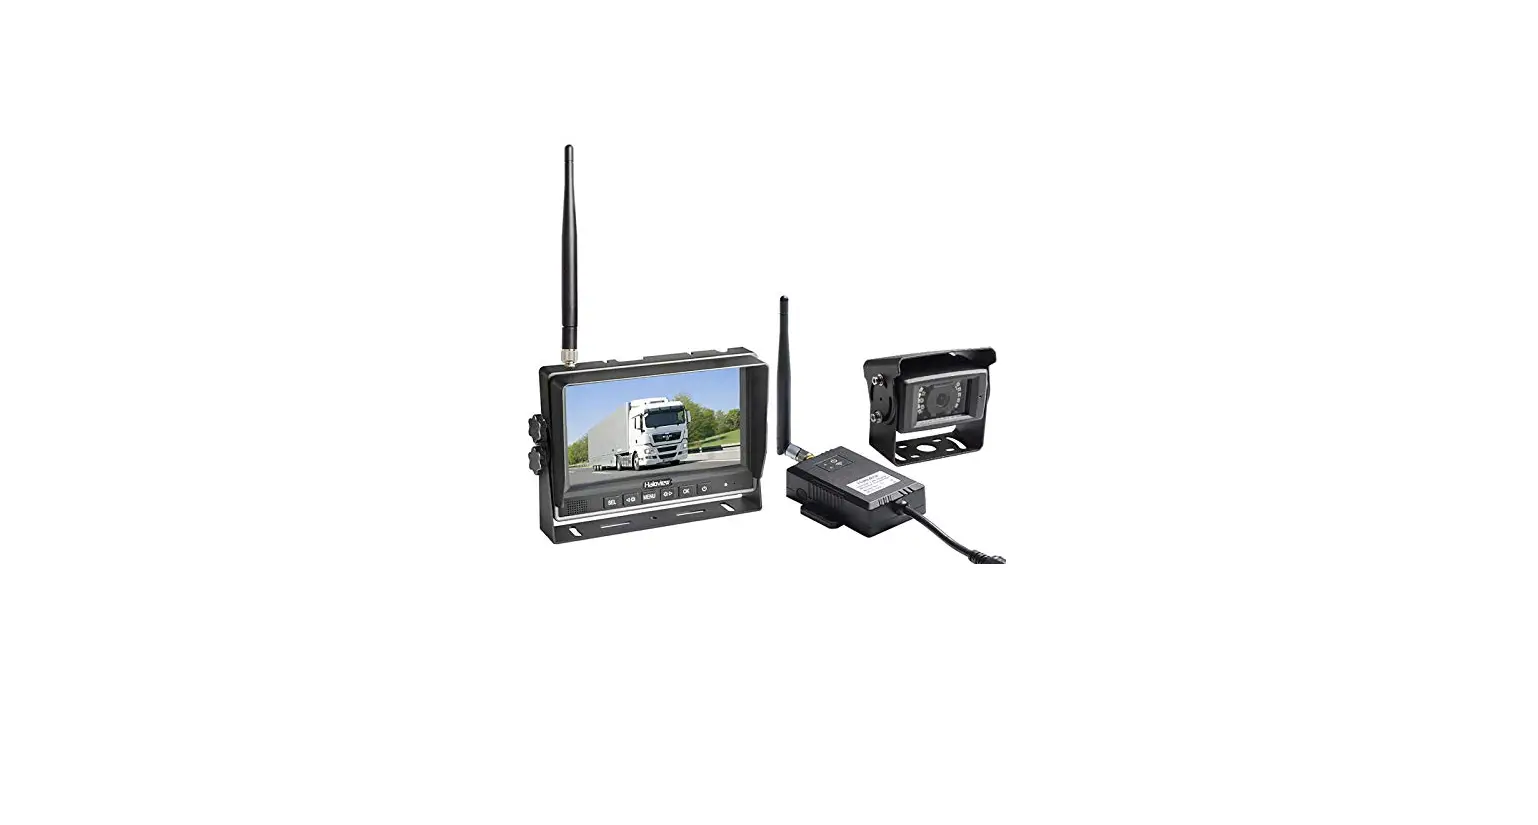
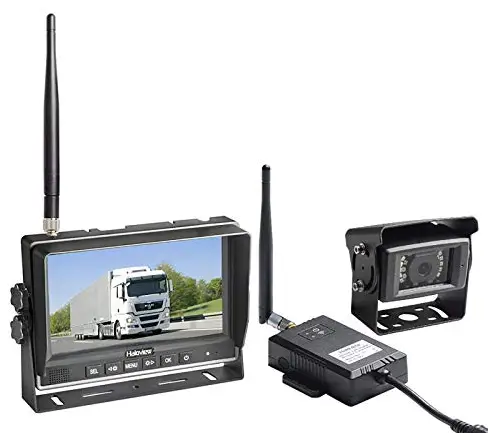
Haloview SM7 2.4G Digital 720 7 Inch LCD Wireless Monitor
Precautions
Storage
- Do not expose the monitor to extreme heat, cold, or sudden temperature changes. The storage temperature of this device is -30 to+ 80°C or -22 to +176° F . The operating temperature is -20 to+ 70°C or -4 to 158° F with the humidity under RH90%.
- Never use this device in environments with excessive moisture, dust, or smoke.
- Avoid dropping or striking this device.
- Never puncture, scratch, or use abrasive cleaning materials on this device.
- Leave at least a 2″ space between the monitor and walls, cabinets or other objects to allow adequate air circulation around the device.
- The monitor is not designed to be waterproof.
Operating Precautions
- The device can be powered by a 10 -32 volt automotive battery or vehicle electrical system.
- Improper cable connections may damage the monitor. Remove the power cable connections when you do not intend to use the device
warning
- High voltage is present within the monitor. The opening of the case should be by professionals.
- Do not watch the video while driving unless you are monitoring the rearview camera display.
Special Notice
Occasionally, a few highlights or dark spots may occur on the LCD screen. This is a very common phenomenon in active matrix display technology and doesn’t necessarily indicate any defects or faults. Never try to repair this device by yourself. In case of any problems, please turn off the display at once and notify our company or an authorized dealer. The monitor is a complex device. Any disassembly or modification may lead to damage and void the warrantee.
Maintenance
- Remove all the cable connections from the monitor before cleaning the device.
- Use a mild household detergent and clean the unit with a slightly damp, soft cloth.
Never use strong solvents such as thinner or benzine, as they might damage the finish of the device
CAUTION
RISK OF ELECTRIC SHOCK DO NOT OPEN
CAUTION: TO REDUCE THE RISK OF ELECTRIC SHOCK DO NOT REMOVE THE COVER(OR BACK). NO USER-SERVICEABLE PARTS INSIDE. REFER SERVICING TO QUALIFIED SERVICE PERSONNEL
- This symbol is intended to alert the user to the presence of uninsulated “dangerous voltage” within the product’s enclosure that may be of sufficient magnitude to constitute risk of electric shock to persons.
- This symbol is intended to alert the user to the presence of important operating and maintenance (servicing) instructions in the literature accompanying the appliance
FCC
This device complies with part 15 of the FCC Rules. Operation is subject to the following two conditions: (1) this device may not cause harmful interference, and (2) this device must accept any interference received, including interference that may cause undesired operation. Any changes or modifications not expressly approved by the party responsible for compliance could void the user’s authority to operate the equipment.
NOTE: This equipment has been tested and found to comply with the limits for a Class B digital device, pursuant to Part 15 of the FCC Rules. These limits are designed to provide reasonable protection against harmful interference in a residential installation. This equipment generates, uses and can radiate radio frequency energy and, if not installed and used in accordance with the instructions, may cause harmful interference to radio communications. However, there is no guarantee that interference will not occur in a particular installation.
If this equipment does cause harmful interference to radio or television reception, which can be determined by turning the equipment off and on, the user is encouraged to try to correct the interference by one or more of the following measures:
- Reorient or relocate the receiving antenna.
- Increase the separation between the equipment and the receiver.
- Connect the equipment to an outlet on a circuit different from that to which the receiver is connected.
- Consult the dealer or an experienced radio/TV technician for help.
To maintain compliance with FCC’s RF Exposure guidelines, This equipment should be installed and operated with a minimum distance between 20cm the radiator your body: Use only the supplied antenna.
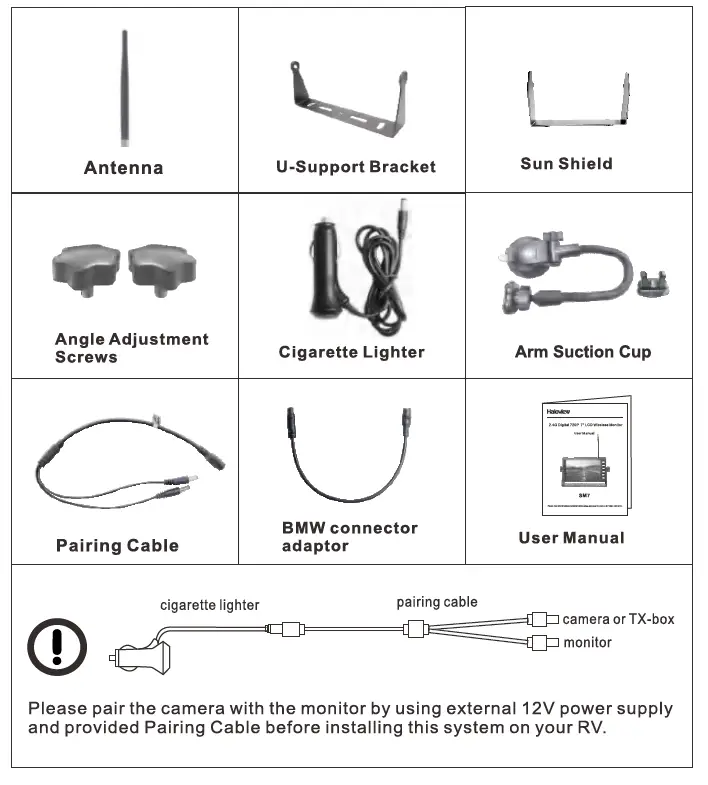
ACCESSORIES
The product is under continuous improvement and the specifications will change without notice. Picture for reference only. Please refer to the actual product and accessories.
Special Notice
Accessories supplied in the kit may be different for each application_
Features
- NORMAL, MIRROR, FLI P and MIR-FLIP viewing available.
- Split mode, auto-scan mode, and single-display mode are available.
- Auto pairing: Auto pairing happens when the camera is activated.
- Support 4-channel composite and single-channel recording in AVI signal format.
- Auto dim function is available.
- 4 wireless camera inputs.
- Video input: 720P.
- Wide voltage input: 1 O – 32V.
- The backlight of the monitor buttons can be turned ON/OFF.
- Camera night LED can be turned ON/OFF via monitor.
- Al ZOOM can be turned ON/OFF.
- Al BEEP can be turned ON/OFF.
Specifications
| LCD size | 7″ 16:9 |
| Resolution | 1024 x 3 (RGB) x 600 |
| Contrast | 800:1 |
| Brightness | 1000cd/m2 |
| Viewing Angle | U/D: 85, R/L: 85 |
| Aspect Ratio | 16:9 |
| Channel | 4 channels |
| Operating Frequency | 2400 – 2483 MHz |
| Receiving Sensitivity | -85 dBm |
| Video Compression | H.264 |
| Latency | 200ms |
| Transmitting Distance | 984ft line of sight |
| Micro-SD /TF Card | Max.256G |
| Video Format | AVI |
| Power Supply | DC 10-32V |
| Power Consumption | Max. 8W |
| Loudspeaker | 1W/80 |
| Operating temperature | -20-+70°C,RH90% |
| Storage temperature | -30-+80°C,RH90% |
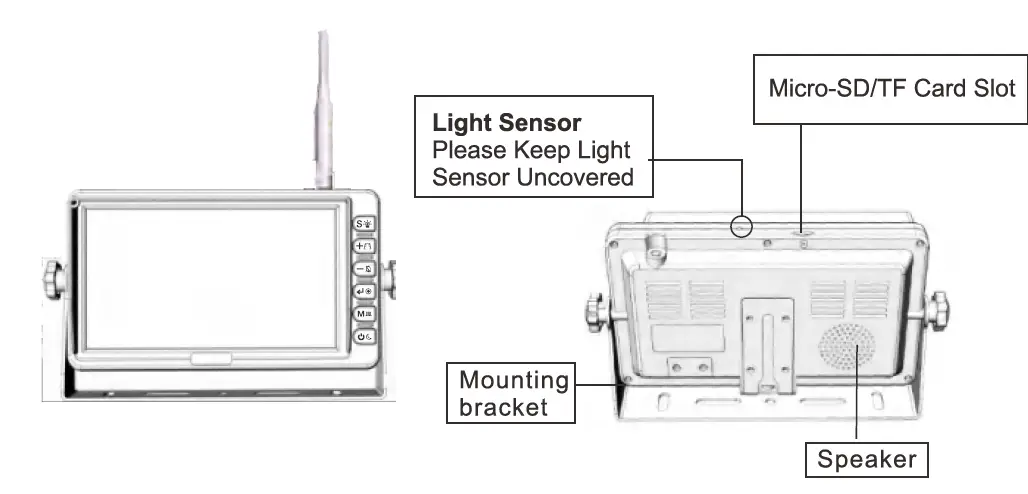
Functions of each part

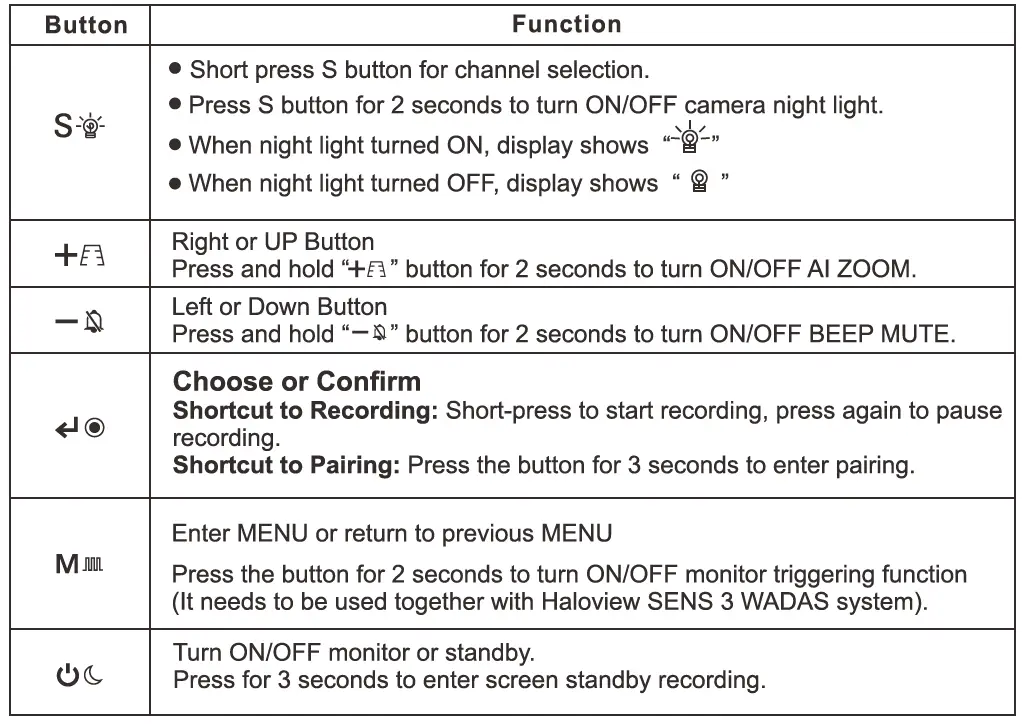
BASIC OPERATION
- Clean the surface of the place whe111 you plan to put the suction cup.
- Remove the film on the suction cup
- Open the buckle
- Put ltle suction cup on a certain place.

- Close the buckle
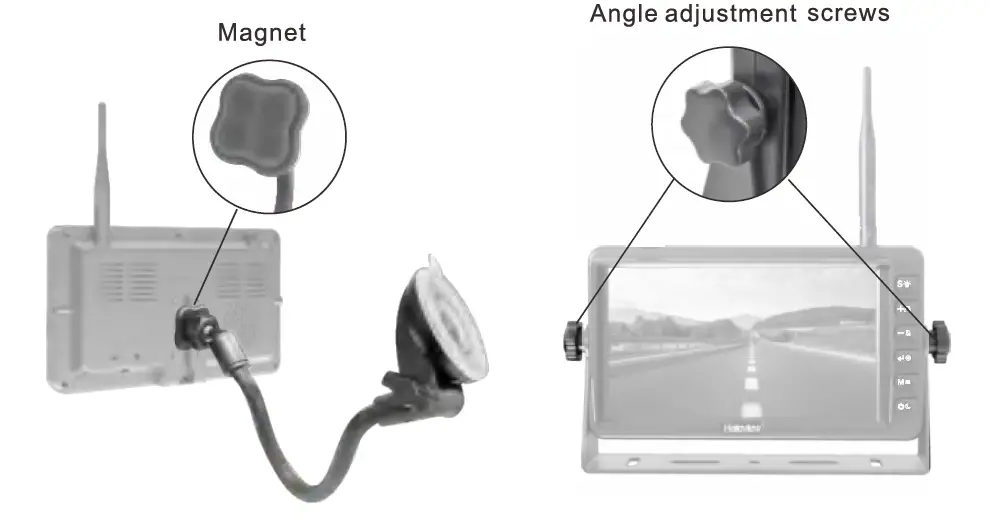
- Mount the fixture base
- Magnet the monitor with little arm suction cup mount


Wiring Instruction
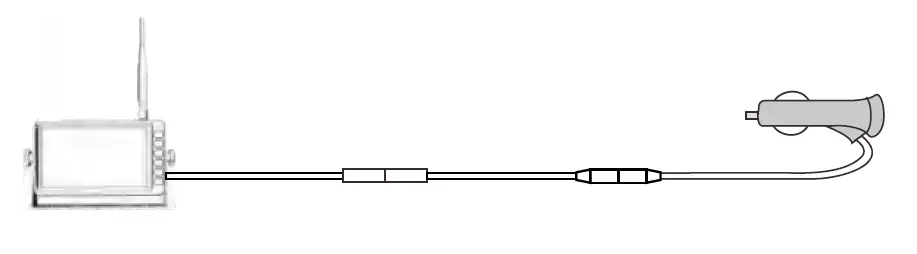
Monitor Wiring:
Connect the monitor with BMW connector adaptor, and connect the DC connector of the BMW connector adaptor to the cigarette lighter. Power the monitor by vehicle 12V through a cigarette lighter.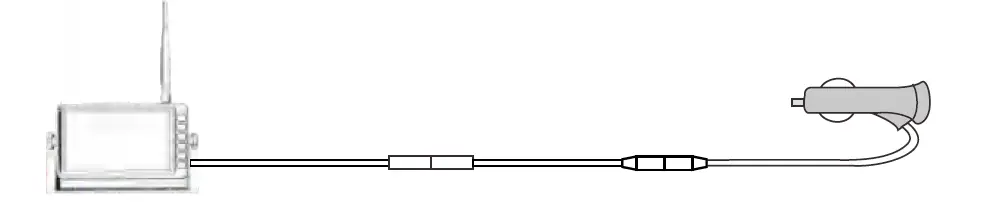
For more cameras, extra cameras can be paired separately to CAM 1 /CAM2/CAM3/CAM4. Please refer to page 20 PAIRING.
Installation
Please find best signal reception position before the installation
The metal body of the vehicle can attenuate wireless signal strength sharply. It is necessary to test the signal strength before installation.
- Please connect the monitor and camera as below picture

- Pairing the camera to the monitor, please refer to page 20 PAIRING. 4 cameras can be paired separately to CAM1 /CAM2/CAM3/CAM4.
- Put the monitor and the camera at the intended position to test signal strength.

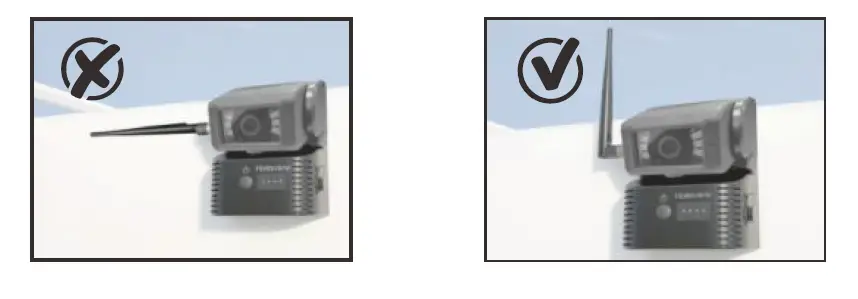
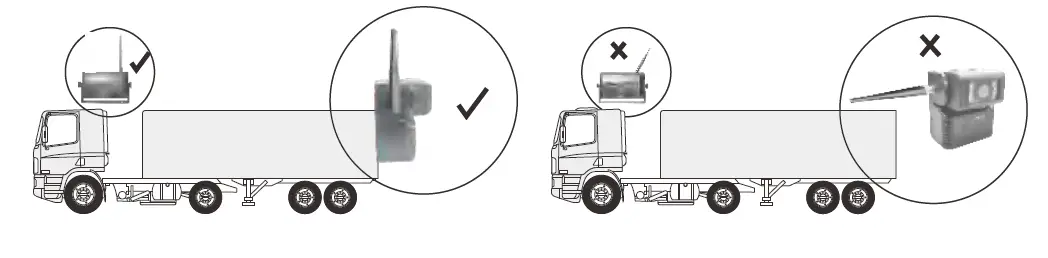
- If the signal strength of the position that you planned to install a camera is under 3 bars, please change to another position, or mount the camera higher to make sure the antenna is highest of the top without being blocked. Please refer to below pictures:

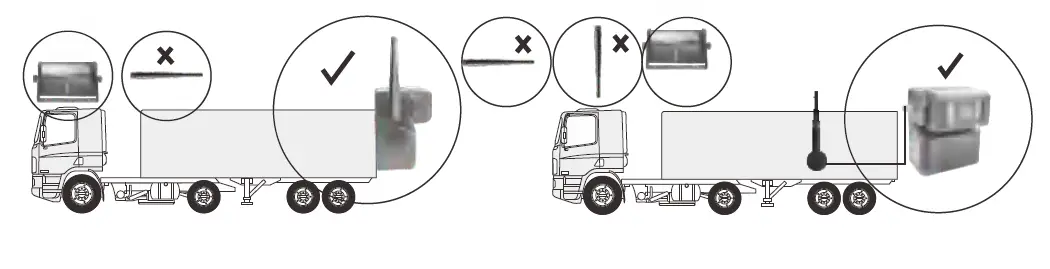
- Installation Position 1: Mount the camera higher than your vehicle’s roof, keeping the antenna vertical.
- Installation Position 2: Mount the camera lower but as close as possible to the vehicle’s roof, and move the antenna outward 15-30 degrees. The antenna’s proximity to any metal surfaces on the vehicle may affect signal strength.

Special Notice
After position adjustment, you can start the installation if your signal strength is still above 3 bars.
Installation
- Antennas should be vertically lined to the ground. Make sure there is no obstacle around antennas

- Magnet-based extension antenna should be attached on the top of the vehlcle. Make sure there Is no obstacle around

ANTENNA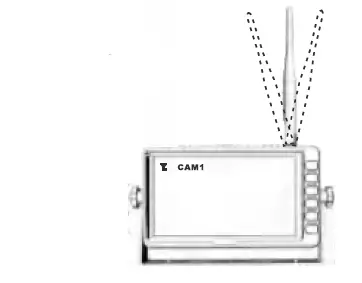
If you get poor signal reception, or signal cannot reach at least 3 bars, please adjust the angle of the antenna to find best signal reception position
Press the button to enter the below Interface. MENU Is only allowed for operation under single image mode instead of quad mode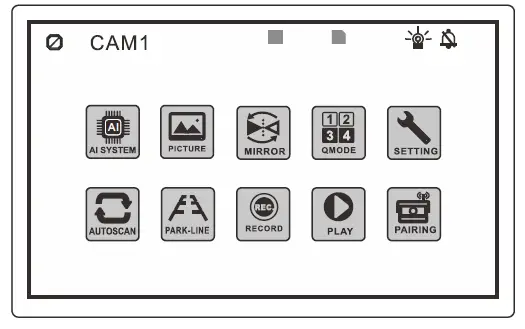
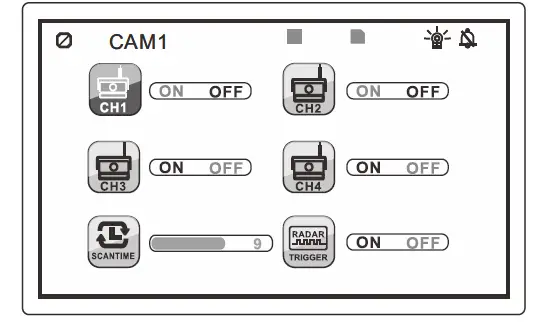
Al System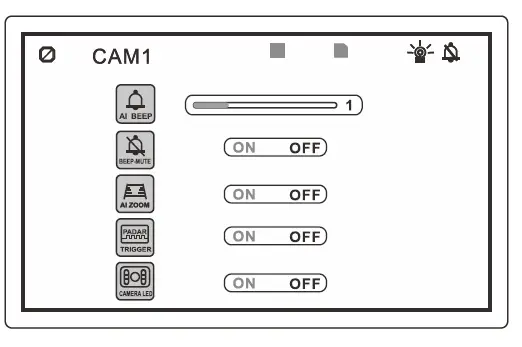
- Press the ENTER button to enter Al BEEP, and Press
 to adjust the beep volume.
 - Press to choose BEEP MUTE, and press the ENTER button to confirm. When BEEP MUTE is turned ON, the beeper will not make a sound.

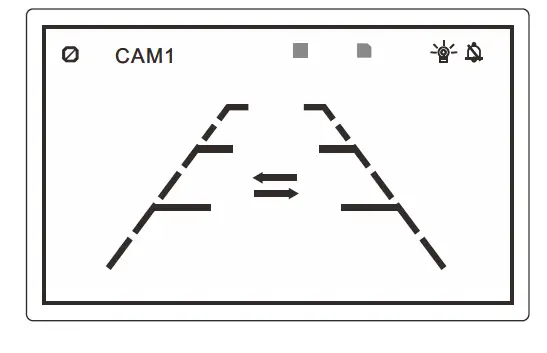
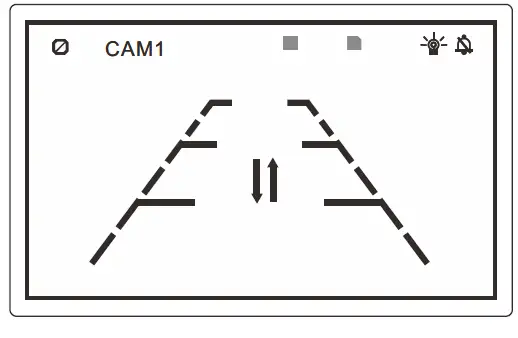
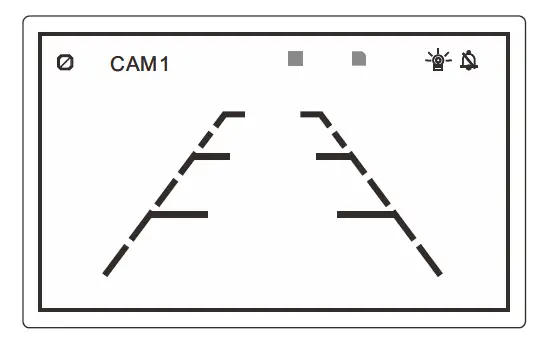
- When Al ZOOM is turned ON, a trapezoid alarm zone will appear in the display.
Once people or vehicles enter the alarm zone, ii will change from blue to red with an alarm sound. (Notice: if BEEP MUTE is set, ii will not make a sound) - When RADAR Trigger is turned ON, there is a yellow icon
 on the monitor. RADAR Trigger is a function that needs to be used together with Haloview SENS 3 WADAS system. For customers who purchase 720P wireless system and Haloview SENS 3 WADAS system, turn on the RADAR Trigger function can achieve the high-end functional linkage for safe driving.
 - If CAM LED is turned ON, the camera LED will be automatically turned on when the ambient brightness is low.

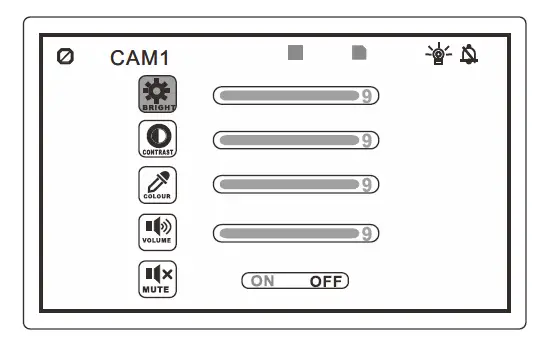
Picture
- Press “Mall” button to enter the menu interface.
- Press to select PICTURE, Press
 to enter
- Press to select BRIGHTNESS/CONTRAST/COLORNOLUME Press to confirm. Press to adjust settings.
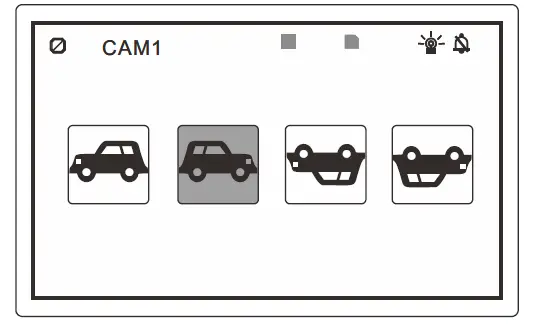
Mirror
- Press “MJIIIL” button to enter menu interface. Press to select MIRROR. Press button to enter the MIRROR setting.
 Press to select NORMAL/MIRROR/MIR-FLIP/FLIP.
- The Al Camera does not have a MIRROR function.
 Press
Press QMODE
- Press “MJIIIII” button to enter the menu interface. Press and button to enter QMODE
 Press
Press  to select display mode. Press to confirm.
- After setting, you can switch to the mode you set by pressing the” S-‘®’-” button.
- Quad or Split Audio Setting
When the monitor display Quad or Split picture, you can press button to play audio of any of the CAM channel.
 Press
Press 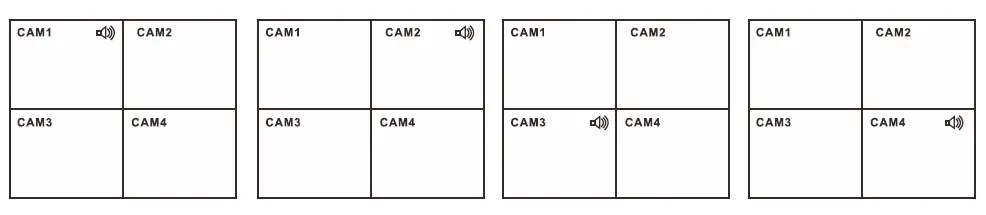
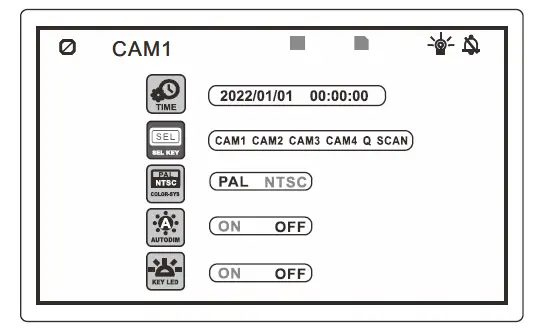
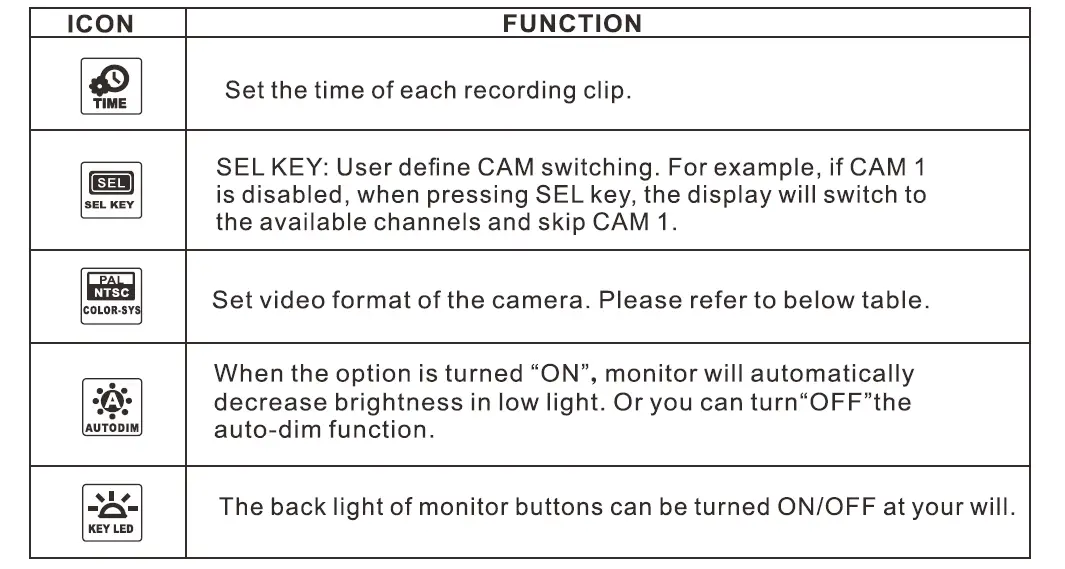
Setting
- Press
 button to enter menu interface. Press to select SETTING. Press button to enter SETTING.
 - SELKEY: User-defined CAM switching. For example, if CAM1, CAM2, Q(QUAD MODE) are selected When pressing the SEL key, the display will switch from CAM 1 to CAM2, and QUAD MODE, it will skip CAM3, CAM4, and SCAN.
- Press to move the selection, and press key to select or cancel.
- The bottom yellow dot indicates the current selection.


VIDEO FORMAT COUNTRY PAL
Argentina, Australia, Austria, Belgium, Brazil, Bulgaria, China, Cyprus, Czechoslovakia, Denmark, Dubai, Egypt, Finland, France, Germany, Gibraltar, Greece, Hungary, Iceland, India, Indonesia, Ireland, Israel, Italy, Jordan, Kuwait, Luxembourg, Malaysia, Netherlands, New Zealand, Norway, Sultanate of Oman, Poland, Portugal, San Marino, Saudi Arabia, Singapore, Spain, Sweden, Switzerland, Turkey, United Kingdom, NTSC
Bolivia, Canada, Chile, Colombia, Costa Rica, Ecuador, Japan, South Korea, Mexico, United States
- Press and button to setTIME/PAL-NTSC/AUTODIM.
AUTO SCAN
- Press the “MJIIII “button to enter the menu interface. Press the and buttons to enter the SCAN setting

- Press and buttons to set SCAN channels and SCANTIME.
- Press
 button to switch to the SCAN interface. A SCAN icon will appear on the display. Press again to exit SCAN mode.
When RADAR Trigger is turned ON, there is a yellow icon ![]() on the monitor.
on the monitor.
RADAR Trigger is a function that needs to be used together with Haloview SENS 3 WADAS system. For customers who purchase the Byte Tango system and Haloview SENS 3 WADAS system, turn on the RADAR Trigger function can achieve thehigh-end functional linkage for safety driving.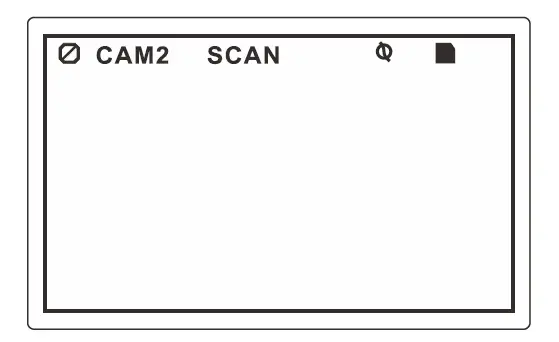
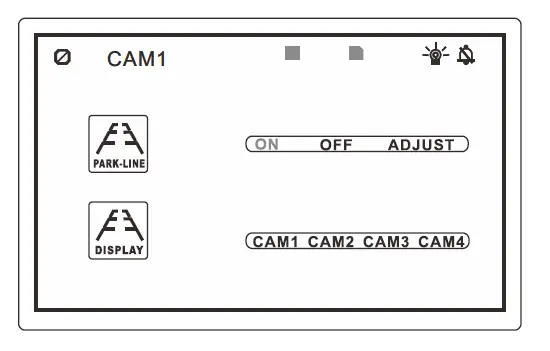
Park-line
- Press the” MJ1111 “button to enter the menu interface. Press the and buttons to enter PARK-LINE.
- Display: To set the park line display in a certain channel of CAM. Press the button to select, and press button to confirm.
- Turn on/off parking lines or enter adjust parking lines setting.

- Press button to adjust the position of parking lines.

- Press button to adjust the position of parking lines
 Note: Park line display in CAM4 as default, but it is settable if you want it displayed in other channels of CAM.
 Note: Park line display in CAM4 as default, but it is settable if you want it displayed in other channels of CAM.
Record
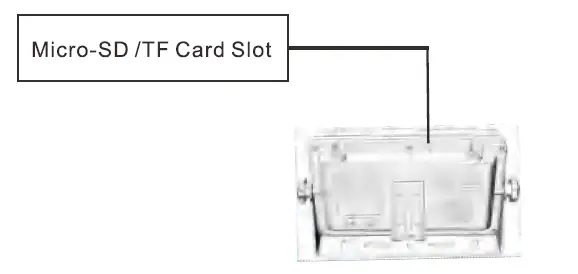
- insert TF Card
Please insert TF card in TF card slot, max 256G Micro-SD/TF Card
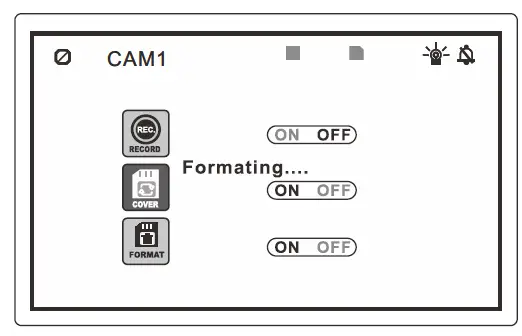
- Format the TF card.
Note: TF card must be formatted before use.
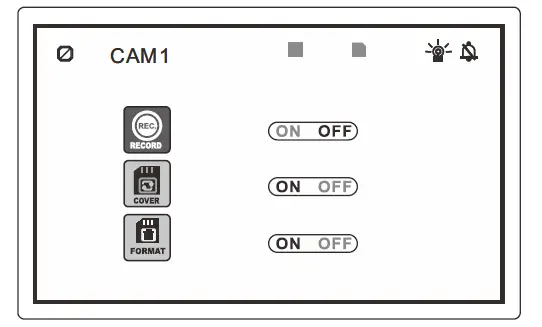
Pressbutton to enter the menu interface, and enter the RECORD setting
When COVER is turned on, overwrite function will be activated. Previously recorded video tiles will be overwritten when TF card memory is full.
After TF card is formatted, a yellow folder icon will be shown on the screen, indicating TF card is available now
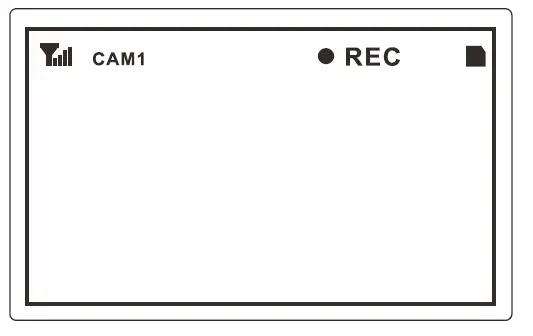
- After setting, turn on RECORD to start recording or pause recording, or, you can press the button to start recording or pause recording.
 Note: Pressing button in QUAD or SPLIT display, the monitor will record all displayed channels of CAM at the same time

 Note: Pressing
 Play Recorded File
Recorded videos can be played by a monitor.
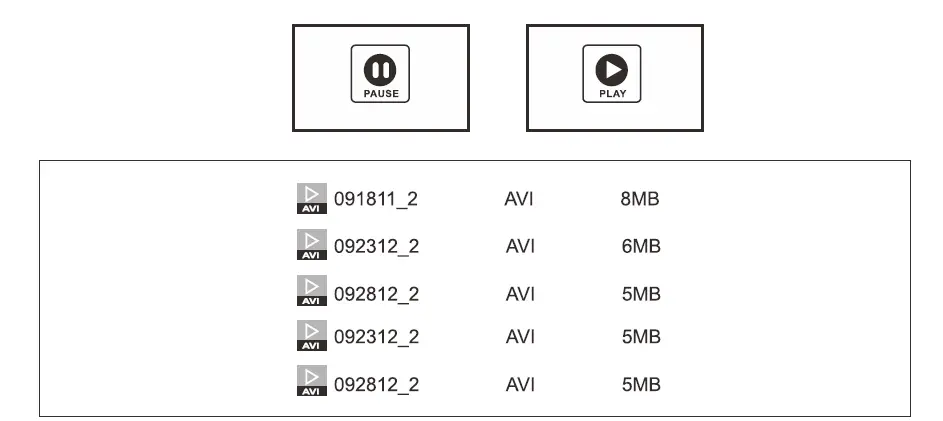
- Press and buttons to enter PLAY.
- Press and buttons to select a file.

- Press to select TIME& CHANNEL, Press to enter.

- Press button to PLAY or PAUSE the file.


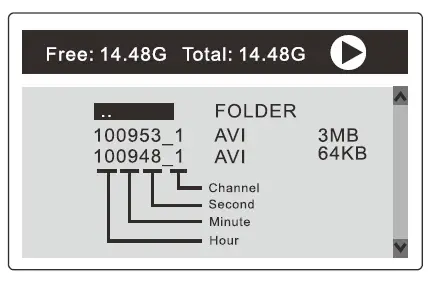
Read the SD card through the computer, there will be two formats of files. It is suggested to play the AVI format files for higher video resolution
Pairing
The camera and monitor are paired at the channel of CAM 4 as the factory default setting. When you open the box, power on the monitor and camera, and press ![]() button to switch to CAM 4, the image will be displayed. Otherwise, please try the below methods for pairing.
button to switch to CAM 4, the image will be displayed. Otherwise, please try the below methods for pairing.
Please finish pairing before installtion.
- Press button to select a channel that needs to be paired.
- Monitor Pairing
Method 1: Enter the menu Interface and select PAIRING, press• +I@” to confirm, you will have 20 seconds for pairing.
Method 2: Pre&S button for 3 seconds to enter PAI RI NG status, you will have 20 seconds for pairing.
- Camera Pairing
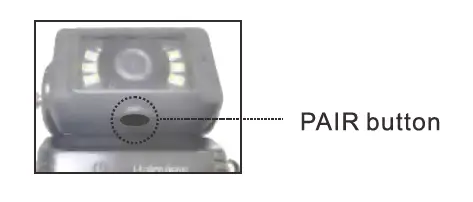
Method 1 : Press the pairing button on the bottom of the camera.
Method 2: Power off the camera and power on It again
- The video will be displayed after the pairing is complete.
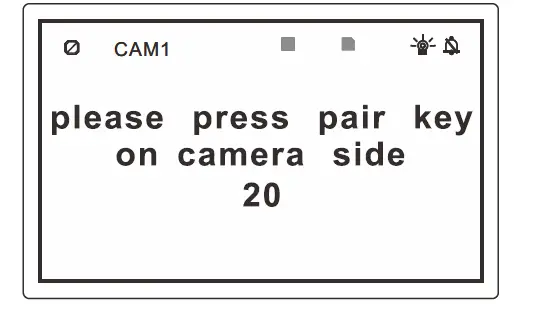
Special Notice
If no picture is displayed after pairing, please retry the pairing steps and power-on again the camera. The pairing must be completed within 20 seconds, otherwise, you need to re-power the camera for pal rl ng.
Troubleshooting
| Symptoms | Possible Causes/Solutions |
| No picture No sound | Improper connection of automobile adapter. Use of unauthorized power supply. Power switch is OFF. Please re-pairing the system. Refer to page 20 PAIRING. |
|
No signal | Check whether the camera is powered on. Please check whether antennas are plugged on both monitor and camera. Please check the angle of the antenna. Please check whether metal obstacles near the antenna. Please re-pairing the system. Refer to page 20 PAIRING. |
| No sound | Check whether the sound volume is turned off or set too low. |
| Dark picture | Check whether brightness and contrast are adjusted correctly. |
| No color | Adjust the HUE settings. |
|
Button invalid | All Button invalid when trigger wire is activated. Please deactivate trigger wire signal to get the button function valid.
For example, if you connect the camera to left turn signal light, the camera will automatically displayed on the monitor every time the left turn signal light turned on. Buttons invalid during triggering. Once triggering released, buttons will be operational again. |
| Unable to record | Please check whether TF card inserted Please check whether TF card formatted before recording Please check whether TF card storage full |
The symptoms described below do not necessarily mean a failure within the display. Please check the following items before you initiate a request for repair.
The monitor is equipped with an Anti-Glare screen. Please remove the screen protector to get the best picture quality after installation.


