
FoxEss 11kW EV Charger User Manual
Notes on This Manual
Scope of Validity
This manual describes the assembly, installation, commissioning, maintenance and troubleshootingof the following model(s) of Fox products:
- A011KP1-E1-R
- A011KP1-E1-B
- A011KP1-E1-S
- A011KP1-E2-R
- A011KP1-E2-B
- A011KP1-E2-S
- A011KS1-E1-R
- A011KS1-E1-B
- A011KS1-E1-S
- A011KS1-E2-R
- A011KS1-E2-B
- A011KS1-E2-S
Note: Please keep this manual where it will be
Target Group
This manual is for qualified electricians. The tasks described in this manual only can be performedby qualified electricians.
Symbols Used
The following types of safety instructions and general information appear in this document as described below:
![]() Danger!
Danger!
“Danger” indicates a hazardous situation which, if not avoided, will result in death or serious injury.
![]() Warning!
Warning!
“Warning” indicates a hazardous situation which, if not avoided, could result in death or serious injury.
![]() Caution!
Caution!
“Caution” indicates a hazardous situation which, if not avoided, could result in minor or moderate injury.
![]() Note!
Note!
“Note” provides important tips and guidance
| Symbols | Explanation |
| Symbol Explanation CE mark. The charger complies with the requirements of the applicable CE guidelines. | |
| Beware of hot surface. The charger can become hot during operation. Avoid contact during operation. | |
| Danger of high voltages.Danger to life due to high voltages in the charger! | |
| Danger.Risk of electric shock! | |
| Read the manual. | |
| Product should not be disposed as household waste. |
Safety
FoxESS EV chargers are designed and tested in accordance with international safety requirements. However, certain safety precautions must be taken when installing and operating this. The installer must read and follow all instructions, cautions and warnings in this installation manual.
- All operations including transport, installation, start-up and maintenance, must be carried out by qualified, trained personnel.
- The electrical installation & maintenance of the charger shall be conducted by a licensedelectrician and shall comply with local wiring rules and regulations.
- Before installation, check the unit to ensure it is free of any transport or handling.Unauthorizedremoval of necessary protections, improper use, incorrect installation and operation may leadto serious safety and shock hazards or equipment damage.
- Do not install the equipment in adverse environmental conditions such as in close proximity toflammable or explosive substances; in a corrosive or desert environment; where there is exposure to extreme high or low temperatures; or where humidity is high.
- Do not use the equipment when the safety devices do not work or are disabled.
- Use personal protective equipment, including gloves and eye protection during the installation.
- Inform the manufacturer about non-standard installation conditions.
- Do not use the equipment if any operating anomalies are found. Avoid temporary repairs.
- All repairs should be carried out using only approved spare parts, which must be installed inaccordance with their intended use and by a licensed contractor or authorized FoxESS servicepartner.
- Liabilities arising from commercial components are delegated to their respective manufacturers.
Packing List
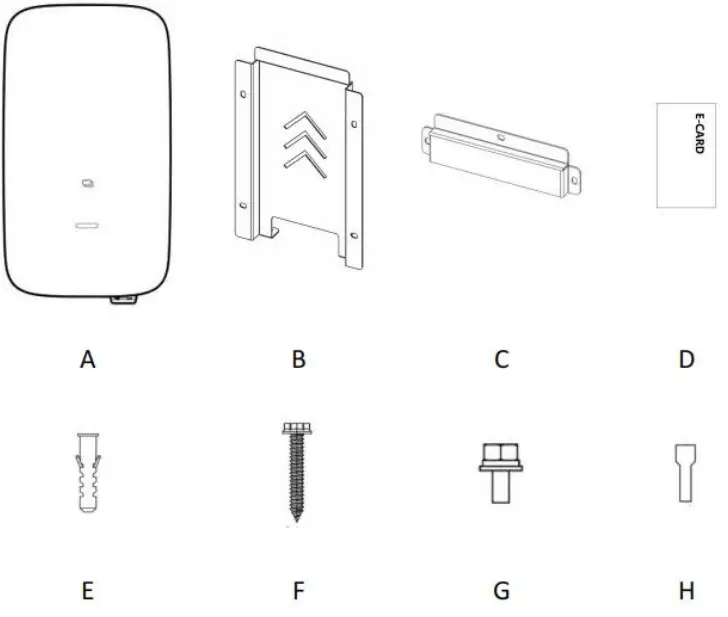
| Object | Name | Qty |
| A | Charger | 1 |
| B | Mounting backplane | 1 |
| C | Mounting bracket | 1 |
| D | RFID card | 2 |
| E | Expansion tube | 4 |
| F | Expansion screw | 4 |
| G | Screw | 5 |
| H | Tubular terminal | 5 |
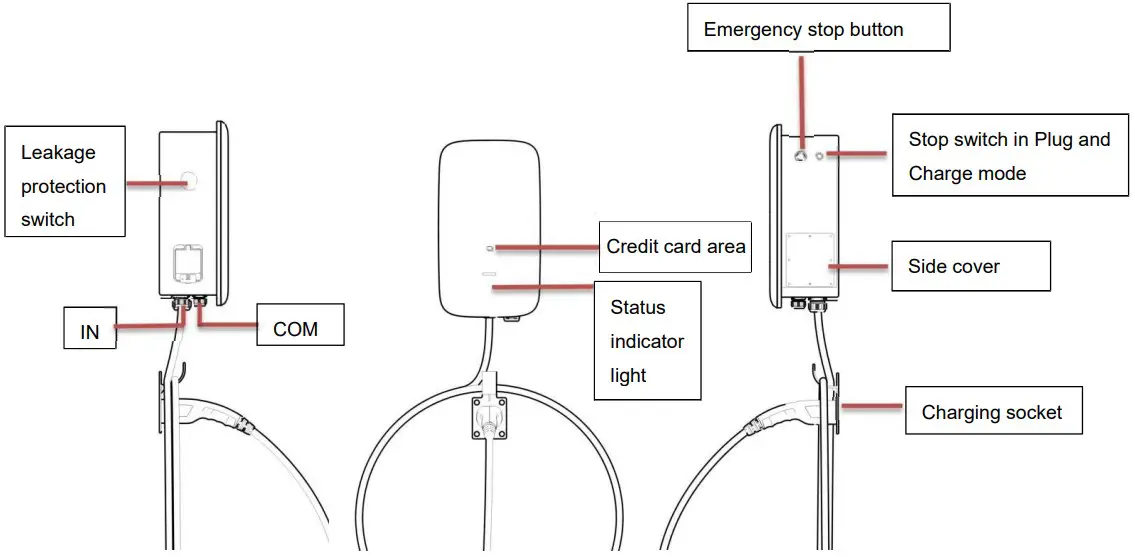
Introduction
Socket version
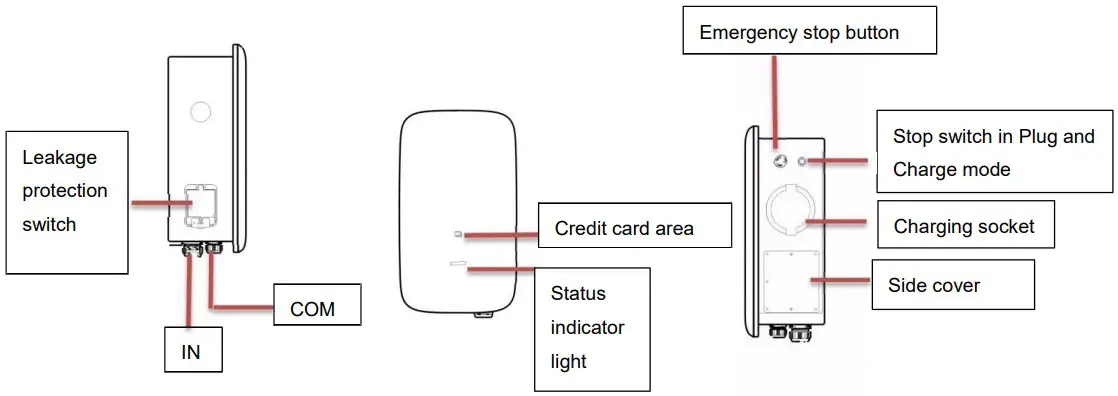
Plug version
Technical Data
| Model | A011KP1-E / A011KS1-E |
| General | |
| Name | AC Charger |
| Input | |
| Input line | 3P+N+PE |
| Rated voltage | 400Vac,±20% |
| Rated current | 16A |
| Rated frequency | 50/60Hz |
| Output | |
| Output voltage | 400Vac,±20% |
| Maximum output current | 16A |
| Rated power | 11kW |
| Interaction method | |
| Charging connection method | With cable/socket |
| Card reader | Mifare ISO/IEC 14443 A |
| Start-up mode | Plug and Charge/RFID Card/APP |
| Communication method | |
| Bluetooth | Yes |
| WiFi | Yes |
| Using environment | |
| Installation method | Wall mounting/column mounting |
| Working temperature | -25°C ~50°C |
| Working humidity | 5%-95% no condensation |
| Altitude | ≤2000m |
| Size and weight | |
| Size | 480*275*180 mm |
| Weight | 6.5kg(socket),8.8kg(plug) |
| Safety | |
| Waterproof rating | IP54 |
| Anti-collision grade | IK08 |
| Type A RCD | 6mA DC |
| Protection function | Over-current protection, grounding protection, lightning protection, over-voltage protection, under-frequency protection, over temperatureprotection |
| Certification | CE/UKCA |
| Certification standard | EN/IEC 61851-1: 2019, EN/IEC 61851-21-2: 2018 |
Charger installation
Product Handling
To ensure safety, the following points should be paid attention to:
- All accessories are placed separately during transport or handling.
- Avoid violent shock and impact, and take it lightly.
- Avoid inversion.
Out of the box inspection
- Open the charging pile packaging, please check the random attachment according to theattachment list.
- Check the charging pile for damage in transport. If damage or missing parts are found, do not
boot up and inform the carrier and dealer. Determine if this machine is the model that you want to purchase.
Note: Please keep the packing boxes and packaging materials for future handling.
Install
- Pre-installation preparation
The following tools are required for the installation: Cross screwdriver, special plum screwdriver, stripping pliers, pressing pliers. - Installation precautions
Please strictly follow the wiring requirements and correct access. Please confirm that all fasteners are locked to secure the charging pile. - Installation placement environment and location
- The area where the charger must be placed must be well ventilated, far away fromwater, combustible gas and corrosive agent.
- Ensure that the ground or installation platform can withstand the weight of the charger.
- If the charger is disassembled and used at low temperature, there may be water droplets condensation phenomenon, be sure to wait for the charger inside and outside completely dry. After dryness can be installed and use, otherwise there is a danger of electric shock.
- Please place the charger near the mains input to disconnect the mains input switch and cut off the power supply in an emergency
Note: The actual installation needs to comply with local installation requirements and local safety regulations.
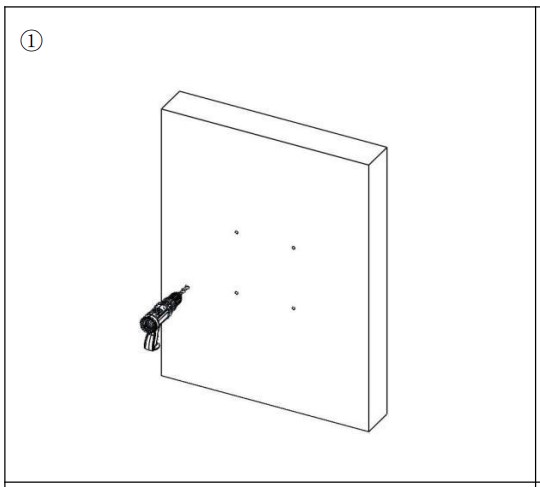
Ensure that the wall or column is vertical or positive 15 ° before installation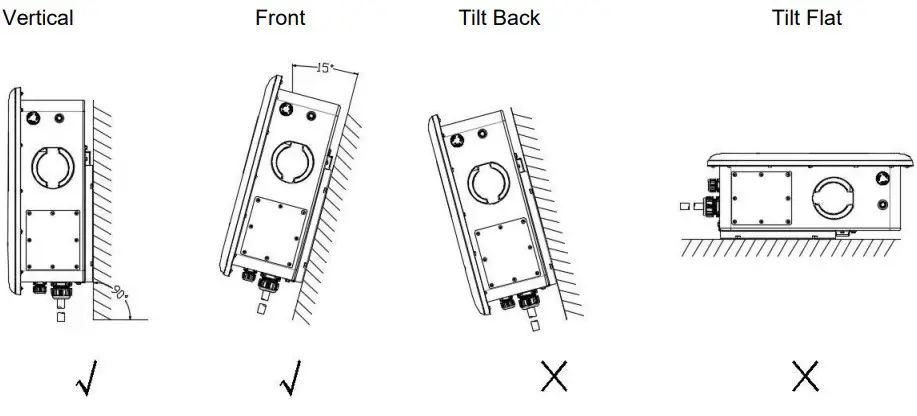
Wall-mounted installation method:
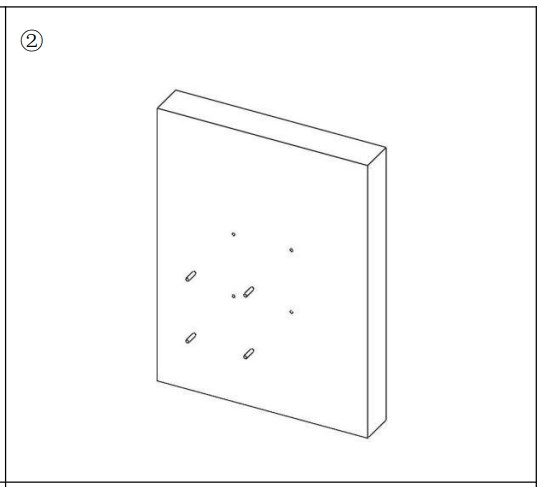
- Open the package and mark 4 holes in the wall (φ 8 * 50mm).

- Fit into the expansion tube.
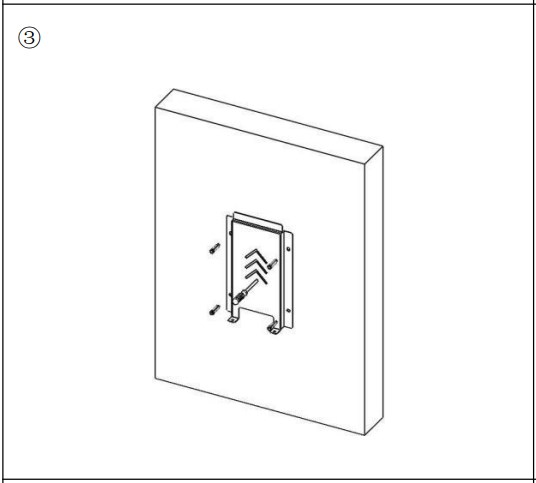
- Attach the mounting backplane with screws to the mounting wall

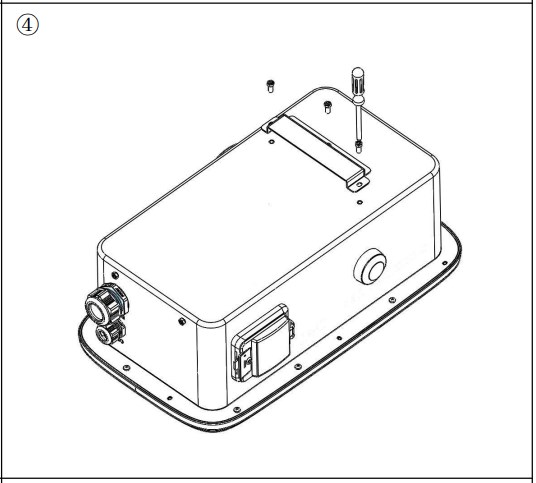
- Attach the bracket to the charger.
- Hang the charger into the mounting back plate and screw it.
- Installation completed.
Note: Installation wall angle 90°±15,thickness > 50mm
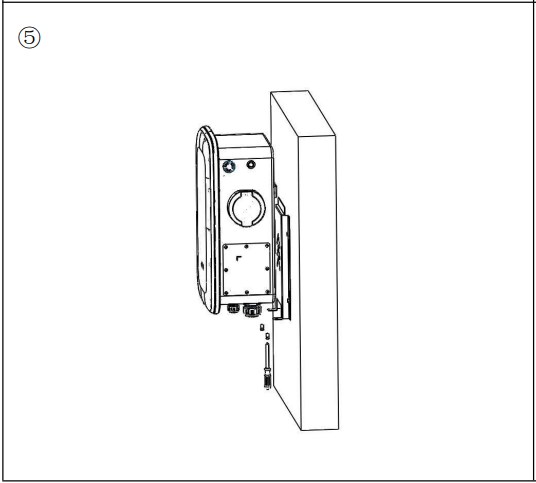
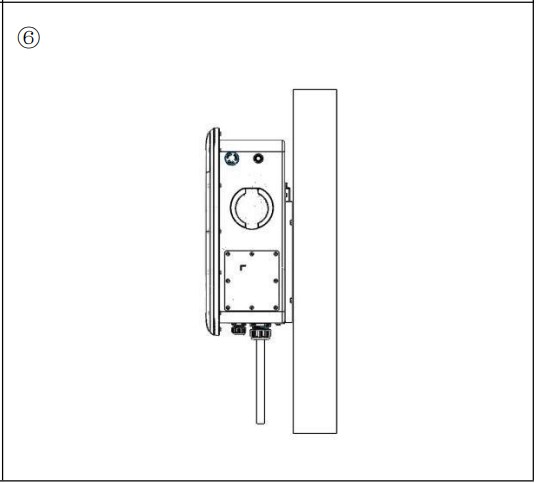
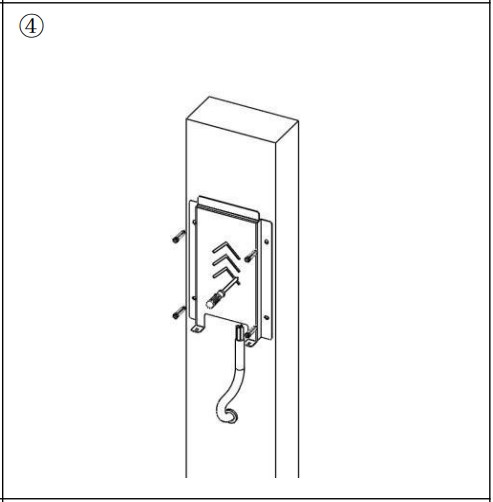
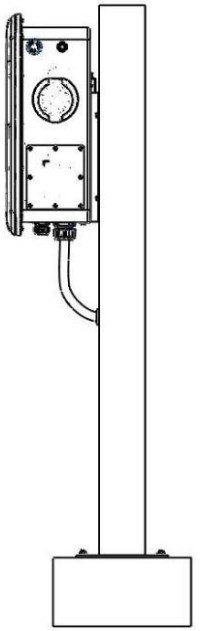
Floor type / Vertical installation method:
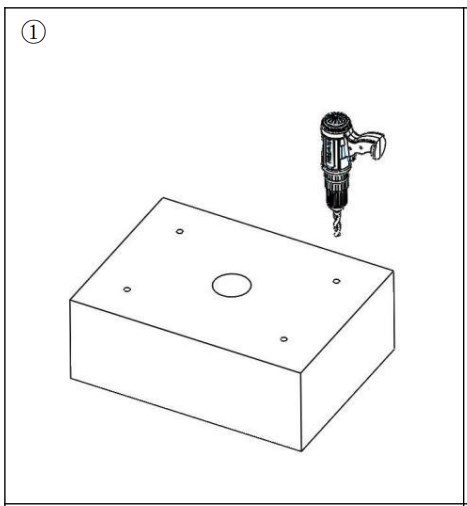
- Drill holes on thecement floor,four holes with diameter φ 12mm deep 60mm screws and one φ 60mm through duct hole.

- Install and fix the anchor screws.

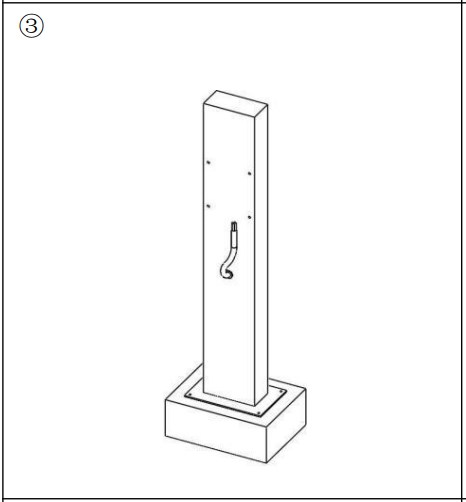
- The input line runs through the column hole through the bottom of the column.

- Install the backplane is fixed to the landing column with screws.

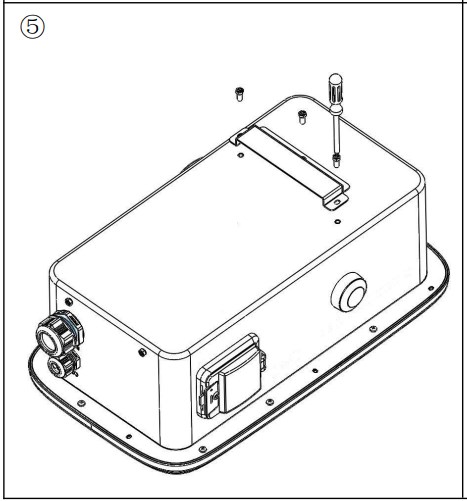
- Attach the bracket to the charger.

- Hang the charger into the mounting back plate and screw it well.

- Installation completed.


Electrical Connection
Step 1: Peel five L1, L2, L3, N and PE copper 16mm with wire stripping pliers, and press L1, L2, L3, N, PE and tube terminals with terminal pliers.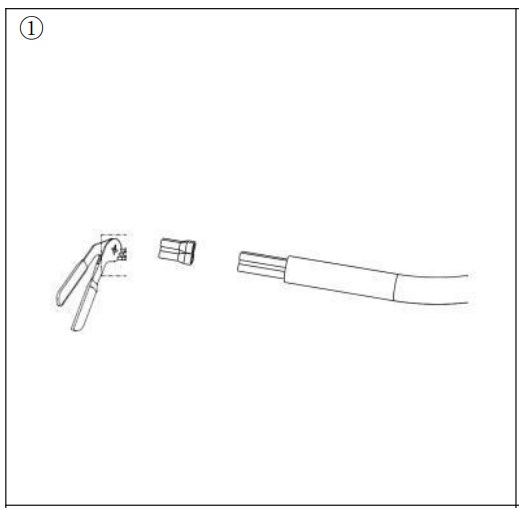
Step 2: Loosen the screw nut and puncture the hole.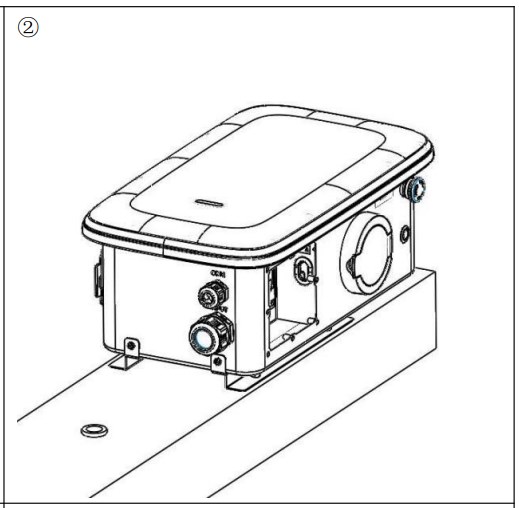
Step 3: Open the side cover, load the cable (13-18mm) and tighten the gram head.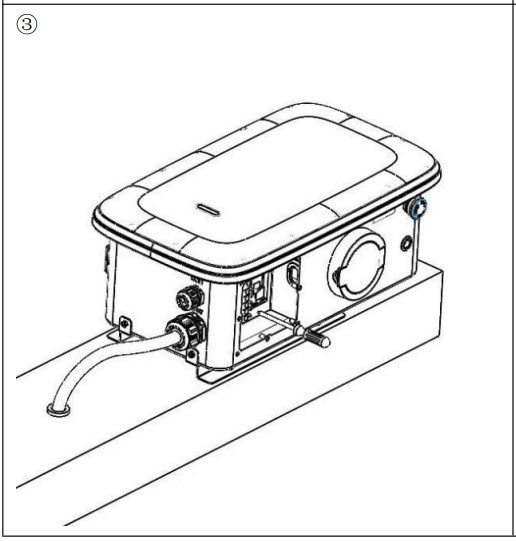
Step 4: Unscrew the terminal screws. Link L.N.PE line lock the terminal screw, lock the side cover.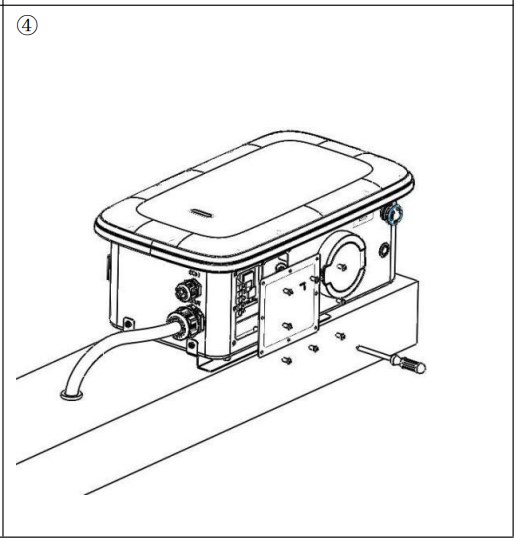
Note:choose10~12 AWG five core wire
APP download
Users can scan the QR code (Android and IOS ) in the quick installation manual, or go to the AppStore and Google Play to search for FoxSwitch.
Operation
Charger Status Indicators
| LED Indicator description | Definition |
| Green Flashing | Device available |
| Blue Steady | EV connected,User not authorized |
| Blue Flashing | Authorized, Wait for charging |
| Blue marquee light | Charging |
| Blue Flashing | Charging suspension |
| Green Steady | Charging Finish, Wait for unplug |
| Yellow Steady | Charging Locking |
| Red Steady | Device Fault |
Charging mode and Operation
Users can set three charging modes through the charging mode setting interface of the APP: controlled, locked, plug and charge.
A. Plug and charge mode
Charging will start automatically after EV plugged in. If you want to stop the charging, just press thestop button on the side of the charger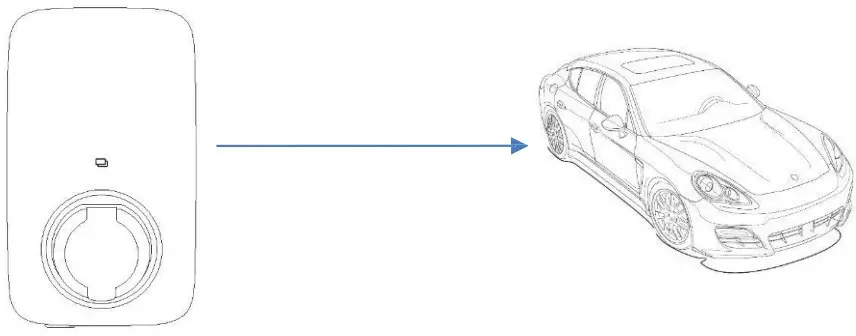
Start Charging:
- Set the charger to the Plug and Charge mode
- Insert the charging plug into the EV
- Charging session started
Stop Charging:
Press the stop button on the side of the charger.
B. The controlled mode
Initiate or cease charging by using APP or by swiping RFID card on this mode. You can also useAPP for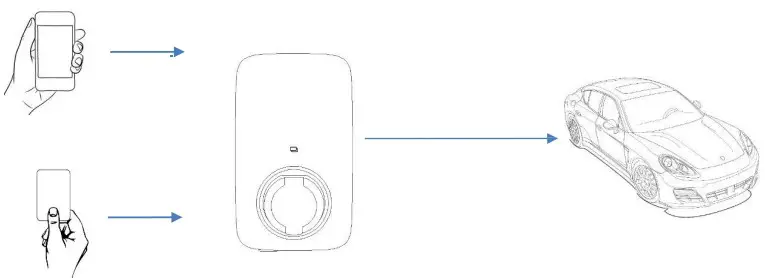
The controlled mode with RFID card
Start Charging:
- Set the charger to the Controlled mode
- Insert the charging plug into the EV
- Click to Start the Charge on the APP
- Waiting for authorizing
- Charging session started
Stop Charging:
- Swipe card
- Charging session end
The controlled mode with APP
Start Charging:
- Set the charger to the Controlled mode
- Insert the charging plug into the EV
- Click to Start the Charge on the APP
- Waiting for authorizing
- Charging session started
Stop Charging:
- Click to Stop the Charge on the APP
- Charging session end
C. The locked mode
On this mode, the charger is locked and cannot be used.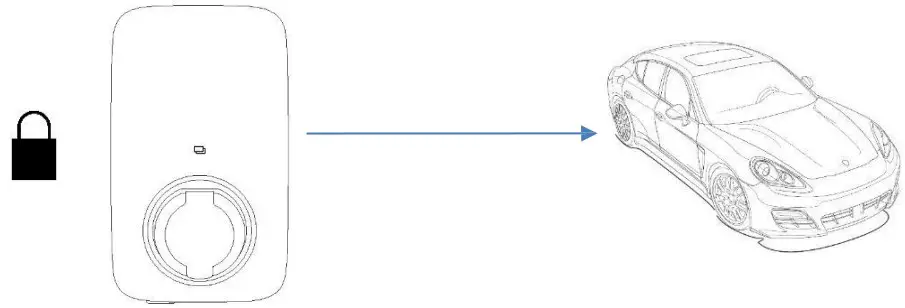
Note: Please refer to the app user manual for the specific operation of the app.
Maintenance
Troubleshoot by Alarm information on APP or LCD display. If fault occurs, users can check the fault information on the APP or by blinks of the LED indicator light.
| No. | Fault code on app | Solution |
| 1 | Electronic lock fault | Set the electronic lock status to the correct position.Or seek help from us. |
| 2 | Emergency stop fault | Reset the emergency stop button.Or seek help from us. |
| 3 | Abnormal CP voltage | seek help from us. |
| 4 | Abnormal AC output contactor | seek help from us. |
| 5 | Over current | Reduce output current. Or seek help from us. |
| 6 | Over voltage | Wait for the grid voltage to return to normal.Or seek help from us. |
| 7 | Undervoltage | Wait for the grid voltage to return to normal.Or seek help from us. |
| 8 | Electric leakage | seek help from us. |
| 9 | Reverse connection of lin N | Correctly connect P and N lines.Or seek help from us. |
| 10 | Abnormal frequency | Wait for the grid frequency to return to normal.Or seek help from us. |
| 11 | Over temperature of charging interface | Wait for the temperature of charging interface to return to normal.Or seek help from us. |
Decommissioning
Dismantling the charger
- Disconnect the charger from AC Input and AC output.
- Disconnect communication and optional connection wirings. Remove the charger fromthebracket.
- Remove the bracket if necessary.
Packaging
If possible, please pack the charger with the original packaging. If it is no longer available, you canalso use an equivalent box that meets the following requirements.
- Suitable for loads more than 30 kg
- Contains a handle
- Can be fully closed
Storage and Transportation
Store the charger in dry place where ambient temperatures are always between -40°C- +70°C.Take care of the charger during the storage and transportation; keep less than 4 cartons inone stack. When the charger or other related components need to be disposed of, please ensure it is carried out according to local waste handling regulations. Please be sure to deliver any charger that needs to be disposed from sites that are appropriate for the disposal in accordance with local regulations.
The copyright of this manual belongs to FOXESS CO., LTD. Any corporationor individual should not plagiarize, partially or fully copy (including software, etc.), andnoreproduction or distribution of it in any form or by any means is permitted. All rightsreserved.Add: No.939, Jinhai Third Road, New Airport Industry Area, Longwan District, Wenzhou, Zhejiang, China
Tel: 0510- 68092998
WWW.FOX-ESS.COM.


