![]() Assembly Instructions for
Assembly Instructions for
Outlaw Chassis
SKU: 3209-0005-0001
Kit Contents
| Idler Wheel Kit for 2400 Series Tracks (1-1) SKU: 2407-0001-0001 QTY: 2 (one 2 pack) | 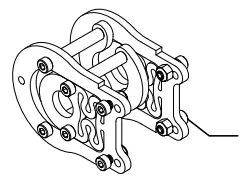 | Short Tensioner Kit for 2400 Series Tracks SKU: 2406-0001-0001 QTY: 2 (one 2 pack) | |
| Flanged Ball Bearing 8mm REX ID x 14mm OD SKU: 1611-0514-4008 QTY: 12 (six 2 packs) | 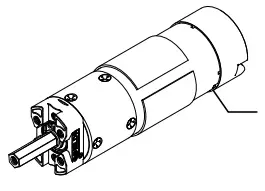 | 5203 Series Yellow Jacket Planetary Gear Motor 19.2:1 Ratio SKU: 5203-2402-0019 QTY: 4 | |
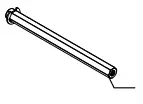
 | Stainless Steel REX Shaft 8mm Diameter, 52mm Length SKU: 2106-4008-0520 QTY: 2 | 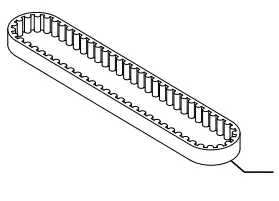 | 5mm HTD Pitch Timing Belt 9mm Width, 320mm Pitch Length SKU: 3412-0009-0320 QTY: 2 |
 | Stainless Steel REX Shaft 8mm Diameter, 96mm Length SKU: 2106-4008-0960 QTY: 4 |  | 5mm HTD Pitch Set-Screw Pinion Timing Belt Pulley (8mm REX Bore 16 Tooth) SKU: 3414-4008-0016 QTY: 4 |
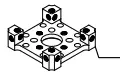 | Quad Block Pattern Mount (43-2) SKU: 1201-0043-0002 QTY: 2 |  | Wera Tools 2.5mm Ball-End Hex-Plus L-Key SKU: 5027103001 QTY: 1 |
 | 1310 Series Hyper Hub (8mm REX Bore) SKU: 1310-0016-4008 QTY: 8 | | Wera Tools 3mm Ball End Hex-Plus L-Key SKU: 5027104001 QTY: 1 |
| 8mm ID Spacer 10mm OD, 4mm Length SKU: 1514-0010-0040 QTY: 4 (one 4 pack) | Zinc-Plated Steel Socket Head Screw 8mm Length SKU: 2800-0004-0008 QTY: 25 (one 25 pack) | ||
| 8mm ID Spacer 10mm OD, 6mm Length SKU: 1514-0010-0060 QTY: 4 (one 4 pack) |  | Zinc-Plated Steel Socket Head Screw 10mm Length SKU: 2800-0004-0010 QTY: 50 (two 25 packs) | |
 | 8mm ID Spacer 10mm OD, 8mm Length SKU: 1514-0010-0080 QTY: 4 (one 4 pack) |  | Zinc-Plated Steel Socket Head Screw 16mm Length SKU: 2800-0004-0016 QTY: 50 (two 25 packs) |
 | Steel, MOD 0.8 Pinion Gear 8mm REX Bore 24 Tooth) SKU: 2303-4008-0024 QTY: 4 | Zinc-Plated Steel Washer 4mm ID x 8mm OD SKU: 2801-0004-0008 QTY: 50 (two 25 packs) | |
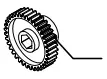 | Steel, MOD 0.8 Pinion Gear 8mm REX Bore 36 Tooth) SKU: 2303-4008-0036 QTY: 2 | Stainless Steel Shim 8mm ID x 11mm OD SKU: 2807-0811-1000 QTY: 12 (one 12 pack) | |
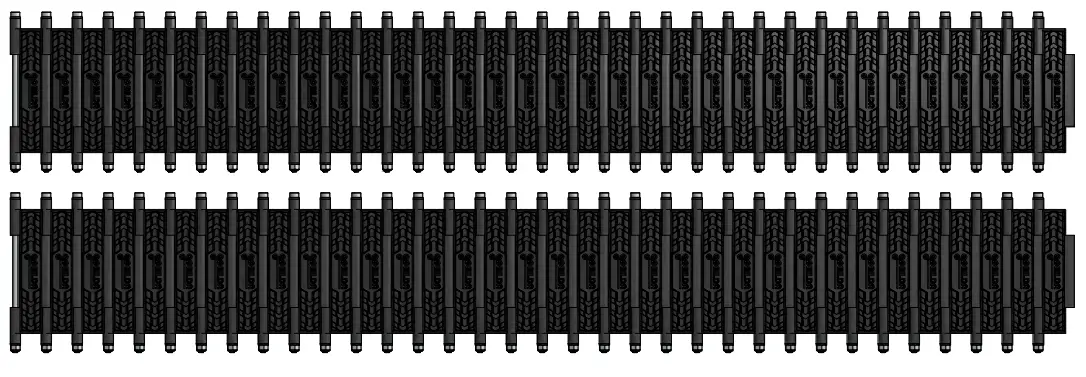
 | Badlands Tank Track SKU: 2400-0112-0001 QTY: 72 (twelve 6 packs) |  | Plastic Grommet (14-1) SKU: 2911-0014-0001 QTY: 12 (one 12 pack) |
 | Track Sprocket, 12 Tooth SKU: 2401-0014-0012 QTY: 8 (four 2 packs) |  | Dual Block Mount SKU:1205-0301.0002 QTY: 2 tones 2 pocks) |
STEP 1
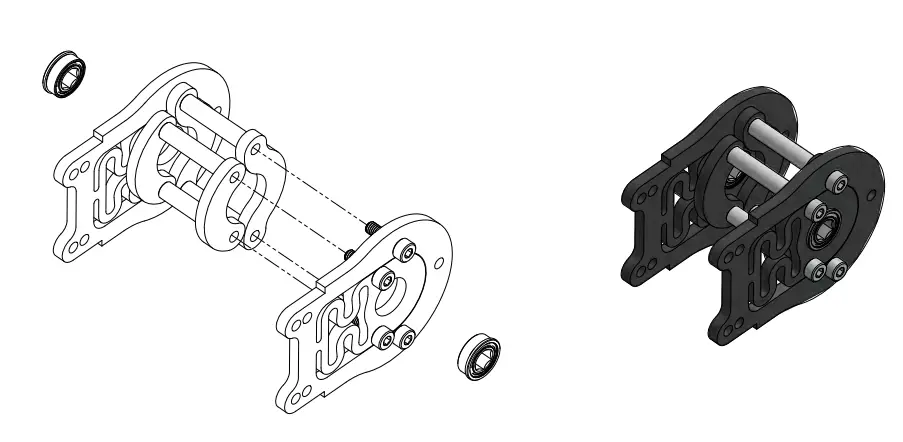
This chassis kit comes with a tensioner kit 2 pack which will have all the parts used in this step (minus the bearings). Insert two 8mm REX bore bearings into two of the tensioner side plates. Then assemble one tensioner using eight 14mm length screws and four 27mm length standoffs.
STEP 2
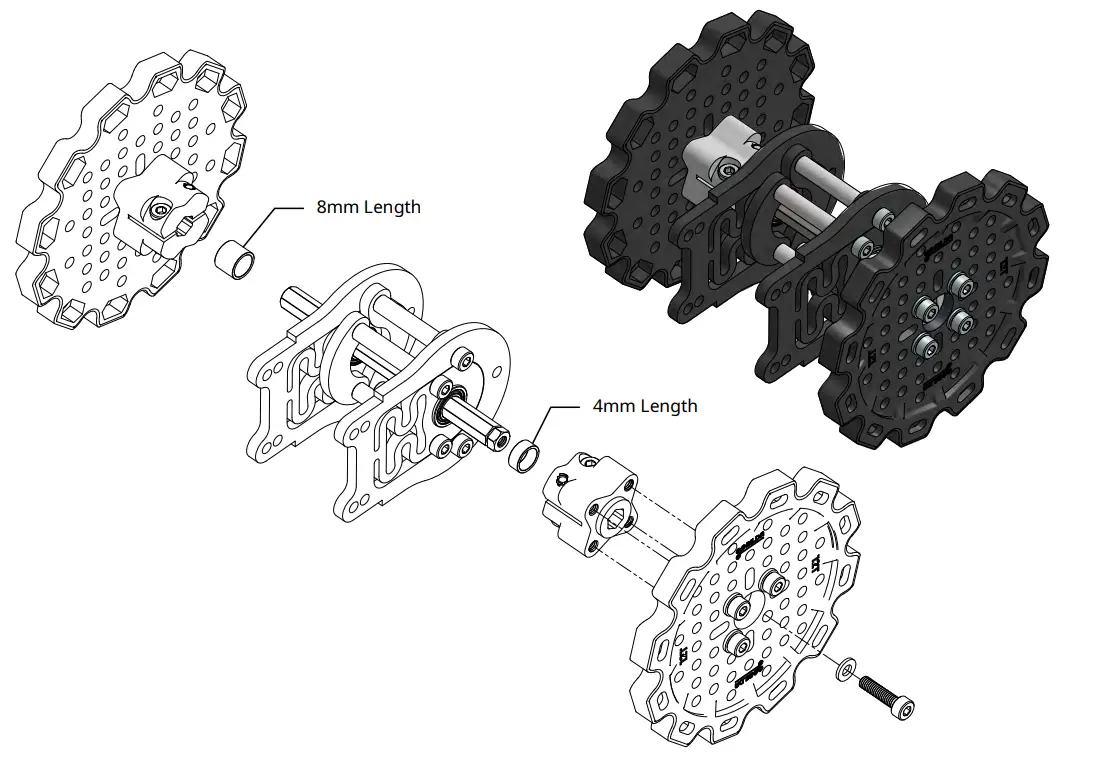
Use four 16mm length screws (each with a washer) to attach a Hyper Hub to the flat side of a track sprocket. Do this again for a total of two sprocket assemblies. Remove the e-clip from a 96mm length shaft and slide the shaft through the bearings of the tensioner. slide a 4mm length spacer on one side and an 8mm length spacer on the other side. Then put the two sprocket assemblies on the shaft. Tighten the pinch bolts of the Hyper Hubs.
Tech Tip:
We recommend you install the screws through the small slots of the track sprocket even though the large slots also align with the hub. Whichever you choose, be consistent throughout your build. Two sprockets installed on the same shaft will only align with one another if both hubs are installed in the same orientation with the slots.
STEP 3
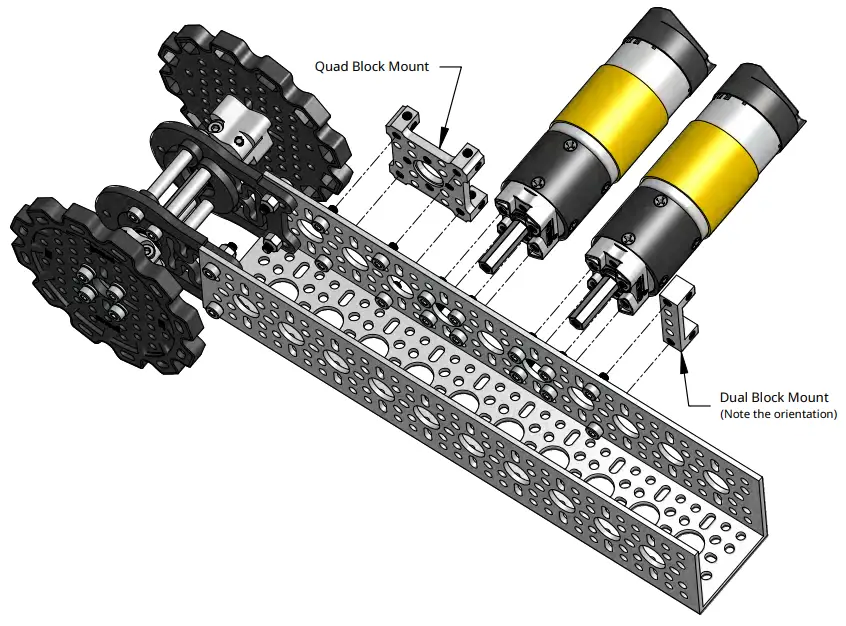
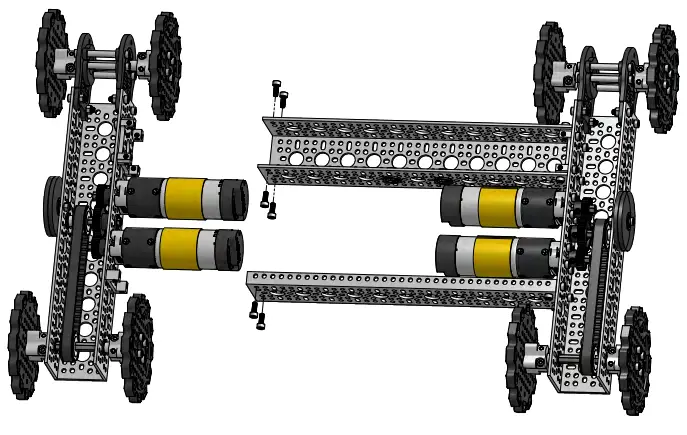
Use four 14mm length screws and four locknuts (which were both included in the tensioner kit bag) to mount the tensioner assembly to a 10 hole channel. Note in the image below which holes are being used. Use six 8mm length screws to fasten a Quad Block Mount and a Dual Block Mount where shown. Use eight 10mm length screws to mount two motors where shown.
STEP 4
Add a 24 tooth pinion gear to each motor shaft. Slide them as close to the motor as you can and tighten the set-screws just enough to keep them from sliding off (their final positions will be set in a future step).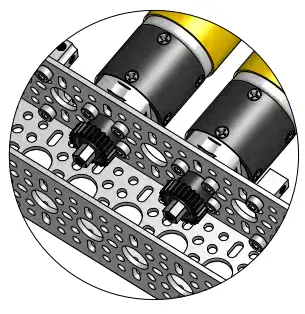
STEP 5
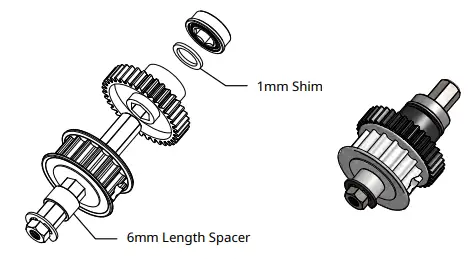
Grab a 52mm length shaft and add a 6mm spacer, a timing pulley, a 36 tooth gear, a 1mm shim, and a bearing. Slide all the components towards the e-clip on the shaft. Tighten the set-screws on the timing pulley. Leave the gear/shim/bearing loose on the shaft for now.
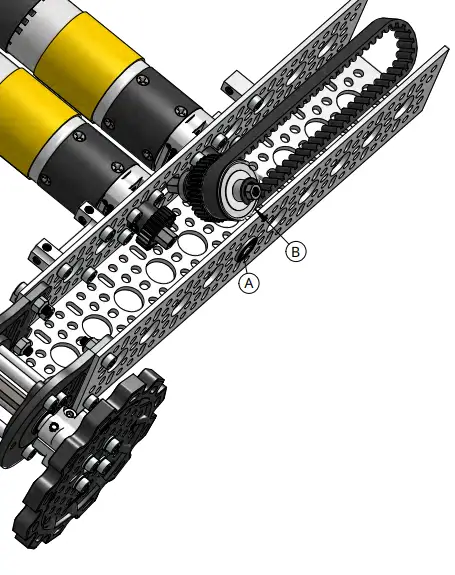
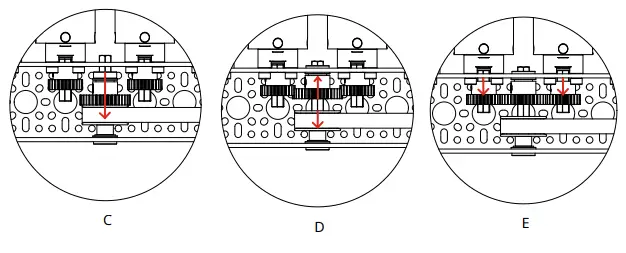
STEP 6
(A) Seat a bearing (with the flange on the inside of the channel) in position A.
(B) Add a timing belt around the timing pulley of the assembly from the previous step. Angle the assembly from the last step into the channel between the two motors.
(C) Seat the end of the shaft into the bearing you just placed in the channel.
(D) Slide the large pinion gear towards the motor side (seating the bearing on the shaft into the 14mm hole between the motors. While ensuring the pulley and the gear are spread as far apart from each other as they can be, tighten the set-screws on the gear.
(E) Now you can loosen the set-screws on the smaller pinion gears on the motor shafts and slide them out to line up with the larger pinion gear and tighten down their set-screws.
STEP 7
Using four 16mm length screws (each with a washer) mount a Hyper Hub to the flat side of a track sprocket. Do this again for a total of 2 sprocket assemblies. Add a timing pulley into the belt from the previous page. Remove the e-clip from the 96mm length shaft and insert the shaft into the pulley. Add a bearing to the shaft on either side and seat them in the 14mm holes. Then add a 1mm shim on the non-motor side and a 6mm length spacer on the motor side. Slide the sprocket/hub assemblies onto the shaft and tighten the pinch bolts of the Hyper Hubs.
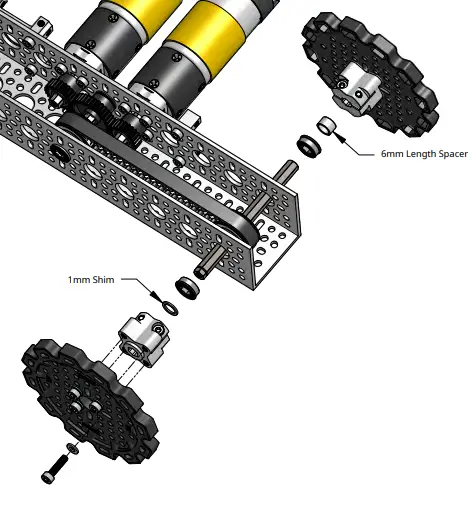
Note that we are again using the small slots of the sprocket as opposed to the larger slots (see the Tech Tip in STEP 2)
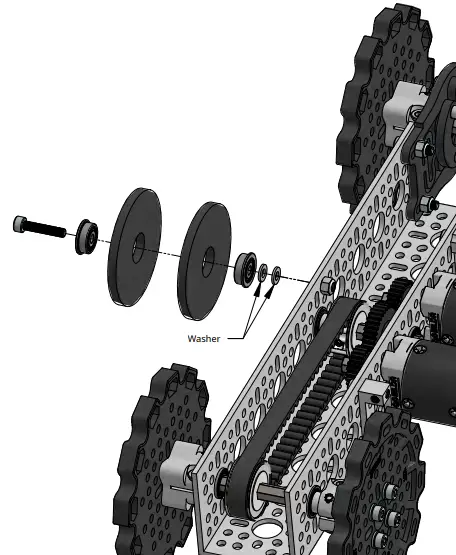
STEP 8
The included idler kit contains two idlers, each consisting of 2 discs, two 4mm bore bearings, two washers, a screw, and a locknut. Assembly one idler and mount it where shown.
STEP 9
You now have one “track pod” minus the track segments. Repeat Steps 1-8 to create the other track pod for this chassis. Note that the second track pod needs to be a mirror image of the first.
STEP 10
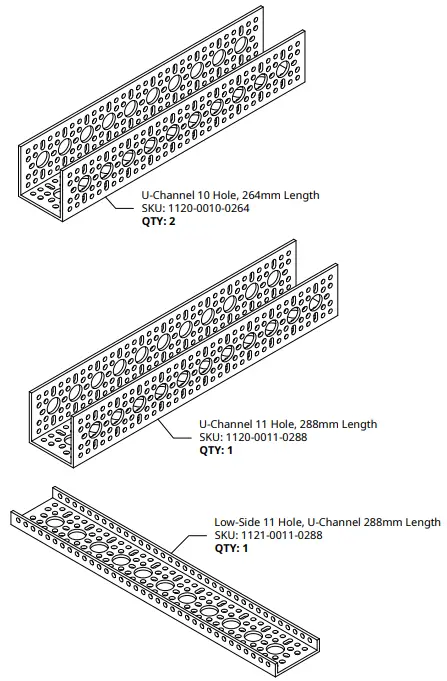
Using eight 10mm length screws, attach the 11 holes U-Channel to the Quad Block Mounts on the two-track pods. Using four 10mm length screws attach the 11 holes Low-Side U-Channel to the Dual Block Mounts on the two-track pods. Note that grommets have been added in suggested locations in the 11 hole U-Channel. This provides a place to pass motor wires through without the chance of them getting chaffed on the edge of the aluminum channel.
STEP 11
Assemble two lengths of tracks, each 34 segments long. You will have 4 track segments left over.
STEP 12
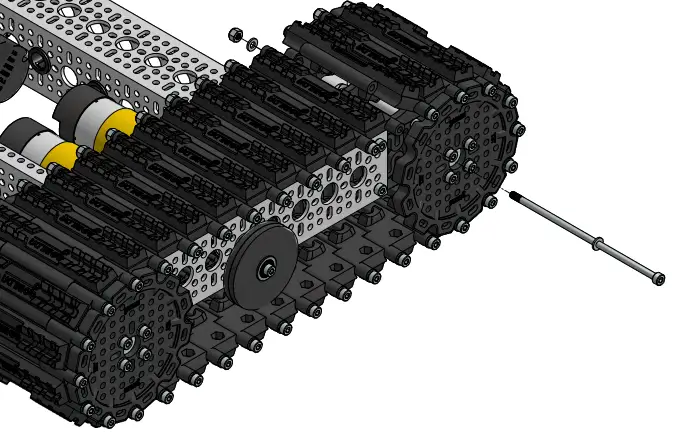
Wrap one of the track segment assemblies around one of the track pods. Pull the ends together and insert the final screw (with washer), then add the locknut (also with an asher). Because there is a tensioner, it may be easier to do this step with two people, one to pull and hold the tracks, and one to insert the screw. Repeat this process with the other track segment assembly on the other track pod.
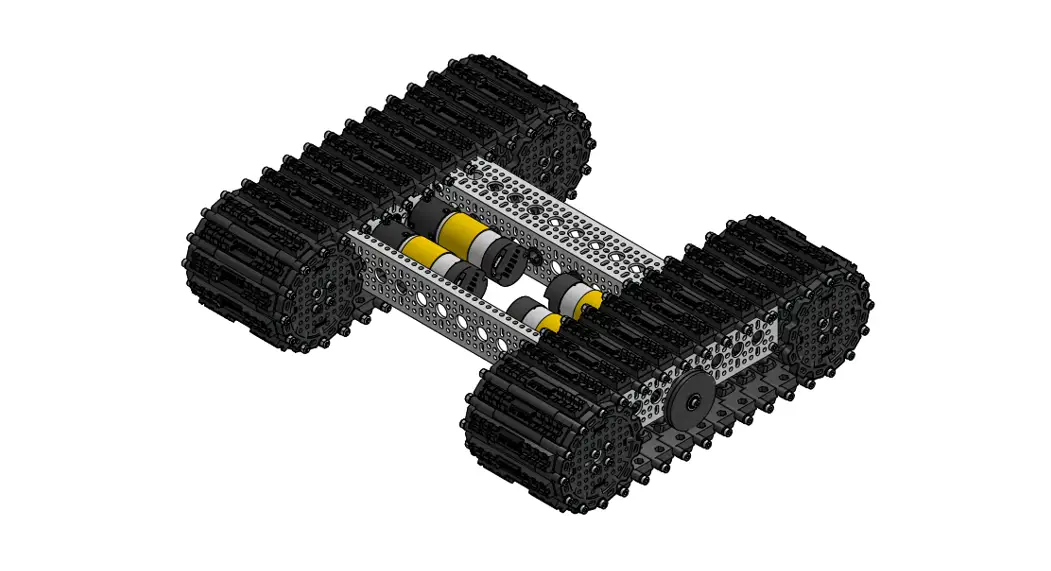
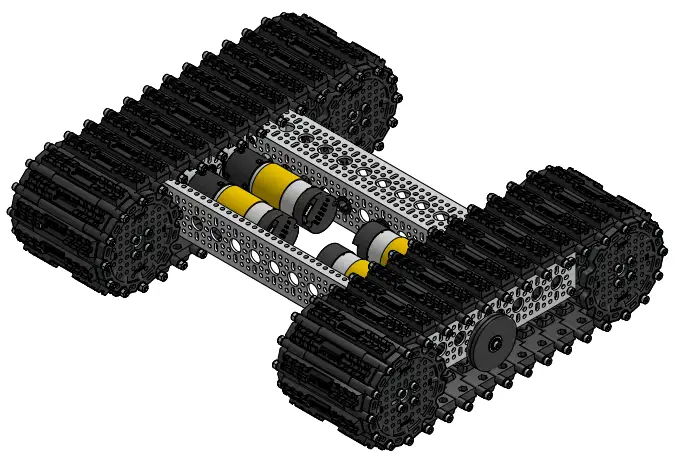
Congratulations!
Your Outlaw Chassis is now assembled!


