
OPT7 07-14 LED DRL Projector Headlights Installation

Product Information
The Trapmate is a device that is used in conjunction with the Skyhawk Hub (sold separately) and the Skyhawk CE smartphone app to receive alerts. It comes with various parts including the Trapmate device itself, AA Alkaline Batteries, Pull Magnet Kit, Self-Stick Mounting Magnets, Tacky Puddy, Quickstart guide, and Warranty card. The Trapmate has features such as LED Indicator, Magnet Alignment Notch, Cover Screws, Function Button, Mounting Cutout, Accelerometer Sensor, Feature Jumpers, Reed Sensor, and Battery Holder.
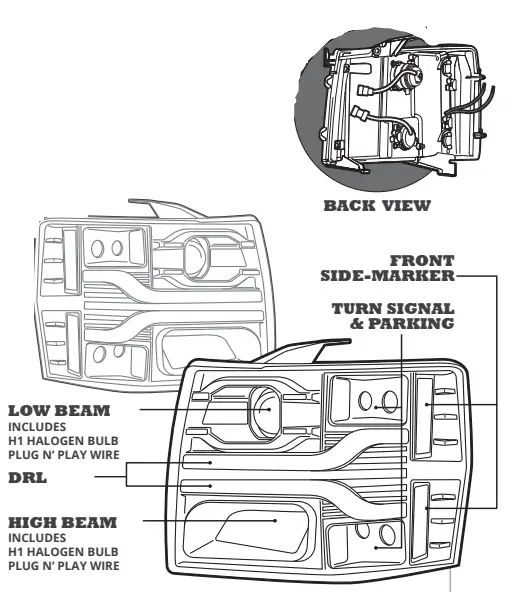
PRODUCT OVERVIEW
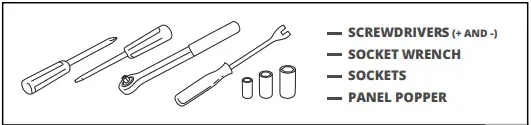
TOOLS NEEDED
INSTALLATION
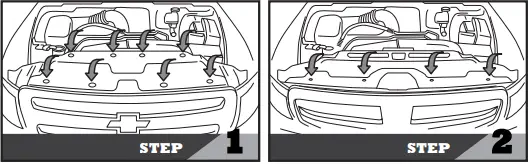
STEP 1
- Open the hood.
- Please find the 8 points marked in step 1 and remove the plastic fasteners (8x) from the filler panel.
- Remove the filler panel.
STEP 2
- Remove the 10mm bolts(4x) from the grille as shown in step 2.

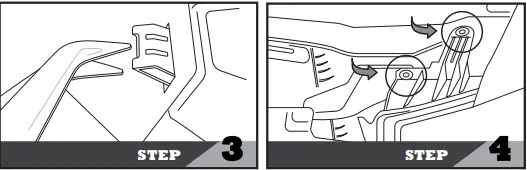
STEP 3
- Remove the front grille by releasing (6x) retaining clips.
STEP 4
- Remove the 10mm bolts (2x) from the OEM headlight as shown in step 4.

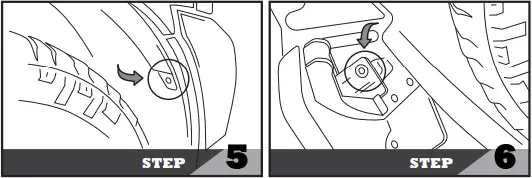
STEP 5
- Remove the 10mm bolt (1x) to open the fender liner.
STEP 6
- Next, please find the last 10mm bolt (1x) and remove it as shown in step 6.

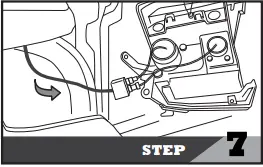
STEP 7
- Release the OEM headlight and disconnect the headlight harness.

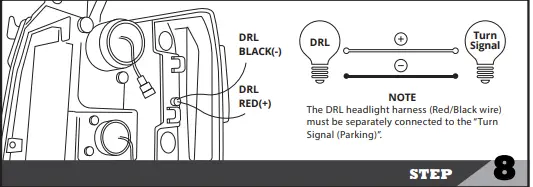
STEP 8
- Reattach the electrical connectors to the new headlight housing as shown in step 8.
- Ensure the wires are tied up securely to ensure wires are organized and store away from any metal surface.

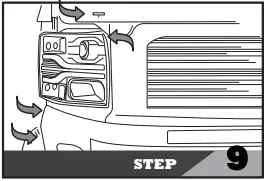
STEP 9
- Line up the headlight housing mounting tabs and push rearward to seat in place as shown in step 9.
- Reinstall the 10mm bolts(4x) to secure the new headlight.
- Please test all functions before tightening all bolts and screws.
- Next, please restore other components (includes grille and filler panel ) to factory settings.
DISCLAIMER
- OPT7 Lighting is not liable for damages or personal injuries while installing this product. The Installation Guide is intended as assistance to reduce setup time. OPT7 Lighting assumes no responsibility for improper installation.
- If you are unfamiliar with your vehicle or inexperienced with aftermarket upgrades, please seek professional assistance.
- This holds a 60 days warranty starting from the order date.
SCAN FOR TROUBLESHOOTING TIPS, AND MORE.