![]()
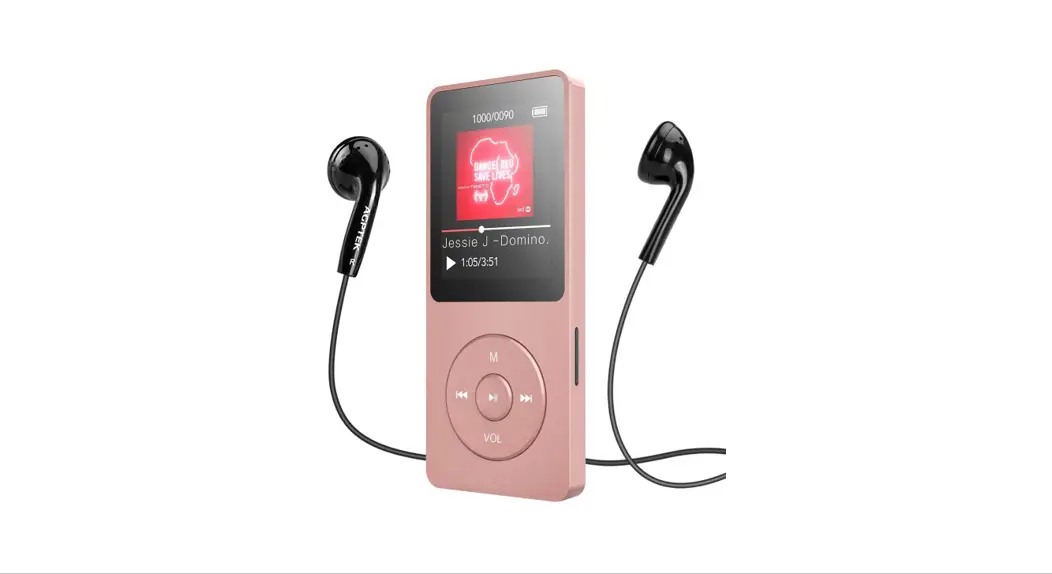
 A02ST Music Player
Before use
Thank you for purchasing AGPTEK MP3 Player. Please read the manual carefully before using the product. Specifications are subject to change without prior notice.
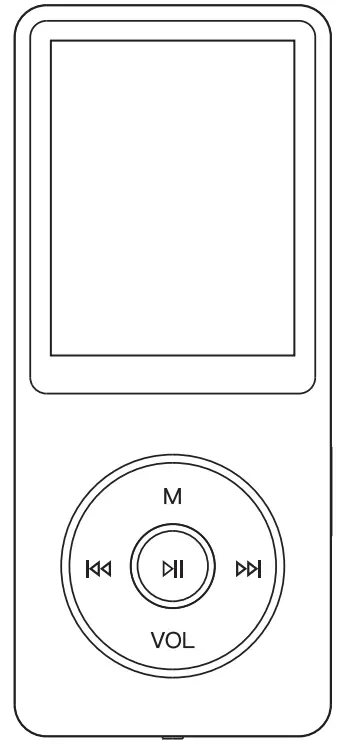
Buttons&Controls
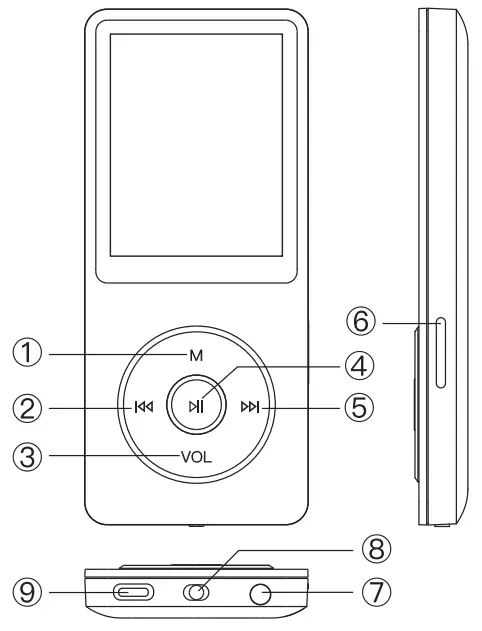
- Menu button/Scroll up/Volume +
- Previous/Rewind/Back button
- Back button/Scroll down/Volume –
- Play/Pause/Enter/ Power on/off
- Next/Fast forward
- Card slot
- Earphone jack
- Power slider
- Type-C Port
Quick Guide
Charge the Player
- By USB cable. The USB cable can both be used for data transfer and charging the player.
- Use 5V/500mA charger(Charger not included) Please note: The specifications of the charger must meet the following requirements or any accident or failure that happened will be regarded as man-made damage.
Basic Operation
- Power On/Off. Standby status: hold the play button for 3 seconds to power on/off.
- Screen Lock/unlock. Press and hold the button M to lock or unlock the screen.
Home Menu
Each time you press the button /
/![]() , it will bring you to one of its 9 different functions, including Music, FM radio, Folder, Bluetooth, Record, Setting, Tools, Ebook and Pictures.
, it will bring you to one of its 9 different functions, including Music, FM radio, Folder, Bluetooth, Record, Setting, Tools, Ebook and Pictures.
Music
Find “Music” on the home menu and press the button![]() to access to its function. A related list will show:
to access to its function. A related list will show:
- All songs. All the music files are in the local folder or card folder.
- Resume (Now playing). Take you back to the song or audio file you are playing last time or playing now.
- Artists/Albums/Genres. View music files sorted by artists/albums/genres.
- Playlist. There are 3 default playlists on the player: Playlist on the go [1 ]/[2]/[3].
- Update playlists. Update music files.
- Local folder/Card folder. View the music files in the local folder or card folder.
Note: These functions are only available when a memory card is inserted. Play the music While it’s on the music playing interface, hold down the button![]() to fast forward, press to skip to the next track; hold down the button
to fast forward, press to skip to the next track; hold down the button![]() to fast rewind, and press to play the previous track. Press button
to fast rewind, and press to play the previous track. Press button![]() to play/pause. Press the button
to play/pause. Press the button![]() to increase the volume, and press the button Ill to lower the volume. Press and hold the “VOL” button to wake up the volume function. Sub-menu When it is on the music playing interface, hold down button M to access to the Sub-menu, a related list will show:
to increase the volume, and press the button Ill to lower the volume. Press and hold the “VOL” button to wake up the volume function. Sub-menu When it is on the music playing interface, hold down button M to access to the Sub-menu, a related list will show:
- Home. Press the button
 to return the home menu.
 - Play mode.
“Play music from…”. Choose to play from all songs/this artist/album/genre.
- Repeat. Press the button, you will see a related list: Repeat Off/repeat 1/repeat all.
- Shuffle. Click the button to turn on the shuffle mode. 3) “Language learning” (only available when the music is playing)
• Choose the option “Repeat mode” with a button to confirm the starting time A(A is flashing).
• Then click the button again to set the ending time B(B is flashing). Click the button again and the passage from time A to B will be repeated automatically. The icon for the A-B indication will appear on the screen.
• Click the button again to back to normal playback. - Sound settings. Choose to set Equalizer, Speed, and Volume limit.
- Delete. Choose to delete the song that is playing now.
- Bookmarks. Choose to add a bookmark, for the song that is playing now. And you can also choose to go to bookmark or delete bookmark for checking the bookmark list or delete the bookmark which you want to delete
- Add to playlist.
- Remove from playlist.
FM Radio
Select “FM Radio” on the main menu, and click the button![]() to access to its function. A related list will show including “Station list”, “Manual tune”, “Autotune” and “FM recording” . Click the button M/VOL to select. Press button 144 to go back. While on the radio playing interface, press the button
to access to its function. A related list will show including “Station list”, “Manual tune”, “Autotune” and “FM recording” . Click the button M/VOL to select. Press button 144 to go back. While on the radio playing interface, press the button ![]() to go to its Sub-menu.
to go to its Sub-menu.
- Choose “Start FM radio recording” to save the radio you want to record, find the saved recordings in the “FM recording” .
- “Tuner Region”. Choose from the Common/Japanese/European Band.
- “FM Recording”. All saved recordings will be listed here.
- Radio Background: Choose to open or close
- Save to Presets
- Clear Presets
- Automatic Tuning: Automatically search for radio stations
Note: You can only listen to mono radio stations on this player.
Folder
Find “Folder” on the Home menu with the button![]() to access to its function. All of the files in the player will be listed. If the Micro SD card is inserted, you can choose to go to the Local folder or the Card folder.
to access to its function. All of the files in the player will be listed. If the Micro SD card is inserted, you can choose to go to the Local folder or the Card folder.
Bluetooth
Find”Bluetooth” on the Home menu and press the button ![]() to enter, and it will automatically search and display the Bluetooth-enabled devices(Bluetooth headphones/speakers). You can choose and press the button
to enter, and it will automatically search and display the Bluetooth-enabled devices(Bluetooth headphones/speakers). You can choose and press the button ![]() to connect/cancel the pairing or press the button to go to the menu list, including
to connect/cancel the pairing or press the button to go to the menu list, including
- Bluetooth on/off. Choose to enable or disable Bluetooth.
- Search for the device. When Bluetooth is enabled, choose “Search Device” to search the nearby Bluetooth devices manually, then all of the detected Bluetooth devices will be listed.
- Device list. Select the device you want to connect/disconnect, and then press the button to confirm. After successfully connecting, this player is ready to play music or FM radio by Bluetooth headphones, Bluetooth speaker, etc.
Note: When listening to the radio by Bluetooth, wired headphones are needed for the radio antenna.
Record
ANL
Select “Record” on the Home menu, click the button ![]() to access to its function, then a related list will show as “Start Voice Recording” , “Recordings library” , “Storage”(only available with the card inserted), “Record format” and “Record bitrate”. New features: Recording Source: the recording source can choose microphone and line-in. Note: line-in has 2 functions. Playback Function: when the machine plays, connect MP3 and speakers with LINE IN line to play music.
to access to its function, then a related list will show as “Start Voice Recording” , “Recordings library” , “Storage”(only available with the card inserted), “Record format” and “Record bitrate”. New features: Recording Source: the recording source can choose microphone and line-in. Note: line-in has 2 functions. Playback Function: when the machine plays, connect MP3 and speakers with LINE IN line to play music.
Recording Function: turn on the recording Line-in function, connect two MP3s with LINE IN line or connect other devices with output function (such as mobile phones) with MP3 to record audio files.
Settings
Find “Settings” on the Home menu with the button![]() to access to its function. A related list will show as follow:
to access to its function. A related list will show as follow:
- Language: Choose display language.
- Display settings: Set the Brightness, Backlight timer, and Screen saver of your player. Power off: Choose “Shut down Power off ” to turn off this function or set the Power off between 1-99(minutes) Sleep timer: When there is no operation on the device will shut off automatically when reaches the set time.
• Date and time: Click button to switch. Click button M/VOL to set. Click the button to save your settings. - Format device/Factory settings: Format the device/SD card or restore the player to factory default settings.
Note: Before formatting the device, please back up the file so as not to lose any files. - Information: Check player information and disk space about your player.
Tools
Select “Tools” on the home menu, and click the button![]() to access to its function. A related list will show “Pedometer”, “Video” “Calendar””Stopwatch” and “Alarm”.
to access to its function. A related list will show “Pedometer”, “Video” “Calendar””Stopwatch” and “Alarm”.
- Calendar Press the button to switch among year I month I day, press the button M/VOL to choose a specific year I month I day.
- Stopwatch Press the button to enter. Press again to start the timer, and then press again to stop or hold down the button to resume. Press the button M/VOL to start a new one. The maximum Stopwatch list is 4.
- Alarm
- Video
- Press the button to access to its function. You will need to choose from the local folder or card folder if the memory card is inserted.
- Press buttonto watch videos, Press button/ to go to the previous/next video or hold button / to fast backward/forward.
- When it’s on the video playing interface, hold down the button M to access to its submenu, including Brightness, Repeat, Delete video, and Update card data. Set according to your preference.
Pedometer
Press the button pilot access to its function. There is a related list will show: - Start step
Choose to start the step, it will display your Elapsed time and Step counts
Press the buttonto stop and then press the button VOL to save your step. - Personal info Set your height and weight. you can adjust your height and weight by pressing the button M/VOL.
Set your step length between 1~250cm with the button to confirm. - History
All your saved step records will be listed here, you can save up to 7 records. If the historical record is full, it will cover the previous one. - Clear History
You can choose to clear one of the 7 history records you want or clear all history records.
Ebook
Find “Ebook” on the Home menu with the button![]() to access to its function.
to access to its function.
- While it’s on the text playing interface, press button 44 / to turn the pages. Press the button to play automatically, press again to stop. • Submenu. While it’s on text playing interface, hold down button to enter its submenu and set your preference, including Playsetting Brightness, Page color, Delete ebook, Bookmark select, Delete bookmark, Add bookmark, Select page, Local folder and Card folder (Only available when TF card inserted).
Pictures
Find “Pictures” on the Home menu, and click the button ![]() to access to its function. Click MI to view pictures, click
to access to its function. Click MI to view pictures, click ![]() /
/ ![]() to go to previous/next picture. When it’s on picture viewing interface, press the button M to access to its submenu, including: Brightness, Backlight timer, Slideshow settings, Delete picture, Update playlist. You can set it according to your preference.
to go to previous/next picture. When it’s on picture viewing interface, press the button M to access to its submenu, including: Brightness, Backlight timer, Slideshow settings, Delete picture, Update playlist. You can set it according to your preference.
Trouble Shooting
a. How to re-choose the language? Find this icon C) in the main interface, and click the button ![]() to access to its menu, scroll down to the last menu(the menu at the button is “Factory settings” in English). Click button
to access to its menu, scroll down to the last menu(the menu at the button is “Factory settings” in English). Click button ![]() to enter and choose the first(upper) option which means “Yes”. Click the button
to enter and choose the first(upper) option which means “Yes”. Click the button ![]() again to confirm and restore to factory settings. The player will power on automatically and then you can choose language again.
again to confirm and restore to factory settings. The player will power on automatically and then you can choose language again.
b. Can’t turn on the player; the screen of player goes blank/black; the player is crashed or has a firmware bug.
1) Power off the player and try again.
2) Slide the power switch to the “Left” side to turn off the player, then hold the play button for 10 seconds to reset the player.
3) Update the firmware. Please visit http://www.agptek.com/support/down load. htm Vor www.agptek.com/blog to download the firmware and update. c. Disk error. If the screen says “Disk error”, please format the player. Find it in”settings”>”Format device”. d. Songs can’t be recognized by the player. Please check if the song is in a wrong format or has been encrypted, or the song format is not supported by this player. Find the supported audio format below: MP3: Bit rate: 8Kbps-320Kbps, Sampling rate:8MHz-48MHz; WMA: Bit rate:5Kbps-384Kbps, Sampling rate:8MHz-48MHz; APE: Bit rate:800Kbps-1000Kbps(FAST normal compressed), Sampling rate:8MHz-48MHz; WAV: Bit rate:32Kbps-384Kbps, Sampling rate:8MHz-48MHz; FLAG: Bit rate:1 000Kbps-1 200Kbps(LO—L8), Sampling rate:8MHz-48MHz. I
| Screen | 1 .8″ TFT screen | |
| Weight | 30g | |
| Dimension | 39 8*90mm | |
| Flash memory | 8G/16G | |
| Format | Audio | MP3/WAV/APE/WMA/FLAC/etc. |
| Lyric | LRC | |
| Video | AMY/AVM 28*160 converted to video) | |
| Recording | MP3/WAV | |
| EBook | TXT | |
| Picture | JPG/BMP | |
| Playing time | Music | 40H |
| Video | 9H | |
| F FM radio 14H | ||
| Recording | 40H | |
| Bluetooth | 10H | |
| Battery | 3.7V/420 mAh |
| Charging time | 2 hours |
| TF card expansion | Up to 1 28G |
| Recording distance | 3 meters |
| Bluetooth range | 10m in open space |
Manufacturer: Shenzhen RuiZu Digital Technology Co., Ltd.
Address: 6/F, Building D, KeShangMei Park, Chongqing Road, Fuyong,
Baoan District, Shenzhen, China
Email: [email protected].
For a detailed user manual, please visit:
http://www.agptek.com/support/download.html.


