![]() iV Product Series Decentralised ventilation Devices
iV Product Series Decentralised ventilation Devices
Instructions
iV Product Series Decentralised ventilation Devices
![]() Decentralised ventilation devices
Decentralised ventilation devices
with heat recovery www.inventer.de
Trademarks, copyrights and property rights inVENTer® , Xenion® , inVENTron® and Inventin are registered trademarks of inVENTer GmbH.
The copyright to this document remains with the manufacturer.
Rights to all content and images: © inVENTer GmbH 2022.
All trademarks used in this document are the property of their respective manufacturers and are hereby acknowledged.
Disclaimer
This documentation represents the original dismantling instructions. Once installation is complete, information regarding access to the dismantling instructions must be passed on to the user (tenant, owner, property management company, etc.).
The content of this documentation has been checked for compliance with the described components. Nevertheless deviations may still
occur, therefore no guarantee of compliance can be provided.
This documentation describes the functionality of the standard scope.
The documentation does not purport to cover all details on all types of the product and cannot cover every conceivable scenario for dismantling.
The illustrations in this documentation may differ slightly from the design of the product that you have installed. The same functions and the individual steps of the dismantling process will remain the same, despite any difference in their details.
This documentation is updated regularly. Necessary corrections and appropriate supplements are always included in subsequent editions. You can also find the latest version at www.inventer.eu/downloads.
Company information
Publisher:
| inVENTer GmbH | Phone: +49 (0) 36427 211-0 |
| Ortsstraße 4a | Fax: +49 (0) 36427 211-113 |
| 07751 Löberschütz | E-mail: [email protected] |
| Germany | Web: www.inventer.de |
CEO: Annett Wettig
VAT ID number: DE 815494982
Jena District Court HRB 510380
User and safety instructions
This document provides you with a summary of the key safety precautions that need to be taken when dismantling the product at the end of its service life.
User information
Safety and warning instructions
The safety and warning instructions in this documentation have a uniform structure and are marked with a symbol on the left side of the instruction.
A signal word in front of the text also indicates the hazard level. If several hazard levels exist, the highest level safety instruction is always used.
The safety and warning instructions contain the following information: SIGNAL WORD: Type and origin of the danger. Possible consequences of the danger!
- Measures to avoid the danger.
The signal word indicates the severity of the potential danger unless the preventive measures are taken:![]() DANGER means: There is an immediate threat of serious physical harm, even death.
DANGER means: There is an immediate threat of serious physical harm, even death.![]() CAUTION means: Direct danger of minor/significant injury.
CAUTION means: Direct danger of minor/significant injury.
If you see these signs, ensure you observe the described measures to prevent possible hazards and/or damage.
Other symbols used in this documentation
In addition to the safety instructions, the following symbols are used:
► Action required: Prompts the user to perform a specific action.![]() Check the results: Prompts the user to check the results of the action performed.
Check the results: Prompts the user to check the results of the action performed.
Safety instructions
The dismantling instructions are part of your ventilation device from the following product series:
| • iV-Smart+, | • iV-Compact, | • iV-Twin+, | • iV-Office. |
| • iV-Light, | • iV14-Zero, | • iV14-Max Air, |
These must always be available (see www.inventer.de/downloads). When handing the system to a third party, the information regarding access to the dismantling instructions must be handed over as well.
Before performing any work on the device/system, read the dismantling instructions carefully and observe all notices that refer to the dismantling process in this section.
Also note the safety instructions that precede the described handling instructions.
Non-observance of safety instructions could result in injury and/or property damage.
 DANGER: The system’s electrical and electronic components may only be disconnected by qualified electricians.
 CAUTION: The system may only be dismantled by qualified personnel.
Dismantling system components
The decentralised inVENTer ventilation devices with heat recovery can be recycled thanks to their low-pollution manufacturing process. They contain valuable materials that can be recovered.
The separation of waste materials into different varieties facilitates recovery of the recyclable materials. Contact a disposal company to arrange environmentally friendly recycling and disposal of your old system. They will dispose of the product in compliance with the applicable national regulations.
At the end of its life cycle, the installed ventilation device must be dismantled to ensure that it is disposed of correctly. The disassembly necessary for disposal is carried out in reverse order of assembly.![]() NOTE: This documentation does not contain the breakdown of PCBs, motors or electrical or electronic components. In this case, if necessary, contact [email protected] or your inVENTer contact.
NOTE: This documentation does not contain the breakdown of PCBs, motors or electrical or electronic components. In this case, if necessary, contact [email protected] or your inVENTer contact.![]() CAUTION: ROtating components on the ventilation device and/or live components can cause physical injury!
CAUTION: ROtating components on the ventilation device and/or live components can cause physical injury!
- Only work on components of the ventilation system when the mains voltage is disconnected.
The following tools are required for dismantling the system. They are allocated to each stage of the assembly process below in brackets.
| A: Flat-head screwdriver (small) | |
| B: Cordless screwdriver / screwdriver (Phillips/Torx) | |
| C: Cutter | |
| D: Hex key | |
| E: Angle grinder |
2.1 Remove the exterior closure
Weather protection hood
► Remove the cover from the base plate:
Flex (all variants) / Nova / 09:
– Push the cover upwards and remove it. Smart/Compact/Compact XL:
– Loosen the screws on the sides (B)
– Pull the cover towards you to remove it.
► Separate out the sound protection mat from the cover (C).
► Unscrew the base plate from the façade (B).
► Remove the base plate from the wall sleeve.
► Remove the sealing tapes (C).
► Remove the end-stop tape from the wall sleeve (C).
Weather protection grille
► Loosen the screws (B).
► Remove the weather protection grille from the wall sleeve.
► Unfasten and remove the screws and fastening hooks.
► Remove the sealing tapes (C).
► Remove the end-stop tape from the wall sleeve (C).
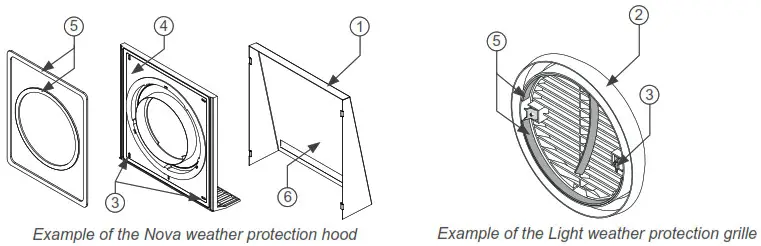
| Item | Component | Material |
| 1 | Flex / Nova / 09 / Smart / Compact / Compact XL weather protection hood cover | Powder-coated stainless steel Powder-coated aluminium |
| 2 | Light weather protection grille | ASA |
| 3 | Screws, washers, fastening hooks | Stainless steel / steel |
| 4 | Smart / Compact / Compact XL weather protec- tion hood base plate | Powder-coated stainless steel |
| Flex / Flex-Zero / Flex Twin+ / Flex Office / Nova / 09 weather protection hood base plate | ASA | |
| 5 | Sealing tapes | PUR foam |
| 6 | Cover sound protection mat | EPDM |
| Wall sleeve end-stop tape | PE foam |
Corner exterior closure
► Unscrew the reveal grille (B).
► Expose the Corner flat duct.
► Remove the flat duct from the exterior wall (B).
► Unscrew the sliding sleeve (B).
► Remove the sealing tapes (C).
► Remove the end-stop tape from the wall sleeve (C).
Nordic exterior closure
► Unscrew the exterior grille (B).
► Expose the Nordic exterior closure.
► Remove the exterior closure from the exterior wall.
► Unscrew the sliding sleeve (B).
► Remove the sealing tapes (C).
► Remove the end-stop tape from the wall sleeve (C).
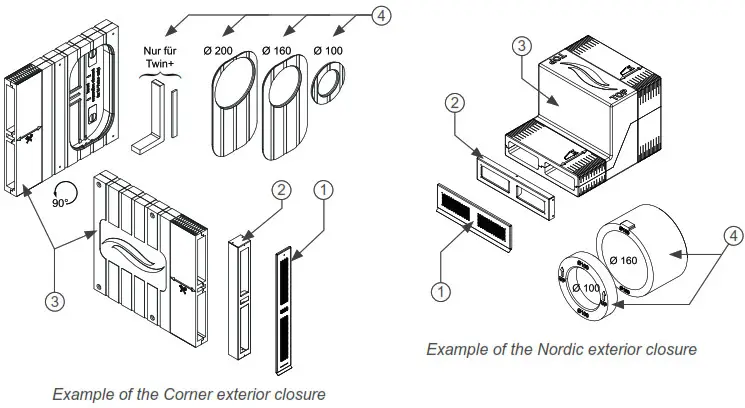
| Item | Component | Material |
| 1 | Corner reveal grille | Powder-coated stainless steel Powder-coated aluminium |
| Nordic external grille | Powder-coated aluminium | |
| 2 | Sliding sleeve | Stainless steel |
| 3 | Corner flat duct | EPS |
| Nordic façade closure | ||
| 4 | Adapter for various wall sleeves | EPS |
| Sealing tapes | PUR foam | |
| Wall sleeve end-stop tape | PE foam |
Sylt exterior closure
► Expose the exterior closure.
► Release the wall brackets (B).
► Remove the hood attachment, hood pipe and R-D160 branch from the wall sleeve (B).
► Remove the end-stop tape from the wall sleeve (C).
Top exterior closure
► Expose the exterior closure.
► Remove the hood attachment, riser incl. couplers and rain cuff, as well as the R-D160 branch from the wall sleeve.
► Pull the branch off the riser.
► Remove the sealing tape from the branch (C).
► Separate the hood attachment and riser (E).
► Remove the EPS from the riser (C).
► Remove the end-stop tape from the wall sleeve (C).
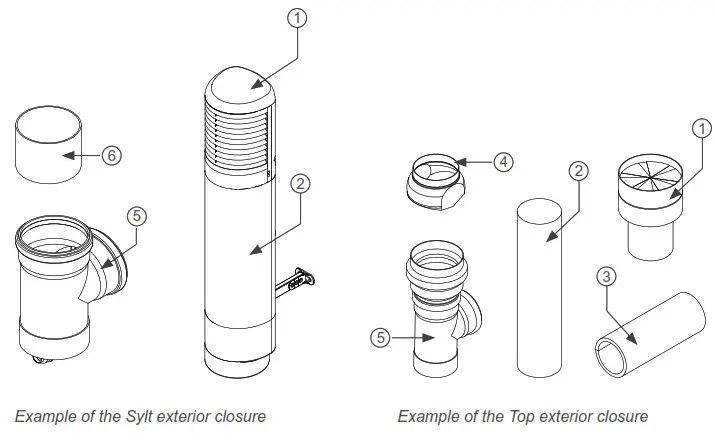
| Item | Component | Material |
| 1 | Hood attachment | PP |
| 2 | Top riser pipe / Sylt hood pipe / wall bracket | PP |
| 3 | EPS insert | EPS |
| 4 | Rain cuff | PP |
| 5 | R-D160 branch | PVC |
| 6 | Connecting piece | PPs |
| 7 | Wall sleeve sealing tapes / end-stop tape | PE foam |
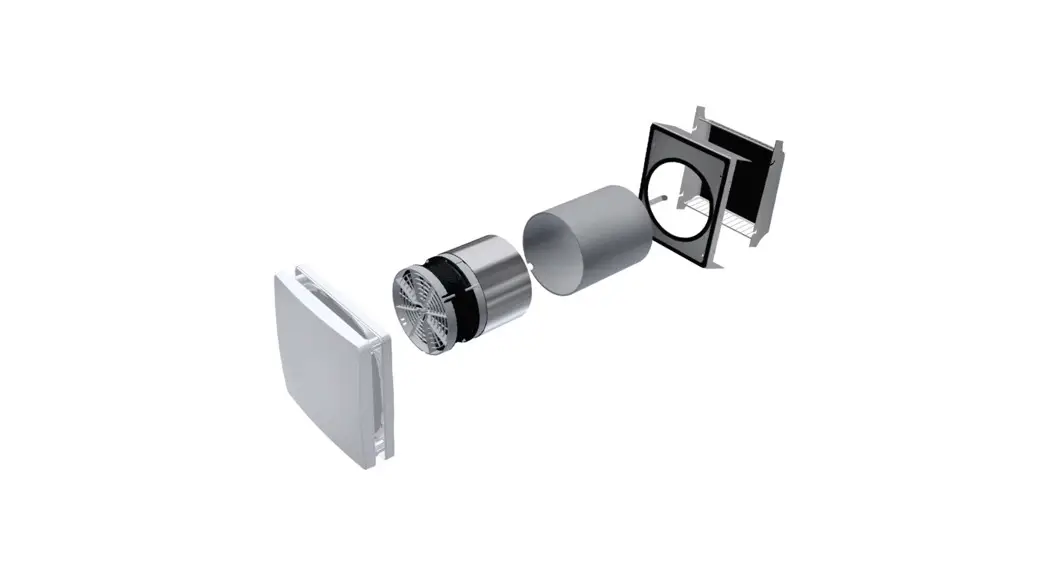
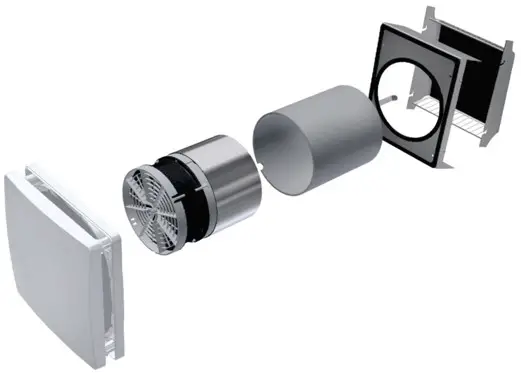
Remove the inner cover
► Remove the inner cover panel.
► If present: Separate out the sound insulation insert from the inner cover panel (C).
► Remove the filter from the base plate.
► Separate the filter frame from the filter material (C) if required.
► Unscrew the base plate from the interior wall (B / D).
► Pull the sealing strips off the base plate (C).
► Disconnect the spacers from the base plate.
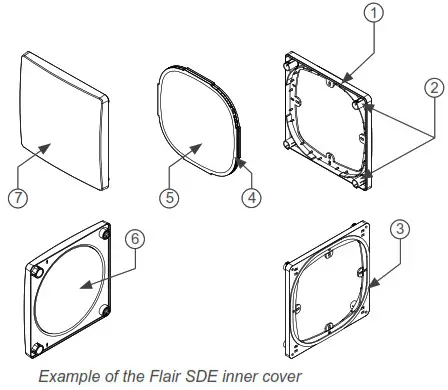
| Item | Product | Material |
| 1 | Inner cover base plate adapter (iV-Office) / inner cover base plate inserts (iV14-Zero) | PS |
| 2 | Inner cover spacer | POM |
| 3 | Base plate sealing tape | PES foam |
| 4 | Filter frame | TPU |
|
5 | ISO coarse 45 % (G3) dust filter material | ELS stick-shaped permanent filter |
| ISO coarse 60 % (G4) dust filter material | PES | |
| Pollen filter material | PES | |
| Activated carbon filter material | PES fleece with activated carbon | |
| 6 | Sound insulation inlay | Melamine resin foam |
| 7 | Inner cover panel / retaining plate, incl. inserts if present (e.g. iV-Twin+) | PS |
Remove the insert
► Disconnect the plug connection. Remove the plug and socket from the wires (A).
► Remove the fan device from the wall sleeve.
► Release the guiding vanes from both sides of the reversible fan.
► If present: Remove the filter from the guiding vane (iV-Twin+).
► Disconnect the sheathing on the reversible fan (C).
► Pull the thermal accumulator out of the wall sleeve.
► Remove the retaining handle from the thermal accumulator.
► Separate the insulation from the thermal accumulator (C).
► If present: Remove the air flow separator from the wall sleeve (iV-Twin+).
► If present: Remove the sound insulation insert from the wall sleeve.
► Remove the wall sleeve from the wall.
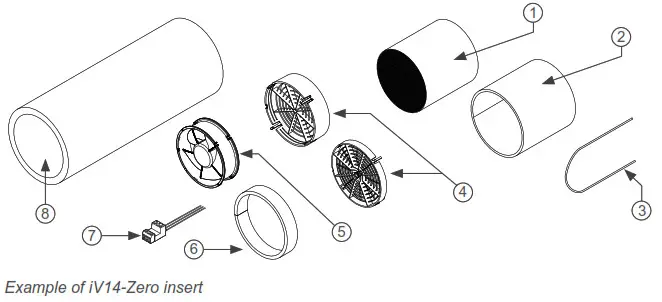
| Item | Product | Material |
| 1 | Ceramic thermal accumulator | Clay porcelain |
| 2 | Ceramic thermal accumulator insulation | PUR ether |
| 3 | Retaining handle | Steel cord with PVC sheathing |
| 4 | Slim / Standard / R-D200 / iV-Twin+ fan device guiding vane | PC |
| 5 | Reversible fan | Electronic components, PBTP/PA | PBT/GF |
| 6 | Reversible fan sheathing | PUR ether |
| 7 | Plug connections, connecting terminals | PA / PC |
| 8 | Sound insulation lining (iV14-Zero, iV-Office) | Inventin (melamine resin-based polymer) |
| Separating element (iV-Twin+) | PP-s / EPDM | |
| Connecting cable (iV-Twin+) | Copper with plastic sheathing | |
| Wall sleeve | PP |
![]() inVENTer GmbH
inVENTer GmbH
Ortsstraße 4a
07751 Löberschütz
Germany
www.inventer.de
Subject to modifications.
We accept no liability for printing errors.
Item number: 5001-0055
Version: 1.0 – 11/2022