![]() Technical data sheet and installation and operation manual
Technical data sheet and installation and operation manual
rzx smart thermostat
User Manual
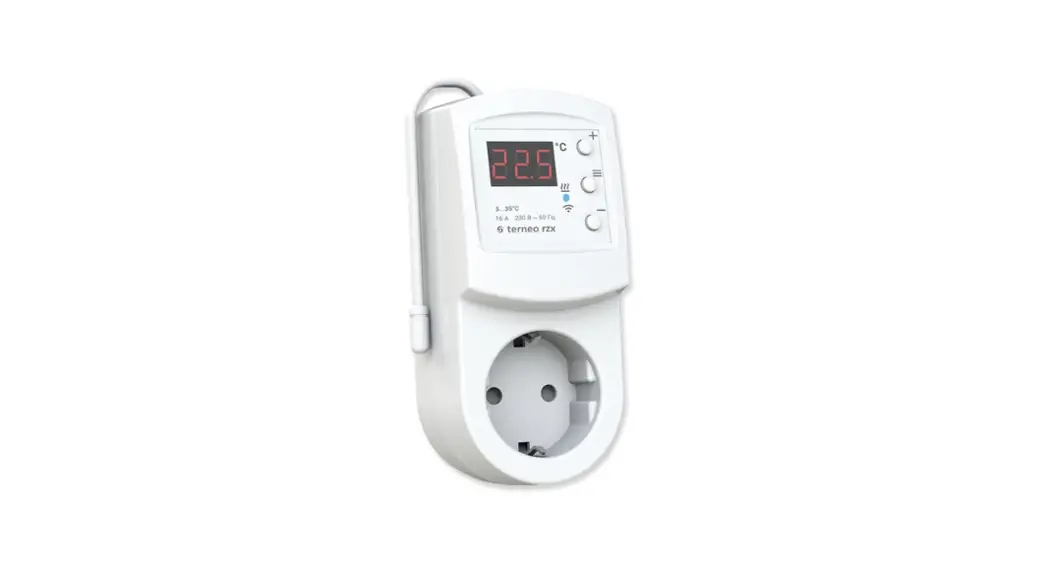
rzx Smart Thermostat
Smart thermostat terneo rzx is designed to control heating systems based on infrared panels, electric convectors and other electric heaters through the terneo mobile application, my.terneo web page or voice by using Yandex Alice.
Scan to download the free terneo app

According to data from temperature sensor, the thermostat turns off the heating when the desired temperature is reached and turns on when it decreases at the hysteresis value.
IN THE BOX
| Thermostat | 1 piece |
| Technical data sheet and installation and operation manual and warranty card | 1 piece |
| The packing box | 1 piece |
Scan to see all the benefits of Smart thermostat terneo bx and download the terneo app features brochure from the web-page.
IMPORTANT. Before the installation and operation of the device, please read by the end of this document. This will help to avoid possible danger, mistakes and misunderstandings.
IN CASE OF NO VOLTAGE, all thermostat and heating schedule settings are kept in the non-volatile thermostat storage, and the clock will continue to operate fed from the internal power source for three days.
TECHNICAL DATA
| Adjustment range | 5…35 °C |
| Maximum load current | 16 A |
| Rated load capacity | 3 000 VA |
| Input voltage | 230 V ±10 |
| Weight in the complete set | 0,2 kg ±10 % |
| Temperature sensor | NTC thermo-resistor 10K OM at 25 °C (R10) |
| The length of the sensor connected cable | 0,1 m |
| Number combinations under heat, at least | 50 000 cycles |
| Number of combinations without heating, no less than | 20 000 000 cycles |
| Temperature hysteresis | 0,5…10 °C, step 0,1 *C |
| Wireless Networking Standard | 802.11 b/g/n |
| Minimum recommended speed of Internet connection | 128 kb / s |
| Operating frequency range | 2400-2483,5 MHz |
| Minimal Internet traffic | 20-30 MB / ms. |
| Wi-Fi power output | +20 dBm |
| Overall dimensions | 58 x 124 x 87 mm |
| Available languages on the app | ru, ua, en, rom, cs, pl, de |
WIRING
The terneo rzx thermostat is plugged into a standard socket with grounding 230 V ~ 50 Hz, which should be rated at a current of at least 16 A. The socket should ensure reliable contact with the thermostat plug.
To enable the thermostat you should:
- plug the thermostat into the socket;
- plug the load to the socket of the thermostat.
It is necessary for the thermostat to switch the current to no more than 2/3 of the maximum current specified in the passport.

INSTALLATION
The thermostat is designed for indoor installation. The risk of moisture and liquid appearance on the installation site should be minimal.
To protect against short circuit and exceeding power in the load circuit, it is necessary to install a circuit breaker (CB) with a rate of not more than 16 A before the thermostat in the phase wire break in the switchboard.
To prevent the oxidation of the socket contacts, which can lead to damage of the device, the use of a thermostat inside the greenhouse is prohibited.
To protect a person from electric shock, an RCD (residualcurrent device) is installed in the switchboard.
Wires cross-section of the wiring to which the device is connected must correspond to the value of the electric current consumed by the load.
RESISTANCE OF EXTERNAL TEMPERATURE SENSOR at different ambient temperatures
| 5 °С | 25339 Ω |
| 10 °С | 19872 Ω |
| 20 °С | 12488 Ω |
| 30 °С | 8059 Ω |
| 40 °С | 5330 Ω |
SMART REMOTE CONTROL FEATURES
- WLAN control from a mobile app;
- weekly schedule;
- energy consumption graphs in kWh and monetary terms;
- Nobody is home and Preheat functions (self-learning);
- single control over a group of thermostats;
- granting access to other family members;
- voice control via Google Assistant.
Smart functions allow you to save up to 50% by maintaining a comfortable floor temperature when you need it only.
CONNECTING TO THE «CLOUD» FOR CONTROL FEATURES
If to say in brief, the «cloud» is intended for the safe keeping of the data in the net Internet, comfortable and safe long-distance connection and operation.
Internet connection available the thermo stat constantly synchronizes with the cloud, performs its commands, receives the latest settings and sends the telemetry about its status. If you block the remote control of the thermostat, the «cloud» can only be used to accumulate statistical data (see details in Table 1). For the statistics and heating schedule to operate correctly, after connecting to the «cloud», specify your time zone.
Further, the thermostat will independently update the date and time online.
In the absence of the Internet, the thermostat will continue its operation according to the latest settings. In addition, you can control the thermostat via the thermostat buttons or offline mode in the terneo app.
Please note that instead of landline connection modes, you can use mobile data. To do this, you need a separate device (for example, a smartphone) with a WLAN Hotspot to share.
When restoring the Wi-Fi connection of the thermo stat with the cloud, all settings are synchronized.
Not recommended to use in networks with Multi WAN technology.
![]() If previously you connected the thermostat to your Wi-Fi network or want to use these settings, choose «Clı» Client mode (Таble 1).
If previously you connected the thermostat to your Wi-Fi network or want to use these settings, choose «Clı» Client mode (Таble 1).
WARRANTY TERMS
The warranty for terneo devices is valid for 36 months from the date of sale, provided that the instructions are followed. The warranty period for products without a warranty certificate is counted from the date of production.
If your device is not working properly, we recommend that you first read the section «Possible problems». If you cannot find an answer, contact Service Center. In most cases, these actions resolve all issues.
If you continue to have issues with the device, please send it to a Service Center or to the store where you purchased the device. If your device is defective due to our fault, we will repair or replace it under warranty within 14 business days.
Please see the full text of the warranty and the data you need to send to your Service Center on the website https://ds-electronics.com.ua/en/support/warranty/. If you have a warranty case, please, contact the General distributor in your area.
Setup and terneo Account for Android
- Download the free app «terneo» on Google Play and launch it.
- Register or log in with the help of your Facebook account, Apple ID or Google accoun.
- Turn the thermostat to the mode «AP» — Access Point mode. Upon the first switching on of the thermostat will stay in the Access Point mode during approximately 10
minutes If during this period of time there is no connection to the thermostatic regulator, there will automatic return to the Client mode «Clı».
In order to pass to Access Point « AP »:
• regime button « ≡ » before emergence of theinscription «APC»; 
• using «+» «–» or replace «Clı» value with «AP». 
When connecting to the thermostat in the Access Point mode, on the screen there will be a message like «con» (conneсtion) every 5 second. - In the application press «+», further press «Device» or « ≡ », further «Add th», further «Device».
- Select the Wi-Fi network created by the thermostat (for example, terneo x_ rz 27001 А ).
- Enter the name and password from your Wi-Fi.
The WLAN connection does not have to be 5G.
The app will show you how to connect your thermostat. In the presence of the internet, the thermostat will be added to the main application screen and registered in the «cloud».
Setup and terneo Account for IOS
- Download the free app «terneo» on Google Play and launch it.
- Register or log in with the help of your Facebook account, Apple ID or Google accoun.
- Turn the thermostat to the mode — « AP » Access Point mode. Upon the first switching on of the thermostat will stay in the Access Point mode during approximately 10 minutes. If during this period of time there is no connection to the thermostatic regulator, there will automatic return to the Client mode « Clı».
In order to pass to Access Point « AP »:• regime button « ≡ » before emergence of theinscription «APC»; • using «+» «–» or replace «Clı» value with «AP». When connecting to the thermostat in the Access Point mode, on the screen there will be a message like «con» (conneсtion) every 5 second. - In the application press «+», further press «Device» or « ≡ », further «Add th», further «Device».
- Select the Wi-Fi network created by the thermostat, press «Further». The WLAN connection does not have to be 5G.
- Go to WLAN settings on your iPhone Connect to Wi-Fi. network, created by the thermostatic regulator (for example, terneo x_ rz 27001
A). If a password is required for the connection, enter DSEXXXXXX, where XXXXXX is the last six symbols in the name of network (for example: DSE 27001 А).
Then return to the app. The app will show to connect your thermostat.
In the presence of the internet, the thermostat will be added to the main application screen and registeredin the «cloud».
Setup and terneo Account trough web page my.terneo.ua
- Turn the thermostat to the mode — « AP » Access Point mode. Upon the first switching on of the thermostat will stay in the Access Point mode during approximately 10 minutes. If during this period of time there is no connectionto the thermostatic regulator, there will automatic return to the Client mode «Clı».
In order to pass to Access Point « AP »:• regime button « ≡ » before emergence of theinscription «APC»; • using «+» «–» or replace «Clı» value with «AP». When connecting to the thermostat in the Access Point mode, on the screen there will be a message like «con» (conneсtion) every 5 second. - Go to WLAN settings.
On the desktop connect to WiFi network, created by the thermostat (for example, terneo b 27001 x_
А). If a password is required for the connection, center SEXXX XXX, where XXX XXX is the last 6 symbols in the name of network D (for example:
DSE 27001 The Android operating system may prompt А). you to confirm the connection to a WLAN network that does not have access to the Internet. To continue the connection, click « Do not disconnect». - In the address bar of the browser, type 192.168.0.1
- On the thermostat page, select your Wi-Fi network and enter its password.
Click the «Connect» button . - The thermostat during one minute will generate the connection to your Wi-Fi net. The successful connection to the WLAN network will be indicated by the constant glow of the blue indicator of the thermostat.
- After the successful connection the screen of the thermostat will display PIN-code, necessary for the connection to «cloud» ( three-digit number without any additional characters).
- Go to WLAN settings on your phone and make sure you are already connected to your home WLAN network.
- In the address bar of the browser, enter my.terneo.
- Register or log in with the help of your Facebook account, Apple ID or Google accoun.
- On the desktop app click «+ Add» – «Device» and enter a name (for example, «Bedroom») and a pin-code, which is displayed* on the thermostat screen. Press « Next » and device will be added.
| * f there is no PIN-code on the thermo screen, read the chapter «PIN-code for registration in the cloud or local IP» table 1. | |
| If the thermostat displays «iP» instead of a PIN code, this indicates no connection with the « cloud ». |
If the thermostat screen does not display «Pin » or « i P» the WLAN connection is failed.
TO CHANGE THE PASSWORD OF YOUR WI-FI NETWORK, follow the first six points of the section «Connecting through web page my.terneo».
STATUS OF THE BLUE INDICATOR on the thermostat indicates the WLAN mode and connection with the « cloud »
| lights | there is a connection with the cloud | |
| does not light | no Wi-Fi connection or Wi-Fi off | |
| flashing 2 times / s | mode Access Point (AP) | |
| flashing 1 time / 3 s | the mode Client is a Wi-Fi, but there is no connection to the cloud |
After switching on the thermostat will start to display the sensor temperature. If it is below the current set temperature, voltage is applied to the load. The indicator starts to glow red.
Use «+» «–» or to change the heating temperature. The screen will first display the operating mode, then the set temperature of this mode.
For viewing of necessary section of the menu press certain number of times button « ≡ ». For the selection and change use buttons «+» «–» and.
5 seconds after the last push of the buttons, there is a return to the temperature display.
Button blocking (child and public protection)
![]() In order to enable (disable) button blocking press the «+» «–» and buttons at the same time for 6 sec till up to appearance in indicator « Loc » or running line (« unLoc »).
In order to enable (disable) button blocking press the «+» «–» and buttons at the same time for 6 sec till up to appearance in indicator « Loc » or running line (« unLoc »).
Reduce to factory reset![]() For reset of all settings to factory (besides Wi-Fi settings) press button «–» during 30 second. before emergence on the screen of the inscription «dEF».
For reset of all settings to factory (besides Wi-Fi settings) press button «–» during 30 second. before emergence on the screen of the inscription «dEF».
After release of the button thermostat will reload.
Viewing of firmware version (current firmware version 4F2. )![]() Holding button «–» during 12 seconds will display on the screen the version of insertion.
Holding button «–» during 12 seconds will display on the screen the version of insertion.
After release of button, thermostat will return to the normal mode.
If the firmware version of thermostat does not meet the version mentioned in the manual, download from website Operation Manual for the required version. The website address can be found in the instructions in the Contacts section.
Our company reserves the right to make changes to its firmware, cloud interface and applications for iOS and Android for improving the energy efficiency of the device
and for optimizing its operation.
Enabling sleep mode
| Hold the « ≡ » button for 4 seconds (3 dashes will appear on the display one by one) before appearing on the display «oFF». For a complete shutdown, the circuit breaker should be turned off. | |
| To disable sleep mode, also hold down the middle button for 4 seconds until « on » pops up on the screen. |
Table 1. FUNCTION MENU
| Menu section | Press « ≡ » button | Screen | Notes |
| Robot mode (factory setting « hnd » — Hand mode). The controller has 4 operating modes. One of two modes can be set from the thermostat buttons only: « hnd » — Hand mode or « Sch » — Schedule mode. | 1 time | Adjustable via the app If the. Preheat feature is enabled on the app, the screen will display «Prh». If to change the temperature of the setting in the mode Schedule to the timetable, the thermostat will support it until the end of the current period. The outcome from the temporary mode under: the return of the setting back, the shutdown of the supply, turning on of the period of the leaving. | |
| Installed load capacity (factory setting 2.0, a range of change 0, 1…25,0 к , 0W the step length depends on power capacities) | 2 times | Adjustable via the app or controller buttons. For proper operation of energy consumption statistics, it is required to insert installed load capacity. | |
| Floor temperature correction (factory setting 0, a range of change ±9,9 °С, step 0,1 °С) | 3 times | Adjustable via the app or controller buttons. If necessary, it is possible to make correction to the floor temperature at Indicator of the thermostat. | |
| The brightness in the mode of waiting (factory setting a range of change 6, 0…9) | 4 times | With 0 in the screen only points will be displayed: left — indicator of the presence of the tension of the power supply; middle — is reflected state of loading; right — is reflected state of Wi-Fi net. | |
| PIN-code or local IP (the section is available when connected thermostat to a Wi-Fi network) | when connection to a Wi-Fi network 5 times | When Wi-Fi is turned off, the item is unavailable. When connected to the cloud, it outputs a PIN-code for registration. When you connect to Wi-Fi, but the lack of communication with the cloud will output your local IP address. | |
| Operating mode Wi-Fi ( factory setting « Cli »— Client mode) | when connection to a Wi-Fi network 6 times otherwise 5 times | ||
| Remote management blocking by thermostat (factory setting «LАn» — blocking of changes through local area network) | when connection to a Wi-Fi 7 network times otherwise 6 times. |
POSSIBLE PROBLEMS, CAUSES AND WAYS TO OVERCOME THEM
The thermostat does not display the PIN code. The blue indicator on the controller is constantly on
It is necessary to: go to the «Pin» section on the thermostat (T ).
You will see a PIN code (a three-digit number with no additional characters) see able 1.
Connection failed via Android or iOS apps, the indicator is blue
The thermostat is connected to the «cloud», but the account is not accessed.
It is necessary to: follow steps 8-10 to connect via the my.terneo desktop application.
The load does not operte according to the settings, every 5 seconds the screen displays «OC» «SC» or
| «OC» — open of circuit of the sensor | |
| «SC» — short circuit of the sensor |
The temperature controller has switched to the
Emergency Timer Mode.
Possible cause: Failed connection, damage to the sensocircuit, or temperature out of range (see Specifications).
What should be done: check the junction of the temperature sensor with the thermostat and its circuit, check for mechanical damages along the entire length othe connecting wire and no power wiring that passes close.
Operation in the Emergency Timer Mode: the mode will ensure the operation of the underfloor heating in case ofdamage to the sensor: t he user selects the time of the work of the applied force, the rest time in the 30 –minutes cyclic interval the applied force will be switchedoff. The time of the work of the applied force can be installed in the range oFF, 1…29 minutes, on. For the purpose that applied force will work constantly elect «on» «oFF», for the purpose to switch off it completely select.
Neither indicator nor display light up upon thermostat switch-on
Possible reason: no power supply voltage.
Required: check availability of power supply voltage using a voltmeter. If power supply voltage is available then contact the Service center please.
The thermostat does not respond to changing settings on the app
Possible reason: switched on blocking of changes from «cloud».
Required: go to the thermostat menu section «blc» and change its status to «oFF» see able 1 Remote (T, « management blocking by thermostat »).
The load is disabled, oht flashes on the screen « »oht
The temperature inside the housing exceeded 80°C and triggered protection against internal overheating.![]() Every 1 sec the screen displays «oht».
Every 1 sec the screen displays «oht».
Possible cause: internal overheating of the thermostat.
It can occur if the outlet supplying the device or the load plug is not rated for the required power, the ambient temperature is high or the switching load power is exceeded.
It is necessary to: to make sure that the power of the socket supplying the device, or the load plug are rated for the required power and the load power does not exceed the permissible one.
Feature of protection against internal overheating: the device will be unlocked in case if the temperature inside will decrease to 5°C.
If the protection trips more than 5 times within 24 hours, thermostat 7 the is blocked until the temperature inside the case drops to °C and one of the buttons is pressed 49 or after 30 minutes without pressing any buttons. When overheated, pressing any button will display the current temperature of the thermal protection sensor.
Every 5 sec the screen displays «Ert»![]() Possible cause: open or short circuit of the internal overheating sensor. Control over inner overheating will not be done.
Possible cause: open or short circuit of the internal overheating sensor. Control over inner overheating will not be done.
It is necessary to: send the device to the Service Center.
Otherwise control over inner overheating will not be done.
When you press the buttons, it displays «Lbt »![]() Possible cause: discharge or damage to the internal power supply.
Possible cause: discharge or damage to the internal power supply.
It is necessary to: wait approximately 1-2 hours to charge the power supply or contact the service center. Otherwise, if there is no power in the network, the operation of the
clock will not continue.
For the connected controller, the LED has stopped glowing blue, the state of the controller on the application is offline
Possible cause:
- Internet connection unavailable or provider-side issues;
- change of the router, its settings or its damage; It is necessary to:
- make sure you have an available WLAN connection or Internet access;
- in case of changing the router settings, reconnect the thermostat via the terneo desktop app;
- until the issue is solved, you can change the temperature using the thermostat buttons or using the offline mode on the Android application.
Preliminary warming up out-of-service or incorrect operation
Possible cause:
- the function is disabled on the app Preliminary warming up;
- there are often sudden changes in temperature in the room or the power of the underfloor heating is not enough to reach the set temperature in less than 3 hours;
- the transition between heating / cooling modes is completed, and there is not enough time for self-learning;
- the floor temperature offset has been changed, and there is not enough time for self-learning.
It is necessary to: make sure that there are no frequent sudden changes in the room temperature or that the power of the underfloor heating is sufficient to reach the set temperature in less than 3 hours. For the preheat function to operate, make sure that this function is enabled on the app, the thermostat is in schedule mode and enough time has passed for self-learning.
Heating does not turn off, the set heating temperature remains not reached
Possible cause:
- insufficient power of the heating cable;
- lack or insufficient thermal insulation;
- the power is not enough for the operation of the underfloor heating in the specified mode.
It is necessary to: make sure a sufficient level of thermal insulation of the room is made and that the power of your power supply network is sufficient for the operation of the
underfloor heating. Otherwise, contact the service center.
Wrong password when connecting to the WLAN network created by the thermostat
It is necessary to: enter a password case-sensitive, language-sensitive, and number-of-character-sensitive DSEXXXXXX, where XXXXXX is the last six symbols in the name of network Wi-Fi, created by the thermostat and to which actual connection is being established ( for example: DSE 27001 А).
WE TAKE YOUR PRIVACY SERIOUSLY
We’re committed to being open and honest about how we use data. We’ll work hard to keep your data safe and we always ask for permission before sharing personally identifiable information.
To learn more about our Privacy Policy, go to https://my.terneo.ua/confidential/en.
ADDITIONAL INFORMATION
Do not fire and do not throw away the device with the household waste.
After the end of its service life, the product must be disposed of in accordance with applicable law.
Transportation of goods carried in the package, ensuring the safety of the product.
The devi e is transported by any kind of transport (rail, sea, motor, air transportation).
Date of manufacture is on the back side of device.
Application time is unlimited.
The device does not contain harmful substances.
If you have any questions or you something will not clear, call the Service centre the telephone number listed below.
SAFETY INSTRUCTIONS
Carefully read and become aware of yourself these instructions.
Before the installation (dismantling) and connection (disconnection) of the device, turn off voltage supply and also act according to the «Rules of an arrangement of electric installations».
Do not immerse the sensor with a connecting wire in the liquid medium.
Do not connect the device to the network disassembled.
Avoid hitting of water or moisture to the device.
Do not expose the device to extreme temperatures (higher than 40 ºС or below –5 °C) and high humidity.
Never clean the device with the use of chemicals such as benzene, solvents.
Do not store the device and do not use it in areas with the dust.
Do not attempt to disassemble and repair the device.
Do not exceed the landmarks value adaptor and power.
To protect against overvoltage caused by lightning discharges, use a lightning protector.
Protect the children from games with the working device, it is dangerous.
WARRANTY CARD
serial №:___________
date of sale:______________
a seller, a seal: place of a seal
an owner contact for a service center:____________
SERVICE CENTER CONTACT:
+38 (091) 481-91-81
WhatsApp Viber Telegram
[email protected]![]() vF24_220728
vF24_220728
Low Voltage Directive 2014/35/E U
EMC Directive 20 4/ 1 30 /EU
Manufacturer and vendor: DS ELECTRONICS, LTD![]() 04136, Ukraine, Kyiv region, Kyiv, 1-3 Pivnichno-Syretska str.
04136, Ukraine, Kyiv region, Kyiv, 1-3 Pivnichno-Syretska str.![]() +38 (091) 481-91-81, Service Center: +38 (091) 481-91-81
+38 (091) 481-91-81, Service Center: +38 (091) 481-91-81![]() [email protected] www.ds-electronics.com.ua/en/
[email protected] www.ds-electronics.com.ua/en/


