![Asi 0192-1-93 4 Inch [102] Turbo Swift Ada Compliant Hand Dryer Instruction Manual](https://static-data1.manualsee.com/1/img/133/2586645/2022/04/ASI-0192-1-93-4-Inch-Turbo-Swift-ADA-Compliant-Hand-Dryer-Featured-Image.png)
![]()

Model No.: 0192-1-93 110-120V 60HzTM
4″ [102] TURBO Swift
ADA COMPLIANT HAND DRYER

1903281349 Rev.
A 3 Apr 2019
PLEASE READ CAREFULLY THROUGH THIS MANUAL BEFORE USING THE PRODUCT, OBSERVING ALL SAFETY INFORMATION, CAUTIONS, AND WARNINGS.
SAFETY WARNINGS
Before installing, be sure to read this installation manual and retain it for future reference. This product must be installed by qualified personnel in accordance with the instructions are given in this manual and installation must comply with all applicable regulations, national security standards, and laws in force in the country where the product is installed. Turn off the power at the main switch before installing or servicing the dryer unit. The dryer must not be installed on a flammable surface. Do not damage any parts of the electrical connections. Pre-arrange an appropriate power outlet and a system of disconnection in accordance with current local regulations. Make sure the product is properly connected to the ground. If there is no grounding connection, there is a risk of an electrical shock. Do not install the dryer over a washbasin. If the power cord is damaged, it must be repaired by qualified personnel to avoid any type of risk. or mental abilities or lack of experience and knowledge, if they have been given supervision and appropriate training regarding the use of the dryer in a safe manner, can use it with no restriction. Children should not play with the apparatus. Cleaning and maintenance performed by the owner should not be done without the children having supervision. This dryer can be used by children aged 8 years and above. People with reduced physical, and sensory During use, temperatures above 158℉ [70℃] may develop in the parts near the hot air nozzle. Do not touch or cover the dryer during use or when finished using it.
GENERAL SAFETY INFORMATION
![]() WARNING This product is intended for installation by a qualified service person. Use AWG NO.12 solid conductor for wiring.
WARNING This product is intended for installation by a qualified service person. Use AWG NO.12 solid conductor for wiring.![]() DANGER Failure to properly ground the unit could result in service electrical shock and/or death.
DANGER Failure to properly ground the unit could result in service electrical shock and/or death.![]() WARNING Disconnect power at the service breaker before installing or servicing.
WARNING Disconnect power at the service breaker before installing or servicing.![]() WARNING All units must be supplied with a 3-wire service. The ground wire must be connected to the dryer’s backplate.
WARNING All units must be supplied with a 3-wire service. The ground wire must be connected to the dryer’s backplate.
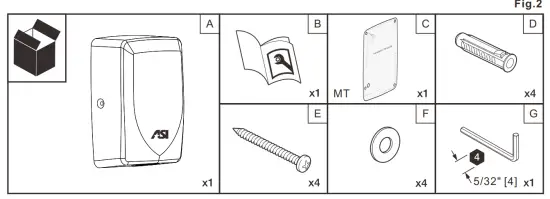
PACKING LIST
Fig.1
| ITEM KEY | PC’S | DESCRIPTION |
| A | 1 | Hand Dryer Unit Complete |
| B | 1 | Owner Manual (OM -This Booklet) |
| C | 1 | Mounting Template (MT) |
| D | 4 | Wall Anchors 5/16″ Dia.x 1-1/2″ [08×38] |
| E | 4 | Self-Threading PPHS No.10ABx 1-3/16″ [M5 x 36] |
| F | 4 | Flat Washer for No.10AB [M5] PPHS |
| G | 1 | Hex Key 5/32″ [4] |
SPECIFICATION
| ITEM CATEGORY | DESCRIPTION |
| Operating Voltage | 110-120 V, 60Hz, 1 kW |
| Output Warm Air Temp | 104°F [40°C] at ambient T=77°F [25°C], Distance from Nozzle=4″ [100] |
| Output Air Velocity | 328 ft/s [100 M/s], 224 MPH [360 km/h] |
| Output Air Flow | 82.4 CFM [140M3/H] |
| Drying Time | 10-12 seconds |
| Sensor Range | 2″-7-5/64″ [51-180], for sensing capability under optimum conditions Owner ADJUSTABLE |
| Motor Type | Brush Contacts, Dual Ball Bearings, 30 rpm, 600 W, 0.8 HP |
| Sound Pressure | 80 dB-A @1 M, 74 dB-A @ 2 M |
| Power Supply | Outlet Socket within 8″ [203] or concealed hardwire (see MT) all by others |
| Stand-by Power | Less Than 2.0 W |
| Timing Protection | Forced Hold-On 60 seconds auto shut-off |
| Timing Duration | Auto Shut-Off 5 3 sec after the last sensor read |
| Fuse Protection | Main PCB, 05×20, 250V, 12A |
| Heater Element | Nichrome wire, 20-80, 1/64″ Dia. [0 0,4], 24 0, coil on armature type |
| ITEM CATEGORY | DESCRIPTION |
| Protection Level | IP 23 |
| Electrical Isolation | Class 1 |
| Cover & Cabinet | Stainless Steel Type 304 |
| Finish on Cover | Satin |
| Net Weight | 5.5 lb [2.5 Kg] |
| Shipping Weight | 6.6 lb [3.0 Kg] |
| Unit Size | 6-27/32″ W x 10-1/16″ H x 3-31/32″ D [174 x 256 x 101] |
BEFORE INSTALLATION
Installation must be carried out in accordance with the current edition of the local wiring regulations code having jurisdiction. Installation should be performed only by a qualified electrician.
INSTALLATION
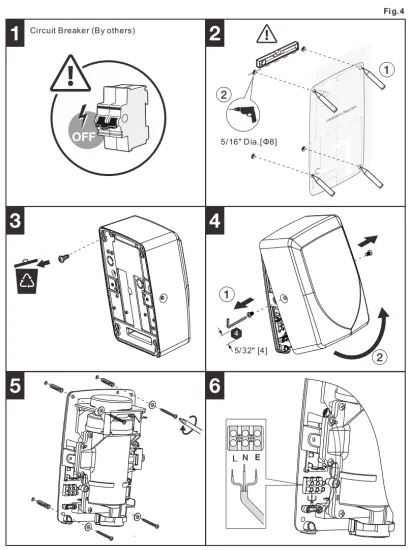
- Make sure the power supply breaker is switched off. Installation must adhere to the regulations of the current edition of the local wiring code having jurisdiction. Installation should be performed only by a qualified electrician.
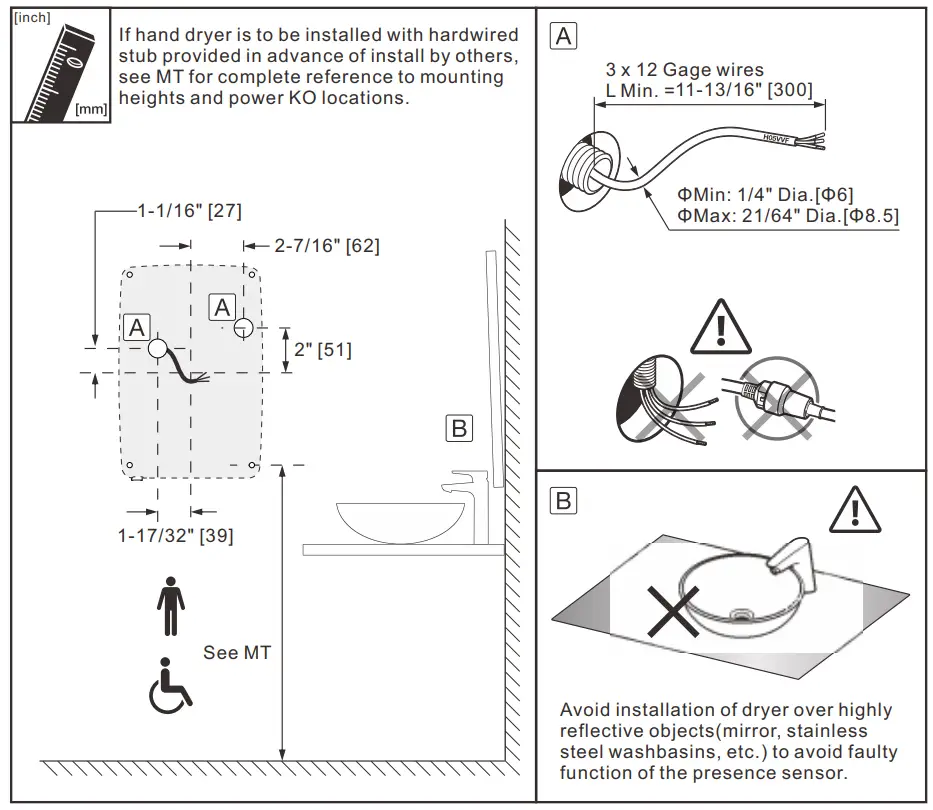
- Place the template against the wall at the desired height (see mounting height recommendations on MT) and mark the location of four (4) mounting holes and wire service entry at the knockout (KO) location if the unit is to be hardwired. Ensure the holes are level and the pattern is square.
NOTE: For two (2) or more dryers placed adjacently, units should be no closer than 24″ [610] on centers. - Remove and properly discard transport safety screw on the rear of dryer chassis.
- Remove and retain two (2) screws with hex socket on cover sides with the hex key provided. Remove cover and retain in a safe place to avoid damage during the next steps of installation.
- Install the dryer chassis on the wall (see OM, pg 6, Fig 4, Step 5):
a. Insert the wall anchors provided so the heads are flush with the wall surface
b. Use the screws and washers provided to attach the chassis and snug it up securely. - If the unit is to be hard-wired (see OM, pg 4, Fig 3, Step A) to verify the correct location, gage, and length of cable has been provided prior to installation of the dryer. If correct, proceed to prepare stub cable to attach to terminal block through KO in chassis and under strain relief clamp. See OM pg 6, Fig 4, Step 6 for illustration. Tighten terminal block screws securely.
a. Connect live wire (color maybe Brown, Red, or Black) to terminal block at mark “L”
b. Connect neutral wire (color may be Blue or Black) to terminal block at mark “N”
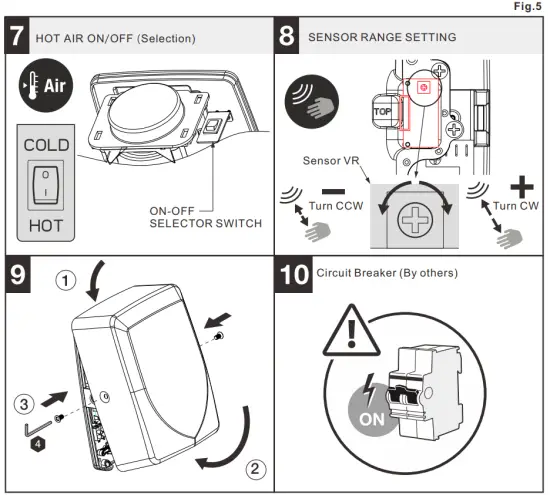
c. Connect ground wire (color may be Green or Yellow) to terminal block at mark “E” - The owner may choose to exercise options for heater ON or OFF as per OM Pg 7, Fig 5, Step 7 and Pg 8, Fig 7, Step A.
- The owner may choose to exercise options for Sensor Range adjustment as per OM Pg 7, Fig 5, Step 8 and Pg 8, Fig 7, Step B.
- Reinstall the cover (retained in step 4 above) with the saved security hex socket screws and the hex key provided. Do not over-tighten the screws.
- If the unit is powered with a short cord to a nearby {suggested within 8″ [203] max distance} then plug it incorrectly and reinstate power at the circuit breaker. Clean up installation debris; turn OM and hex key over to Owner.
- Test unit operation. Walk away happy.
OPERATION
No-touch operation.
There is a blue LED light to guide the user to the airflow. Shake excess water from hands. Place hands under the outlet to start operation. Rub hands lightly and rapidly under the nozzle outlet. Stops automatically after hands are removed or if maximum time is reached.
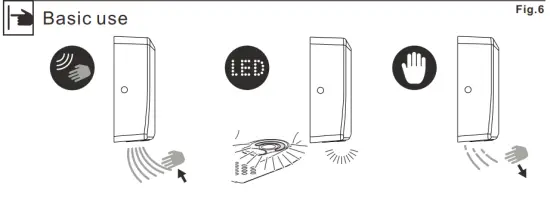 | ||
| Operation without touching, place your hands under the nozzle to activate the dryer. | Blue LED light guides hands to airflow. | After 3 seconds without detecting hands, the dryer stops automatically. |
OWNER ADJUSTMENTS
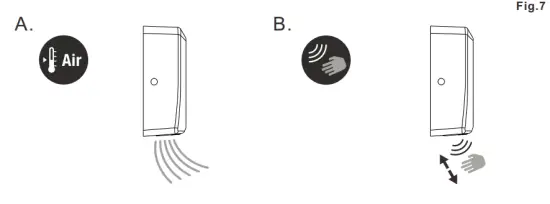 | |
| Turn on/off heated air with a switch on the unit chassis. (see step 7 in INSTALLATION Page 7, Fig. 5). | Sensor range may be adjusted with the potentiometer (VR) located inside the unit on the program PCB (see step 8 in INSTALLATION Page 7, Fig. 5). |
MAINTENANCE
- Periodic cleaning of the unit is recommended.
- Remove cover and clean dryer dust lint.
- Wipe the cover with a damp cloth and mild cleaning solution. Do not soak.
- Never use abrasives to clean the cover.
DIAGNOSTICS & REMEDIES
| SYMPTOM | CORRECTIVE ACTION |
| The hand dryer fails to start | Ensure the breaker supplying the dryer is operational. If it is, disconnect the power and remove the hand dryer cover. Check all the wire connections to sure they are well fixed. Turn on the power and verify the correct power at the terminal block. If it does not work then replace the circuit board. |
| The hand dryer turns on/off erratically or is not sensitive enough | Ensure that there is no obstruction on or in front of the infrared sensor zone. Clean any dirt off the sensor lens. Try adjusting the sensitivity potentiometer on the program board. If it still does not work, replace the circuit board and sensor board. |
| The hand dryer does not produce warm air | Check if the heat element switch is set for power on. Check if the heating element is broken. If yes, replace it with a new one. |
| The hand dryer makes a ticking noise | Check the motor brush’s wear-down condition. Replace them if worn out or install a new motor. Disconnect power, remove the cover, check to make sure no object is stuck in motor vents. |
WARRANTY
All of our dryers are designed and manufactured to provide years of dependable performance. Component parts are guaranteed to be free of defects in material and workmanship for a period of one (1) year from the date of the original invoice. This guarantee will be honored provided that the dryer is installed and maintained in accordance with the instructions. Parts damaged during the installation are the purchaser’s responsibility. ASI’s warranty covers defects exclusively, and only liability for the replacement of defective parts will be accepted. This warranty does not cover wear and tear, or misuse and abuse. Transportation, freight cost, and labor are also excluded. Defective parts must be returned prepaid, accompanied by the unit serial number, to the point of purchase. This warranty is granted solely to the original purchaser of the unit and is subject to registration.
HAND DRYER CIRCUIT DIAGRAM
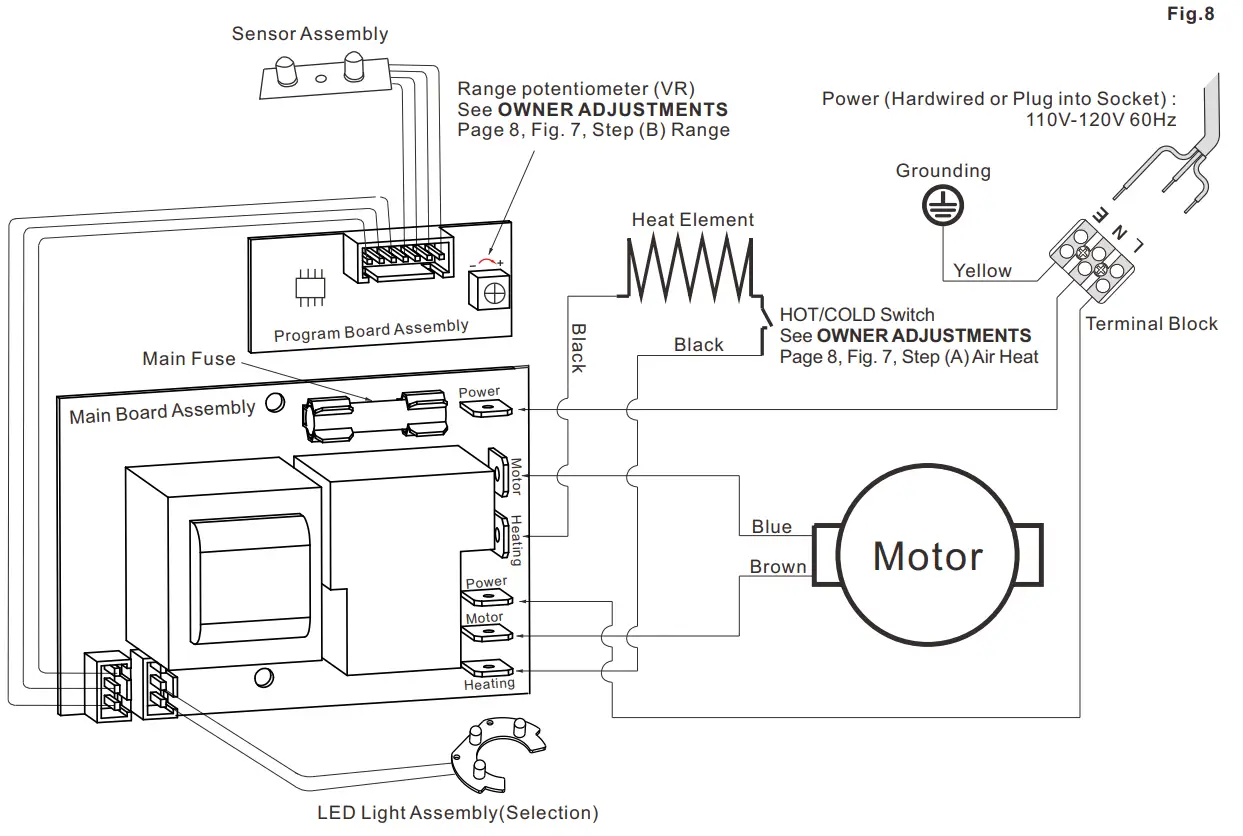
HAND DRYER CIRCUIT DIAGRAM
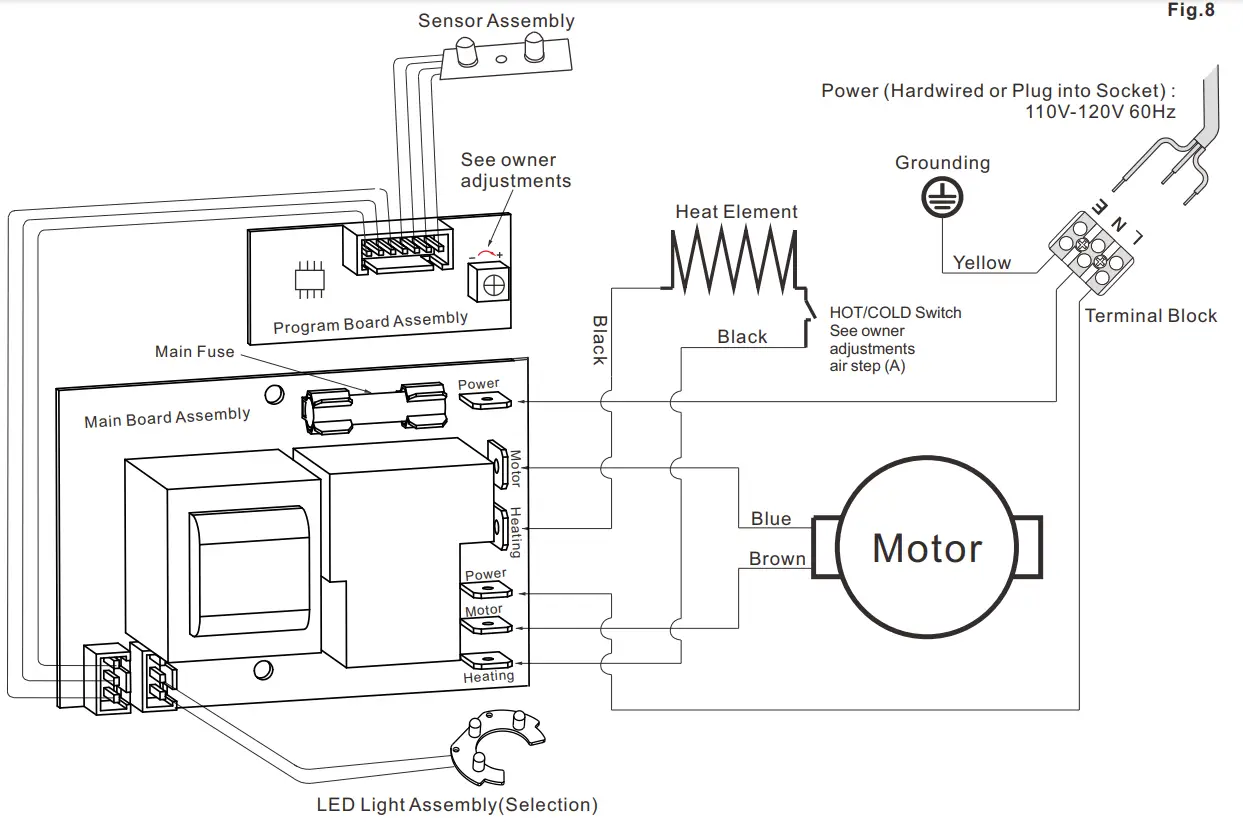
–NOTE: Do not install dryer over washbasin —
![]() AMERICAN SPECIALTIES INC.
AMERICAN SPECIALTIES INC.
441 Saw Mill River Road Yonkers, NY 10701-4913
Tel: 914.476.9000 Fax: 914.476.0688
[email protected] http://bit.ly/ASI-0192


