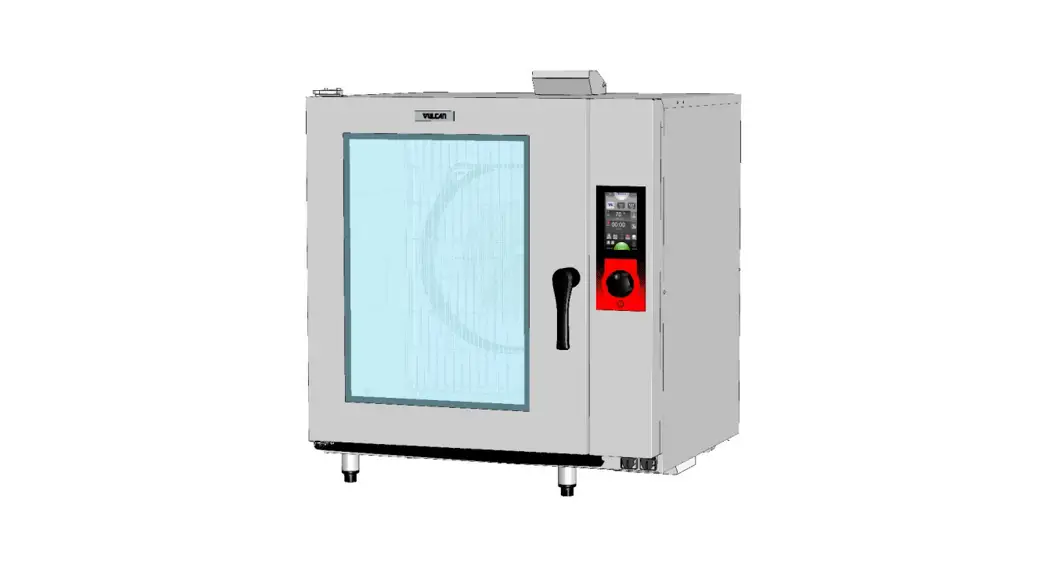
Combi Ovens
OPERATING MANUAL
Combi Ovens
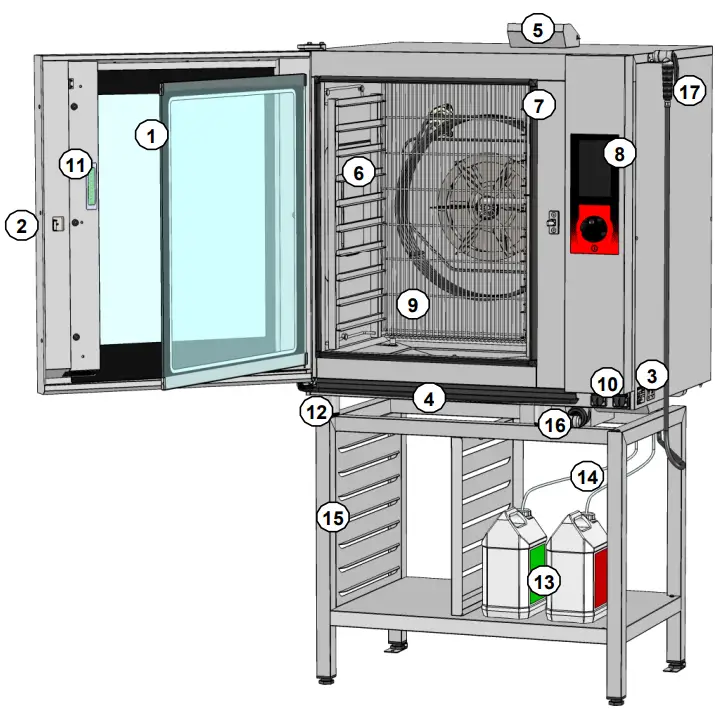
- Double glazed door (unlocked from the inside)
- Door handle
- Data plate (visible with the door open)
- Door channel
- Motorized vent valve
- Runners
- Cavity seal
- Control panel
- Wire or sheet duct
- Prise Port USB / USB port
- LED strip lighting
- Oven legs height adjustable
- Cleaning / Descaler product container (not supplied)
- Cleaning and Descaler products supply pipes with end weight and bung
- Stand (accessory)
- Retractable hose kit (accessory)
- Independent hose kit (accessory)
PRACTICAL OPERATING ADVICE
USE LIMITS
Internal oven capacity:MODEL 6/7 GN1/1 10 GN1/1 10 GN2/1 Plaques GN 1/1 / GN 1/1 trays 7 10 20 Plaques GN 2/1 / GN 2/1 trays – – 10 1/2 bac format US (18×13″) sur grille GN1/1Half size US pan (18×13″) on grids GN1/1 7 10 10 Bac format US (18×26″) sur grille GN1/1 / – – 10 Full-size US pan (18×26″) on grids GN1/1 – – _ Number of levels 7 10 10 Spacing between levels (mm) 71 67 67
LOAD LIMITS![]() Attention: For your safety and that of the equipment always comply with these load limits.
Attention: For your safety and that of the equipment always comply with these load limits.
| Model | Maximum quantity | Support |
| 6 / 7 GN 1/1 10 GN 1/1 10 GN 2/1 | 24 Kg 40 Kg 80 Kg | Runners Runners and trollies with runners or for Banqueting Runners and Banqueting or runners trolley |
NOTE: The NONOBSERVANCE of these RECOMMENDATIONS will create problems for which the Manufacturer cannot be held responsible.
– WARRANTY –
To ensure the guarantee on this equipment, you should comply with the MANUFACTURER’S INSTRUCTIONS in this manual.
However if you cannot undertake the required maintenance operations, our installation and service network is available to provide you with a personalized contract.
– WARNING –
- The product delivered to you complies with current standards. If any modifications are made the manufacturer cannot accept any responsibility whatsoever. The manufacturer cannot be held responsible in the event of inappropriate use of the equipment.
- This equipment is intended for use by suitably trained professionals.
- Read all the documentation before the user.
- Keep your documents for future reference.
- Translation of the original manual
GENERAL
The toughened glass control panel on your oven consists of:
– a coder knob:


Switches on the oven and its display screen.
Power on: press for 1 second
Switch off: press for 3 seconds
Allows parameters to be changed rapidly (Temperature, time …) and validated by simply pressing the knob.
– a touch screen:![]() The control panel is operated via a serigraphic touch screen using your fingers. We recommend the exclusive use of your fingers and no other items such as knives, forks or spoons, etc.
The control panel is operated via a serigraphic touch screen using your fingers. We recommend the exclusive use of your fingers and no other items such as knives, forks or spoons, etc.
You need only touch the screen with your finger to access parameters and information.
The welcome menu is displayed briefly when the unit is switched on and then replaced by the Manual menu.
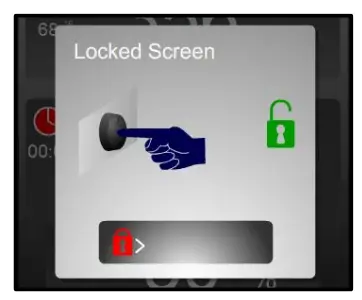
18.1 SCREEN LOCKING
- The screen automatically locks after a few seconds at the start of a cooking or cleaning cycle.
- This function is disabled by default but may be activated within the client parameters
- The “padlock” icon indicates whether the screen is locked or not.

- To unlock the screen press the coder or slide the padlock to the right
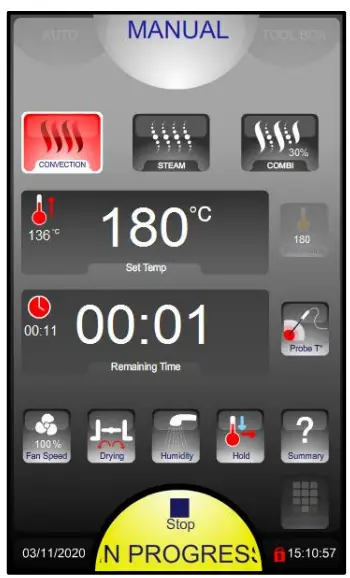
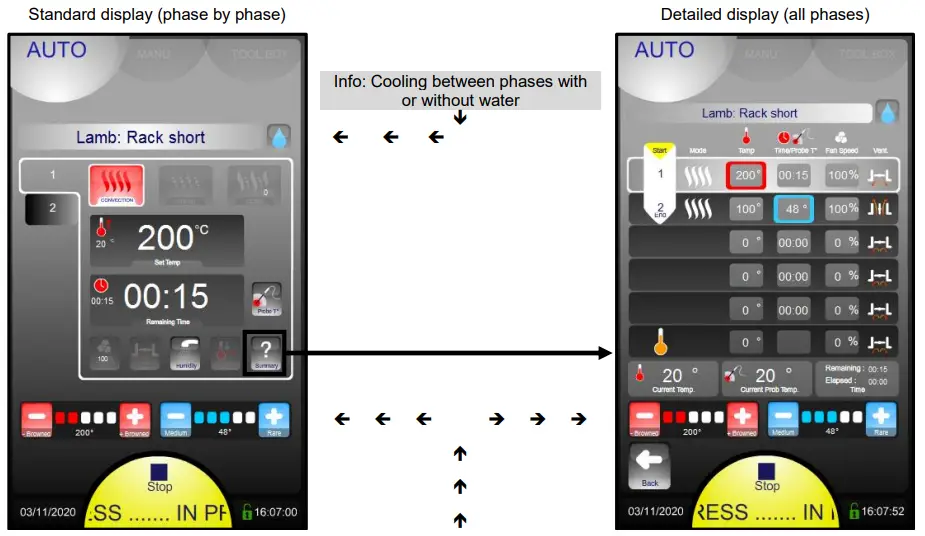
ABC MODE
- Display of actual and set temperature
- Time display
- Automatic Humidity adjustment based on temperature selection.

- Manually change if desired. 0% is similar to convection setting with vent open, 100% is always adding humidity Date and time

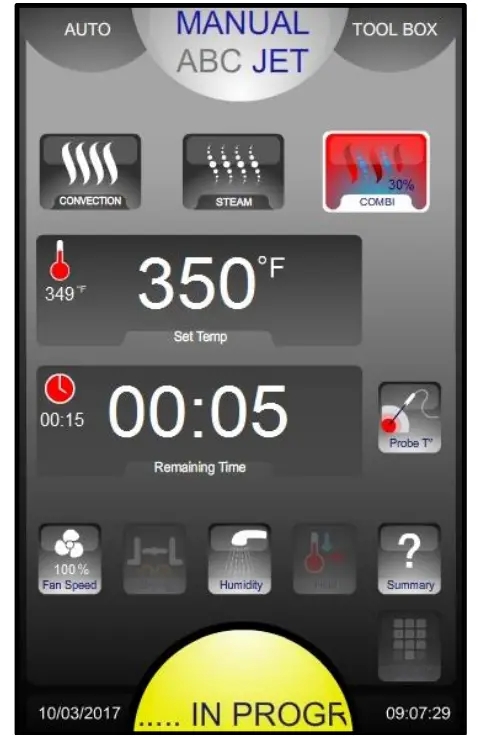
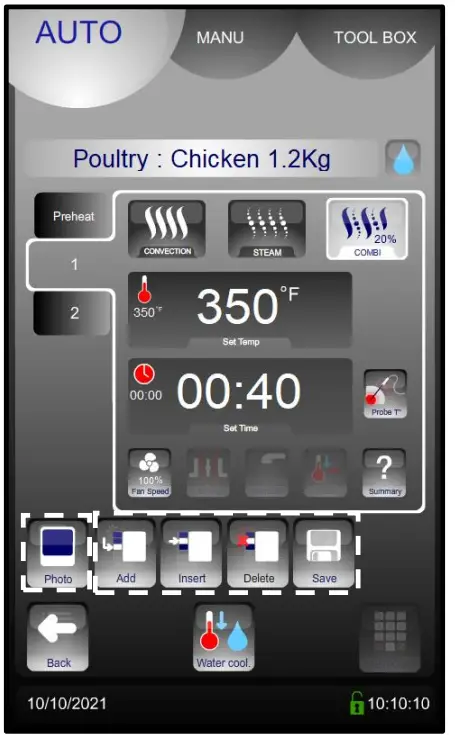
JET MODE
 3 cooking modes: Convection, Steam, and Combined (from 0 to 100%)
- Display of actual and set temperature
- Time / Core temperature display
- Ventilation speed (1 to 100%)
Vent outlet
Manual humidification
Cooking details - … In progress: cooking in progress
II: Pause (door open)
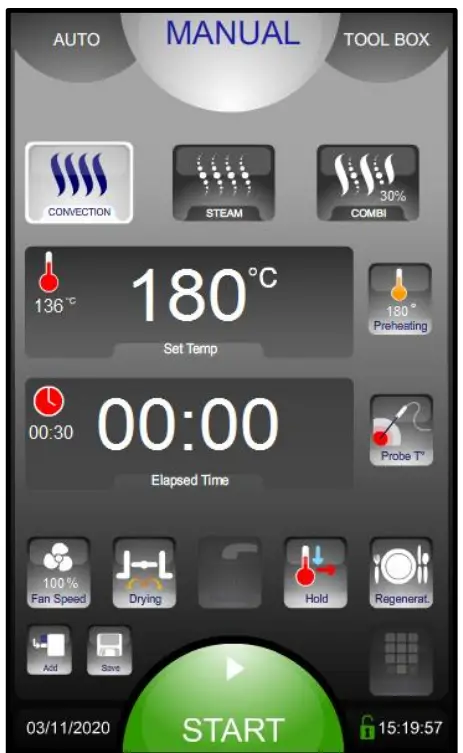
 3 cooking modes: Convection, Steam, and Combined (from 0 to 100%)
- 3 cooking modes: Convection, Steam, and Combined (from 0 to 100%)
- Display of actual and set temperature
- Selects preheating before cooking. To deactivate press for 3 seconds
- Display of times/core temperature
Ventilation speed (1 to 100%)
Vent outlet
Manual humidification - Rapid cooling & Holding mode (hot cupboard)
Plated meal regeneration - Add a cooking phase
Quick save a recipe
Touch screen (alternative to using the select knob) - Date and time

Water hardness limitations for steam mode:
Depending on steam usage levels, action may be required to treat hard water to avoid a build-up of limescale in the boiler and excessive consumption of descaling products.
| Steam usage level | Water hardness | |
| GN 1/1 oven | GN 1/1 oven | |
| Medium (3 to 7 hours/day) | Max 40°f (28°e, 22°d, 400ppm) | Max 20°f (14°e, 11°d, 200ppm) |
| Intensive (>7 hours/day) | Max 20°f (14°e, 11°d, 200ppm) | Max 10°f (7°e, 6°d, 100ppm) |
21.1 DEFERRED START
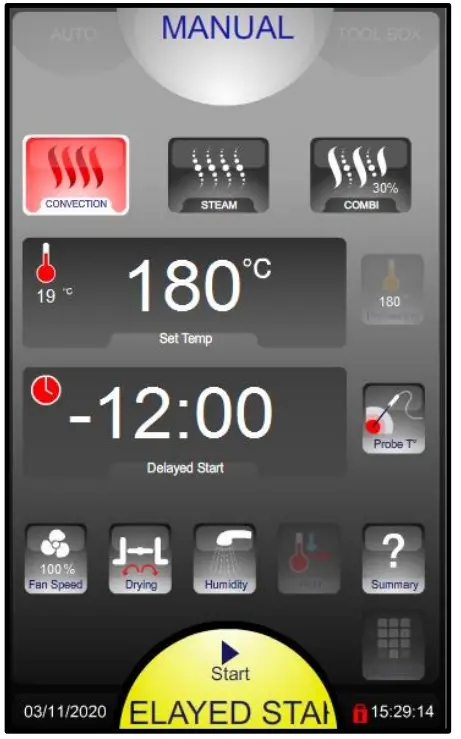
This function is only available in manual mode, not with a programmed menu
At the start point for cooking press and hold START and turn the coder knob anti-clockwise to program a « negative time » corresponding to the delay before cooking starts.
The setting is validated after 5 seconds or by touching another zone/button
For example:
Display « -12:00 »: signifies that cooking will start in 12h and 00 minutes.
The cycle start button will flash in yellow and the countdown will run from « -12:00 » to « 00:00 » until the selected cooking starts (this can still be changed).
NOTE: if an automatic wash cycle has been programmed this will not take place
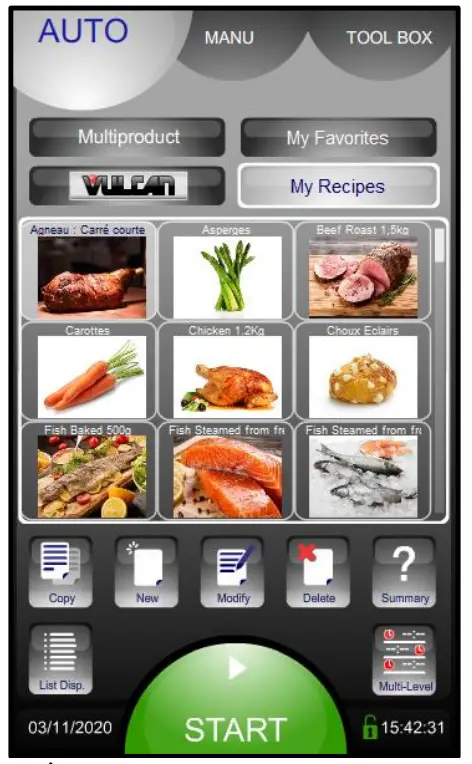
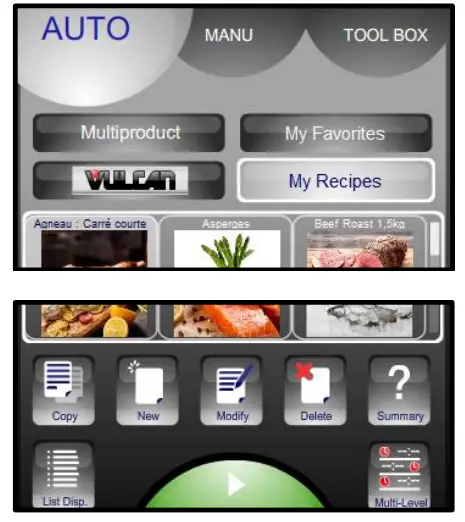
22.1 AUTOMATIC / PROGRAMMED RECIPES
- Favorite recipes
- Pre-programmed recipes (80 roughly)
Clients’ recipes (capacity of 100 recipes in total, each with 6 cycles) - 6 Principle families with direct access to the recipe
- Recipes can be edited
Copied
Created
Modified
Deleted
Detailed display - «Multi-Level» program: 10 independent timers
- Recipe displayed by list or photos
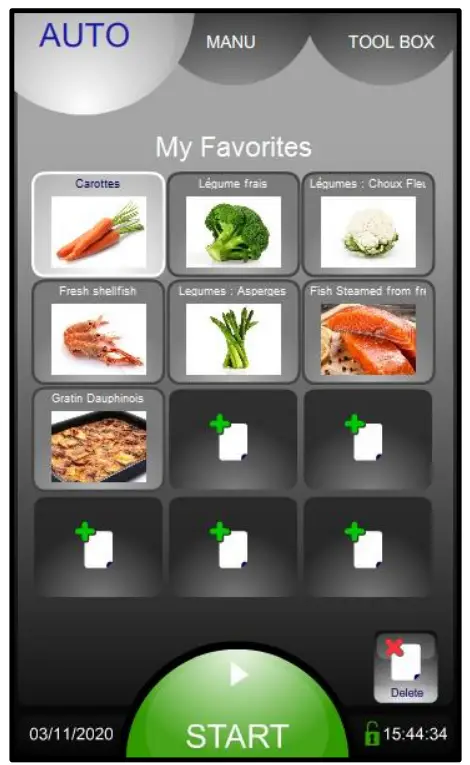
2.2 FAVOURITE RECIPE
To add a favorite recipe: select a recipe from the factory or clients list, then press a free space for 3 seconds Free space
Delete a favorite recipe
22.3 MULTI-PRODUCTS SCREEN
To use this mode, recipes must have already been added to My Favourites.
- The first recipe selected determines the cooking mode and temperature
- Example for selected recipes:
Level 6: Recipe selected but not started - Level 5: Cooking
Press the elapse time to display the identification image of the recipe for 5 seconds
Level 4: Recipe finished - Level free for a new recipe
Pressing the icon displays only recipes from My Favourites compatible with the first recipe selected
 - Erases all the recipes that have finished or not yet started

- Display of the recipes from My Favourites which are compatible with Multiproduct mode

22.4 TYPE OF DISPLAY
2 criteria allow the recipe to be adapted to the client’s taste (e.g.: +/- browned, blue, or well done) without the need to create a new recipe … or to know what to modify (Time, Temperature, which phase …)
Only applicable for manufacturer recipes
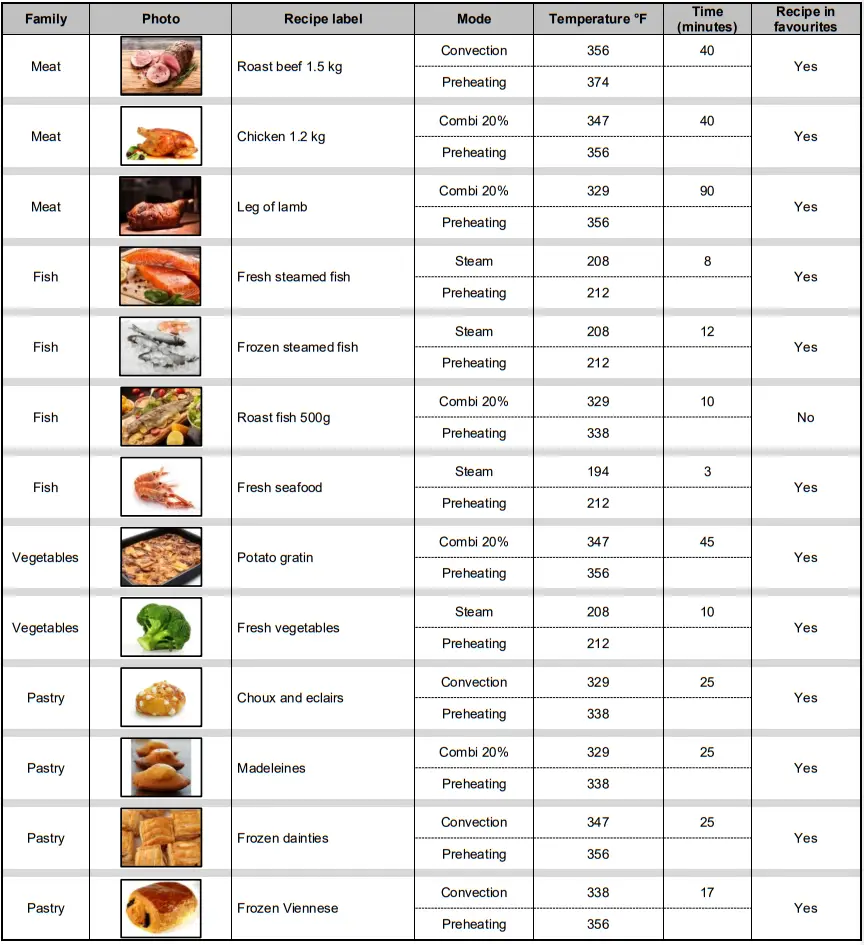
22.5 LIST OF PRE-RECORDED PROGRAMMES
2.6 CREATING A RECIPE
- Select “My Recipes” (library capacity: maxi 100 recipes)

- Select the « New » icon
- Enter the name of the recipe: The more precise your name, the easier it will be to find your recipe

- Validate
- Pressing the name zone allows you to modify the name and/or select the family of the recipe (Meat, Fish, Vegetables, Pastry, Various, and Banquet)
- The « water drop » icon indicates the choice of waterless or without water for cooling between cycle

- Create the cycle or cycles by adding the various cooking information (cooking mode, temperature, time, ventilation speed, oura valve, etc.).
- Possibility to add a photo from the « Photos library »
- If necessary Add, Insert or Delete additional cooking cycles (capacity of 6 cycles maximum including preheating)
- Save a recipe
- To activate or disable the Cooling with Water

➔ Rinse (between batches of cooking…) and replaces the spray hose
➔ Auto Cleaning
➔ Programmable auto clean for every day of the week (Day / Time)
➔ Operating mode Data exchange (HACCP, Photos, Recipes, Manual, Consumption levels (Energy, water …),
Profiles) Client settings (Adaptable)
Installation parameters
Technical / After sales
➔ Maintenance information
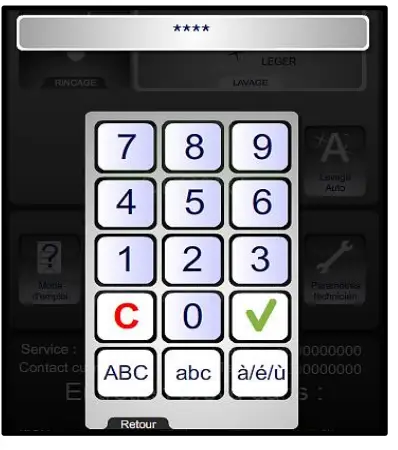
23.1 PASSWORD
Allows the client access to:
– Data exchange
– Client parameters
– Change the Manual / Auto cleaning
➔ 0000: Changeable PIN Code CHEF: Password (Upper or lower case)
➔ For a personalized code in text format it is possible to switch the keypad to and from alphanumeric
23.2 DATA EXCHANGE
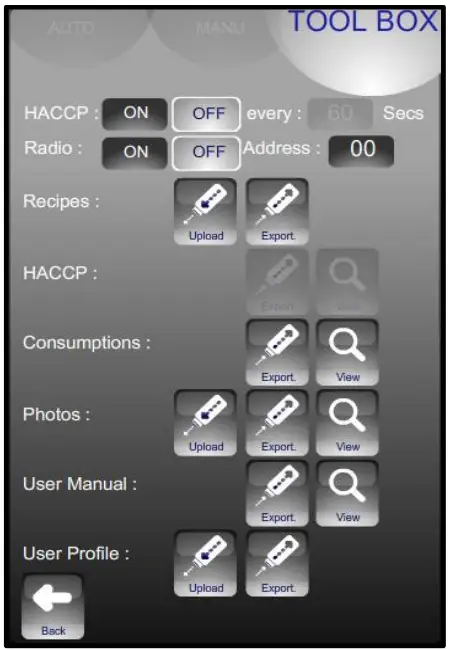
➔ HACCP ON/OFF: Records HACCP data (for approx. 1 year) and frequency of data capture
➔ Oven identifier: individual for each oven if there are several ovens on site.
➔ USB (or Radio) information exchange viewable on the oven
Warning: A FastPAD USB stick should be used for data exchange consumptions, recipes, HACCP, photos, or updates…
Using a USB stick that is not recognized can lead to crashes or bugs.
23.3 CLIENT PARAMETERS
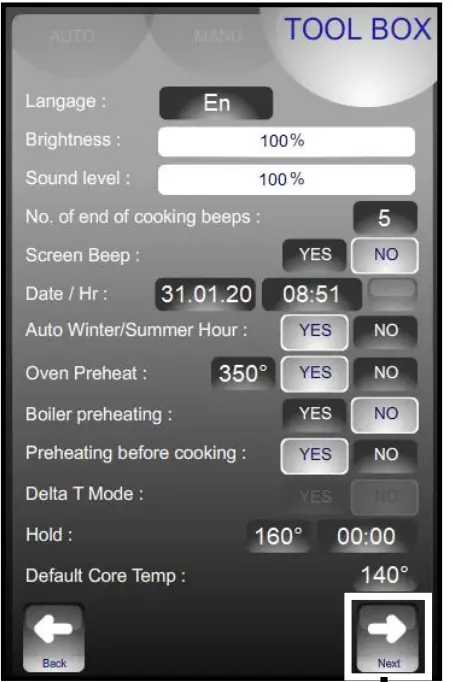 | ➔ Adjust the screen brightness ➔ Adjust the end-of-cycle buzzer volume ➔ Activation and adjustment of the automatic pre-heat when the oven is switched on. ➔ Activation of pre-heat function before cooking. Function only available in Eco mode. Not available in JET and ABC mode ➔ Adjust the time and temperature in holding mode (operating as a hot cupboard in Manual mode) |
 | ➔ Choice of default mode displayed when first started ➔ Choice of humidity level for food regeneration ➔ Cooling the cooking cavity with or without water (by air) ➔ Choice of manufacturer’s recipes displays: Fr = French / En = English ➔ Recipes displayed by family group (yes) or alphabetically (no) ➔ Activate the screen saver (blacks out) after the selected time. Not when a cycle is running. |
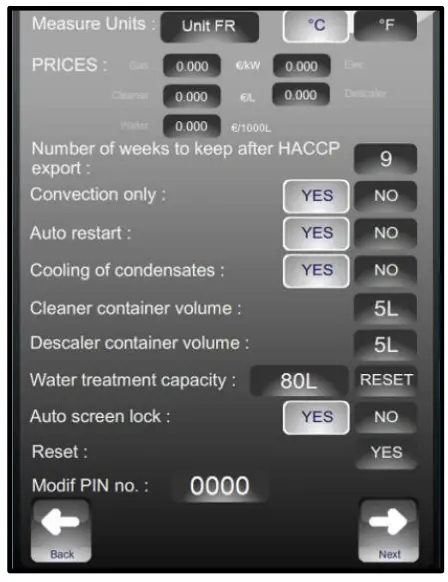
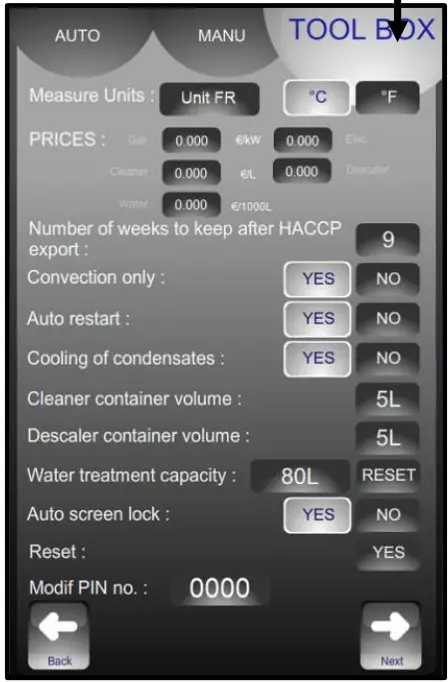 | ➔ Choice of temperature display units ➔ Enter the cost of energy, chemicals, and water to calculate consumption costs. The first press activates the cost area. The value can be changed slowly with the knob. The second press displays the keyboard to enter a value directly. ➔ After being exported to a USB stick HACCP data prior to this number of weeks is deleted. ➔ Restarts a cycle automatically if the is a power cut 9 if set to YES). ➔ Option of cooling condensate ➔ Default volume of cleaner and descaler product containers ➔ The screen automatically locks after a few seconds at the start of cooking or cleaning cycle ➔ Software reset (Attention: All recorded information is erased from memory: HACCP data….) |
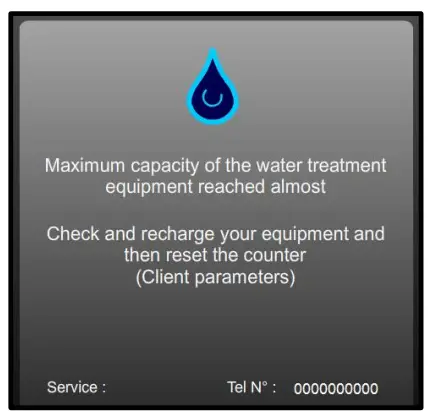
23.4 WATER TREATMENT
This message appears only when the capacity of the water treatment system is being approached (if the counter has been set in Client parameters). This counter is only used if the unit has two separate water supplies. ➔ Warning message This message appears every time the oven is switched on if the programmed water capacity has reached its limit. After the renewal of the system reset the counter as above.
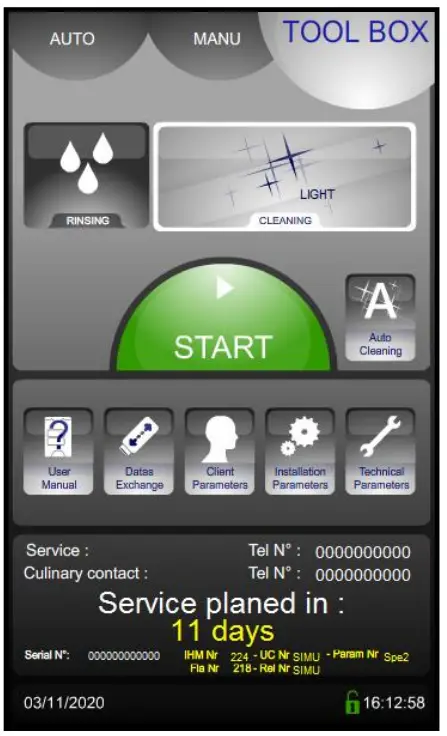
WATER TREATMENT COUNTER
- Go into the “TOOL BOX” screen
- Select the “Client parameters” screen
- Enter the password “CHEF” Permanent pass word (Upper or lower case)
- Validate “V”: if the code is correct the menu can be accessed if not return to inputting the PIN

- To modify or enter the value for the capacity of the water treatment system (in liters). Set to zero by default (if the oven does not have a dedicated water treatment system).
* Select the zone to be changed
* Adjust with the coder knob. - After any regeneration of the water treatment, reset the counter as required.
* Press « RESET »
* Confirm by pressing « YES »
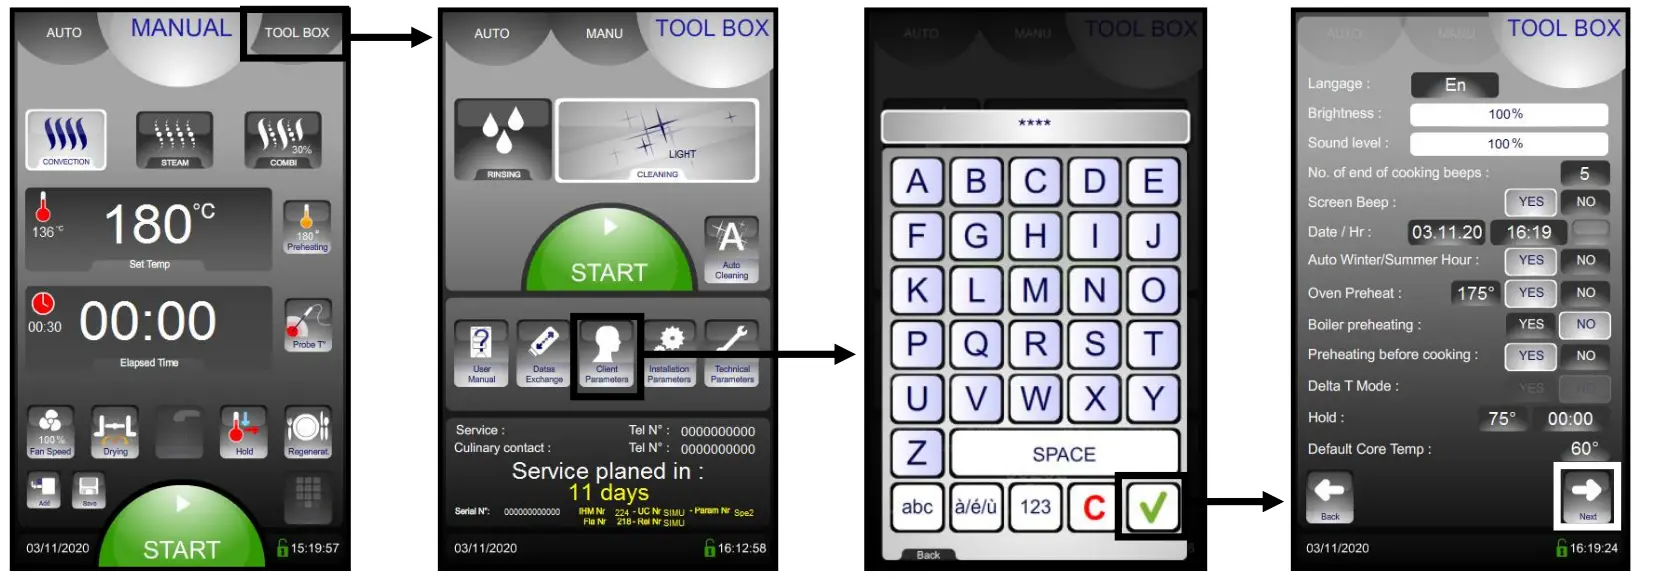

➔ The water treatment system’s capacity in liters. Reset. By default set to zero (if there is no dedicated treated water supply to the oven)
23.5 PREVENTIVE MAINTENANCE
This message appears only when the oven preventive maintenance is required (if the counter has been set in the Installation parameter). The customer will be automatically informed when service is needed. The service counter is a calculated function of the frequency of use and of the number of hours between 2 services.
These values must be entered by the technician when installing the oven and must be verified after every maintenance operation. ➔ Warning message
This message appears every time the oven is switched on if the use time programmed in the preventive maintenance counter is reached. Notify the maintenance department for intervention as soon as possible If the number of days falls to 0 or below, the message will be displayed in red and indicates how many days past the scheduled maintenance date the oven is.
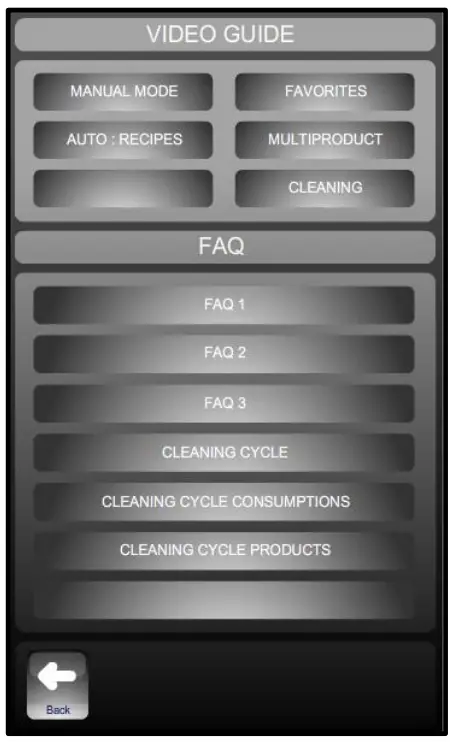
23.6 QUICK GUIDE ➔ Graphic demonstration and or animated of the main menus
➔ Information and « tips and advice » most used
There are 2 possibilities:
- Manual cleaning (on demand)
- Auto cleaning (cleaning programmed every day of the week):
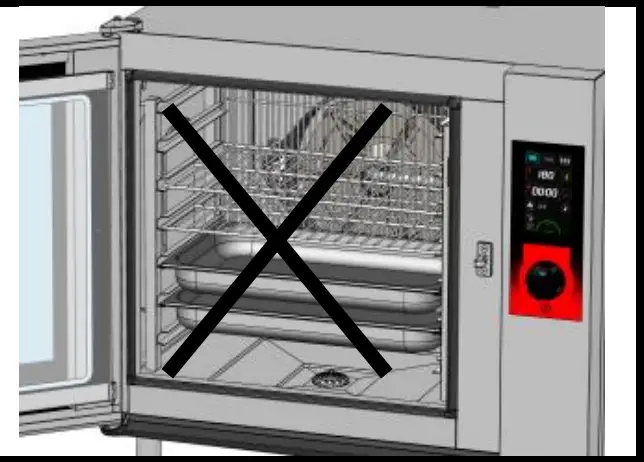
![]() The cavity should never be cleaned with grills or containers in situ. 24.1 « MANUAL » CLEANING (on demand):
The cavity should never be cleaned with grills or containers in situ. 24.1 « MANUAL » CLEANING (on demand):
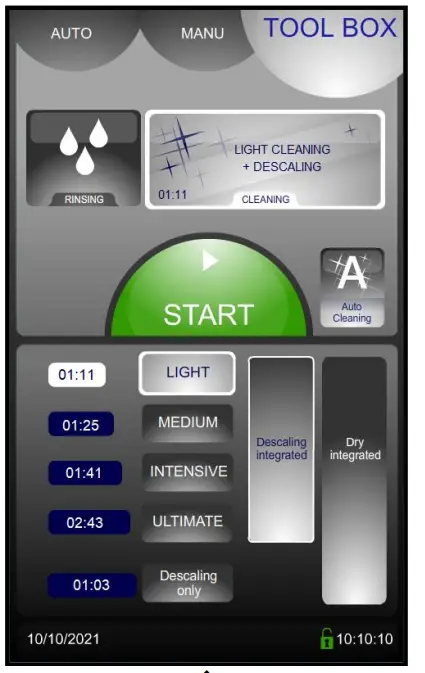
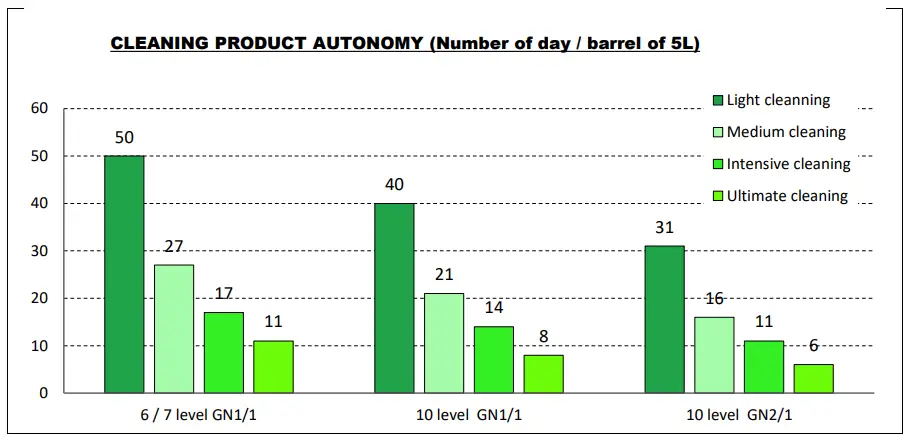
➔ Intensity of the cleaning: Light / Medium / Intensive / Ultimate (The durations are shown on the left)
➔ Descaling included: In addition to the cleaning cycle, a descaling cycle will be run if necessary, depending on the use and setting of the oven. (Measured by the frequency of use of the oven and the water hardness recorded in the parameters)
➔ Integrated drying: drying of the cooking cham as well as the cleaning and/or descaling cycle if the key is selected.
➔ 2 possible mode choices:
– Washing with descaling activated as default: if this choice is un-ticked the cycle time is shortened to cleaning time only,
– Descaling only: allows enhanced descaling cycle to be run.
Procedure:
- Switch the oven on.
- Wait a few seconds until the start screen clears. If the preheat starts press STOP.
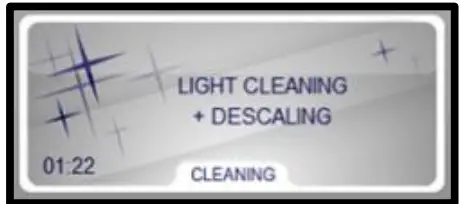
- Press the Service tab. The screen shows the last washing level used and whether a descaling cycle will be run.
 ➔ “Cleaning and descaling (if necessary)”
 - Press to select:
 ➔ “Start” a cleaning cycle.
 - The screen indicates the different phases selected for the cycle, the running time, and the remaining time. When the cleaning cycle has finished the “Service” screen is displayed again.
Note: The washing level/descaling/dry can be modified: - Press to select: ➔ “Cleaning “
- Select the required level of cleaning depending on how dirty the oven is.
 ➔ “Cleaning level” Light, medium, intensive or ultimate. The time for each is indicated in the box, shown in minutes.
 - If you wish to skip the scheduled descaling cycle, deactivate the button.
 ➔ “Descaling” pre-selected function
 - Check the pipes are connected to the chemical containers and that the quantities are sufficient. If not refer to the paragraph “Replacing the chemical containers”
- Press the button if you wish to add integrated drying.
 ➔ “Integrated drying” function to be selected (deactivated by default). The cycle time depends on the cleaning level selected
– Light : 3 minutes
– Medium: 4 minutes
– Intensive: 4 minutes
– Integral: 4 minutes. - then press to select: ➔ “Start” a cleaning cycle.
- The screen indicates the different phases selected for the cycle, the running time, and the remaining time. When the cleaning cycle has finished the “Service” screen is displayed again.
Note: Descaling can be performed alone without washing the oven. Repeat the above manual cleaning procedure in full by selecting this option : ➔ “Descaling only” if you only wish to perform descaling.
 ➔ “Cleaning and descaling (if necessary)”
 ➔ “Start” a cleaning cycle.
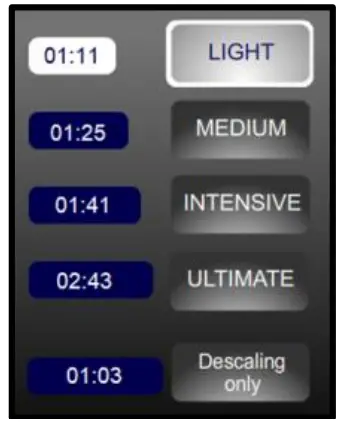 ➔ “Cleaning level” Light, medium, intensive or ultimate. The time for each is indicated in the box, shown in minutes.
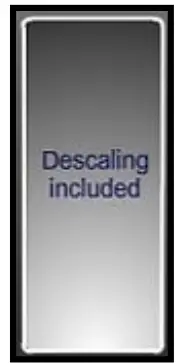 ➔ “Descaling” pre-selected function
 ➔ “Integrated drying” function to be selected (deactivated by default). The cycle time depends on the cleaning level selected
 ➔ “Descaling only” if you only wish to perform descaling.
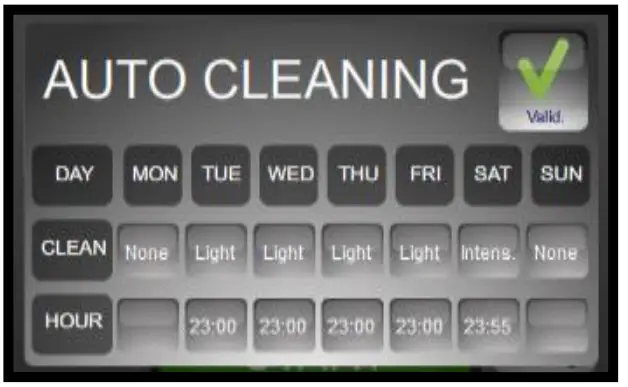
24.2 “AUTO” CLEANING (cleaning programmed every day of the week):
Scheduled auto cleaning will only activate:
- if the door is closed and the oven is on
- if the interface has not been switched off by pressing the 3s button
- if no cycle is already in progress at the programmed auto cleaning start time. Cleaning will not automatically start at the end of the cooking cycle as there could still be products left inside.
- if the interface is not in ABC or JET mode (which are considered permanent cycles …)
The interface must therefore be in ECO / Manual or Auto mode, (with no cycle in progress, or the Service tab, inactive, power on, etc.). Auto cleaning is activated in standby mode. - Switch the oven on.
- Wait until the start-up screen disappears. If preheating starts press STOP.
- Select the Service screen.
- Press to select:
 ➔ “Auto cleaning”
 - Put in your PIN code (0000 by default, select Client parameters in the service screen) then validate.
- The daily cleaning screen will appear.
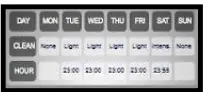
- For each day select the level of cleaning required and the time by pressing the corresponding touch button then validate
 ➔ “Programming screen”.
 - The automatic cleaning program is displayed. The cleaning cycle will start at the set hour each day and at the intensity selected. A descaling cycle will be automatically integrated into necessary.

- To deactivate the automatic cleaning select Manual cleaning and enter your PIN. The values programmed in will be remembered for the next time you select automatic cleaning.
 ➔ “Manual cleaning”
 ➔ “Programming screen”.
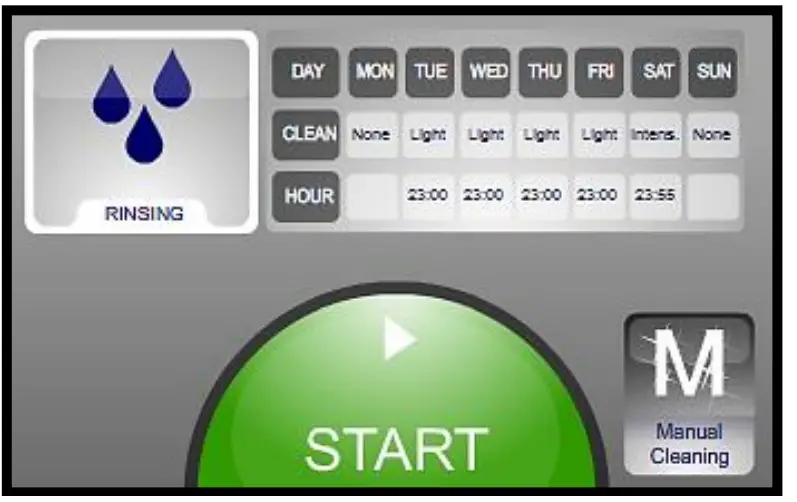
 ➔ “Manual cleaning”
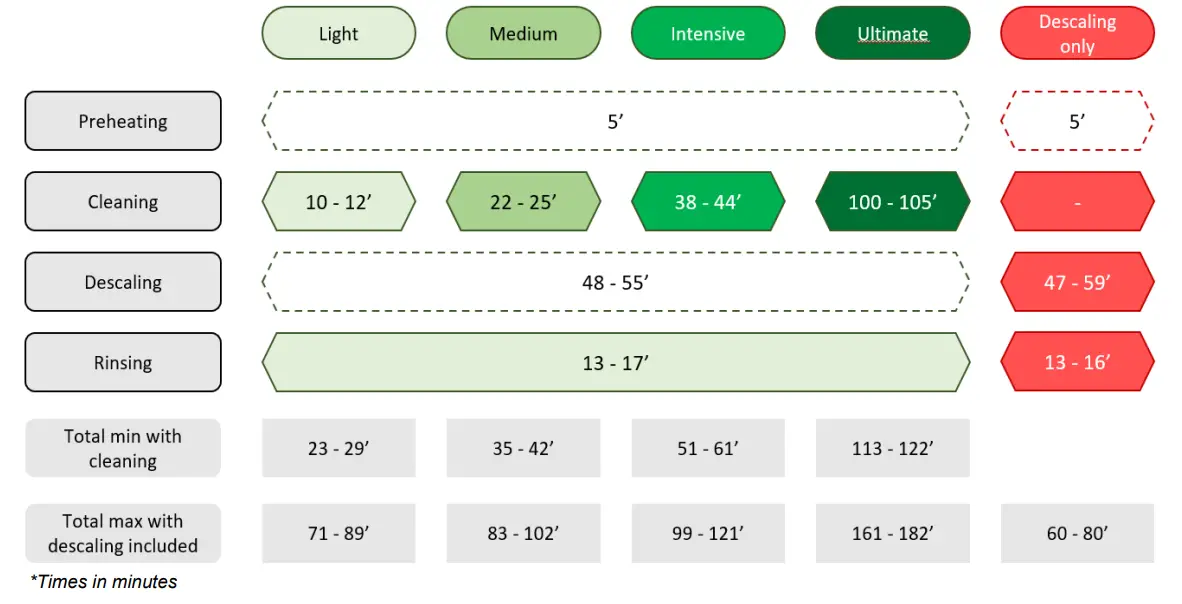
24.3 CYCLES AND DURATIONS
24.4 RAPID RINSING

➔ Rapid rinse function using only water (no chemical) for example between two different types of cooking
24.5 EMPTY DETERGENT / DESCALER BOTTLE DETECTION
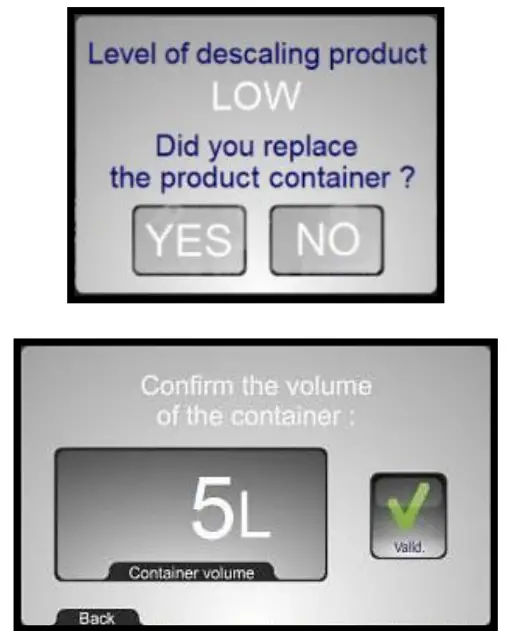 | ➔ This message appears when the cleaning and/or descaling product container is/is almost empty Note: Refer to the “consumables” paragraph for the product consumption depending on the oven and its cleaning cycle |
| ➔ Validate or change the size of the container. Note the counter is calibrated against this volume. |
24.6 REPLACEMENT OF THE CHEMICAL CONTAINERS:![]() Never use descaling products in the automatic cleaning system. This could seriously damage the oven’s hydraulic circuits.
Never use descaling products in the automatic cleaning system. This could seriously damage the oven’s hydraulic circuits.
The suction pipes for washing products and descaling products are marked with labels and a colored cap to position the pipe in the correct container: NEVER SWITCH THE PRODUCTSCleaning (colored green) CLEANING PRODUCT 
DISCLEANING PRODUCT PROHIBITED Descaling (colored red) DISCLEANING PRODUCT ![]()
DON’T USE NITRIC ACID
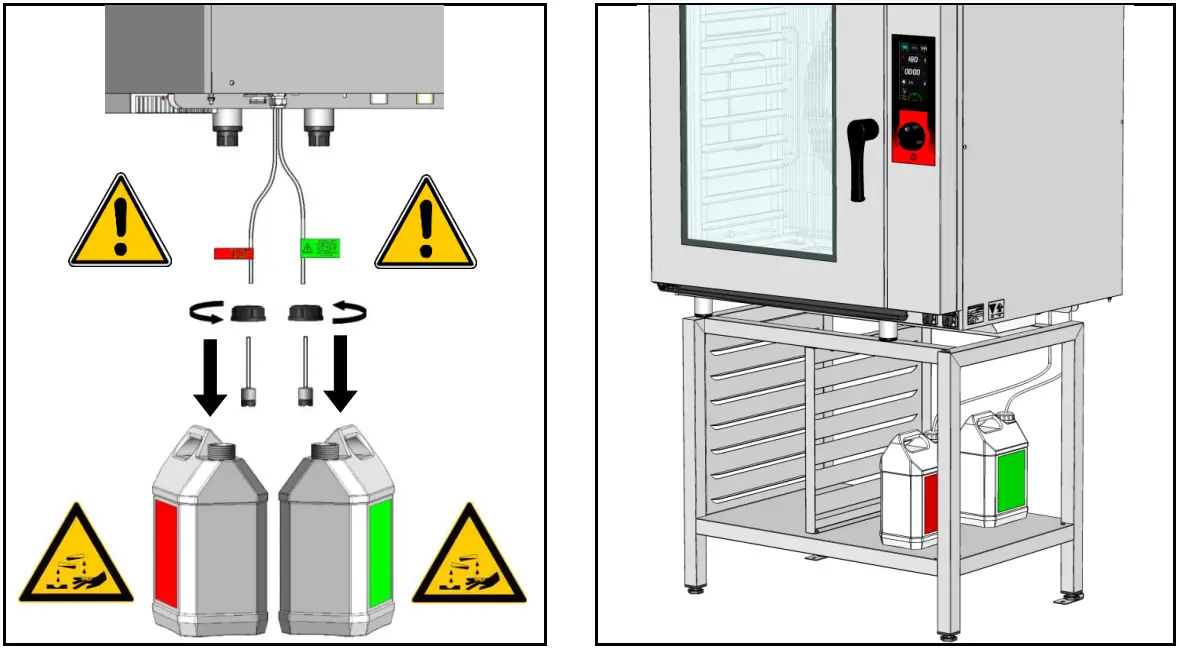
![]() Note: Refer to the “Recommendations” chapter when handling or using these chemicals, if in any doubt refer to the products safety sheet
Note: Refer to the “Recommendations” chapter when handling or using these chemicals, if in any doubt refer to the products safety sheet
GUIDANCE AND INFO ABOUT THE CONTROL SCREEN
– In manual mode, the change from a set temperature during a Convection or Combination cooking cycle doesn’t activate a cooling cycle.
– In manual mode starting a cycle when the actual temperature is already over the set temperature starts an automatic cooling phase with water injection (as per Client parameters).
– Whilst cooking moving from convection or combination to steam automatically starts a water injection cooling cycle until the set temperature is reached.
– Inputting a cavity temperature of 80°F in convection mode creates a waiting phase or a phase where nothing happens (no heating, no ventilation)
– In Auto mode, selecting a time of 99h00 is interpreted as a holding cycle (no cooking) in the mode and temperature selected.
– Programs in the library named « Multi-level timing » allow you to set a specific time for each level with and end of the cooking alarm.
– It is possible to see a summary of the phases by pressing detail « ? ».
– For manufacturer’s recipes, it is possible to adjust the level of browning and cooking even after a cycle has started.
– In the client library, it is possible to link a photo to a recipe and display only the recipes that have a photo. (Auto / Modify / Photo)
– It is possible to block access to modify, erase and copy in «Clients» parameters.
– A copied recipe has the symbol « * » before the name.
– The names of « client » recipes can be personalized: Modify /click on the zone name or family / Change the name or family.
– Because « Modify » is deactivated in client parameters.
–  HOLDING mode generates a cooling phase to the set temperature followed by holding at this temperature. This is like a hot cupboard without ventilation to avoid drying the products.
– It is possible, that the HOLDING button is activated and the holding mode will begin after the cooking has finished. If a core temperature has been selected holding will be at this temperature otherwise it will be at the temperature set in the « Client» parameters.
– Temperature holding mode follows the parameters set in the client menu: temperature and time. (167°/ time unlimited)
– The automatic initial preheat can be switched on or off, whilst the preheat temperature can be set in the « Client » parameters
– 
 It is possible to program an automatic cleaning cycle by day of the week and at a specific time with a greater or lesser degree of intensity.
– A message indicating that a service is required 10 days before it is due.
– Access to « Client parameters» is by PIN code, the default is « 0000 » which can be changed. DO NOT FORGET IT!
–  Access to certain parameters is restricted by a PIN and reserved for installation and service engineers.
– There is an automatic standby mode, timing is set in the « Client » parameters, this controls the ovens principle functions (blank screen, lighting).
The welcome message can be changed in the Client parameters. The message can be associated with a photo from the gallery or a welcome logo.
–  The Service/Exchange menu allows you to control HACCP data: start automatic recording, Viewable on-screen or after exporting to a USB stick in spreadsheet-compatible format.
– In the Service / Exchange data menu, it is possible to import photos (“FastPAD PC” software is required to do this)
– In the Service / Exchange data menu/consumption levels are displayed daily, at monthly and yearly intervals for, water, gas/electricity, and detergent. Costs are also displayed if the actual costs have been put into the corresponding fields in Client parameters.
– In the event of a fault in the electronics or the display, it is still possible to start a Safe Mode cycle: convection at the temperature set for preheating 347°F by default. When operating in the mode any inputs from the control panel are ignored.
– Switch the oven off and back on, then open and closed the door 3 times within 10 secs. The light will go off every time the door is opened and flash 3 times on the third closure to indicate the start of a Safe Mode cycle.
– To stop a Safe Mode cycle, switch the oven off.
USB PORT SOCKET / CORE PROBE SOCKET
The USB port and core probe sockets are fitted with a silicone protective cover.

![]() Warning!
Warning!
- Always put the protective cover in place (lowered to protect connections) whenever the socket is not in use.
- Never “clean” connections with a water hose or a sponge. (If the silicone cover is used and put back in place after use, no maintenance is necessary).
- The guarantee will not apply if these recommendations are not observed.
Note: To use the USB socket, refer to the “Data export” paragraph or to the “FastPAD PC” software in the user manual
TOOLS FOR OPTIMAL COOKING
27.1 CORE PROBE
The core probe allows the perfect control of the level of your cooking which can be reproduced day after day whatever the size of the product. The core temperature to be reached will vary, of course, with the kind of product and the cooking level desired.
WARNING: The cooking of a product does not stop at once when removed from the oven.
As a matter of fact, after a standstill, the core temperature continues rising to reach a temperature all the higher as the product has been cooked at a high temperature.
Example:
Beef roasted in combined mode at 392°F and removed from the oven at the time when its temperature reaches 104°F will see this later rise to about 135°F.
The same beef, steam-cooked at low temperature at 140°F (as the last phase) and removed from the oven at the time when its core temperature has reached 126°F, will evolve very little reaching 133°F.
| PRODUCTS | CORE TEMPERATURE TO BE REACHED | Core TEMPERATURE WHEN REMOVED FROM THE OVEN | |
| Classical cooking according to the chart annexed | Low-temperature cooking | ||
| Red meats | |||
| Very rare | 130 | 99 | 122 |
| rare | 133 | 104 | 126 |
| Just done | 140 | 113 | 133 |
| Well done | 144 | 118 | 138 |
| White meat | |||
| Veal | 162 | 136 | 156 |
| Poultry | 171 | 145 | 167 |
| Fish | |||
| Salmon – Tuna | 167 | 167 | 167 |
| White fleshed fish | 176 | 176 | 176 |
| Pork preparations – terrines | 153 | 149 | 149 |
NOTE: Recommendation for controlling the core temperature (cooking degree):
To control properly the degree of cooking, the aspect, and the weight loss, more especially in the case of red meats, we recommend finishing cooking with a low-temperature steam phase. Adjust the temperature to 46°C above the core temperature desired.
Example: Roasting beef:1 st phase: Coloration Dry air 410°F for 15 minutes 2 nd phase: Core cooking Steam 140°F Till core T° = 126°F
The cooking time increases to about 1 hour 25 minutes.
27.2 LOW-TEMPERATURE COOKING
To optimize certain types of cooking, electronic regulation allows for long low-temperature cooking. The set temperature corresponds to the core temperature which must be achieved.
Low temperature is indispensable for treating big pieces (sucking pig, leg of pork (ham), big fish), often treated in vacuum bags (sous vide).
This cooking mode is also worthwhile for perfectly controlling the cooking level (very rare, rare, well done…), for the aspect (external and sliced), for diminishing weight loss, but also for being safer from a hygienic point of view in the preparation of food products.
The quality of cooking is also much less sensitive to the size of the products treated, as well as to their quality.
The time necessary for cooking entirely conducted at low temperatures is of course longer.
| LOW TEMPERATURE | |||
| Products | Mode | Cooking T° | Approx. time |
| Red meats | Steam | 131°F | |
| White meats | |||
| Veal | Steam | 162°F | 6 h to 12 h |
| Pork and poultry | 171°F | ||
| Pork preparations and terrines | Steam | 153°F | |
| Fish | |||
| Salmon – Tuna | Steam | 167°F | 2 h to 4 h |
| Whitefish | Steam | 176°F | |
| Miscellaneous | |||
| Farm-produced foie gras | Steam | 158°F | 1 h to 1 h 30′ |
| Fruit | Steam | 194°F | |
| Potatoes | Steam | 185°F |
NOTE: Medium size pieces of meat (joints, leg of lamb…)
It is possible to diminish significantly the cooking times (2 or 3 times less), for medium-sized pieces, and still partly keep the advantages above, by following:Products 1st phase COLORATION 2nd phase COOKING 3rd phase COOKING Blown air Steam Steam Red meats 410°F For 15 min 158°F till Core T° = 38°C 140°F till Core T° = 52°C White meats 410°F For 15 min 194°F to Core T° = 140°F 185°F till Core T° = 163°F
MAINTENANCE OF THE OVEN
WARNING: Regular and thorough cleaning will ensure the prolonged service life
- UNDER NO CIRCUMSTANCES SHOULD CLEANING CHEMICALS BE USED ON SURFACES THAT ARE OVER 140°F. The result will be serious discoloration and damage to the surfaces.
- Jet washers and hoses, high or low pressure should never be used for cleaning.
- The warranty will not cover the resulting damage if the following guidance is ignored.
- The appliance must be isolated electrically during cleaning or maintenance and when replacing parts.
28.1 INFORMATION ABOUT STAINLESS STEEL
Stainless steel is a steel grade designed in that a thin protective sheet is formed on the metallic surface, which protects it against corrosion (Oxide film resulting from the chemical reaction of oxygen on the metallic surface).
Anything hindering the formation of this sheet, or facilitating its partial destruction (Food residues, overflow of liquids, stagnant liquids…)
reduces the resistance of stainless steel to corrosion.
Whilst the composition of stainless steel enables it to withstand some chemical aggression better than classical steel, you must not think that stainless steel is indestructible.
⚫ 3 main factors contributing to corrosion should be watched for:
| – The chemical environment in general: | * Different brines (Salt concentration, Sauerkraut…) * Chlorides contained in particular in: – cleaning products – bleach. |
| – The temperature: | Any chemical environment is made considerably more aggressive to stainless steel as the temperature rises. |
| – The duration: | The longer the contact time between stainless steel and the chemicals, the more noticeable the consequences of corrosion will be. |
The combination of these three factors may lead to the eventual destruction of parts of the equipment, even if they have been made in very high-quality stainless steel.
Note that when stainless steel becomes corroded, it is extremely rare that this is generated by the steel itself. Generally, cleaning products, which are not appropriate or are improperly used, lack maintenance, or are under extreme conditions of use are often found to be the cause of the damage.
WARNING!
The manufacturer will not be held responsible for cases of corrosion resulting from these conditions and the warranty will not apply.
A list of the most frequent causes follows, to allow you to better identify possible inappropriate use and to ensure the long service life of your equipment.
28.2 THE COMMONEST CAUSES OF CORROSION:
Floor cleaning
Floors are often cleaned with very aggressive products (prior to handover or during a kitchen deep clean). If the product is sprayed, without necessary precautions or suitable dilution, any splashes on the appliances may result in the corrosion of legs, bases, and low-level trims.
Worse still, if the area is not properly ventilated after application, the vapor from these products may settle on the equipment and result in corrosion spreading to the entire surface.
Inappropriate cleaning products (Bleach, Acids, Soda)
If inappropriate products, such as bleach, acid, or soda dilutions, (all products which are not specifically designed for the maintenance of stainless steel) are used, irreversible etching of the stainless-steel surfaces can occur.
Cleaning product applied when the temperature is too high
All cleaning products are more aggressive at higher temperatures. In principle, the temperature of any surface must not exceed 140°C or permanent staining (blackening) of the stainless steel will result.
Inadequate rinsing after cleaning
After cleaning the surfaces should all be rinsed thoroughly to remove any chemical residues. If this is not done the residue will continue to act over time with the risk of starting the corrosive process.
Worse still, if the affected surface is submitted to temperatures over 140°C (inside of an oven, a tank, or tank, …), the impact will be greater and corrosion will almost inevitably occur.
Stagnation of cleaning products
In the same way, all the areas that can trap chemicals, especially the channels, gutters, drainage manifolds, traps, etc. must be subject to careful and plentiful rinsing. (Use a nylon brush to reinforce the action of rinsing with clean water).
Salt concentration
Salt, much in use in kitchens, is often found to be the origin of pitting that can even penetrate the stainless steel. Spillages on any surface should be cleaned up at once.
The particular case of cooking in boiling salted water:
Salting water in a tank or tank presents a major risk: never put cooking salt into the tank before the water and remember that salt can concentrate on the base of the tank. Salt should be added to the water and stirred until it dissolves, the risk is reduced using table salt which dissolves faster.
Intensive use with brine
Certain products, such as sauerkraut (acid juices), fish and seafood (presence of salt), and in general, all brines, must be subject to particular attention. In the case of occasional use, there should be no problem if the equipment is carefully and systematically cleaned after each use.
In the case of intensive use, all the cooking equipment (ovens, boiling pans, even utensils) must be selected with a grade of stainless steel specifically adapted to use in such an environment
Too much chlorine in the mains water supply
Sometimes certain networks supply water containing chlorine at above normal levels. In this event, it is not unusual to be faced with problems of corrosion, pay particular attention to bain-marie, water baths, and equipment left to soak overnight, etc.
Cleaning aluminum or aluminum coated items
The presence of aluminum or items that are aluminum coated in a chlorine solution is a particularly powerful catalyst for damaging stainless steel.
Do not leave fittings such as hood filters, aluminum trays, or dishes soaking in tanks, tanks, pots, fryers, etc. Just one night is sufficient to etch stainless steel at the point of contact with aluminum.

28.3 MAINTENANCE OF EXTERNAL SURFACES
It is necessary to clean the metal surface carefully so as to eliminate all dust, metal particles, and deposits of any kind which could damage the protective layer mentioned above. For this purpose, it is sufficient to wash these surfaces with soapy water or any other neutral and non-abrasive cleaning product. RINCE CAREFULLY and wipe the surfaces. Never scrub stainless steel with metal wool, but if necessary, only with a “Scotch Brite” type pad or a similar product, by following the direction of polishing of the stainless-steel surface.
28.4 CLEANING THE ELECTRONIC COMPARTMENT VENTILATION OPENINGS
Cooling of the electronic compartment is ensured by means of the ventilation apertures at the right front of the equipment (6 / 7 and 10 levels). Once a week, check that the aeration grids are clean and not obstructed by dust by cleaning their surface with a dry cloth. 28.5 CLEANING THE CAVITY GASKET
In order to remove traces of grease or food scraps that can damage the gasket, regular and manual cleaning of the cavity gasket should be performed on the inner and outer faces.
Before cleaning, use water with soap or neutral and non-abrasive detergent with a sponge or a soft cloth to remove the grease from the cavity gasket.
28.6 CLEANING THE SELECTION KNOB
To clean the part behind the selection knob, remove it.
28.7 CLEANING BEHIND THE INNER DOOR
In order to keep optimum visibility of the cooking area, regularly clean the inner door and the door paneling with a suitable product and a soft cloth.
Opening the internal glass
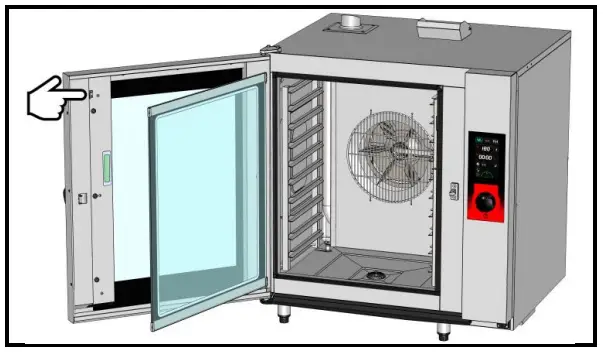
* Open the door
To open the internal glass
– Press gently on the retaining clip to release the glass
Opening the door paneling
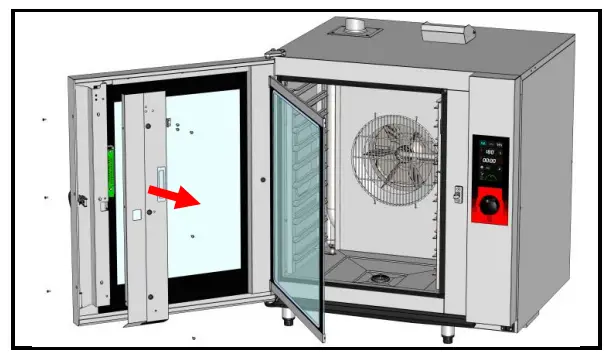
Open the door
To open the internal glass
– Press gently on the retaining clip to release the glass
Removing the door paneling
– Undo the 2 Phillips screws on the side of the door
– Undo the 3 Phillips screws holding the door paneling
– Remove the paneling and the internal glass retaining clips
28.8 MAINTENANCE OF INTERNAL SURFACES
The general principle consists in not letting the following settle in certain places:
– Substances are likely to become concentrated and so become corrosive.
– Settling of different minerals contained in water and likely to generate corrosion (walls) performance and life-duration (fan balancing, exchanger dissipation, ..) problems.
CLEANING, DEGREASING: Once a day (see section « Cleaning menu »)
DESCALING: Every day if necessary.
If there are any mineral deposits (whitish specks) as a result of un-softened water in the cooking chamber this must be removed daily.![]() For maximum efficiency of the descaling product without damaging the material and components of the oven, you should use an appropriate descaler. The use of certain acids has an irreversible destructive effect that may cause significant damage. The descaling product must contain corrosion inhibitors to prevent the metal attack. It must also comply with legal requirements, in particular for material intended to come into contact with foodstuffs.
For maximum efficiency of the descaling product without damaging the material and components of the oven, you should use an appropriate descaler. The use of certain acids has an irreversible destructive effect that may cause significant damage. The descaling product must contain corrosion inhibitors to prevent the metal attack. It must also comply with legal requirements, in particular for material intended to come into contact with foodstuffs.
Chemical products containing nitric acid are strictly prohibited. Recommended composition:
– Phosphoric acid <50%
– Corrosion inhibitor
28.9 MATERIAL USED FOR COOKING CORROSIVE PRODUCTS (Sea fish, sauerkraut)
The materials used intensively and regularly for cooking corrosive products, such as sea fish, and sauerkraut, …, should be cleaned carefully and systematically after each use.
PREVENTATIVE MAINTENANCE
The appliance must be isolated electrically during cleaning or maintenance and when replacing parts.Subject Daily Weekly Monthly Every year (Or every 3000 h) Recommendations Cleaning the external surfaces x Use the correct dose of cleaning product; Do not use abrasive products. Cleaning the cavity seal (all models) x Use the correct dose of cleaning product; Rinse thoroughly; Do not use abrasive products. Visual inspection of cavity seal (all models) x In case of damage, alert the after-sales service Cleaning and descaling of internal surfaces x Respect cleaning product dosage; Rinse thoroughly; Alert the after-sales service if any rust points appear. Checking the amount of cleaning agent in the container x Replace the container as often as necessary Checking the condition of the hose and of the base valve in the cleaning agent container Check when replacing the container / Clean the base valve Checking the amount of descaling product in the container x Replace the container as often as necessary Checking the condition of the hose and the base valve in the descaling agent container Check when replacing the container / Clean the base valve Cleaning the electronic compartment ventilation openings x Visual check of the presence of inner door stops x Visual check of the condition of the lighting strip label x Clean if necessary, with a non-aggressive and non-abrasive degreaser. Rinse thoroughly. In case of damage, alert the after-sales service Visual inspection of the core probe (tip, cable, passage through the bulkhead) x In case of damage, alert the after-sales service Periodic maintenance by the after-sales service x
ERROR MESSAGES
| Message on the screen | Consequences | What to do? |
| i28: Core probe not connected | Cooking stops. | To continue cooking connect a probe or switch to timer mode. |
| E30: Electronics overheating | Control panel overheated | Clean the air inlet. |
| i31: Electronics overheating: Temperature reduced to 350°F | Cooking continues automatically at a temperature below 350°F | Clean the lower and rear air intakes. If the problem persists, call a service technician. |
| E32: Core probe with 2 points nonfunctional | Cooking will continue | Consider changing the probe after cooking |
| i33: The core probe is nonfunction or is not plugged | Cooking stops | To continue cooking connect a probe or switch to timer mode. |
| E46: Electronic communication fault (Bus RS485) | Cooking stops | Possible to launch safe mode: convection mode at 347°F (see guidance and info about the control screen). |
| E53: Motor short-circuit or ventilation nonfunction | Cooking stops | Switch the oven off and call a service technician. |
| E61: Ambient probe short circuit | Cooking stops | Switch the oven off and call a service technician. |
| E62: Ambient probe nonfunction | Cooking stops | Switch the oven off and call a service technician. |
| E67: Gas safety activated | Cooking stops | Check gas inlet. Switch the oven off and call a service technician. |
| E68: Cavity at + 554°F | Cooking stops | Switch the oven off and call a service technician. |
| E72: Electronics at over + 167°F | Cooking stops | Switch the oven off and call a service technician. |
| E73: Cleaning pump failure or running constantly | Cooking continues. | Arrange for a service technician |
| i81: Water flow problem | Reduced functionality or Pause the cleaning | Check the valve and water pressure. If the message appears during a cleaning cycle it is possible to stop the cycle if the cleaning chemicals have not yet been injected, by pressing stop. Check that the water has not been switched off to recommence the cycle automatically. If this is not the case the cycle is blocked. To force an end to the cycle : – press on « Tools/Cleaning » – enter the PIN code « RSTC » to exit – manually undertake a thorough rinse of the cooking cavity to eliminate all chemical residues before cooking – call a service technician |
| i81 LAV: Water flow too low during cleaning | Pause the cleaning cycle | Check the valve and the water pressure. Switch the oven off and call a service technician. |
| E82: Solenoid sticking | Cooking continues. | Switch the oven off and call a service technician. |
| i83: Maximum capacity of water treatment equipment reached | Cooking continues. | Check and recharge your equipment then reset the counter (client parameters) |
| i84 : révision impérative | Cooking continues. | Call a service technician. |
| USB stick full | The USB stick is full. | Clear the USB stick |
| USB missing | USB stick required | Connect a USB stick |
| A screen blocked or not working | Cooking continues in the previously configured mode. | Turn off the oven and restart it. If the problem persists, reset the interface: Open and close the door 6 times after switching it on. |
LES CONSUMABLES
31.1 GENERAL
We recommend the use of products supplied by the manufacturer for cleaning your equipment and to guarantee effective results. Contact your distributor who can supply these detergent chemicals
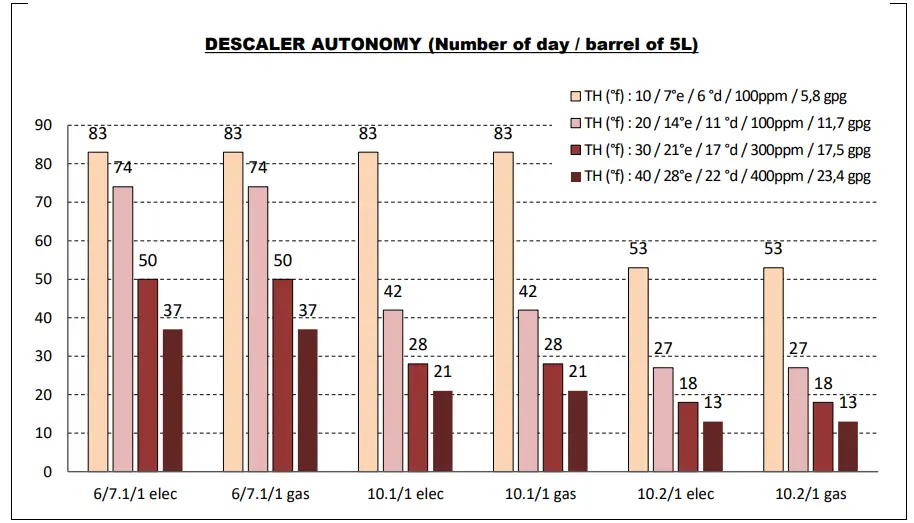
31.2 CLEANING PRODUCT 31.3 DESCALER PRODUCT
RECOMMENDED AND FRONT-LINE SPARE PARTS
| Designation | Codes |
| Drive shaft gasket + wear ring | 145587 |
| 120W UL Motor service kit | 147147 |
| UL drainage valve | 147861 |
| Resistance service kit 11.43 KW 240V + gasket (outer flange) | 147960 |
| Resistance service kit 19.6 Kw 240V + gasket | 147961 |
| Resistance service kit 16.3kw 208V + gasket | 147962 |
| Regulation probe service kit 1PT100 | 148071 |
| 250W Motor service kit + ring + gasket | 148095 |
| Resistance service kit 11.43 Kw 240V + gasket | 148096 |
| Resistance service kit 22KW 277V + gasket | 148097 |
| Resistance service kit 11KW 277V | 148098 |
| 40 diameter burner service kit 15-24 kW | 148246 |
| 40 diameter burner service kit | 148247 |
| Gas fan service kit | 148257 |
| One-way UL solenoid valve 1 x 10L/min | 148597 |
| Two-way UL solenoid valve 2 x 10L/min | 148598 |
| After-sales kit facia seal | 148755 |
| Motor relay with a fixation bracket | 300282 |
| Reed switch | 300676 |
| Fuse holder 6.3 x 32 | 300679 |
| Three-pole 25A 230V 50/60 Hz contactor | 300697 |
| Three-pole 50A 230V 50/60 Hz contactor | 300700 |
| Tree-pole 80A 230V 50/60 HZ contactor | 300702 |
| Anti-interference relay | 300769 |
| Ultra-fast fuse 0.2A 250V 5 x 20 | 300787 |
| 10amp 5 x 20 fuse | 300788 |
| 5 x 20 fast fuse 1amp | 300789 |
| 600VAC fuse 10A 10.3 x 38.1 | 300793 |
| Contactor LC1D80P7 | 300798 |
| Glass fuse | 300801 |
| Manual resetting 320°C thermostats + nut | 301066 |
| Peristaltic pump 3 litres/h | 304312 |
| Condenser 12.5µf | 304296 |
| Ventilation fan 120 x 120 x 38 230/50/60 UL | 304297 |
| 24V Motor/gearbox | 305110 |
| Switching regulator 15V 15W RS 15-15 | 308350 |
| Transformer 230V/24 UL | 308492 |
| 830 VA Transformer | 308498 |
| 415 VA Transformer | 308499 |
| Fuse 3.15 Amps | 309407 |
| Inter card cable | 309581 |
| Filter with connection for gas oven | 309608 |
| FastPAD 2 interface assembly | 309634 |
| LED strip | 309638 |
| VISIOPAD coder | 309644 |
| FastPAD 2 Screen | 309646 |
| FastPAD 2 Max UL relay connection | 309663 |
| Gas burner control card | 309704 |
| 848 Sigma 60Hz gas valve | 310355 |
| Security box | 310356 |
| LED strip label | 311356 |
| CP2A pump | 314379 |
| Base weight | 318060 |
| Heating element + immersion heater gasket | 366461 |
| 27 x 3 EPDM 70 shores O ring | 366485 |
| Capacity drainage gasket | 366556 |
| Capacity gasket for oven | 366561 |
| Capacity gasket to 1035 and 1056 | 366562 |
| Doorstop | 366572 |
| 4 x 6 PVC hoses per meter | 366601 |
| Inlet flange gasket exchanger | 366680 |
| Outlet seal exchanger 6/10 levels | 366683 |
| Heat exchanger inlet seal | 366684 |
| Gas fan gasket | 366685 |
| Door closure mechanism | 384187 |
| Anti-parasite module | 407002 |
| Gas ignition | 408402 |
| Arched ignition electrode | 468400 |
| Straight Ionisation electrode | 468401 |
RECOMMENDATIONS
- These appliances are for professional use, only appropriately trained personnel should use them.
- These appliances are intended to be used for commercial applications, for example in kitchens of restaurants, canteens, hospitals, and in commercial enterprises such as bakeries, butcheries, etc., but not for continuous mass production of food.
- These appliances must be installed with sufficient ventilation to prevent the formation of an excessive concentration of substances harmful to health within the premises on which they are installed.
- The rate of new air required for combustion is 2m3/h per kW of heating power.
- Never block the condensate exhaust flue, because the pressure could rise in the appliance and pose a risk of explosion.
- If an error message appears consult the list of error messages and follows the ADVICE given
- When cleaning high pressure jets or lances should never be used.
- NEVER start the oven WITHOUT HAVING POSITIONED AND LOCKED the ventilation duct.
- Do not remove the ventilation duct and the drain grid located in the oven. If this grid is missing do not start the oven.

- Always use a qualified technician to install the equipment and if necessary change the oven from one gas to another.
- IMPORTANT: Please be aware that when cooking dishes prepared with alcohol (coq au vin, pears in wine, etc.…). Vapour saturated with alcohol may when heated cause an explosion in the oven and due to the sealed door, create a momentary overpressure which may cause an irreversible deformation of the panels. This risk is further increased when the user adds alcohol to the products near the end of the cooking cycle and closes the door to complete cooking.
- The appliance must be isolated electrically during cleaning or maintenance and when replacing parts.
- For long-term reliability and safety, it is advisable to have the unit serviced by suitably qualified technicians (Dismantling of burners, inspection, and cleaning of ventures, cleaning jets, adjustment of air rings, cleaning vents, checking for possible leaks, checking control elements, regulating and safety accessories…).
- The oven must be meticulously maintained on a DAILY basis (see the “Maintenance” chapter). In particular, the fans, heating elements, and internal surfaces must be kept clean grease and mineral deposits must not be allowed to accumulate.
- Never place the probe behind the ventilation duct (the probe may deteriorate in proximity to the elements or gas exchange.
- NEVER APPLY ANY CLEANING PRODUCT WHEN THE OVEN IS HOT, AT ANYTHING OVER 140°F THE SURFACE WILL BE IRREPARABLY DAMAGED.
- Do not open the oven door during a cleaning cycle.
- Combination ovens should be cleaned with specific products which can resist temperatures of up to 158°F. An inappropriate cleaning or descaling product may have a slightly corrosive effect.
- The detergent chemical risk should not exceed 3 in accordance with EN 1717 (Toxicological information FDS: LD50 > 200mg/kg).
- We strongly advise using cleaning products recommended by the manufacturer to ensure optimal cleaning and component life.
- To guarantee optimal cleaning and avoid chemical damage, we recommend using suitable cleaning products. For cleaning products to be compatible with our ovens, they should:
– be composed of less than 25% potassium hydroxide WITHOUT sodium hydroxide
– be compatible with an operating temperature of 140°F.
– contain anti-corrosion agents - For maximum efficiency of the descaling product without damaging the material and components of the oven, you should use an appropriate descaler. It must also comply with legal requirements, in particular for material intended to come into contact with foodstuffs.
Chemical products containing nitric acid are strictly prohibited. Recommended composition:
– Phosphoric acid <50%
– Corrosion inhibitor - Under no circumstances should the oven be cleaned with grills or containers in situ.
- The core probe socket and USB port are fitted with silicone protective covers.
– Always put the protective cover in place (lowered to protect connections) whenever the socket is not in use.
– Never “clean” connections with a water hose or a sponge. (If the silicone cover is used and put back in place after use, no maintenance is necessary). - The manufacturer certifies that the packaging meets provision 94/62/CE (relating to packaging and packaging waste of 20.12.94) and requests that the final installer (or user) observes the rules relating to the removal of the packaging (recycling or reuse).
- « According to article 6 of the decree of 20 July 2005, a marking giving the identity of the manufacturer and the market release date must appear on equipment after 13 August 2005».
- The warranty will not cover problems caused by failure to comply with these recommendations
 Warning! Danger! Caution!
 - Cooking appliances may reach 482°F. BE CAREFUL not to burn yourself when using or handling INNER ACCESSORIES (Plates, modules, filters, duct…).
- The surface temperature of the door can exceed 140°F. BEWARE OF THE RISK OF BURNS.
- Loading and unloading containers and ovenware: The height of the top shelf or runner can be 39.37”. If unloading manually is careful.
ATTENTION: splashes and spillages pose a risk of scalding. - When using the core probe be aware that it can be very hot, always use suitable protection to avoid burns
- Remember the dangers identified on the safety data sheet for detergent and descaler
– Harmful if swallowed.
– Can result in serious burns.
– Irritates the eyes.
– Irritates the respiratory tracts.
– Risk of serious eye lesions. - The danger of irritation to the skin and eyes or acid burns.
Detergents and descaler will cause irritation and possible burns if in direct contact with the skin or eyes.
– Do not inhale the mist or spray
– Avoid direct contact with these products
– Never open the oven door during the automatic cleaning cycle
– Wear protective clothing, gloves, and hermetic protective goggles in accordance with the safety data sheet. - Remember the safety advice provided by the safety data sheet for each detergent and descaler
– Do not each or drink when using these products.
– Do not inhale their vapors.
– If case of contact with the eyes rinse immediately with plenty of water and seek medical advice.
– Wear appropriate protective clothing, gloves, and face and eye protective gear.
– In the event of an accident or sickness seek immediate medical attention
– Dispose of the product and its container as hazardous waste.

PROFESSIONAL KITCHEN EQUIPMENT END OF LIFE CYCLE
Instructions
Dispose of this product according to the national legislation, or other rules in force in your country, regarding the safe disposal of used electrical and electronic equipment.
Note: To do this, contact an appropriate collection point for the recycling of electrical and electronic devices for treatment, recovery, and recycling in accordance with national legislation.
GUARANTEE
PLEASE NOTE THAT NO GUARANTEE IS UNCONDITIONAL
Our guarantee applies only for normal use. That is, with the strict observance of the recommendations given in our instructions for use and maintenance.
It will only be valid on the condition that the periodical maintenance recommended has been carried out by factory-trained engineers.
All appliances are, subject to the above limitations, normally guaranteed for a period of one year, from the date of invoice. In the event of a breakdown due to a visible or hidden defect, our equipment will be repaired at our expense, including parts and labor costs.
To benefit from our guarantee, our appliances must not have been modified in any way or repaired using parts that are not genuine and approved for such use or where repairs have been undertaken by personnel who are not qualified or factory trained.
In case of breakdown or failure, we should be informed in writing at the earliest opportunity of the nature of the problem. In no circumstances should the defect be remedied by the user or a third party.
Regular service inspections and maintenance by our engineers are essential conditions for the correct and reliable operation of our equipment. Such service and maintenance operations can and must only be carried out by our technicians, who are not only fully qualified but also trained to do so. They have the right tooling, and original spare parts and are given regular training updates on the appliances. Periodic servicing is essential; it is carried out at a cost but guarantees reliable operation of our appliances The timing of service and maintenance is relative to the conditions of use. In the event of heavy use, certain operations will need to be carried out more frequently.
WARNING! Damage caused by connecting our appliances to a power supply that does not comply with the data plate (voltage, reversal of phase/neutral conductors …) or where phase order cannot be checked (this is important for three-phase motors, fan direction, electric rams, …) will under no circumstances be covered by warranty.
For this reason, we advise against connecting appliances until the electrical and gas supplies can be checked and compared with details on the data plate.
VULCAN
A division of ITW Food Equipment Group LLC
P.O. Box 696
Louisville, KY 40201


