
![]() CamConnect
CamConnect
User Manual
Chapter 1 System Requirements
1.1 Operating System Requirements
- Windows 10
- Windows 11
1.2 System Hardware Requirements
| Item | Requirements |
| CPU | CPU: Intel i5 / i7 above |
| Memory | Memory: 4GB RAM |
| Free Disk Space | 1GB Free Disk Space |
| Ethernet | Min Screen Resolution: 1920×1080 |
Chapter 2 System Connection and Application
2.1 System Connection

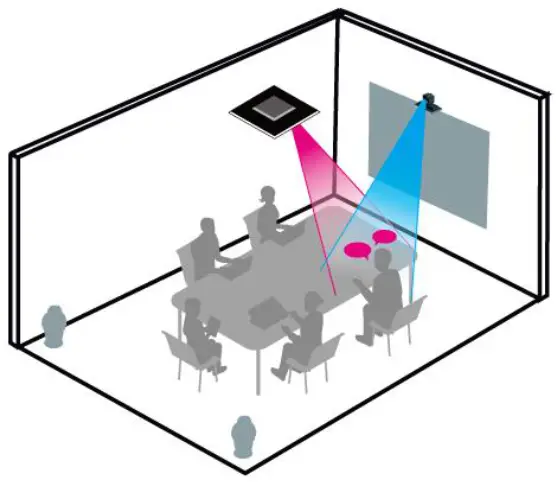
2.2 Scenario
Chapter 3 Support Devices
3.1 Shure Microphone System
- Shure MXA310 Table Array Microphone
- Shure MXA910 Ceiling Array Microphone
- Shure MXA920 Ceiling Array Microphone
3.2 Sennheiser Microphone System
- Sennheiser TeamConnect Ceiling 2 (TCC2) Ceiling Microphone <Note> When using TCC2 with CamConnect, please set and configure the channels on the Sennheiser Control Cockpit software first.
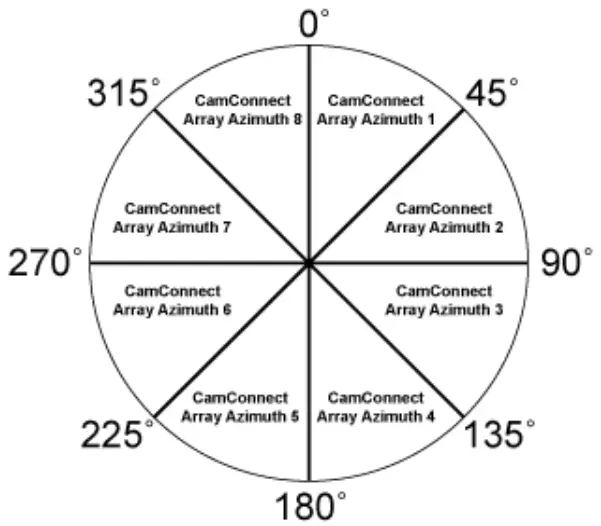
CamConnect is divided into 8 equal parts according to Senheisser’s horizontal angle of view. They correspond to CamConnect Array Azimuth 1 to 8.
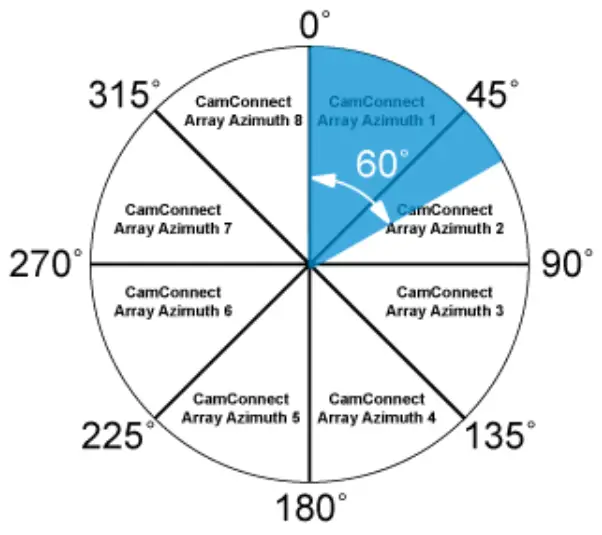
If the forbidden area is enabled on the Sennheiser Control Cockpit software, the corresponding position of CamConnect will also be affected. Example: If the forbidden area is set to 0° to 60°, the audio signal from 0° to 45° of CamConnect Array Azimuth 1 and 45° to 60° of Array Azimuth 2 will be ignored.
Chapter 4 Operation Interface Description
4.1 Main Screen
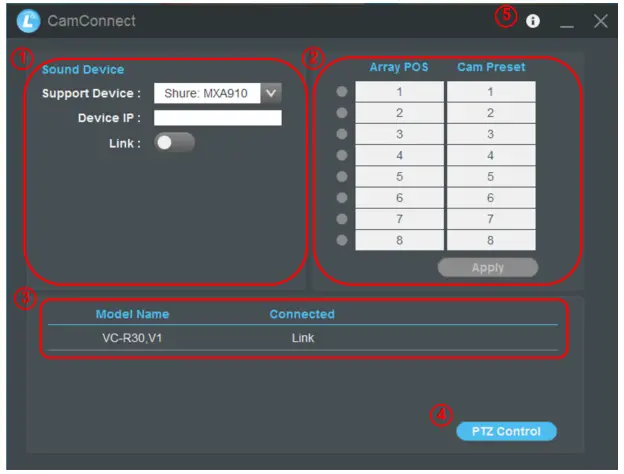
| No | Item | Function Descriptions |
| 1 | Microphone Device | 1.1 Support Device: The following brands and models are supported • Shure: MXA910_ MXA920_MXA310 • Sennhiser: TCC2 1.2 Device IP: IP location of the microphone device 1.3 Link: On/Off |
| 2 | Preset setting | After the microphone device is connected, the camera can be controlled to turn to the corresponding position according to the microphone detection position. There will be a green light at the front of the detection position. • Array POS: For Shure microphones • Array Azimuth: For Sennheiser microphones Click the camera preset and modify Sennheiser microphone Array Azimuths manually. Then click [Apply] when completed. |
| 3 | Searching | The connected USB cameras will be displayed 3.1 When disconnected, click [Link] to connect the camera and perform PTZ control.  3.2 When connected, click [Disconnect] to stop the connection. 3.2 When connected, click [Disconnect] to stop the connection. |
| 4 | PTZ Control | Click to enable PTZ control Refer to 4.2 PTZ Control for function description |
| 5 | About | Displaying software version information For technical support, please scan the QRcode on the page for assistance |
4.2 PTZ Control
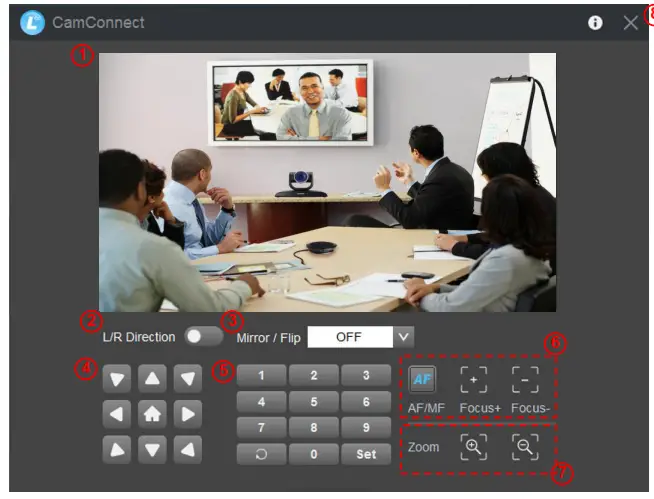
| No | Item | Function Descriptions |
| 1 | Preview window | Display the screen currently captured by the camera |
| 2 | L/R Direction | L/R Direction / Normal |
| 3 | Mirror / Flip | Set image mirroring/flip |
| 4 | Pan/Tilt/Home | Adjust the Pan/Tilt position of the camera screen Click [Home] key |
| 5 | Preset setting | Click the number keys directly to call the preset • Save preset: Click [Set] first and then a number key • Clear preset: Click |
| 6 | AF/MF | Switch to Auto Focus/Manual Focus. Focus can be adjusted in Manual. |
| 7 | Zoom | Zoom In/Zoom Out ratio |
| 8 | Exit | Exit the PTZ Control page |
Chapter 5 Troubleshooting
This chapter describes problems you may encounter while using Lumens CamConnect. If you have questions, please refer to related chapters and follow all the suggested solutions. If the problem still occurred, please contact your distributor or the service center.
| NO | Problems | Solutions |
| 1. | Unable to search camera devices | 1. Check the power supply of camera or PoE power supply is stable. 2. Make sure the PC is connected to the camera with the USB cable 3. Replace the cables and make sure they are not faulty |
| 2. | No response from the microphone detection position | Make sure the microphone device is connected (Link) |
| 3. | When using with a Sennhesier microphone, no response at the specific angle | 1. Make sure the Array Azimuth settings in the CamConnect software include that angle position 2. Make sure if the angle is set as the forbidden area on Sennhesier Control Cockpit software. Refer to 3.2 Sennhesier Microphone System for details. |
Copyright Information
Copyrights © Lumens Digital Optics Inc. All rights reserved.
Lumens is a trademark that is currently being registered by Lumens Digital Optics Inc.
Copying, reproducing or transmitting this file is not allowed if a license is not provided by Lumens Digital Optics Inc. unless copying this file is for the purpose of backup after purchasing this product.
In order to keep improving the product, the information in this file is subject to change without prior notice.
To fully explain or describe how this product should be used, this manual may refer to names of other products or companies without any intention of infringement.
Disclaimer of warranties: Lumens Digital Optics Inc. is neither responsible for any possible technological, editorial errors or omissions, nor responsible for any incidental or related damages arising from providing this file, using, or operating this product.![]()


