
zowieTek B09P86X9GF 1080P HD Smart PTZ Camera
Product Information 1080P HD Smart PTZ Camera
The 1080P HD Smart PTZ Camera is a high-definition camera that can be controlled remotely. It has a standby power mode and complies with Part 15 of the FCC Rules and the Council Directives on the Approximation of the laws of the Member States relating to Electromagnetic Compatibility Directive 2014/30/EU. The camera is Class A ITE, which satisfies the Class A ITE limits but not the Class B ITE limits.
Safety Precautions
During the installation and use of the equipment, all electrical safety regulations of the country and region of use must be strictly observed. Please use the power adapter that comes standard with this product. Do not connect multiple devices to the same power adapter, as exceeding the capacity of the adapter may generate excessive heat or cause a fire. Do not rotate the head of the camera by hand, as it may cause mechanical failure. When installing this product on a wall or ceiling, secure the device securely. To avoid heat build-up, keep ventilation around the device smooth.
Quick Start
If the device emits smoke, smells, or makes noises, please turn off the power immediately and unplug the power cord, and contact the dealer in time. This device is not waterproof, so please keep it dry. This product has no user-serviceable parts, and damage caused by disassembly by the user is not covered by the warranty. Specific frequencies of electromagnetic field may affect the image of the camera!
Product Usage Instructions
To use the 1080P HD Smart PTZ Camera:
- Ensure that all electrical safety regulations are observed during installation and use.
- Use the power adapter provided with the camera and do not connect multiple devices to the same adapter to avoid generating excessive heat or causing a fire.
- Do not rotate the head of the camera by hand, as it may cause mechanical failure.
- Secure the device securely when installing it on a wall or ceiling, and ensure that there are no obstacles within the rotation range of the gimbal.
- Keep ventilation around the device smooth to avoid heat build-up.
- If the device emits smoke, smells, or makes noises, turn off the power immediately and unplug the power cord. Contact the dealer for assistance.
- Avoid exposing the camera to water, as it is not waterproof.
- Do not attempt to disassemble the camera, as it has no user-serviceable parts. Damage caused by disassembly by the user is not covered by the warranty.
- Avoid exposing the camera to specific frequencies of electromagnetic field, as they may affect the image of the camera.
Copyright
All contents of this manual, whose copyright belongs to our corporation, cannot be cloned, copied or translated without the permission of our corporation.
Notice
Product specifications and information which were referred to in this document are for reference only. We may change, delete, or update any content at any time and without prior notice.
FCC NOTICE Class A
This product complies with Part 15 of the FCC Rules. The operation is subject to the following two conditions: (1) this device may not cause harmful interference, and (2) this device must accept any interference received, including interference that may cause undesired operation.
NOTE This product has been tested and found to comply with the limits for a Class A digital device, pursuant to Part 15 of the FCC Rules. These limits are designed to provide reasonable protection against harmful interference in a residential installation. This equipment generates uses and can radiate radio frequency energy and, if not installed and used in accordance with the instructions, may cause harmful interference to radio communications. However, there is no guarantee that interference will not occur in a particular installation. If this equipment does cause harmful interference to radio or television reception, which can be determined by turning the equipment off and on, the user is encouraged to try to correct the interference by one or more of the following measures:
- Reorient or relocate the receiving antenna.
- Increase the separation between the equipment and receiver.
- Connect the equipment into an outlet on a circuit different from that to which the receiver is connected.
- Consult the dealer or an experienced radio/television technician for help.
Class A ITE
Class A ITE is a category of all other ITE which satisfies the class A ITE limits but not the class B ITE limits. Such equipment should not be restricted in its sale but the following warning shall be included in the instructions for use:
Warning
Operating this equipment in a residential environment may cause radio interference.
European Community Compliance Statement (Class A)
This product is herewith confirmed to comply with the requirements set out in the Council Directives on the Approximation of the laws of the Member States relating to Electromagnetic Compatibility Directive 2014/30/EU.
Safety Precautions
- During the installation and use of the equipment, all electrical safety regulations of the country and region of use must be strictly observed.
- Please use the power adapter that comes standard with this product.
- Please do not connect multiple devices to the same power adapter (exceeding the capacity of the adapter may generate excessive heat or cause a fire).
- Do not rotate head of the camera by hand, otherwise it may cause mechanical failure.
- When installing this product on a wall or ceiling, secure the device securely. When installing, make sure that there are no obstacles within the rotation range of the gimbal; do not turn on the power until all installations are completed.
- To avoid heat build-up, keep ventilation around the device smooth.
- If the device emits smoke, smells, or makes noises, please turn off the power immediately and unplug the power cord, and contact the dealer in time.
- This device is not waterproof, please keep the device dry.
- This product has no user serviceable parts, damage caused by disassembly by the user is not covered by the warranty.
Notice
Specific frequencies of electromagnetic field may affect the image of the camera!
Packing List
| Name | Quantity |
| Camera | 1 |
| Power Adapter | 1 |
| Power Cable | 1 |
| RS232 Cable | 1 |
| USB Cable | 1 |
| Remote Control | 1 |
| User Manual | 1 |
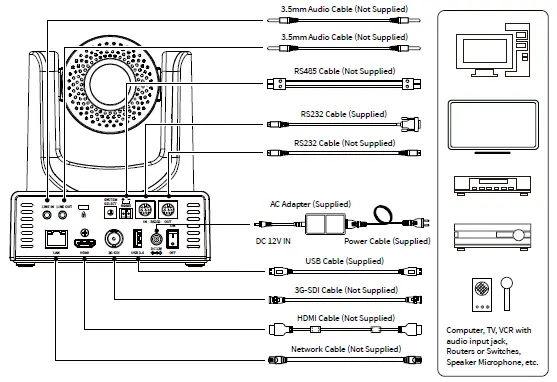
Quick Start
- Please check connections are correct before starting.

- Connect the power adapter to the power connector on the rear panel of the camera. The power indicator on the front panel of the camera is on.
- After the camera is powered on, it starts to initialize, right up to the limit position, and then both horizontal and vertical go to the middle position, the motor stops running, and the initialization is completed.
(Note: If preset 0 is saved, PTZ will be move to preset 0)
Video Format
| Video Format | |||
| 0 | 1080P60 | 8 | – |
| 1 | 1080P50 | 9 | – |
| 2 | 1080I60 | A | 1080P59.94 |
| 3 | 1080I50 | B | 1080I59.94 |
| 4 | 720P60 | C | 1080P29.97 |
| 5 | 720P50 | D | – |
| 6 | 1080P30 | E | – |
| 7 | 1080P25 | F | 720P59.94 |
About Product
Features
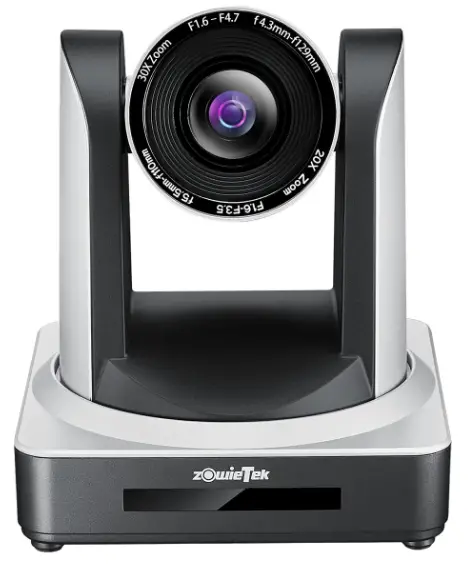
- 60.7° Wide-angle Lens + 20x Optical Zoom
60.7° high-quality ultra-wide-angle lens, optical zoom up to 20x, support 16x digital zoom. - 1080P Full HD
Using 1/2.8-inch high-quality HD CMOS sensor with effective 2.07 million pixels, it can achieve high-quality images with a maximum resolution of 1920×1080. - New ISP Image Processing Algorithm
The new generation of ISP image processing algorithm provides more complete white balance and automatic exposure functions, which significantly improves the image output performance of the camera, and the imaging effect is also better. Widely used in education recording and broadcasting, distance education, video conferencing, live broadcasting, broadcasting and other industries. - Upgraded AI Technology
Using upgraded AI technology, through face recognition, it can accurately determine the location of people, realize automatic tracking and automatic frame selection. - 1080P60 NDI®|HB
It supports 1080P60 NDI®|HB technology, ultra-low latency high-quality audio and video signal transmission, and can achieve unparalleled ultra-high-resolution image quality and lossless effects that are closer to vision. - Leading Auto Focus Technology
Using advanced focusing algorithm, the lens can focus quickly, accurately and stably. - Audio Processing Algorithm
The exclusive audio processing algorithm can eliminate reverberation, effectively reduce environmental noise, and support EQ adjustment to optimize sound effects; the device supports dual mic pickup, and can also be connected to external microphones, wireless bees, etc., to meet the pickup needs of most scenarios. - Multiple Interfaces
Support HDMI and 3G-SDI interface, effective transmission distance of 3G-SDI is up to 150 meters (1080P30). HDMI, 3G-SDI, LAN can output three HD digital signals at the same time. - Remote Control
Through the RS232 and RS485 serial ports, the camera can be controlled remotely.
Specifications
| Camera | |
|
Signal System | 1080P60, 1080P59.94, 1080P50, 1080I60, 1080I59.94, 1080I50, 1080P30, 1080P29.97, 1080P25, 720P60, 720P59.94, 720P50 |
| Sensor | 1/2.8 inch, CMOS, Effective pixels: 2.07M |
| Scanning Mode | Progressive |
| Lens | 20x, f = 4.42mm ~ 88.5mm, F1.8 ~ F2.8 |
| Digital Zoom | 16x |
| Minimum Illumination | 0.5 Lux @ (F1.8, AGC ON) |
| Shutter | 1/30s ~ 1/10000s |
| White Balance | Auto, VAR, Manual, One Push, Indoor, Outdoor |
| Backlight Compensation | Support |
| Digital Noise Reduction | 2D & 3D Digital Noise Reduction |
| SNR | ≥55dB |
| Horizontal FOV | 60.7° ~ 3.36° |
| Vertical FOV | 34.1° ~ 1.89° |
| Pan Angle | ±170° |
| Tilt Angle | -30° ~ +90° |
| Pan Speed | 1.7° ~ 100°/s |
| Tilt Speed | 1.7° ~ 69.9°/s |
| Image Flip | Support |
| Image Freeze | Support |
| Preset Position | 255 |
| Preset Accuracy | 0.1° |
| Audio Features | |
| Microphone Array | Built-in dual microphones, 100Hz to 16KHz frequency response |
| Audio Input | Support LINE IN audio input |
| Audio Output | Support LINE OUT, HDMI, USB and other audio output |
| USB Features | |
| Operate System | Windows 7/8/10, Mac OS X, Linux, Android |
| Color System / Compression | YUY2/MJPEG/H.264 |
| USB Audio | Support |
| USB Video Protocol | UVC 1.1/UVC 1.5 |
| UVC PTZ Control | Support |
| Network Features | |
| Video Compression | H.264/H.265 |
| Video Stream | First Stream, Second Stream |
| First Stream Resolution | 1920×1080, 1280×720, 1024×576, 960×540, 640×480, 640×360 |
| Second Stream Resolution | 1280×720, 1024×576, 720×480, 640×360, 480×272, 320×240, 320×180 |
| Video Bit Rate | 32Kbps ~ 20480Kbps |
| Bit Rate Control | CBR, VBR |
| Frame Rate | 1fps ~ 60fps |
| Audio Compression | AAC |
| Audio Bit Rate | 96Kbps, 128Kbps, 256Kbps |
| Protocols | NDI, TCP/IP, HTTP, RTSP, RTMP/RTMPS, ONVIF, DHCP, SRT, Multicast |
| Interfaces | |
| LINE IN Interface | 1 x LINE IN: 3.5mm Audio Interface |
| LINE OUT Interface | 1 x LINE OUT: 3.5mm Audio Interface |
|
Communication Interface | 1 x RS485: 2pin phoenix port, Max Distance: 1200m, Protocol: VISCA/ Pelco-D/Pelco-P 1 x RS232 IN: 8pin Min DIN, Max Distance: 30m, Protocol: VISCA/Pelco-D/ Pelco-P 1 x RS232 OUT: 8pin Min DIN, Max Distance: 30m, Protocol: VISCA network use only |
| Network Interface | 1 x LAN: 10M/100M Adaptive Ethernet Port |
| HDMI Interface | 1 x HDMI: Version 1.3 |
| 3G-SDI Interface | 1 x 3G-SDI: BNC type, 800mVp-p, 75Ω. Along to SMPTE 424M standard |
| USB Interface | 1 x USB 3.0: Type A |
| Power Jack | JEITA type (DC IN 12V) |
| General Specifications | |
| Input Voltage | DC 12V |
| Input Current | Max. 1.0A |
| Operating Temperature | 0°C ~ 40°C |
| Storage Temperature | -40°C ~ 60°C |
| Power Consumption | Max. 12W |
| Dimension | 146mm x 169mm x 168mm |
| Net Weight | About 1.5Kg |
Note
Product specifications and parameters are subject to change without notice.
Interface and Switch
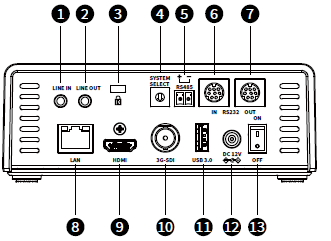
| Item | Description |
| 1 | LINE IN Interface |
| 2 | LINE OUT Interface |
| 3 | Security Slot |
| 4 | System Select Switch |
| 5 | RS485 Interface |
| 6 | RS232 IN Interface |
| 7 | RS232 OUT Interface |
| 8 | LAN Interface |
| 9 | HDMI Interface |
| 10 | 3G-SDI Interface |
| 11 | USB 3.0 Interface |
| 12 | DC 12V Interface |
| 13 | Power Switch |
Dimension
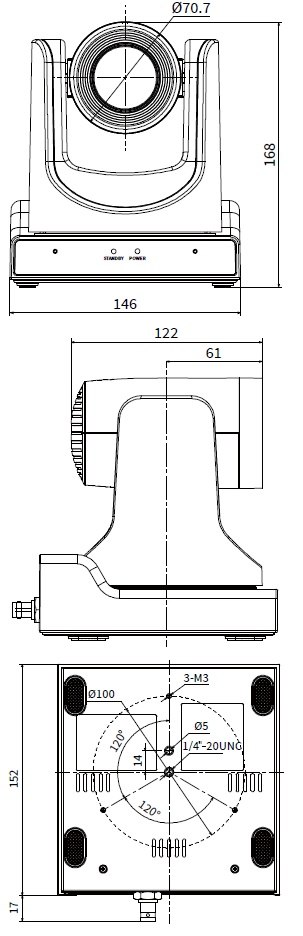
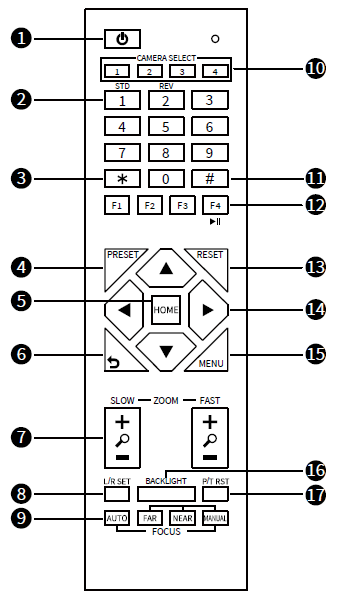
Installation
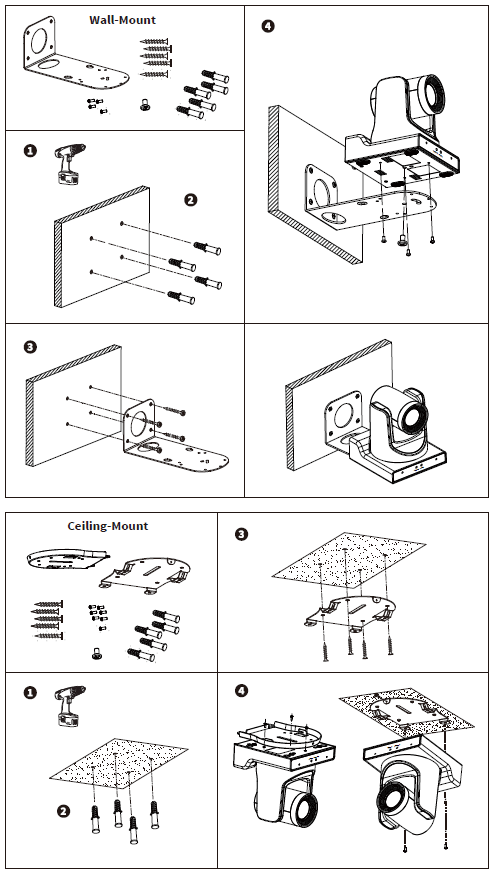
Note
The installation diagram is for reference only. The brackets and screws are not standard. For packing accessories, please refer to the actual product.
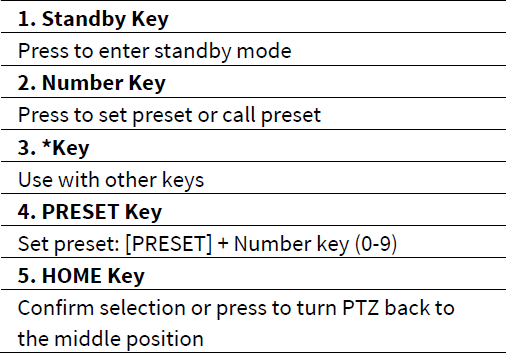
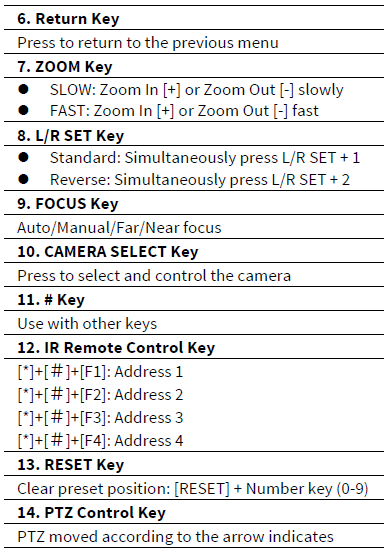
Remote Control
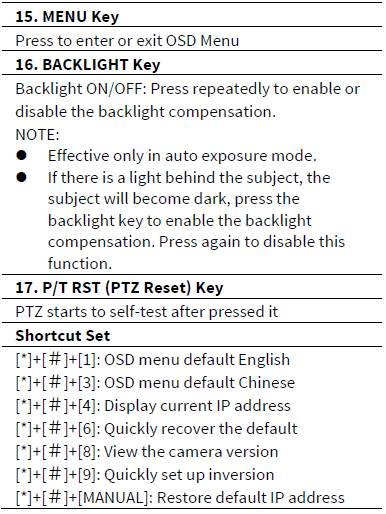
GUI Settings
Menu
Press [MENU] key to display the main menu on the normal screen, using arrow key to move the cursor to the item to be set. Press the [HOME] key to enter the corresponding sub-menu.
Menu
- ENG ENG
- AI MODE Off
- Video Format 1080P60
- Style Default
- Exposure ->
- Color ->
- Image ->
- Display ->
- PTZ Setting ->
- Setting ->
- Version ->
- Default ->
- AI MODE: Off, Single Track, Frame Track, Demo Mode.
- Video Format: 1080P60, 1080P50, 1080I60, 1080I50, 1080P30, 1080P25, 720P60, 720P50.
- Style: Default, Cold, Warm, Clear, Soft, User1, User2, User3.
Exposure
Move the main menu cursor to [Exposure], and press [HOME] key enter the exposure page, as shown in the following figure
Exposure
- AE Auto
- Flicker 50Hz
- Expcomp Mode On
- Expmode 2
- Backlight Off
- Gain Limit 15
- DRC Mode Off
- AE: Auto, Manual, Iris Priority, Shutter Priority, Bright Priority.
- Flicker: Off, 50Hz, 60Hz (Effective only in Auto, Iris Priority, Bright Priority mode).
- Expcomp Mode: On, Off (Effective only in Auto, Iris Priority mode).
- Expmode: -7~7 (Effective only in Expcomp Mode to On).
- Backlight: On, Off (Effective only in Auto, Iris Priority mode).
- Bright: 0~99 (Effective only in Bright Priority mode).
- Gain Limit: 0~32 (Effective only in Auto, Iris Priority, Bright Priority mode).
- Iris: F1.8, F2.0, F2.4, F2.8, F3.4, F4.0, F4.8, F5.6, F6.8, F8.0, F9.6, F11, Off (Effective only in Manual, Iris Priority mode).
- Shutter: 1/30, 1/50, 1/60, 1/90, 1/100, 1/125, 1/180, 1/250, 1/350, 1/500, 1/725, 1/1000, 1/1500, 1/2000, 1/3000, 1/4000, 1/6000, 1/10000 (Effective only in Manual, Shutter Priority mode).
- Gain: 0~31 (Effective only in Manual, Shutter Priority mode).
- DRC Mode: Manual, Auto, Off.
- DRC: 0~14 (Effective only in DRC Mode to Manual).
Color
Move the main menu cursor to [Color], and press [HOME] key enter the color page, as shown in the following figure.
Color
- AWB Auto
- Sens Low
- R-Tuning 0
- B-Tuning 0
- Hue 50
- Saturation 100
- AWB: Auto, VAR, Manual, One Push, Indoor, Outdoor.
- Sens: Low, Middle, High.
- R-Gain: 0~1023 (Effective only in Manual, One Push mode).
- B-Gain: 0~1023 (Effective only in Manual, One Push mode).
- R-Tuning: -128~128 (Effective only in Auto, Temp, One Push mode).
- B-Tuning: -128~128 (Effective only in Auto, Temp, One Push mode).
- Hue: 0~99.
- Saturation: 0~200.
- Temp: 2000 ~ 8500 (Effective only in Temp mode).
Image
Move the main menu cursor to [Image], and press [HOME] key enter the image page, as shown in the following figure.
Image
- Brightness 50
- Contrast 50
- Sharpness Mode Auto
- Gamma Mode Manual
- Gamma Ext
- NR-2D Mode Auto
- NR-3D Mode Auto
- Brightness: 0~99.
- Contrast: 0~99.
- Sharpness Mode: Manual, Auto.
- Sharpness: 0~25 (Effective only in Sharpness Mode to Manual).
- Gamma Mode: Manual, Auto.
- Gamma: Ext, 0.45, 0.5, 0.54, 0.56, 0.63 (Effective only in Gamma Mode to Manual).
- NR-2D Mode: Manual, Auto.
- NR-2D: 0~99 (Effective only in NR-2D Mode to Manual).
- NR-3D Mode: Manual, Auto.
- NR-3D: 0~15 (Effective only in NR-3D Mode to Manual).
Display
Move the main menu cursor to [Display], and press [HOME] key enter the display page, as shown in the following figure.
Display
- OSD-Dir 0
- Frac Rate Off
- HDMI Mode HDMI
- SDI Mode Level A
- Flip-H Off
- Flip-V Off
- Freeze Off
- OSD-Dir: 0, 90, 180, 270.
- Frac Rate: On, Off.
- HDMI Mode: HDMI, DVI.
- SDI Mode: Level A, Level B.
- Flip-H: On, Off.
- Flip-V: On, Off.
- Freeze: On, Off.
P/T/Z Setting
Move the main menu cursor to [P/T/Z Setting], and press [HOME] key enter the P/T/Z setting page, as shown in the following figure.
P/T/Z Setting
- AF-Sense High
- AF-Zone Front
- Focus Limit Off
- LR Mode STD
- Motion Sync Off
- Horizontal Speed 23
- Vertical Speed 19
- Zoom Speed 7
- PTbyZoom On
- AF-Sense: High, Normal, Low.
- AF-Zone: Front, Top, Center, Bottom.
- Focus Limit: On, Off.
- Near Focus Limit: 1M, 1.5M, 2M, 3M, 4M, 5M, 6M, 8M, 10M, 15M, 20M (Effective only in Focus Limit to On).
- Far Focus Limit: 15M, 20M, Infinity (Effective only in Focus Limit to On).
- LR Mode: STD, REV.
- Motion Sync: On, Off.
- Horizontal Speed: 0~23.
- Vertical Speed: 0~19.
- Zoom Speed: 0~7.
- PTbyZoom: On, Off.
Setting
Move the main menu cursor to [Setting], and press [HOME] key enter the setting page, as shown in the following figure.
Setting
- Visca Addr 1
- Visca Mode Series
- Baud Rate 9600
- DHCP Off
- IP Addr 192.168.100.88
- MAC d4e08e548d13
- Visca Addr: 1~7 (Effective only in VISCA protocol). Visca Mode: Serial, Paral.
- Baud Rate: 2400, 4800, 9600, 19200, 38400, 57600, 115200.
- DHCP: On, Off.
- IP Addr: 192.168.100.88.
- MAC: d4e08e548d13.
Version
Move the main menu cursor to [Version], and press [HOME] key enter the version page, as shown in the following figure.
Version
- Main X8.02.15
- AF 14.04.04
- Date 2022-08-18
- Code VF1
- NDI License Okay
- Main: Display the version number of the main program of the camera.
- AF: Display the camera autofocus version number.
- Date: Display the burning date of the main program version of the camera.
- Code: Display the camera code.
- NDI License: Display NDI license verification results.
Default
Move the main menu cursor to [Default], press [HOME] key enter default page, as shown in the following figure.
Default
> Reset No [MENU] Return / [HOME] Enter
Reset: Yes, No.
GUI menu and parameters are subject to change without notice.
WEB Settings
Access Camera Access http://192.168.100.88 to pop up the login window, then input username (default: admin) and password (default: admin). After login, it will show as below
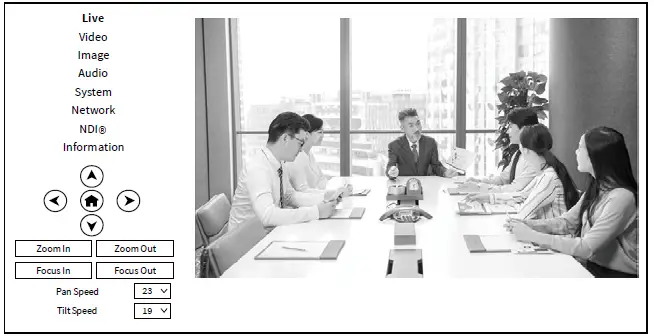
Control Camera
All pages include two menu bars: Real time monitoring: displaying video image Parameter setup: with function buttons.
Video Viewing Window
Video viewing window must be same as video resolution, the bigger the resolution is, the bigger the playing area is. Double click viewing window, will show full-screen, double click again, will return to initialized size. Status bar in viewing window shown as below:
![]()
- Video playback pause button: control real-time video pause, stop the last picture, click recoverable video again.
- Audio control buttons: can adjust the volume or set silent mode.
- Full screen switch button
PTZ Setup
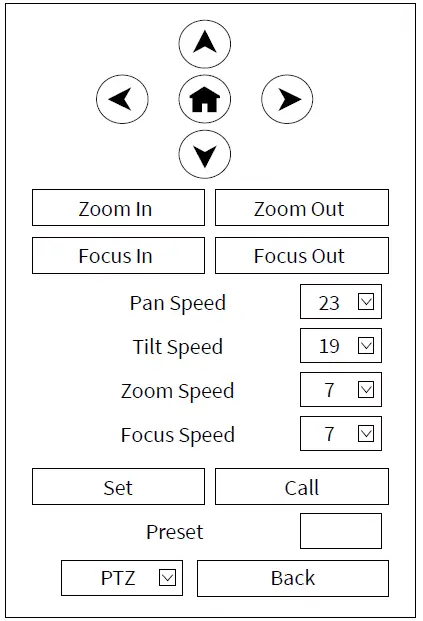
- Pan and Tilt Control
Up, Down, Left and Right arrows and the home button allow you to manually drive the camera to the desired position. - Zoom
Zoom In and Zoom Out buttons allow for wide or narrow view of the space. - Focus
Focus In and Focus Out buttons allow for fine manual focus adjustment if the camera has any problems auto focusing on the difficult object. - PTZ Speeds
Pan speed can be set at any rate between 1 ~ 24, Tilt speed can be set at any rate between 1 ~ 20. Zoom and Focus speeds can be set at any rate between 1 ~ 7. - PTZ Presets
After manually setting up a shot that you would like to return to later, you can save presets for quick recall of these positions. Type a number between 0 and 254 into the Preset box. Click the “Set” button to save the current location with that preset number. Click the “Call” button to cause the camera to return to that position. This enables smooth, quick and convenient control without the need to manually drive the camera. You can set up preset that user want as below. Method: Type preset number into the Preset box.
- PTZ/OSD Dropdown
From the dropdown menu, clicking the OSD option will open the on-screen display menu of the camera giving you control from within the IP interface.

Language Selection

Click either “Chinese”, “English” or “Russian” to change the language of the webpage.
Video Settings
- Frac Rate
Turn On/Off Frac Rate. - Encode Level
Support baseline, mainprofile, highprofile and svc-t four levels. - Encode Protocol
Support H.264 and H.265 protocols. - Resolution
First stream support 1920×1080, 1280×720, 1024×576, 960×540, 640×480, 640×360. Second stream support 1280×720, 1024×576, 720×480, 640×360, 480×272, 320×240, 320×180; The bigger resolution is, the clearer the image will be, more network bandwidth will be taken. - Bit Rate
The user can specify the bit rate. Generally speaking, the larger of the bit rate, the clearer of the image. However, the configuration of the bit rate needs to be combined with the network bandwidth. When the network bandwidth is narrow and the bit rate is configured larger, the video stream cannot be transmitted normally, and the visual effect is worse. - Frame Rate
User can specify the size of the frame rate, generally, the frame rate greater, the image more smooth; Frame rate is smaller, the more sense of beating. - I Key Frame Interval
Set interval between 2 I frame, the bigger interval is the response will be lower from viewing window. - Bit Rate Control
Code stream control way:- CBR (Constant Bit Rate): Video coder will be coding according to preset speed.
- VBR (Variable Bit Rate): Video coder will adjust the speed based on preset speed to gain the best image quality.
- Slice Split Enable
Enable or disable slice split function. - Slice Size
Set the size of slice.
Image Settings
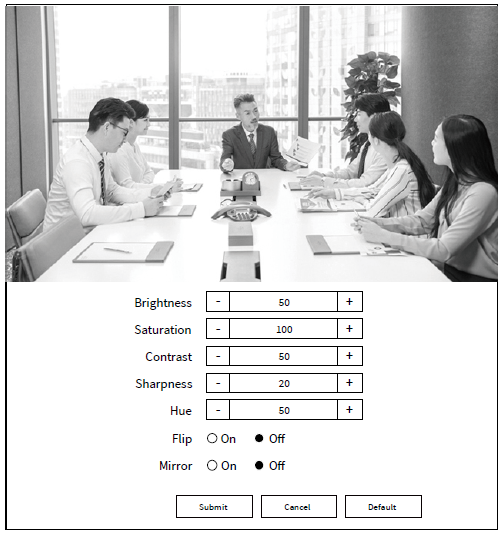
- Brightness
Brightness of image: 0~99 (Default value is 50). - Saturation
Saturation of image: 0~200 (Default value is 100). - Contrast
Contrast of image: 0~99 (Default value is 50). - Sharpness
Sharpness of image: 0~99 (Default value is 20). - Hue
Hue of image: 0~99 (Default value is 50). - Flip
Turn On/Off the Flip function. - Mirror
Turn On/Off the Mirror function.
Audio Settings
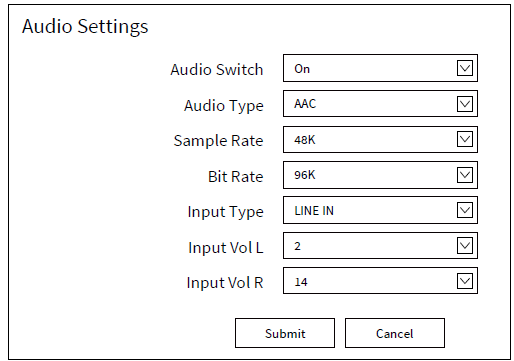
- Audio Switch
Turn On/Off audio switch. - Audio Type
Optional items: AAC. - Sample Rate
Optional items: 32K, 48K. - Bit Rate
Optional items: 96K, 128K, 256K. - Input Type
Optional items: LINE IN, MIC. - Input Vol L
The volume of the left channel. - Input Vol R
The volume of the right channel.
System Settings
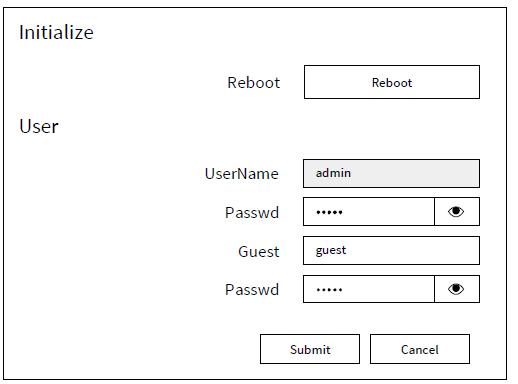
- Reboot
Click the “Reboot” button, system restart. - Username and Password
The user can modify the password (letters and Numbers only).
Network Settings
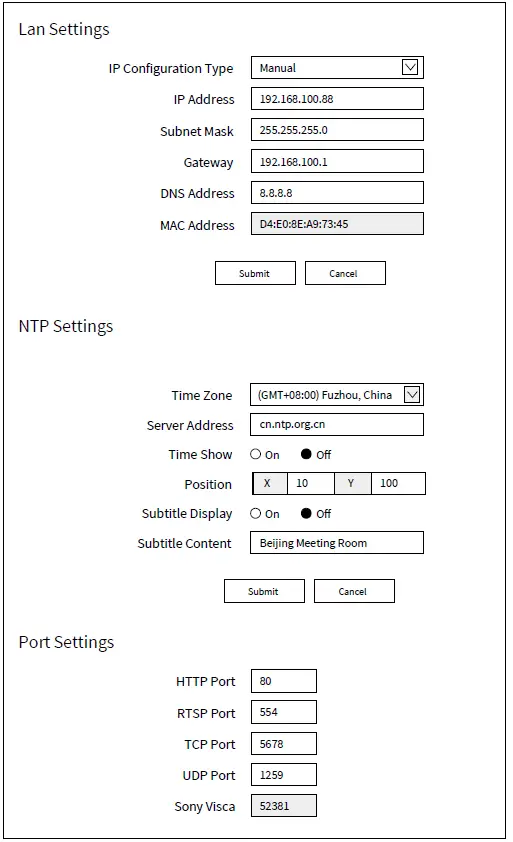
- Lan Settings
Default the IP address is 192.168.100.88, the MAC address cannot be modified. - NTP Settings
Setting NTP Time Zone and Server Address. Turn On/Off Time Show, set the position of the Time Show. Turn On/Off Subtitle Display, set the Subtitle Content of the camera screen. - Port Settings
- A. HTTP Port
IP address identifies network device, the device can run multiple web applications, each network program using network port to transmit data, so data transmission to be carried out between the port and port. Port setting is to set up web server program using which port to transmit. When port mapping, need to be consistent with the port number (default port: 80). - B. RTSP Port
The camera support RTSP protocol, use the VLC tools broadcast, default port: 554. - C. TCP Port
Support TCP connection then control camera, default port: 5678. - D. UDP Port
Support UDP protocol, default port: 1259. - E. Sony Visca
Support Sony Visca, default value: 52381.
- A. HTTP Port
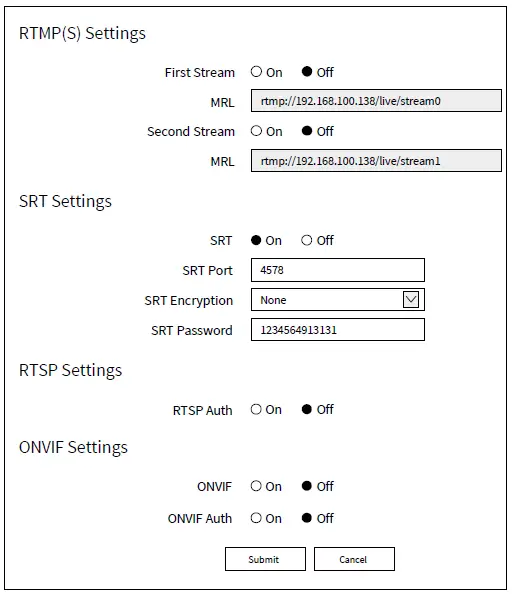
- RTMP(S) Settings
Turn On/Off first stream or second stream, setting the MRL of RTMP. - SRT Settings
Turn On/Off SRT, Setting the SRT Port, SRT Encry and SRT Password. - RTSP Settings
Turn On/Off RTSP Auth. - ONVIF Settings
Turn On/Off ONVIF and ONVIF Auth.
NDI® Settings
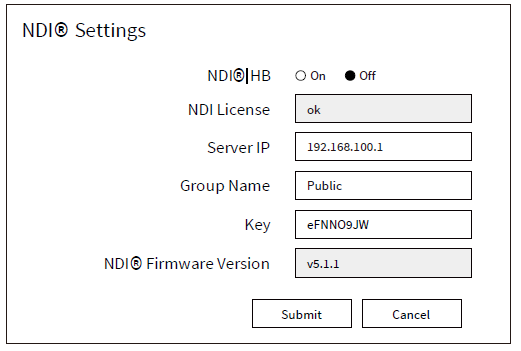
- NDI®|HB
Turn On/Off NDI®|HB. - NDI License
Display NDI License verification results. - Server IP
Setting NDI® Server IP address. - Group Name
Setting NDI® Group Name. - Key
Setting NDI® Key. - NDI® Firmware Version
Display NDI® Firmware Version.4
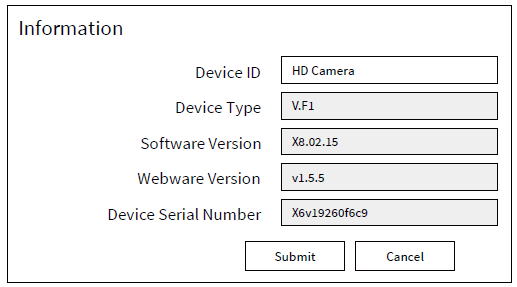
Device Information
Download Upgrade Program
If you need the camera upgrade program, please contact the manufacturer.
Note
WEB interface and parameters are subject to change without notice.
Troubleshooting
Image
- The monitor shows no image
- Check that the camera power supply is connected, the voltage is normal, and the power indicator light is always on.
- Turn off the power switch to check whether the camera is self-testing.
- Check the cable of video platform and TV whether correct connection.
- The video image displayed by the camera lens is jittery
- Check whether the camera installed position be stabled.
- Check whether have vibrating machinery or object near the camera.
- There is no video image in Browser IE browser does not support H5, you need to use VLC plug-in to view videos. Please access VLC website (http://www.videolan.org/vlc) download and install the 32-bit VLC media player, after it installed, access camera will have normal image display. Other mainstream browsers already support H5 and do not need to install the VLC plug-in.
- Unable to access camera through Browser
- Using PC to access the network to test whether the network access can work properly, first of all, the network fault caused by the PC virus can be eliminated, until the PC and camera can communicate with each other Ping.
- Disconnect the network, connect camera and PC separately, and reset the IP address of PC.
- Check IP address, subnet mask, and gateway settings for camera.
- Check whether the MAC address is conflicts.
- Check whether the web port is modified. The default web port is 80.
- Forget the IP address or login password Please remember (The default IP address: 192.168.100.88; default user name: admin; default password: admin).
Control
- Remote control cannot control
- Check and replace the new battery for the remote controller.
- Check whether the camera working mode is correct.
- Check whether the address of remote control can match the camera.
- Serial port cannot control
- Check whether the camera protocol, address and baud rate such is the same.
- Check whether the control line is connected well.


