motorola WM500 Operational Critical Wireless Remote Speaker Microphone (RSM) Installation Guide
Important Information
- Do not charge your accessory in temperature below 0°C (32°F) or above 45°C (113°F).
- Do not store your accessory in direct sunlight or where expected temperatures can exceed this range such as inside a parked car.
- Storing your fully charged accessory in high temperature conditions may permanently reduce the life of the internal battery.
- Battery life may temporarily shorten in low-temperature conditions.
- RSM should be stored in temperatures between -10°C (14°F) and 30°C (86°F) to minimize permanent battery capacity loss.
![]() WARNING:
WARNING:
- To prevent injury, do not disassemble, puncture, or crush the RSM because this action can cause the battery to short-circuit.
- Do not expose or throw the RSM into heat or fire.
- Do not dispose the RSM into household waste.
- Do not fill the audio jack and USB charging port with water. If water enters the audio jack and/or USB charging port, remove water by shaking the RSM. Always cover the audio jack and USB charging port with a dust cap when not in use.
RSM Compatibility
List of radio(s) or device(s) that are compatible to PMMN4127:
- LEX L11
- TLK 100
- TLK 150
- EVOLVE
- SLN 1000
- BYOD Android (apps released 9.1.1 and later)
- MOTOTRBO ION, requires minimum WM500 firmware R03.00.00 (R03) and later
- R7, requires minimum WM500 firmware R04.00.00 (R04) and later
- MXP600, requires minimum WM500 firmware R04.00.00 (R04) and later
These accessories can be paired with a Kodiak Broadband PTT enabled device. Currently, the supported Kodiak feature is Operational Status Messaging (the additional features will be added in the futures), please refer to your Kodak User Guide for setup instructions.
![]() NOTE: MAC Address is located on top of individual box and within QR code behind belt clip.
NOTE: MAC Address is located on top of individual box and within QR code behind belt clip.
Additional MAC Address labels are provided inside individual box.![]() NOTE: Always upgrade WM500 firmware to the latest to support new radios and functionality.
NOTE: Always upgrade WM500 firmware to the latest to support new radios and functionality.
Remote Speaker Microphone (RSM) Features
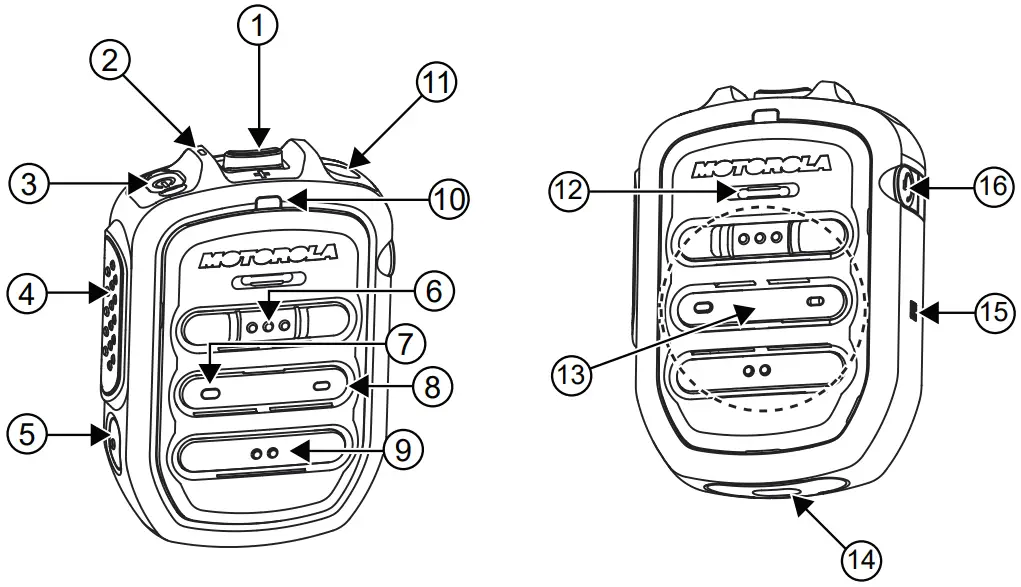
Table 2: WM500 RSM Features
| Label | Description |
| 1 | Volume toggle |
| 2 | Power Indicator |
| 3 | Power button |
| 4 | Push-To-Talk (PTT) button |
| PTT call can be either transmitted to a talk- group or individual user | |
| 5 | Multi function (MFB) Button |
Available multiple functions:
NOTE: The MFB button is not available for TLK series. | |
| 6 |
| Function configured on the host or the WAVE application. WAVE default function: WAVE OSM | |
| 7 | P2 button. |
| Function configured on the host but not on the WAVE application. WAVE default function: Channel Down | |
| 8 | P3 button. |
| Function configured on the host but not on the WAVE application. WAVE default function: Channel Up | |
| 9 | P4 button |
| Function configured on the host or the WAVE application. WAVE default function: WAVE OSM | |
| 10 | Audio/Bluetooth Indicator |
| 11 | Emergency button |
| 12 | Microphone |
| 13 | Speaker |
| 14 | Charging port |
| 15 | NFC Location |
| 16 | Audio jack |
![]() NOTE:
NOTE:
- Operational Status Message(OSM) require per-configuration in the WAVE Application.
- Answer/reject/end call and microphone mute functionality is not applicable for the radios.
- More programmable functions may be added on the WAVE application in the future. Please refer to Kodiak User Guide for detail.
Table 3: WM500 RSM Button Operations
| Button | State | Short Press | Long Press (>1.5s) | Very Long Press (>3s) |
| Power | OFF | N/A | Power ON | Enter Pairing |
| ON | Sign Of Life | N/A | Power Off | |
| PTT | Connected | PTT for Kodiak Group Call | ||
| Not Connected | Kodiak Pair- ing | N/A | N/A | |
| Power + PTT | OFF | N/A | N/A | Power ON and Clear PDL |
| Power + Call But- ton | ON | N/A | N/A | Enter/Exit Dark Mode |
| MFB | Not Connected | Switches Language | N/A | N/A |
| Incoming Call | Answer Call | Reject Call | N/A | |
| On Call | Mic Mute | End Call | N/A | |
| Volume + | Connected | Volume in- crease by one step | Volume Ramp Up | |
| At Maximum Vol- ume | Volume Max Tone | |||
| Volume – | Connected | Decrease volume by one step | Volume Ramp Down | |
| At Minimum Vol- ume | Volume Min Tone | |||
Charging the Battery
Procedure:
- Connect the USB charging cable to the RSM.
- Plug the charging cable to USB power source.
![]() IMPORTANT: Charge the RSM immediately to prevent flat-battery condition.
IMPORTANT: Charge the RSM immediately to prevent flat-battery condition.
Table 4: Charging Indicator Behavior
| Power Indicator | Description |
| Blinking red | Battery is low. |
| Solid red | Battery is charging. |
| Solid green | Battery is fully charged. |
| Blinking green | More than 90% charged. |
| Rapid blinking red | Charging error. |
Battery Indication
Procedure:
- When RSM is not charging, read the following table to understand the indication.
Table 5: Battery Indication
| Power Indication | Description |
| Rapid Blinking Red | Battery level is critically low. |
| Blinking Red | Battery level is low. |
| Off
| Battery is medium or high. |
Status Indication
Procedure:
- Read the following table to understand the audio and Bluetooth status indication.
Table 6: Audio and Bluetooth Status
| Audio/Bluetooth Indication | Description |
| Blinking in Blue | Enter pairing |
| Solid Blue | Disconnected |
| Double blinking Blue (Once) | Connected |
| Solid Red | Mic Muted |
| Blinking in Red | Voice Prompt/Tone Mute |
| Blinking in Green | Receiving Incoming Call |
RSM Status Request
Procedure:
- Short press the Power button to determine the details status of the RSM.
Table 7: Status Indication
| Indicator | Status | Description |
| Audio/Bluetooth | Double-blinking Blue | Connected |
| Power | Double-blinking Green | Battery level is high |
| Dobule-blinking Amber | Battery level is medium |
Maintenance
This chapter provides information about the care and maintenance of this RSM.
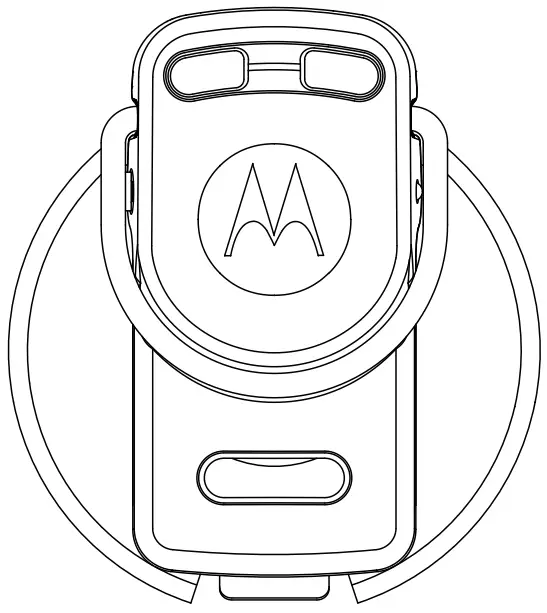
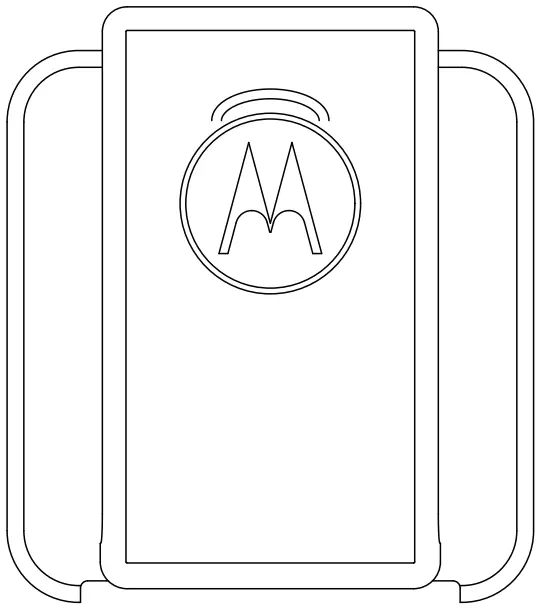
Recommended RSM Wearing Positions
Figure 1: Recommended Wearing Position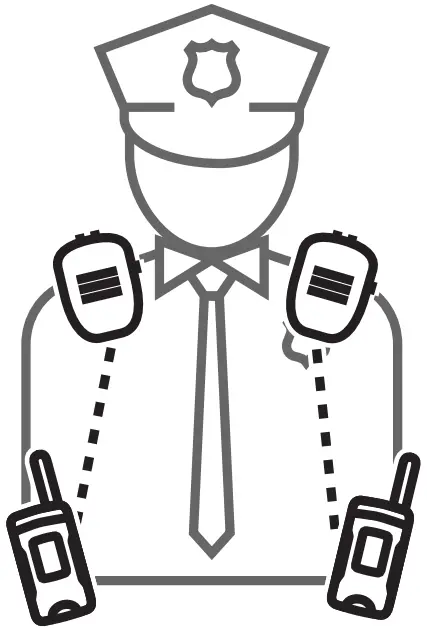
![]() NOTE: For better performance, wear the RSM and the device on the same side.
NOTE: For better performance, wear the RSM and the device on the same side.
Pairing the RSM to the Radio
Pairing the RSM through Bluetooth
Procedure:
- While RSM is power off, press and hold the Power button until you hear the “Power On” followed by “Searching for Host”, and the blue LED blinks for 90 seconds during pairing mode.
- From the compatible device, search and select WM500_xxxx from the Bluetooth list.
Once the devices are paired successfully, a tone is played and a voice prompt from the RSM indicates that the device is “Connected”. - Perform the following choices based on your device:
| If you are using… then, you… | |
| Android devices | no further action is required after step step 2. |
| iPhone | a choose RSM from the Bluetooth list b pair again for second time |
| MXP600 | no further action is required after step step 2. |
| MOTOTRBO ION | radio display prompts another pairing request with RSM. Tap Pair when prompted. When successful, a tone is played from the RSM. |
| R7 | press the MFB button to start the connection process when you hear the “Ring” tone indicating Host is requesting for con- nection. |
![]() NOTE: The WM500 supports various pairing methods depending on the compatible device. If you are using TLK100 or TLK150, refer to Wave Portal User Guide for bluetooth pairing process. If you are using SLN1000, refer to Nitro Portal User Guide for bluetooth pairing process.
NOTE: The WM500 supports various pairing methods depending on the compatible device. If you are using TLK100 or TLK150, refer to Wave Portal User Guide for bluetooth pairing process. If you are using SLN1000, refer to Nitro Portal User Guide for bluetooth pairing process.
Pairing the RSM through NFC
Procedure:
- While RSM is power off, press and hold the Power button until the “Power On” voice prompt follows by “Searching for Host” voice prompt is played and blue LED blinks.
- Align the NFC locations on both the RSM and the compatible devices.
- Check the compatible device for indication of successful pairing.
Unpairing the RSM
Procedure:
- Remove the RSM from the paired device list on the previously paired compatible device.
- From the power-off state, press and hold the Power and PTT buttons simultaneously. The RSM indicates that the paired devices is “Cleared”.
![]() NOTE: Always unpair the RSM from the Bluetooth host and ensure that the paired device is “Cleared” before starting another pairing process.
NOTE: Always unpair the RSM from the Bluetooth host and ensure that the paired device is “Cleared” before starting another pairing process.
Replacing the Battery
Prerequisites:
![]() WARNING:
WARNING:
- Before you start the dismantling procedure, power off the RSM.
- Wear an appropriate electrostatic discharge (ESD) protection device.
Procedure:
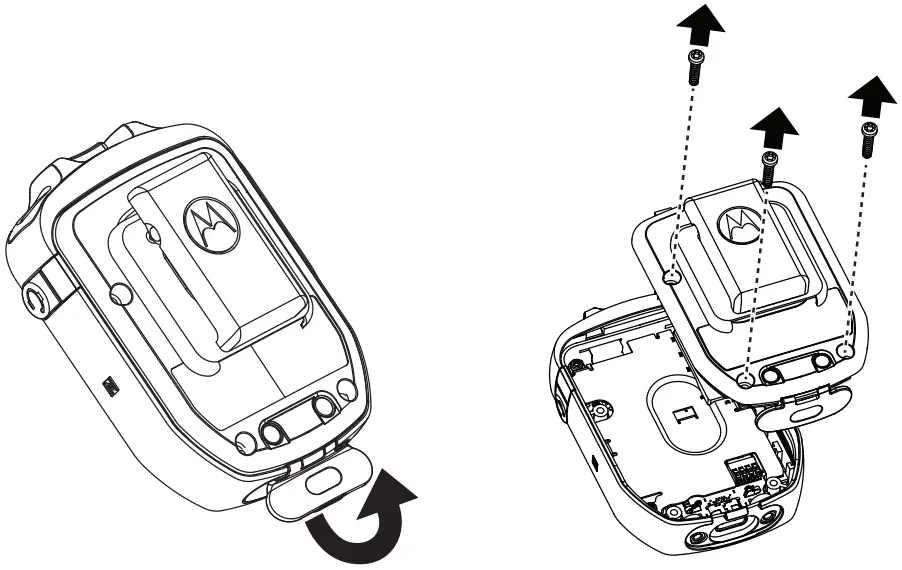
- Open the USB dust cover.
- Unscrew the three screws from the back housing.
 WARNING: Safety Critical
Use a T8 tamper proof torx screwdriver with 3.8 +/-0.1 lbf-in torque to remove the screws.
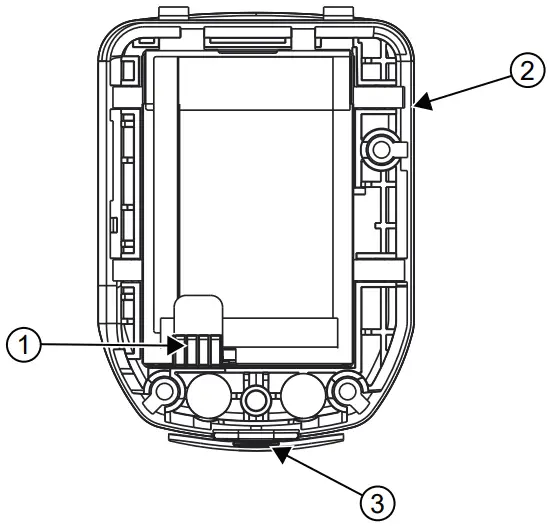
Figure 2: Unscrewing the Back Housing
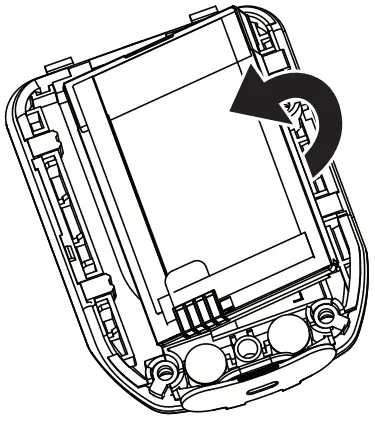
- Remove the battery gently from the left. WARNING: Safety Critical
Do not use conductive or sharp tools when removing the battery.
Figure 3: Removing the Battery
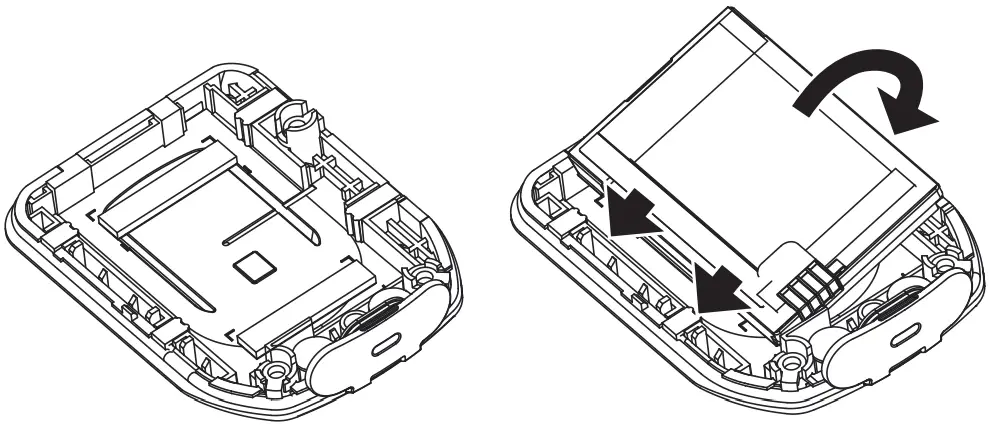
- Insert the battery into the battery compartment. Attach the left side of the battery first. WARNING: Safety Critical
Use only Motorola Solutions authorized BT60 Battery (HKNN4014_).
Figure 4: Inserting the Battery
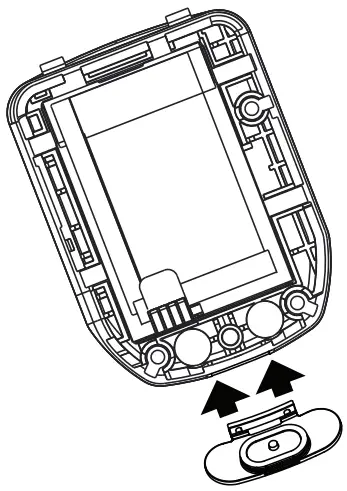
- Attached the USB Dust Cover using two guide pin on back housing if it detached.
Figure 5: Assembling USB Dust Cover
 CAUTION:
- Ensure that the battery contact is facing bottom left.
- Ensure that the rubber seal is securely in place.
- Ensure USB dust cover attached to back housing.

- Secure the battery by pressing it down.
Figure 6: Securing the Battery
- Reassemble the back housing by screwing in the three screws. WARNING: Safety Critical
Use a T8 tamper proof torx screwdriver with 3.8 +/-0.1 lbf-in torque to ensure that the screws are tightened.
Figure 7: Reassembling the Back Housing


![]() WARNING: Safety Critical
WARNING: Safety Critical
- Do not power up the RSM and/or connect the audio jack immediately after replacing the battery.
- To ensure that there are no loose elements left, shake the device gently.
- If you hear any internal rattling or any abnormal sound, disassemble the RSM to inspect for any abnormalities, for example, loose components.
Optional Accessories
| Part Number | Description |
| PMLN7560_ | Receive-only Earpiece with Translucent Tube |
| 42009312001 |
|
| 4205823V01 |
|
| CB000756A01 | USB-C Cable (1m) |
Accessory Manager App Introduction
Download and Install Accessory Manager application for future software upgrades and new feature releases.
You are recommended to install Accessory Manager to upgrade accessory firmware to the latest version for the first time before use.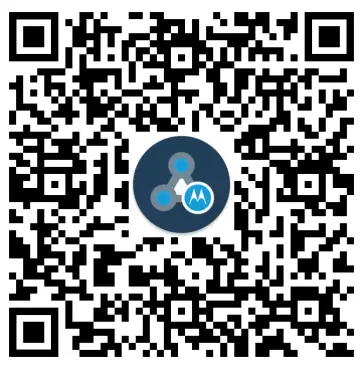
Notice to Users (FCC and Industry Canada)
This device complies with Part 15 of the FCC rules and Industry Canada’s license-exempt RSS’s per the following conditions:
- This device may not cause harmful interference.
- This device must accept any interference received, including interference that may cause undesired operation.
- Changes or modifications made to this device, not expressly approved by Motorola Solutions, could void the authority of the user to operate this equipment.
Declaration of Conformity
Per FCC CFR 47 Part 2 Section 2.1077(a)
Responsible Party
Name: Motorola Solutions, Inc.
Address: 2000 Progress Pkwy, Schaumburg, Il. 60196, U.S.A.
Phone Number: 1-800-927-2744
Hereby declares that the product:
Model Name: WM500
conforms to the following regulations:
FCC Part 15, subpart B, section 15.107(a), 15.107(d) and section 15.109(a)
Class B Digital Device
As a personal computer peripheral, this device complies with Part 15 of the FCC Rules. Operation is subject to the following two conditions:
- This device may not cause harmful interference.
- This device must accept any interference received, including interference that may cause undesired operation.
![]() NOTE:
NOTE:
This equipment has been tested and found to comply with the limits for a Class B digital device, pursuant to part 15 of the FCC Rules. These limits are designed to provide reasonable protection against harmful interference in a residential installation. This equipment generates, uses, and can radiate radio frequency energy and, if not installed and used in accordance with the instructions, may cause harmful interference to radio communications. However, there is no guarantee that interference will not occur in a particular installation.
If this equipment does cause harmful interference to radio or television reception, which can be determined by turning the equipment off and on, the user is encouraged to try to correct the interference by one or more of the following measures:
- Reorient or relocate the receiving antenna.
- Increase the separation between the equipment and receiver.
- Connect the equipment into an outlet on a circuit different from that to which the receiver is connected.
- Consult the dealer or an experienced radio or TV technician for help.
RF Energy Exposure Awareness and Product Safety Guide for Portable Two-Way Radios
![]() CAUTION:
CAUTION:
Before using this product, read the operating instructions for safe usage contained in the Product Safety and RF Exposure booklet enclosed with your radio which contains important operating instructions for safe usage and RF energy awareness and control for Compliance with applicable Standards and Regulations.
![]() NOTE: This device is intended for use in occupational/controlled conditions where users are aware of their exposure and can exercise control over their exposure to meet the requirements in national and international regulations.
NOTE: This device is intended for use in occupational/controlled conditions where users are aware of their exposure and can exercise control over their exposure to meet the requirements in national and international regulations.
To ensure continued compliance with applicable RF exposure limits, use only Motorola Solutions approved, supplied or replacement antennas, batteries, and accessories.
For more information on what RF energy exposure is, and how to control your exposure to ensure compliance with established RF exposure limits, consult the following websites:
- https://www.fcc.gov/
- http://www.ic.gc.ca/eic/site/smt-gst.nsf/eng/sf11467.html
- http://www.ic.gc.ca/eic/site/smt-gst.nsf/eng/sf01904.html
- https://www.osha.gov/
- https://osha.europa.eu/en
- http://www.who.int/peh-emf/project/en/
For additional user training information on exposure requirements, consult the following websites:
- https://www.motorolasolutions.com/en_us/about/company-overview/corporateresponsibility/governance-and-policies/wireless-communication-and-healthfaqs.html
- http://learning.motorolasolutions.com/
Intellectual Property and Regulatory Notices
Copyrights
The Motorola Solutions products described in this document may include copyrighted Motorola Solutions computer programs. Laws in the United States and other countries preserve for Motorola Solutions certain exclusive rights for copyrighted computer programs. Accordingly, any copyrighted Motorola Solutions computer programs contained in the Motorola Solutions products described in this document may not be copied or reproduced in any manner without the express written permission of Motorola Solutions.
No part of this document may be reproduced, transmitted, stored in a retrieval system, or translated into any language or computer language, in any form or by any means, without the prior written permission of Motorola Solutions, Inc.
Trademarks
MOTOROLA, MOTO, MOTOROLA SOLUTIONS, and the Stylized M Logo are trademarks or registered trademarks of Motorola Trademark Holdings, LLC and are used under license. All other trademarks are the property of their respective owners.
License Rights
The purchase of Motorola Solutions products shall not be deemed to grant either directly or by implication, estoppel or otherwise, any license under the copyrights, patents or patent applications of Motorola Solutions, except for the normal non-exclusive, royalty-free license to use that arises by operation of law in the sale of a product.
Open Source Content
This product may contain Open Source software used under license. Refer to the product installation media for full Open Source Legal Notices and Attribution content.
Disposal
 European Union (EU) and United Kingdom (UK) Waste of Electrical and
Electronic Equipment (WEEE) Directive
The European Union’s WEEE directive and the UK’s WEEE regulation require that products sold into EU countries and the UK must have the crossed-out wheelie bin label on the product (or the package in some cases). As defined by the WEEE directive, this crossed-out wheelie bin label means that customers and end-users in EU and UK countries should not dispose of electronic and electrical equipment or accessories in household waste.
Customers or end-users in EU and UK countries should contact their local equipment supplier representative or service centre for information about the waste collection system in their country.
Disclaimer
Please note that certain features, facilities, and capabilities described in this document may not be applicable to or licensed for use on a specific system, or may be dependent upon the characteristics of a specific mobile subscriber unit or configuration of certain parameters. Please refer to your Motorola Solutions contact for further information.
© 2022 Motorola Solutions, Inc. All Rights Reserved
Document History
Table 1: RF Energy Exposure Awareness and Control Information and Operational Instructions for Occupational Use
| Version | Description | Date |
| MN006126A01-AA | Initial release of the Operational Critical Wire- less Remote Speaker Microphone (RSM)– WM500 PMMN4127_Online Installation Guide manual. | September 2019 |
| MN006126A01-AB | Insert “FCC and Industry Canada” and “RF En- ergy Awareness and Control Information and Operational Instructions for Occupational Use” both in en-US and fr-CA | November 2019 |
| MN006126A01-AC | Update the RSM Overview and Description ta- ble and remove the Youtube Law Enforcement link. | January 2021 |
| MN006126A01-AE | Minor update to the manual to RSM Compatibil- ity and RSM Feature sections. | February 2022 |
Foreword
RF Energy Exposure and Product Safety Guide for Portable Two-Way Radios
![]() CAUTION: Before using this product, read the operating instructions for safe usage contained in the Product Safety and RF Exposure booklet enclosed with your radio which contains important operating instructions for safe usage and RF energy awareness and control for Compliance with applicable Standards and Regulations.
CAUTION: Before using this product, read the operating instructions for safe usage contained in the Product Safety and RF Exposure booklet enclosed with your radio which contains important operating instructions for safe usage and RF energy awareness and control for Compliance with applicable Standards and Regulations.
Acoustic Safety
Exposure to loud noises from any source for extended periods of time may temporarily or permanently affect your hearing. The louder the radio’s volume, the less time is required before your hearing could be affected. Hearing damage from loud noise is sometimes undetectable at first and can have a cumulative effect. To protect your hearing:
- Use the lowest volume necessary to do your job.
- Turn up the volume only if you are in noisy surroundings.
- Turn down the volume before adding headset or earpiece.
- Limit the amount of time you use headsets or earpieces at high volume.
- When using the radio without a headset or earpiece, do not place the radio’s speaker directly against your ear.
- If you experience hearing discomfort, ringing in your ears, or speeches that are muffled, you should stop listening to your radio through your headset or earpiece, and have your hearing checked by your doctor.
Service and Warranty
Other than the clip, the PMMN4127 Remote Speaker Microphone (RSM) is not repairable. The RSM is covered under the standard Motorola Solutions one-year limited warranty.
Warranty Exclusion
Motorola Solutions does not warrant the installation, maintenance or service of the Product, accessories, batteries, or parts.
Motorola Solutions is not responsible in any way for problems or damage caused by any ancillary equipment or peripherals (specific examples include, but are not limited to: batteries, chargers, adapters, and power supplies) not furnished or manufactured by Motorola Solutions which is attached to or used with the Product. When the Product is used with ancillary or peripheral equipment not supplied by Motorola Solutions, Motorola Solutions does not warrant the operation of the Product/ peripheral combination and Motorola Solutions will not honor any warranty claim where the Product is used in such a combination and it is determined by Motorola Solutions that there is no fault with the Product. Upon open or dismantle the Product, the warranty is immediately voided. Motorola Solutions specifically disclaim any responsibility for any damage in any way caused by improper installation by unauthorized personnel.
References
 Motorola Solutions
-
RSS-102 — Radio Frequency (RF) Exposure Compliance of Radiocommunication Apparatus (All Frequency Bands)
-
Radiofrequency Energy and Safety
 Federal Communications Commission | The United States of America
 Governance and Compliance - Motorola Solutions
 Home | Occupational Safety and Health Administration


