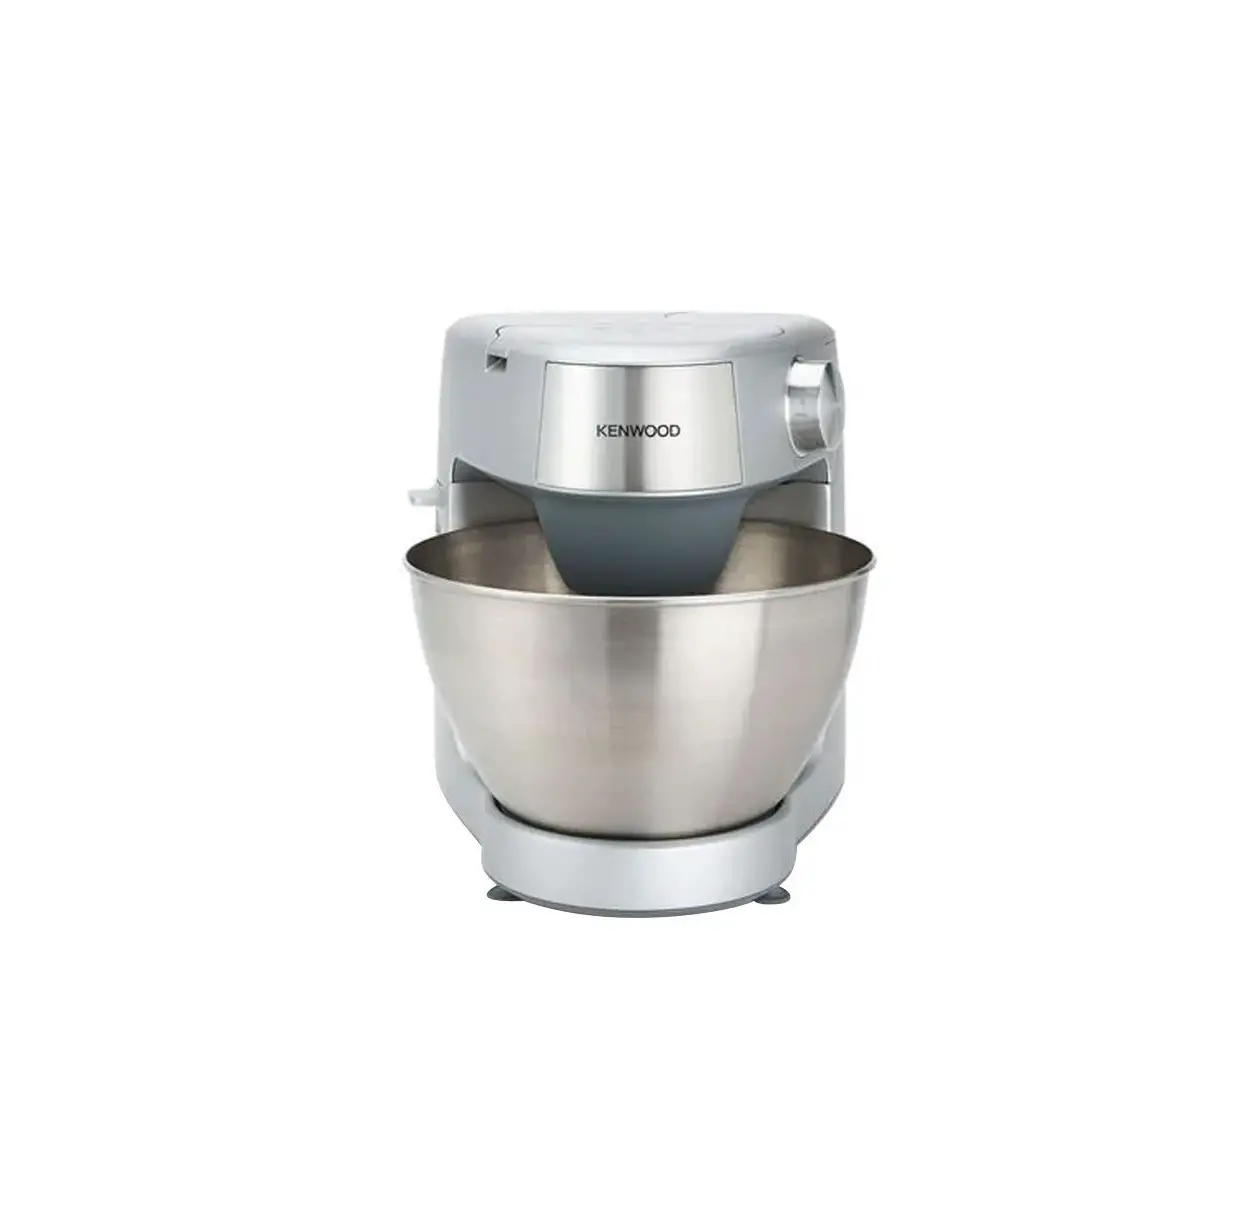
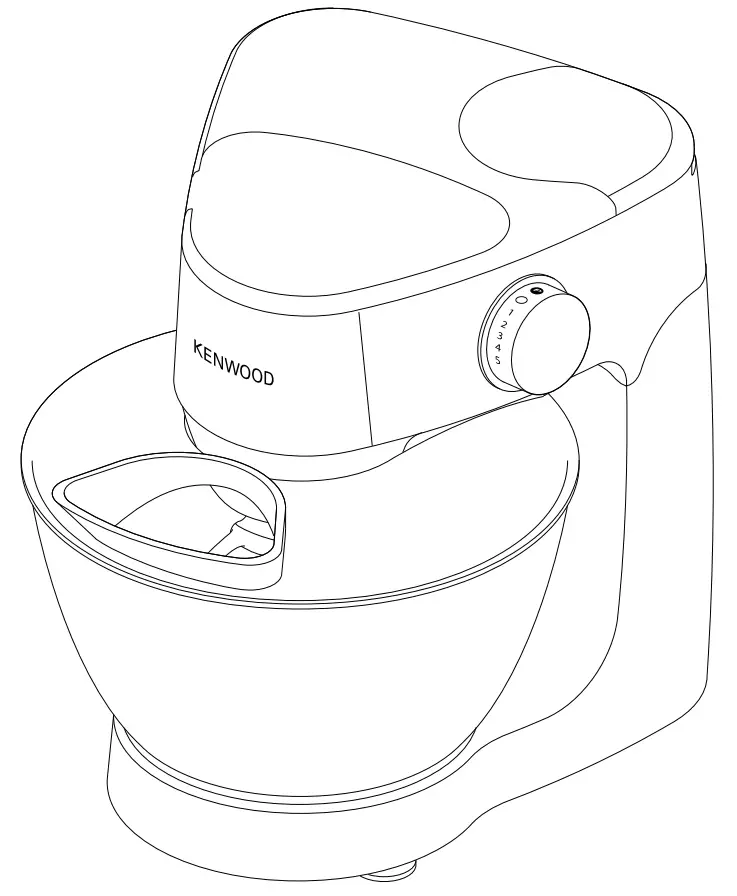
KENWOOD KHC29 Mixer
TYPE: KHC29
Safety
- Read these instructions carefully and retain for future reference.
- Remove all packaging and any labels.
- If the plug or cord is damaged it must, for safety reasons, be replaced by Kenwood or an authorised Kenwood repairer in order to avoid a hazard.
- Turn the speed control to `O’ (OFF) position and unplug:
- before fitting or removing outlet covers/tools/ attachments;
- after and when not in use;
- before cleaning.
- Do not operate your appliance for longer than the times specified below without a rest period. Processing continuously for longer periods can damage your appliance.
Function/ Attachment Maximum OperationTime Rest Period Between Operations Dough Tool 8 mins Unplug the appliance and allow to cool down for 15 minutes Blender 60 secs Mill 30 secs Food Mincer 10 mins - Keep your fingers away from moving parts and fitted attachments. Never put your hand/fingers in the hinge mechanism.
- Never leave the Kitchen Machine unattended when it is operating.
- Never use a damaged appliance. Get it checked or repaired: see ‘Service and Customer Care’ section.
- Never let the cord hang down where a child could grab it.
- Never let the power unit, cord or plug get wet.
- Ensure that no bowl tools are fitted or stored in the bowl when using the drive outlets.
- Never use an unauthorised attachment or more than one attachment at a time.
- Never exceed the quantities stated in the recommended usage chart.
- Take care when lifting this appliance. Ensure the head is correctly latched in the down position and that the bowl, tools, outlet covers and cord are secure before lifting.
- Children should be supervised to ensure that they do not play with the appliance.
- Do not move or raise the mixer head with an attachment fitted as the Kitchen Machine could become unstable.
- Do not operate your appliance near the edge of a work surface.
- Appliances can be used by persons with reduced physical, sensory or mental capabilities or lack of experience and knowledge if they have been given supervision or instruction concerning use of theappliance in a safe way and if they understand theN hazards involved.
- Misuse of your appliance can result in injury.
- This appliance shall not be used by children. Keep the appliance and its cord out of reach of children.
- Only use the appliance for its intended domestic use. Kenwood will not accept any liability if theappliance is subject to improper use, or failure to comply with these instructions.
Attachment General Safety
- Be careful if hot liquid is poured into the food processor or blender as it can be ejected out of the appliance due to sudden steaming.
- Keep hands and utensils out of the blender and food processor bowl whilst connected to the power supply.
- The appliance will not operate if the attachments are not correctly fitted.
- The processing of spices is not recommended as they may damage the plastic parts.
- The rated power is based on the Compact Chopper/Mill attachment. Other attachments may draw less power.
- Should excessive vibration occur when using an attachment, either reduce the speed or stop the machine and remove some of the contents.
- Attachments will be damaged and may cause injury if the interlock mechanism is subjected to excessive force.
- DO NOT process hot ingredients.
- SCALD RISK: Hot ingredients must be allowed to cool to room temperature before placing in the food processor bowl, mill, goblet or before blending.
Blender attachment
- Never fit the blade unit to the power unit without the blender goblet fitted.
- AT282 Important – The skirt on the bottom of the goblet is fitted during manufacture and no attempt should be made to remove it.
- Only operate the blender with the lid in place.
- Only use the goblet with the blade assembly supplied.
- Never run the blender empty.
- Smoothie recipes – never blend frozen ingredients that have formed a solid mass during freezing; break it up before adding to the goblet.
- Do not process spices such as cloves, dill and cumin seeds as they may damage the plastic parts.
- Do not use the blender as a storage container. Keep it empty before and after use.
- Never blend more than the maximum marked on the goblet – less for frothy liquids such as milk shakes.
Food Processor
- The knife blade and discs are extremely sharp, handle with care. Always hold by the finger grip at the top, away from the cutting edge, both when handling and cleaning.
- When slicing/grating do not let the bowl fill up as far as the cutting disc: empty it regularly.
- Do not exceed the ‘MAX’ capacity level on the bowl.
- Always remove the knife blade before pouring contents from the bowl.
- Never use your fingers to push food down the feed tube. Always use the pusher supplied.
- Before removing the lid from the food processor bowl switch off and wait until the blade or discs have completely stopped.
- Do not use the lid to operate the food processor, always use the speed control.
Food Mincer
- Always ensure bones and rind etc. are removed from the meat before mincing.
- When mincing nuts, only feed a few down at a time and allow the scroll to pick them up before adding any more.
- Always use the mincer pusher supplied. Never put your fingers or utensils in the feed tube.
- Warning – the cutting blade is sharp, handle with care both in use and when cleaning.
- Ensure the attachment is secured in position before switching on.
- Do not wash any part in the dishwasher. Never use a soda solution.
- Wipe the screens with vegetable oil, then wrap in greaseproof paper to prevent discolouring/rusting.
Juice Extractor
- Do not use the juicer if the filter, juicer lid or bowl are damaged or has visible cracks.
- The cutting blades on the base of the filter are very sharp, take care when handling and cleaning the filter.
- Before removing the lid, switch off and wait for the filter to stop.
- Only use the pusher supplied. Never put your fingers in the feed tube. Unplug before unblocking the feed tube.
- Should excessive vibration occur when using this attachment, either adjust the speed or stop the machine, unplug and clear any pulp from the drum(the juicer vibrates if the pulp becomes unevenly distributed)
Compact Chopper Mill
- Do not touch sharp blades. Keep the blade assembly away from children.
- Before removing the mill from the machine:
- switch off;
- wait until the blades have completely stopped;
- take care not to unscrew the jar from the blade assembly.
- Only use the jar and blade assembly with the base supplied.
- Never fit the blade assembly to the machine without the jar fitted.
- Do not process hard spices such as dried Turmeric root as they may damage the blade.
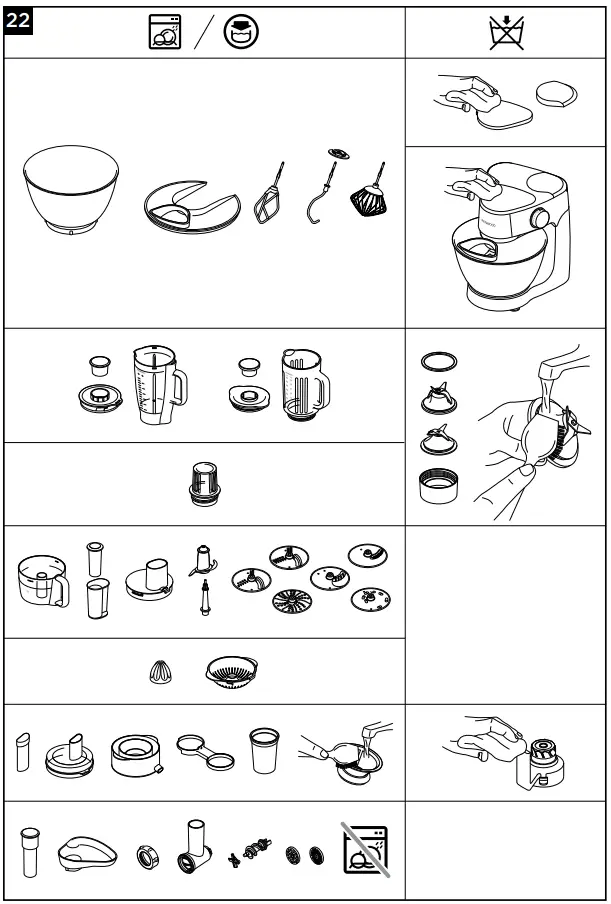
Cleaning
- Always switch off and unplug before cleaning.
- Dismantle attachments fully before cleaning.
- For easier cleaning always wash the parts immediately after use.
- Some foods, e.g. carrot, will discolour the plastic.
- Rubbing with a cloth dipped in vegetable oil helps remove discolouring.
- Handle the blades and discs with care – they are extremely sharp.
Power Unit
- Wipe with a damp cloth, then dry.
- Never use abrasives or immerse in water.
- Ensure the feet on the base of the mixer are kept clean.
Bowl
- Never use a wire brush, steel wool or bleach to clean your stainless steel bowl. Use vinegar to remove limescale.
- Keep away from heat (cooker tops, ovens, microwaves).
Maximum
Before plugging in
|
Before using for the first time
- Wash the parts: see ‘Cleaning’.
Key
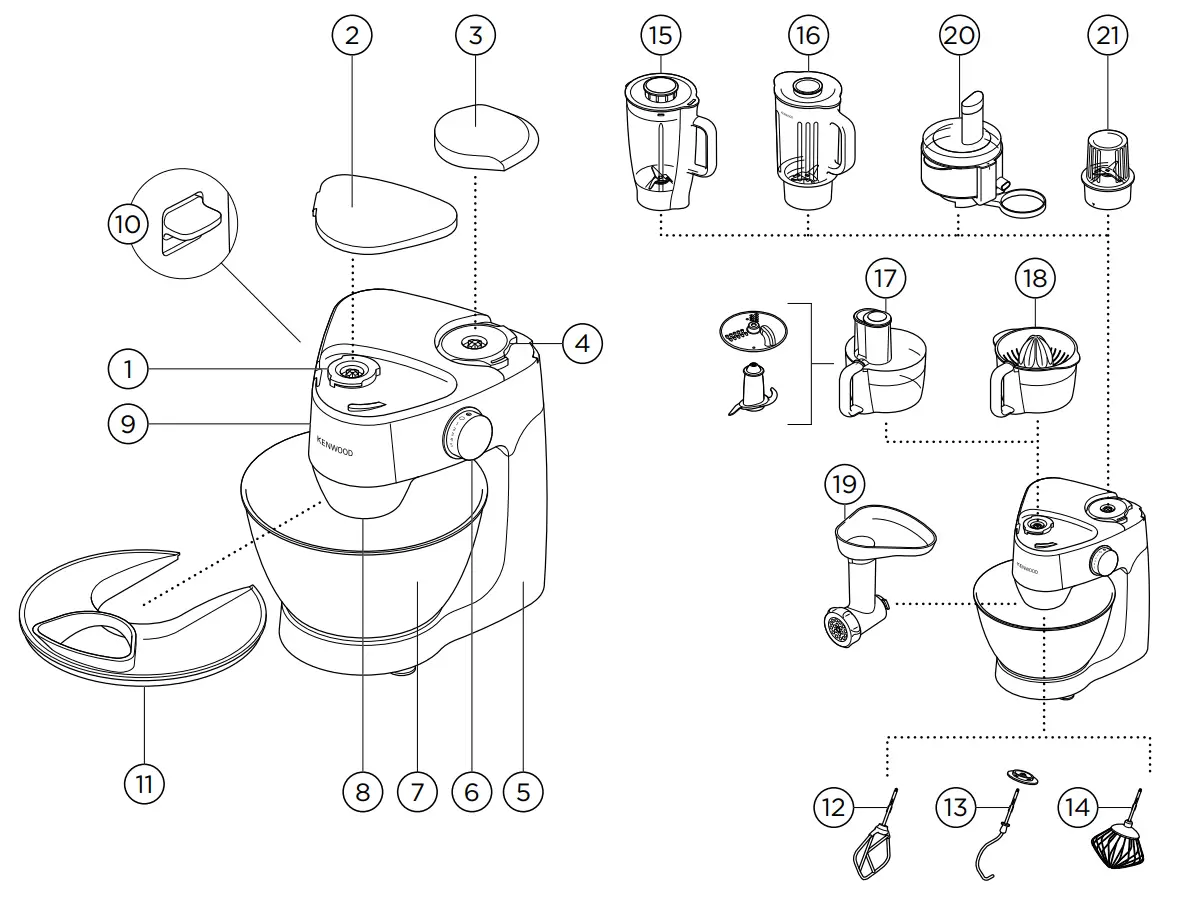
Kitchen Machine
① Medium Speed Outlet
② Medium speed outlet cover
③ High speed outlet cover
④ High Speed Outlet
⑤ Power unit
⑥ On/Off and speed control
⑦ Bowl
⑧ Tool Socket
⑨ Mixer head
⑩ Head release lever
⑪ Splashguard
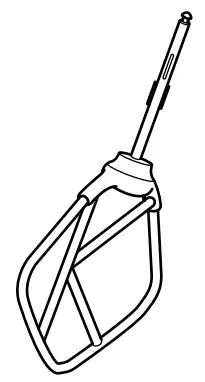
Bowl Tools
⑫ Beater
⑬ Dough hook with removable guard
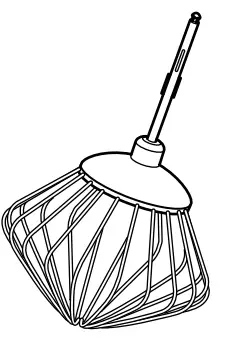
⑭ Whisk
Attachments
Not all of the attachments listed will necessarily be included with your kitchen machine. Attachments are dependent upon the model variant.
For more information or to order optional attachments not included in your pack visit the Kenwood website www.kenwoodworld.com.
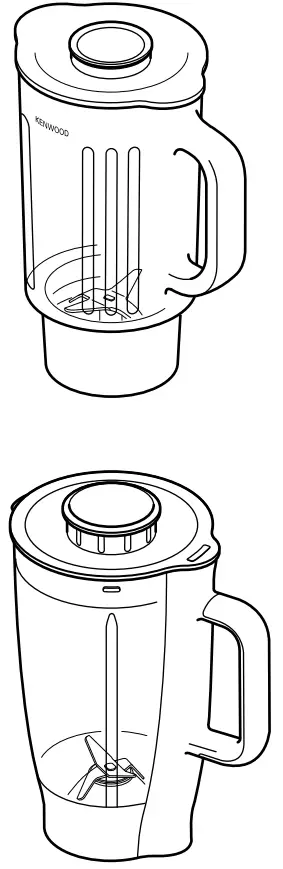
⑮ Plastic blender (AT282)
⑯ Glass blender (AT283)
⑰ Food processor (AT284)
⑱ Citrus juicer (Requires AT284)
⑲ Food mincer (AT281)
⑳ Juice extractor (AT285)
㉑ Compact chopper/mill (AT286)
To Use Your Bowl and Tools
Refer to Illustrations ![]() –
– ![]()
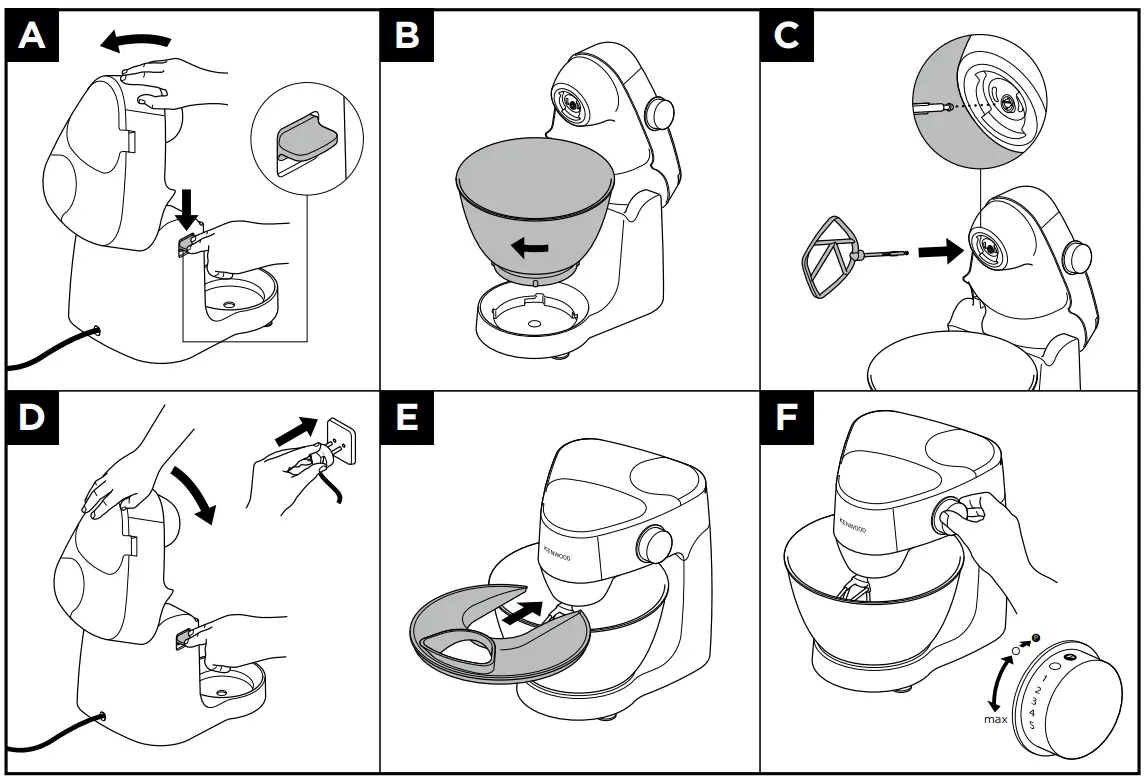
![]() Press down on the head release lever and gently raise the mixer head.
Press down on the head release lever and gently raise the mixer head.![]() Fit the bowl – turn clockwise to lock.
Fit the bowl – turn clockwise to lock.![]() Push the selected tool into the tool socket – you will hear a ‘click’ when fitted securely.
Push the selected tool into the tool socket – you will hear a ‘click’ when fitted securely.
- To prevent food ingress – always ensure the guard is fitted onto the shaft of the dough hook before inserting into the outlet.
![]() Press down on the head release lever and lower the head gently down. Plug into the power supply.
Press down on the head release lever and lower the head gently down. Plug into the power supply.![]() Slide the splashguard onto the bowl to fit.
Slide the splashguard onto the bowl to fit.
- During mixing, ingredients can be added directly to the bowl via the chute.
![]() Turn the speed control to the desired setting, Use pulse (P) for short bursts of speed.
Turn the speed control to the desired setting, Use pulse (P) for short bursts of speed.
After processing turn the speed control to ‘O’ and unplug from the power supply. Raise the mixer head and whilst holding it steady, pull the tool from the outlet.
| Hints and Tips Beater
Dough hook
Flour
Whisk
|
Electronic Speed Sensor Control
Your mixer is fitted with an electronic speed sensor control that is designed to maintain the speed under different load conditions, such as when kneading bread dough or when eggs are added to a cake mix.
You may therefore hear some variation in speed during the operation as the mixer adjusts to the load and speed selected – this is normal.
Points to note:
|
Using the Drive Outlets
High Speed Outlet ④ attachments
Lift off the high speed outlet cover ③. Ensure the medium outlet cover is in place otherwise the appliance will not operate.
Medium Speed Outlet ① attachments
Lift off the medium speed outlet cover ②.
Ensure the high speed outlet cover is in place otherwise the appliance will not operate.
To Use your Attachments
Refer to the relevant illustrations for each attachment and see hint and tips under each attachment section.
 Plastic Blender
a Blade unit
b Sealing ring
c Goblet
d Filler cap
e Lid
 Glass Blender
a Blade holder
b Blade unit
c Sealing ring
d Goblet
e Lid
f Filler cap
Assemble the Blender as shown In illustration and
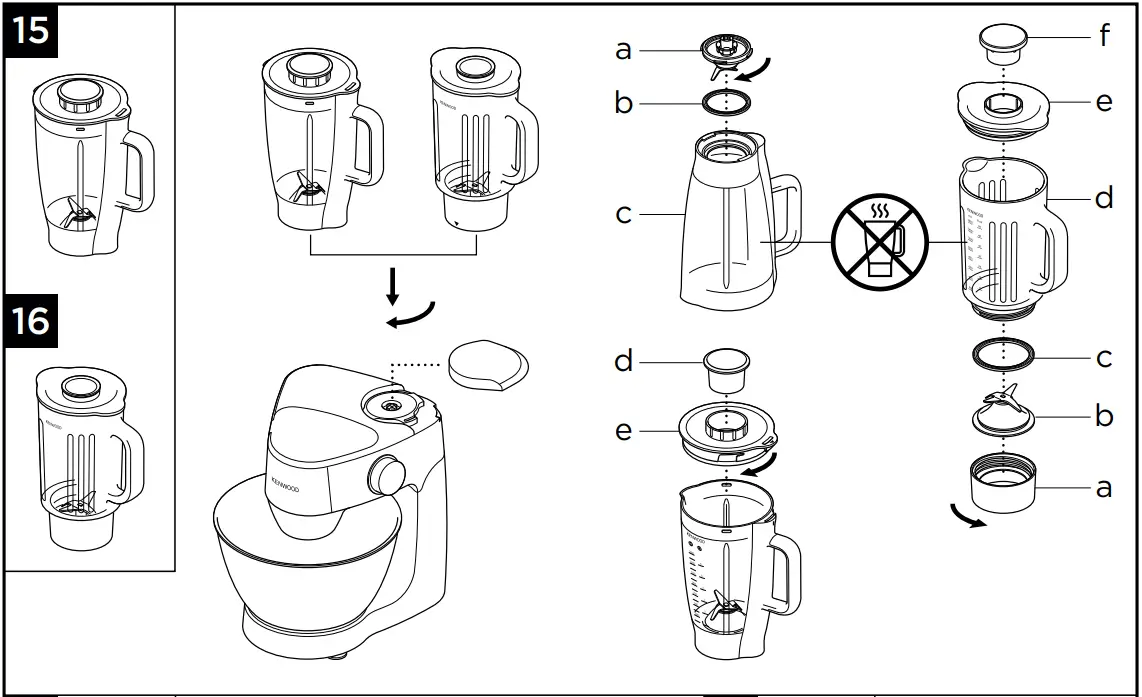
Note: ensure the sealing ring is fitted correctly or leaking will occur.
Lid Fitting
⑮ Plastic blender – turn clockwise to lock.
⑯ Glass blender – push down to secure.
| Hints and Tips Do not process hot ingredients
|
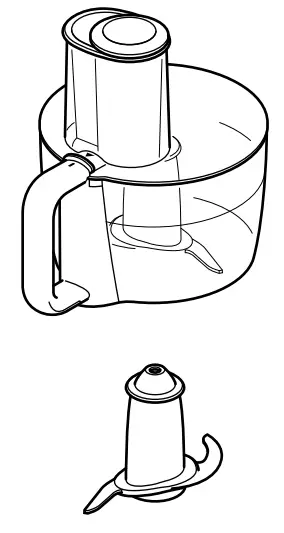
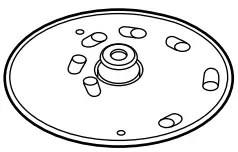
Food Processor
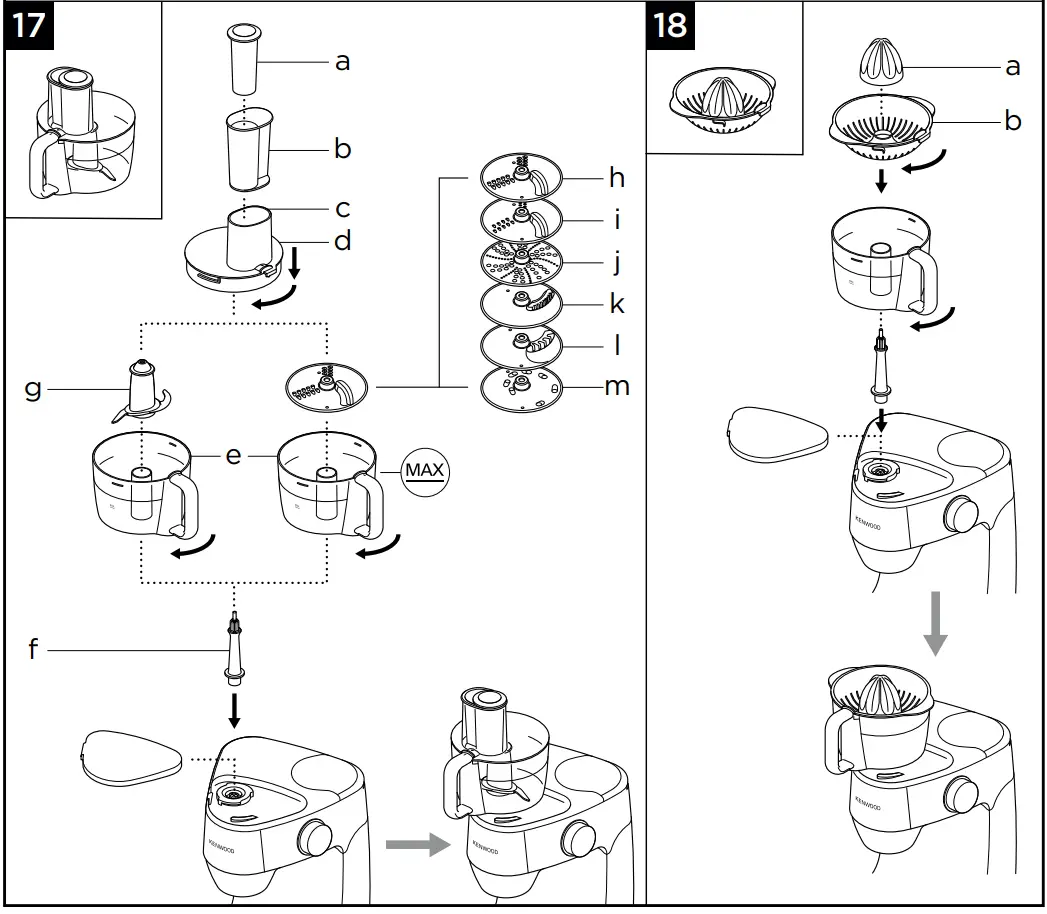
a Small pusher
b Large pusher
c Feed tube
d Lid
e Bowl
f Drive shaft
g Knife blade
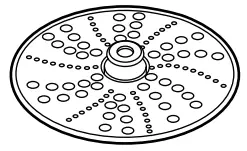
Discs (if supplied)
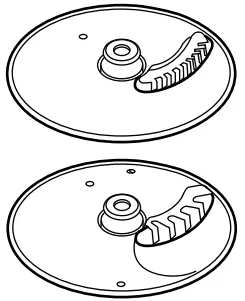
h Thick slicing/grating disc
i Thin slicing/grating disc
j Extra fine grating disc
k Thin julienne style chipper disc
l Standard chipper disc
m Extra thick grating disc
Assemble the Food Processor as shown in illustration ![]()
- Place the drive shaft onto the outlet.
- Fit the bowl over the drive shaft with the handle above the speed control and turn clockwise until it locks into position.
- Fit either the knife blade, one of the discs or the citrus juicer. The knifeblade and cutting section of the discs are sharp so always handle with care.
To use the small feed tube – put the large pusher inside the feed tube first.
To use the large feed tube – use both pushers together.
- Do not let the bowl fill up as far as the cutting disc: empty it regularly.
- Do not exceed the ‘MAX’ capacity level on the bowl.
Hints and Tips
|
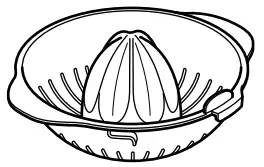
Citrus Juicer
a Cone
b Sieve
Note: This attachment can only be used in conjunction with the food processor AT284
Assemble the Citrus Juicer as shown in illustration ![]()
- Fit the sieve into the bowl ensuring that the tab on the rim locks into the bowl handle.
- Fit the cone over the drive shaft turning until it drops all the way down.
- Cut the fruit in half. Switch to speed 3 and press the fruit onto the cone.
Hints and Tips
|
Food Mincer
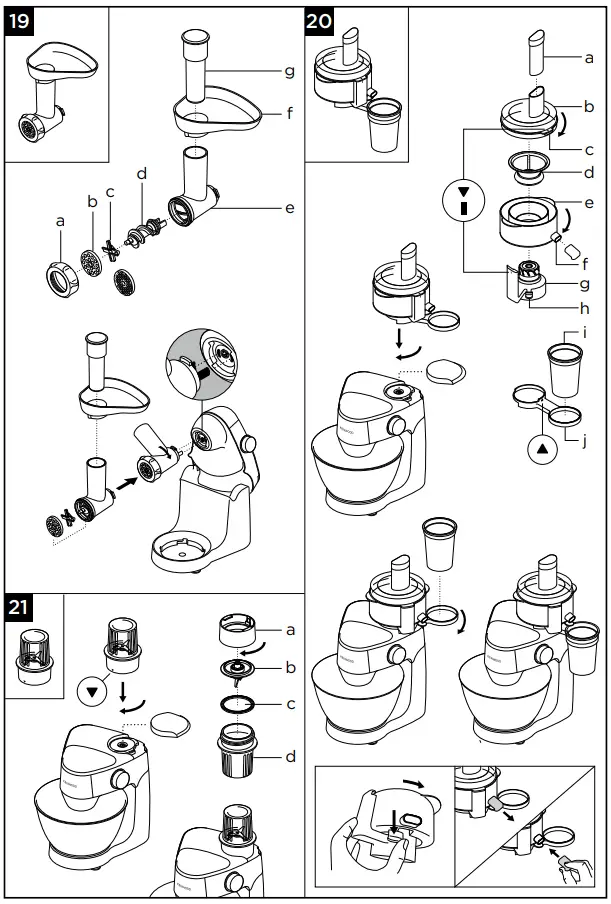
a Ring nut
b Screens: medium or coarse (depends on model variant)
c Cutter
d Scroll
e Body
f Tray
g Pusher
Assemble the Food Mincer as shown in illustration ![]()
- Fit the scroll inside the body.
- Fit the cutter – ensure it is located correctly with the cutting side outermost.
- Fit a screen – align the pin with the notch.
- Loosely fit the ring nut.
To use the Food Mincer
- Raise the mixer head. Ensure both outlet covers are fitted.
- With the attachment in the position shown – align the drive tabs on the end of the scroll with the corresponding slots in the drive outlet.
- Push the attachment into the outlet and turn clockwise until it locks into place.
- Tighten the ring nut manually.
- Fit the tray
- Cut meat into 2.5cm (1”) -wide strips.
- Select Max speed. Using the pusher gently push the food through, one piece at a time. Do not push hard – you could damage your machine.
Hints and Tips
|
Juice Extractor
a Pusher
b Lid
c Lid interlock tab
d Filter
e Pulp container
f Juice outlet (spout)
g Base unit
h Pulp container release lever
i Beaker
j Beaker holder
Assemble the Juicer as shown in illustration ![]()
- Place the pulp container onto the base unit and turn clockwise until it locks into position. When correctl fitted the juice outlet should be located over the pulp container release lever.
- Fit the filter and push firmly into position.
- Fit the lid onto the pulp container – turn clockwise to align the arrow ▼ on the lid tab with the mark
 on the base unit.
 - Place the beaker holder onto the underside of the attachment – the arrow ▲ on the beaker holder should be pointing upwards and aligned with the juice outlet.
- Whilst supporting the beaker holder, fit the attachment to the outlet by aligning the spout over the corner of the machine and then turn clockwise to lock into position.
- To fit the beaker, rotate the holder away from the spout and then place the beaker in the holder. Rotate the beaker so that it is located underneath the juice outlet.
- Cut the food to fit the food tube.
- Turn to Max speed, then place the food into the feed tub. Push down evenly with the pusher – never put your fingers in the feed tube.
Important
|
Hints and Tips
|
Health recommendations
|
To dismantle the Juicer
Reverse the assembly procedure.
To remove the pulp container from base unit – press the release lever on the base unit and rotate the pulp container anticlockwise. Then lift off.
Juice Outlet (spout)
- The spout is designed to be removable for cleaning. Pull the spout to remove.
- To refit after cleaning – push the spout fully on.
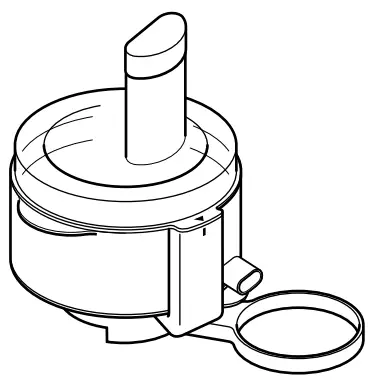
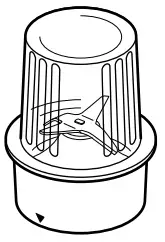
 Compact Chopper/Mill
a Base
b Blade unit
c Sealing ring
d Jar
Assemble the Mill as shown in illustration ![]()
- Put your ingredients into the jar.
- Ensure the sealing ring is correctly fitted on the blade unit. Leaking will occur if the seal is not fitted correctly.
- Turn the blade unit upside down.
Lower it into the jar, blades down. - Screw the base onto the jar until it is finger-tight.
- Place the mill onto the outlet with the arrow on the mill base towards the back of the machine. Turn the mill clockwise to lock firmly into place until the two arrows align .
- Switch on to maximum speed.
Hints and Tips
|
Recommended Usage ChartEggs sizes used = medium sized (Weight 53 – 63g). * This is for guidance only and will vary depending on the exact recipe and ingredients being processed. | ||||||
| Bowl Tool | Recipe/ Process |  |  |  | ||
 | Creaming butter/ margarine and sugar | Fruit cake 1.8kg total (6 egg mix) | Min | Max | 3 – 5 | |
| Beating eggs into cake mixes | 4 | Max | 1 – 4 | |||
| Folding in flour, fruit etc | Min | 1 | 30 – 60 secs | |||
| Pastry & Biscuits – rubbing fat into flour | Flour weight | 450g | Min | 2 | 2 – 3 | |
| All in one cake mixes | Total weight | 1.6kg | Min | Max | 45 – 60 secs | |
 | Bread Dough (stiff yeasted) | Flour Weight | 500g | Min 3 | 45 – 60 secs 5 – 7 | |
| Total Weight | 805g | |||||
| Soft yeasted dough (enriched with butter and eggs) | Flour Weight | 500g | Min 3 | 45 – 60 secs 5 – 7 | ||
| Total Weight | 960g | |||||
 | Egg whites | 8 | Min | Max | 1½ – 3 | |
| Fatless sponges | 620g (6 Egg Mix) | 4 – 6 | ||||
| Cream | 250 – 600ml | Min | Max | 2 – 4 | ||
| Mayonnaise | Egg yolks | 4 | Max | 1 – 2 | ||
| Pancake Batter | 11 | Min Max | 10 secs 45 – 50 secs | |||
| Recommended Usage ChartEggs sizes used = medium sized (Weight 53 – 63g). * This is for guidance only and will vary depending on the exact recipe and ingredients being processed. | |||||
| Bowl Tool/ Attachments | Recipe/ Process | | | | |
| Cold liquids, Drinks and Smoothies | Plastic AT282 | 1.5l | Max | 30 – 60 secs |
| Glass AT283 | 1.2l | ||||
| Milkshake/ Cold Milk | Plastic AT282 | 1.2l | Max | 15 – 30 secs | |
| Glass AT283 | 800ml | ||||
| Ice Cubes | 6 (125g) | P | 15 – 30 secs | ||
 | Raw Meat and Fish | 400g | 3 Max | 15 – 20 secs | |
| Onion | 250g | P | 5 – 10 secs | ||
| Biscuits | 100 – 250g | Max | 20 – 30 secs | ||
| Pastry – rubbing fat into flour. Adding water to combine pastry ingredients | 340g Flour weight | Max | 10 secs
10 – 20 secs | ||
| All in one cake mixes | Total weight | 800g | Min Max | 10 – 20 secs | |
| Mayonnaise | Egg yolks | 3 – 4 | Max | 1 – 2 | |
 | Slice and grate cheese, carrot, potato, cabbage, courgette, beetroot | Do not exceed maximum Mark on the bowl. | Max | 10 – 20 secs | |
| Slice softer items such as cucumbers and tomatoes | 4 – Max | ||||
 | Parmesan cheese and potatoes | Max | |||
 | Potatoes for fries and firm ingredients for salads casseroles and dips (e.g. carrot, swede, courgette and cucumber) | Max | |||
 | Grate carrots and cheeses | Max | |||
| Recommended Usage Chart Eggs sizes used = medium sized (Weight 53 – 63g). * This is for guidance only and will vary depending on the exact recipe and ingredients being processed. | ||||
| Attachments | Recipe/ Process | | |
|
 | All citrus fruit | 1kg | 3 | 2 – 3 |
 | Meat, poultry and fish. | – | Max | 10 |
 | Juice fruit and vegetables e.g. carrots, apples, pineapple, tomatoes and grapes. | 500g | Max | 30 – 60 secs |
| Soft fruits and vegetables e.g. tomatoes and grapes | 500g | Max | ||
|
| Nuts | 50g | Max | 30 secs |
| Coffee Beans | 50g | Max | 30 secs | |
| Cold Purees | 50g | Max | 30 secs | |
| Spicy Honey & Nut Marinade Honey (room temp) Crunchy peanut butter Small Chilli | 250g 40g 1 | P | 10 secs | |
Cleaning Instructions – Refer to the relevant Illustration ![]()
Service and Customer Care
IMPORTANT INFORMATION FOR CORRECT DISPOSAL OF THE PRODUCT IN ACCORDANCE WITH THE EUROPEAN DIRECTIVE ON WASTE ELECTRICAL AND ELECTRONIC EQUIPMENT (WEEE) |

Troubleshooting Guide
| Problem | Cause | Solution |
| Appliance stopped during operation. | No Power. | Check appliance is plugged in. |
| Machine overloaded/ maximum capacities exceeded. | Turn the speed switch to the off position, wait a few seconds and then re-select the speed. The appliance should resume operating straight away. Check maximum capacities in the ‘Recommended Usage Chart’. | |
| Outlet covers not fitted or unlocked. | Check that the outlet cover/s are fitted correctly. | |
| Medium or High speed attachments not operating. | Attachment not fitted and locked on correctly. | Check attachment locked on correctly. |
| Other outlet cover not fitted correctly. | Check other outlet cover fitted correctly. | |
| Movement on the worksurface. | Feet on the underside of the unit are wet or dirty. | Regularly check the feet are clean and dry. |
| Blender, or mill attachment leaking from blade unit. | Seal missing. Seal incorrectly fitted. Seal damaged. | Check seal is fitted correctly and not damaged. To obtain a replacement seal see ‘Service and Customer Care’. |
| Poor performance of tools/attachments. | Refer to hints in relevant ‘Using The Attachments’ section. Check attachments are assembled correctly. | |
Kenwood Ltd
New Lane
Havant
Hampshire
PO9 2NH
kenwoodworld.com
© Copyright 2022 Kenwood Limited. All rights reserved


