Motorola solutions WM500 WIRELESS REMOTE SPEAKER MICROPHONE
SPECIFICATION
| SPECIFICATIONS | |
| Kit Includes | USB-A to USB-C for charging |
| Mic Sensitivity | -44 ± 3 dBV typical |
| Audio Loudness | 100 ±3dBphon at 30cm wideband audio |
| Speaker Rated Audio/ Distortion | 1W, < 5% distortion |
| Dimensions (W x L x D) | 58 x 81 x 24.5 mm (2.28 x 3.18 x 0.96 in) |
| Operating temperature | – 20°C to +60°C (-4°F to 140°F) |
| Weight (includes RSM and cable) | 128 g (5.4.54 oz.) |
| IP Rating | IP67 |
| Battery | 1130mAh |
| Battery Life | BYOD: 40 hours (5/5/90 duty cycle) LMR: 17 hours |
| Charge Time | 2 hours typical |
| Bluetooth Range | 100m line of sight |
| Compatible Radios | LEX L11, BYOD Android, TLK 100, TLK 150 and SLN 1000 ION (Requires WM500 firmware R03.00.00 and beyond) MXP600 and R7 (Requires WM500 firmware R04.00.00 and beyond) |
PRODUCT OVERVIEW
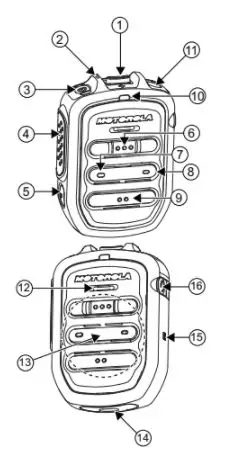
| No. | DESCRIPTION |
| 1 | Volume toggle |
| 2 | Power Indicator |
| 3 | Power button |
| 4 | Push-To-Talk (PTT) button |
| PTT call can be either transmitted to a talkgroup or individual user | |
|
5 | Multifunction (MFB) Button |
| Available multiple functions: ● To change language/tone in disconnected state ● To answer telephone calls upon incoming telephone call ● To reject telephone calls upon incoming telephone call ● To end telephone calls upon ongoing telephone call ● To mute/unmute microphone while call (Kodiak/telephone call) is active Note: The MFB button is not available for TLK series | |
| 6 | P1 button |
| Function configured on the host or the WAVE application. WAVE default function: WAVE OSM | |
| 7 | P2 button |
| Function configured on the host but not the WAVE application. WAVE default function: Channel Down |
| No. | DESCRIPTION |
| 8 | P3 button |
| Function configured on the host but not the WAVE application. WAVE default function: Channel Up | |
|
9 | P4 button |
| Function is set by the host: Function configured on the host or the WAVE application. WAVE default function: WAVE OSM | |
| 10 | Audio/Bluetooth Indicator |
| 11 | Emergency button |
| 12 | Microphone |
| 13 | Speaker |
| 14 | Charging port |
| 15 | NFC Location |
| 16 | Audio Jack |
CHARGING THE BATTERY
GETTING STARTED
Before you start, fully charge the RSM. To charge, connect the USB charging cable to the RSM and plug it into the USB power source.
TABLE 3: CHARGING INDICATOR BEHAVIOR
| POWER INDICATOR | DESCRIPTION |
| Blinking red1 | Battery is low |
| Solid red | Battery is charging |
| Solid green | Battery is fully charged |
| Blinking green | More than 90% charged |
| Rapid blinking red | Charging error |
TABLE 4: BATTERY INDICATION
| POWER INDICATION | DESCRIPTION |
| Rapid blinking red | The battery is critically low |
| Blinking red | The battery level is low |
| Off2 | The battery is medium or high |
LED STATUS INDICATION
Read the following table to understand the audio and Bluetooth status indication
TABLE 5: AUDIO AND BLUETOOTH STATUS
| AUDIO/BLUETOOTH INDICATION | DESCRIPTION |
| Blinking in blue | Enter pairing |
| Solid blue | Disconnected |
| Double blinking blue (once) | Connected |
| Solid red | Mic muted |
| Blinking in red | Voice prompt/Tone mute |
| Blinking in green | Receiving incoming call |
Short press the Power button to determine the details status of the RSM.
TABLE 6: STATUS INDICATION
| INDICATOR | STATUS | DESCRIPTION |
| Audio/ Bluetooth | Double-blinking blue | Connected |
| Power | Double-blinking green | Battery level is high |
| Double-blinking amber | Battery level is Medium |
| BUTTON | WM500 STATE | BUTTON SHORT PRESS | BUTTON LONG PRESS (>1.5s) | BUTTON VERY LONG PRESS (>3s) |
| Power | Off | N/A | Power on | Enter pairing |
| On | RSM turns on | N/A | Power off | |
| PTT | Connected | PTT for Kodiak Group Call | ||
| Not connected | Kodiak pairing | N/A | N/A | |
| Power + PTT | Off | N/A | N/A | Power on and clear PDL |
| Power + Call button | On | N/A | N/A | Enter/Exit Dark mode |
|
Call button | Not connected | Switched language | N/A | N/A |
| Incoming call | Answer call | Reject call | N/A | |
| On call | Mic mute | End call | N/A | |
| Volume + | Connected | Volume increases by one step | Volume ramp up | |
| At maximum volume | Volume max tone | |||
| Volume – | Connected | Decrease volume by one step | Volume ramp down | |
| At minimum volume | Volume min tone | |||
PAIRING TO DEVICES
PAIRING THE RSM THROUGH BLUETOOTH
- While RSM is powered off, press and holds the Power button until you hear “Power On” followed by “Searching for Host”, and the blue LED blinks for 90 seconds during pairing mode.
- From the compatible device, search and select “WM500_xxxx” from the Bluetooth
- Once the devices are paired successfully, a tone is
- A voice prompt from the RSM indicates that the device is “Connected”.
Perform the following choices based on your device:
| If you are using… | then, you… |
| Android Devices | No further actions are required after step 4 |
| iPhone | a. Choose RSM from the Bluetooth list b. Pair again for the second time |
| MXP600 | No further actions are required after step 4 |
| ION | The radio display prompts another pairing request with RSM. Tap Pair when prompted. When successful, a tone is played from the RSM. |
| R7 | Press the MFB button to start the connection process when you hear the “Ring” tone indicating the Host is requesting for connection. |
PAIRING THE RSM THROUGH NFC
- While RSM is powered off, press and holds the Power button until you hear “Power On” followed by “Searching for Host”, and the blue LED
- Align the NFC locations on both the RSM and the compatibles
- Check the compatible device for indication of successful
UNPAIRING THE RSM
- While RSM is powered off, press and holds the Power button and PTT buttons. The blue LED blinks and a voice prompt from the RSM indicates that the paired device is “Cleared”.
Note: Always unpair the WM500 from the Bluetooth host and ensure that the paired device is “Cleared” before starting another pairing process.
UNPAIRING WITH TLK/SLN
- For TLK100/TLK150, refer to Wave Portal for Bluetooth pairing
- For SLN1000, refer to Nitro Portal for the Bluetooth pairing process
ACCESSORY MANAGER APP – FOR FUTURE SW UPGRADES
DOWNLOAD FROM GOOGLE PLAY STORE![]() or Apple App Store
or Apple App Store
https://www.motorolasolutions.com/content/static/dm_app/get_dmapp.html

ACCESSORY MANAGER APP ICON & APP NAME
Note: Install the Accessory Manager application to upgrade WM500 firmware to the latest version for the first time before use. The URL will redirect the user to Google Play Store or Apple App Store upon clicking Google Play or App Store.
OPENING THE APP
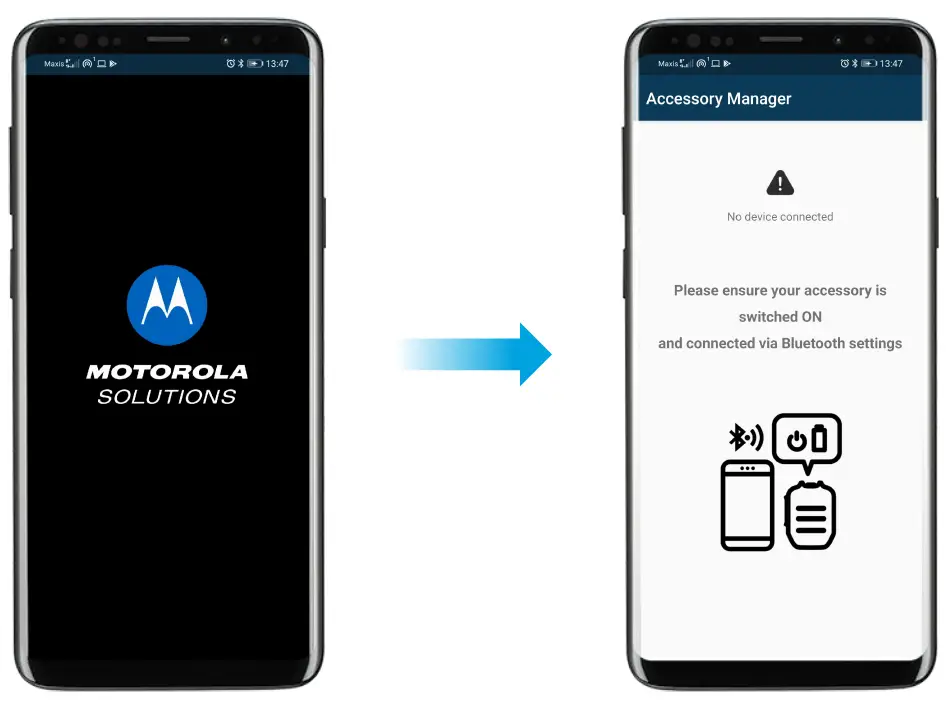
PRIMARY FLOW WHEN DEVICE IS CONNECTED

PRIMARY FLOW WHEN DEVICE IS CONNECTED
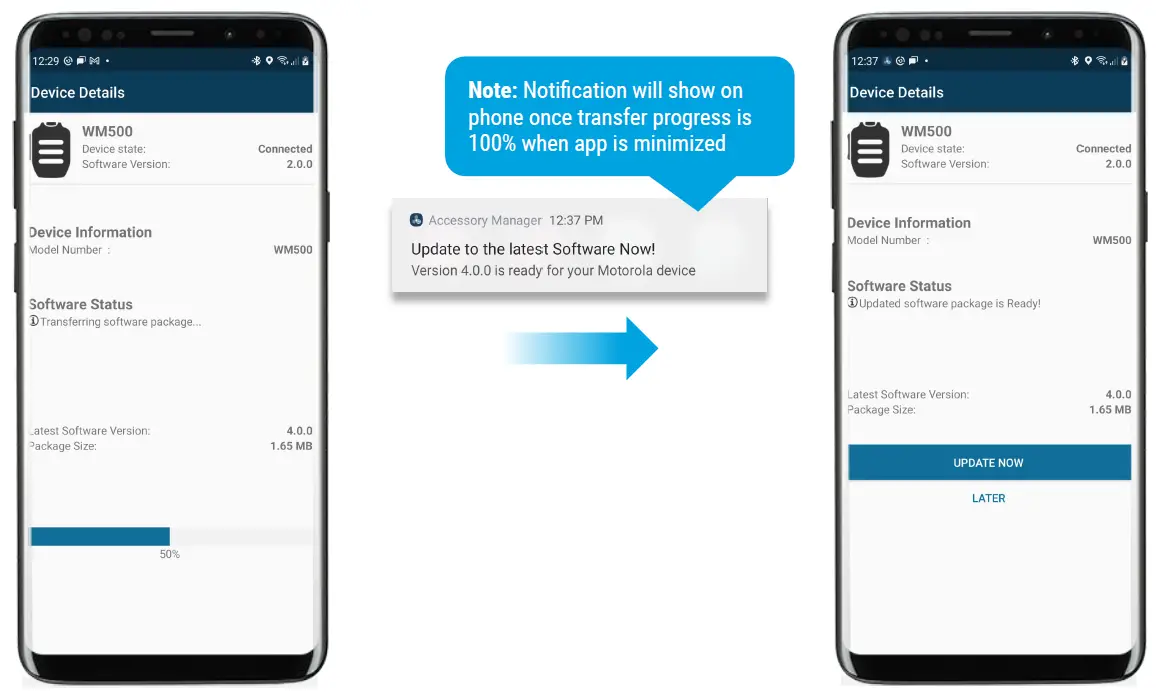
- Note: Notification will show on the phone when the app is minimized
- Accessory Manager: Accessory Manager is running in the background
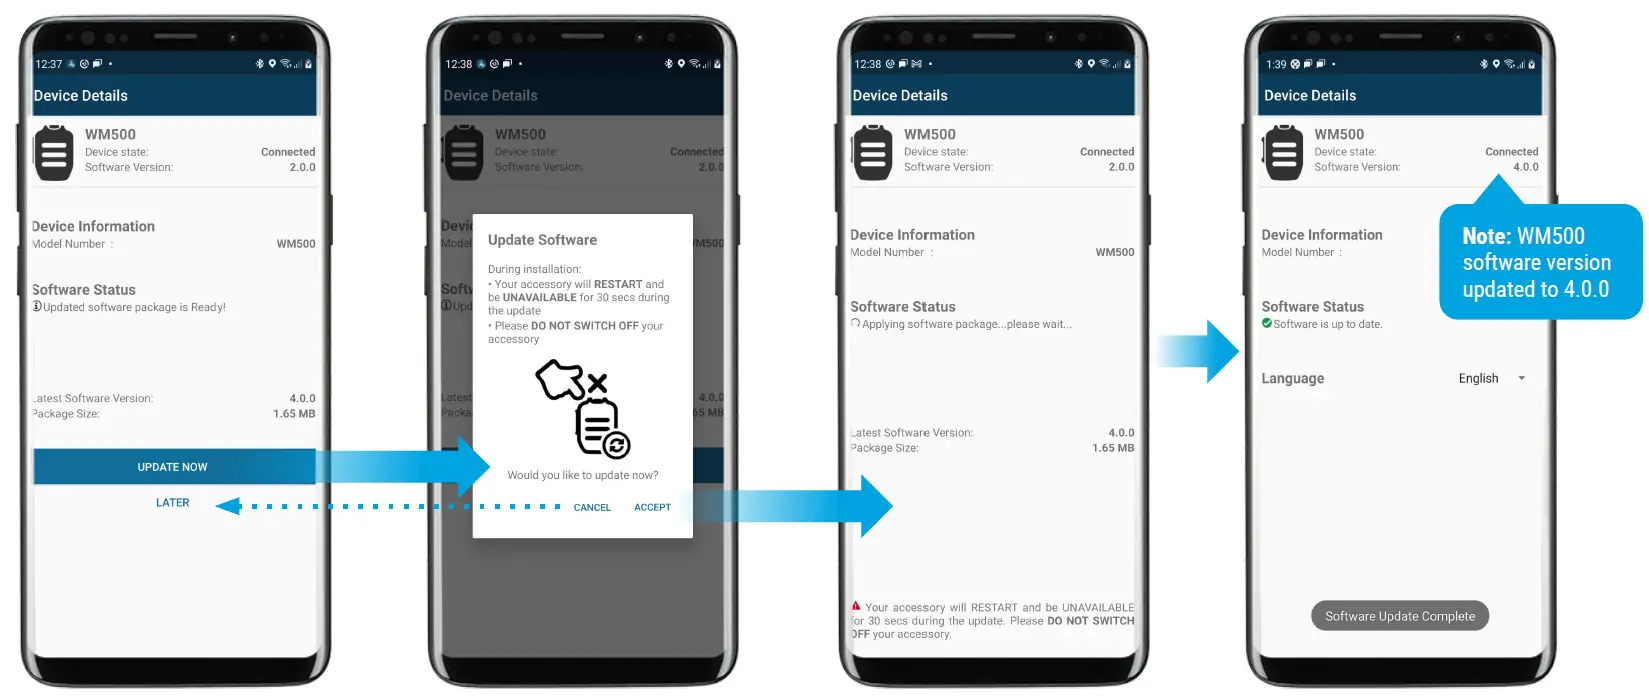
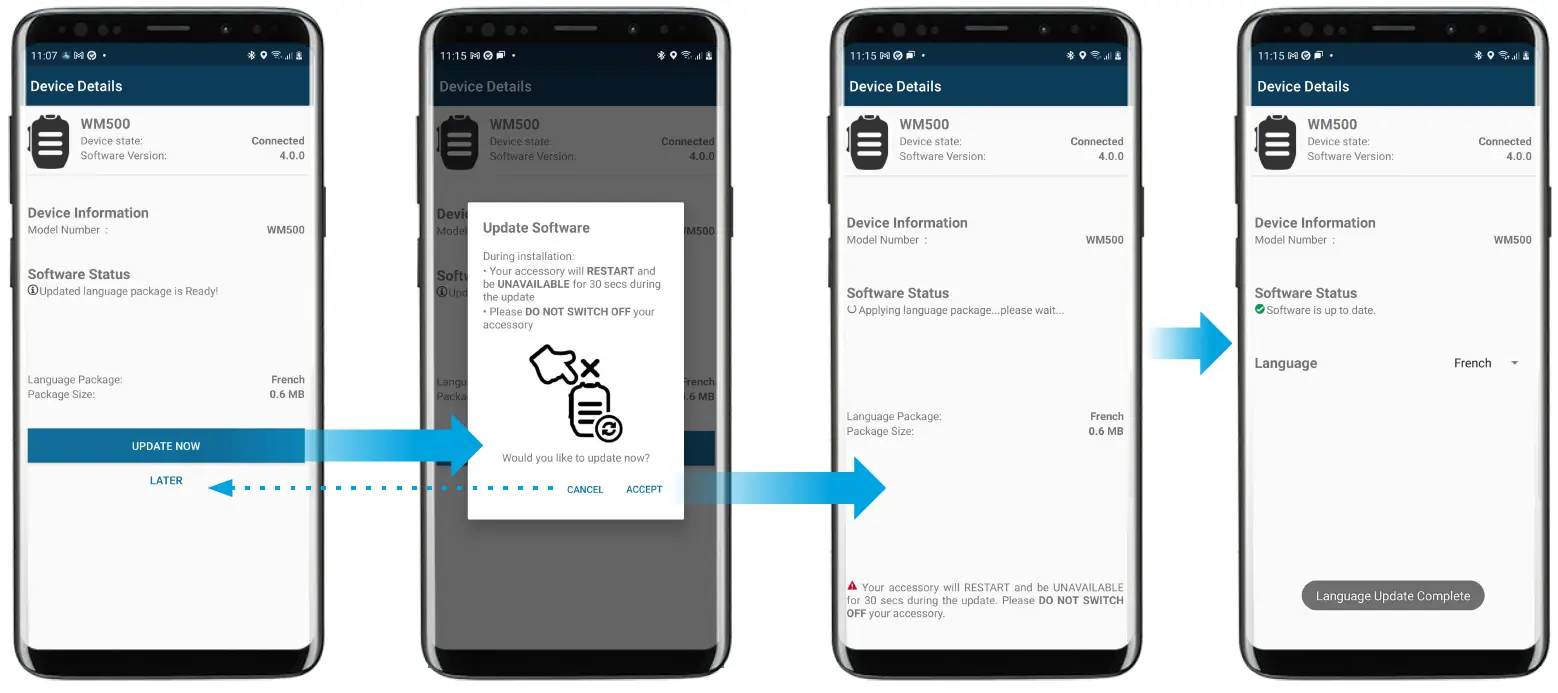
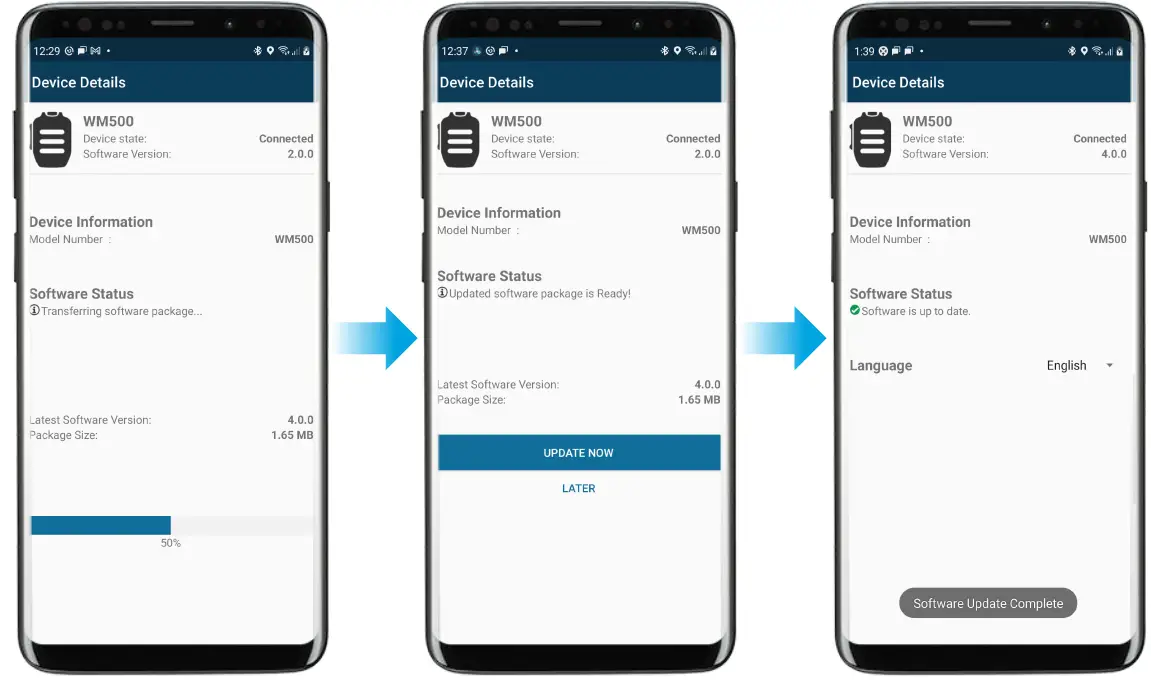
UPDATE SOFTWARE
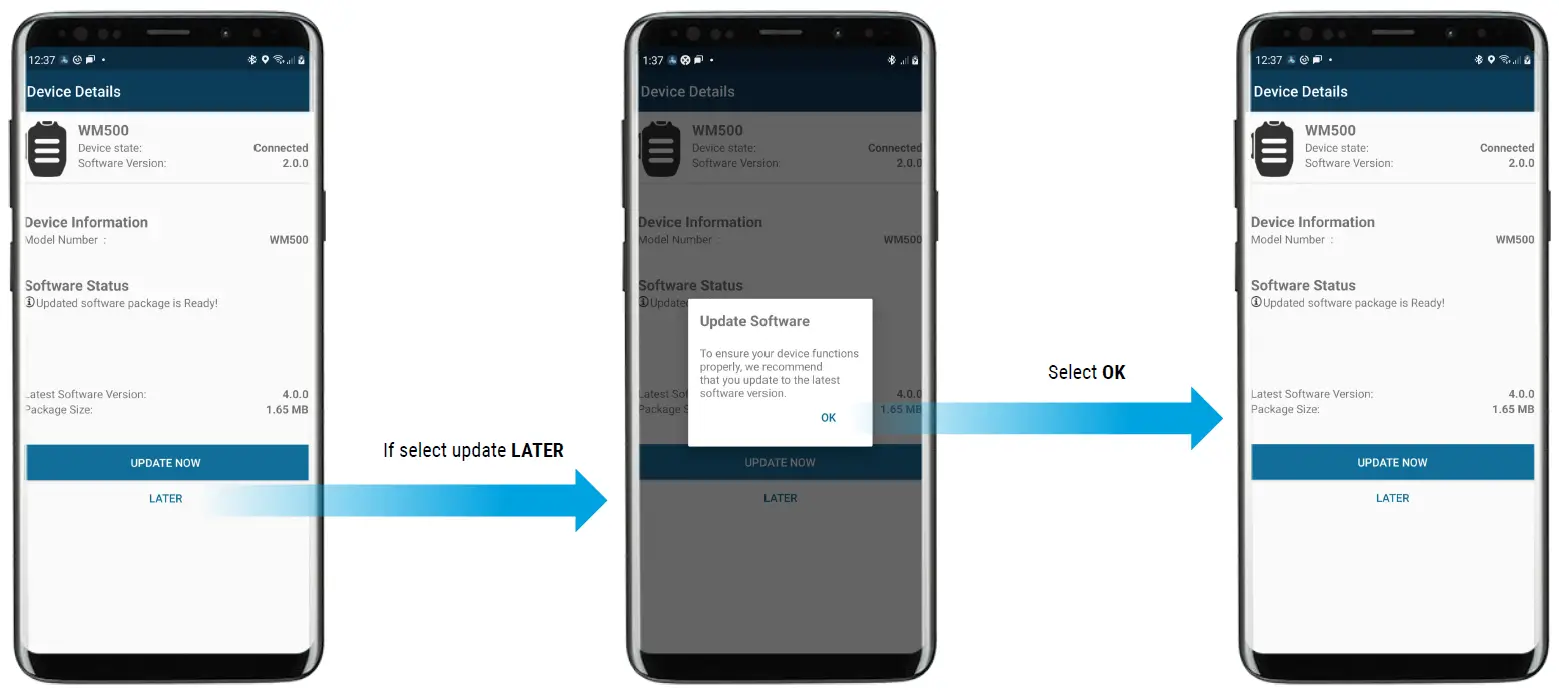
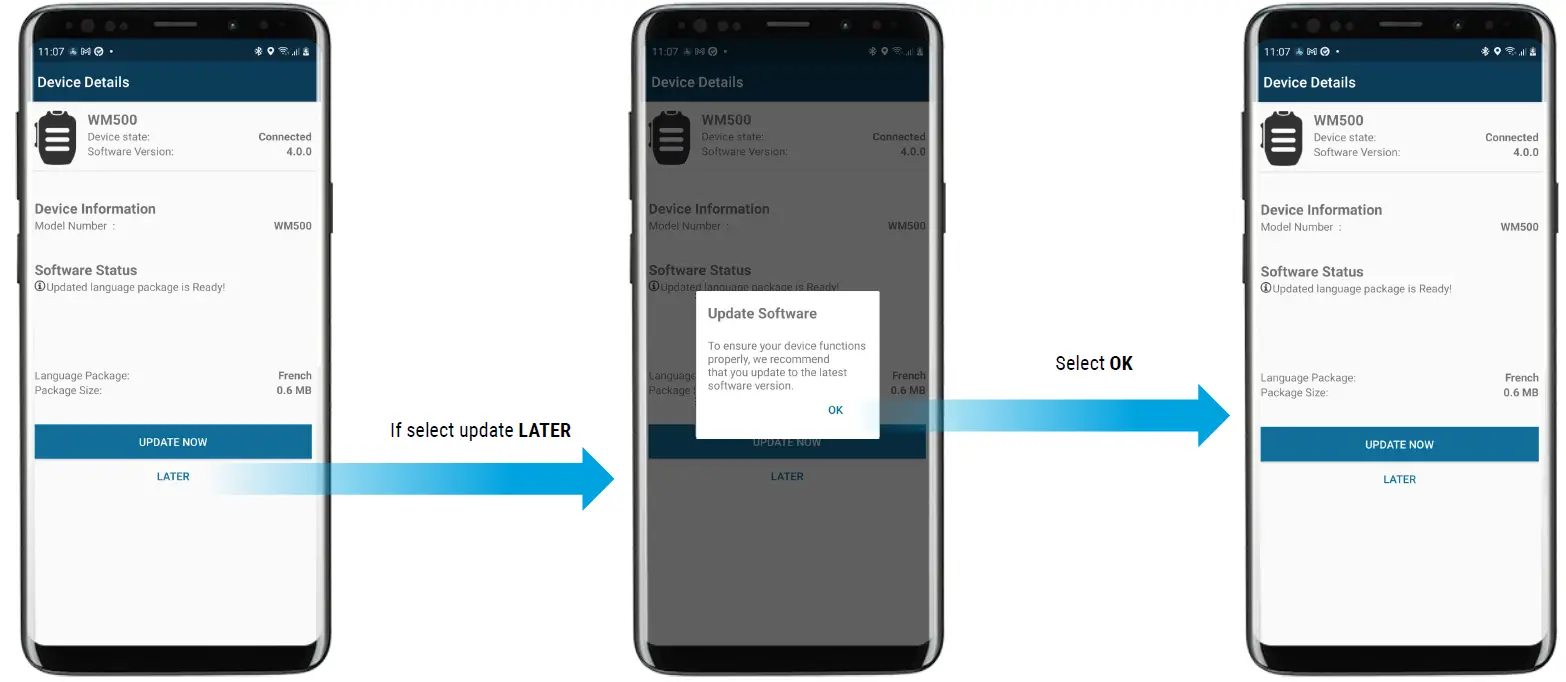
UPDATE SOFTWARE LATER
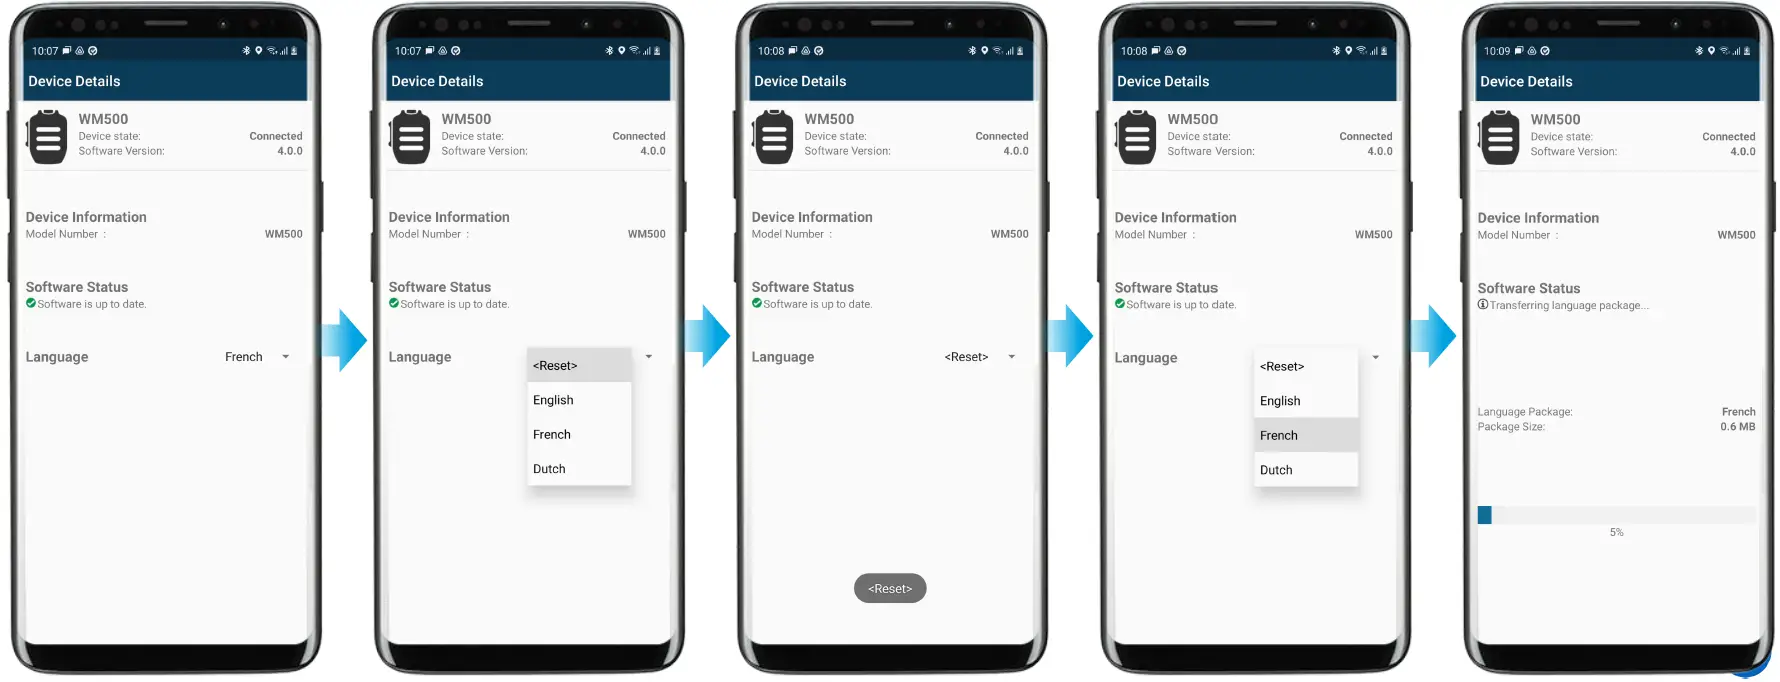
PRIMARY FLOW OF LANGUAGE PACK UPGRADE
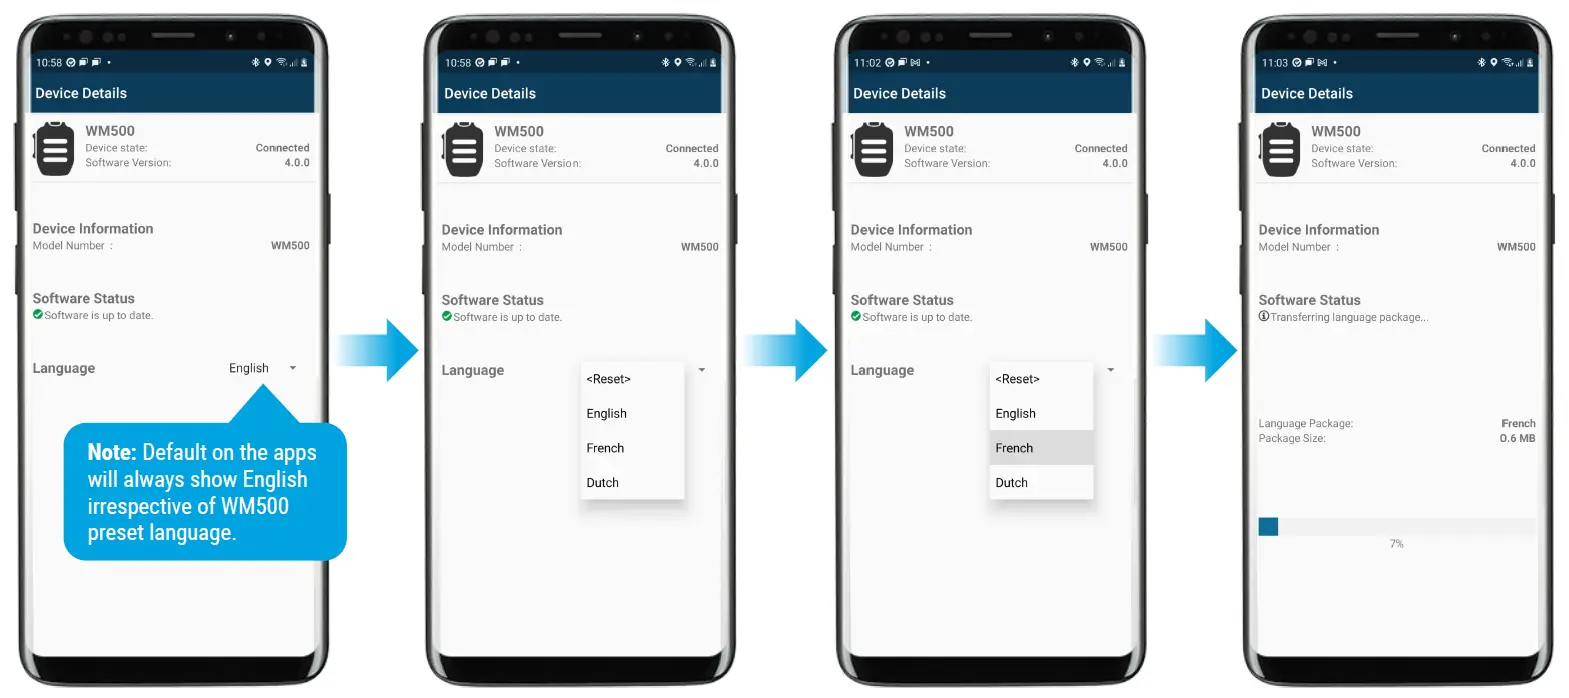
PRIMARY FLOW OF LANGUAGE PACK UPGRADE
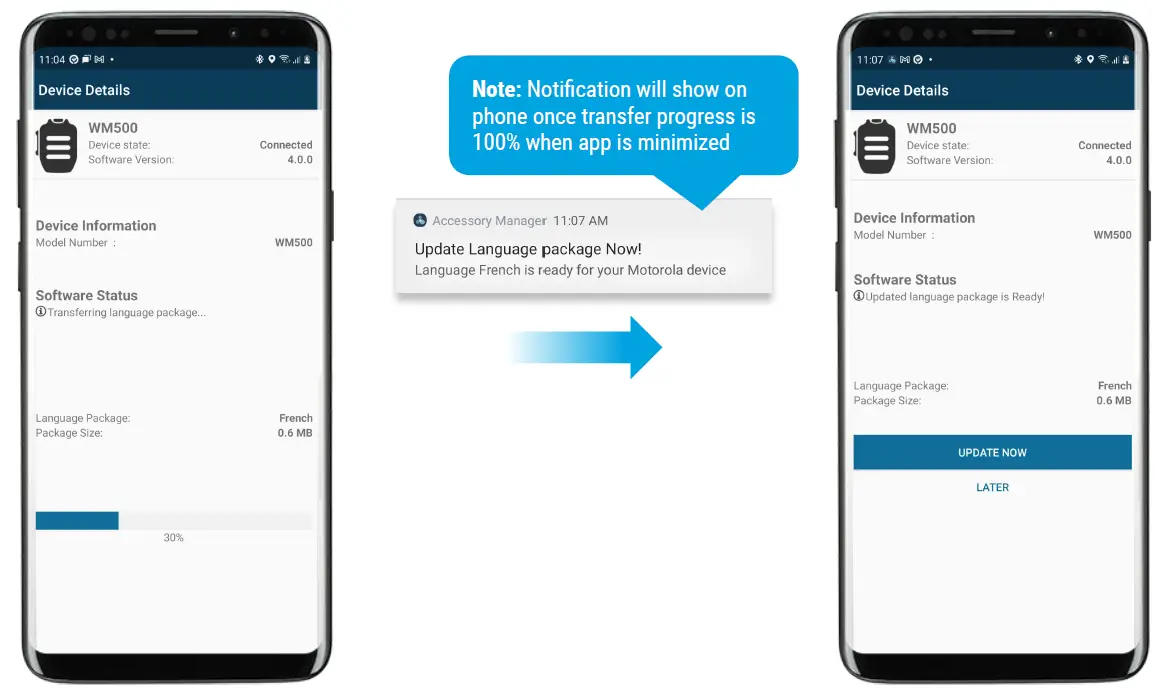
LANGUAGE PACK UPGRADE
LANGUAGE PACK UPGRADE LATER
LANGUAGE PACK UPGRADE FOR MULTIPLE WM500s
The accessory Manager application is able to support language upgrades for multiple units of WM500
- To upgrade multiple units of WM500 to the same language (e.g.: French), please use the ‘RESET’ function & choose French again
PAIRING TO DEVICES via WAVE and NITRO PORTALS
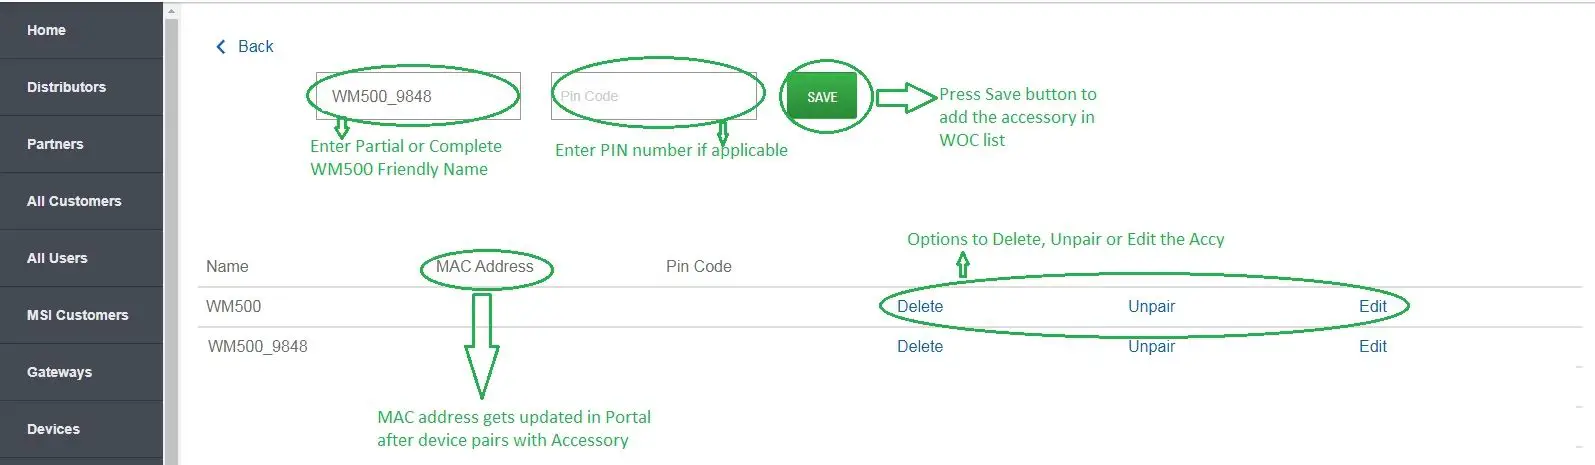
BLUETOOTH ACCESSORY CONFIGURATION IN WAVE PORTAL
- From Wave On Cloud portal, select desired WAVE or SLN1000 Device
- Select “Actions” > “Bluetooth Accessories

- Insert Friendly Name, Pin Code (if applicable)
- Once done, click “SAVE”


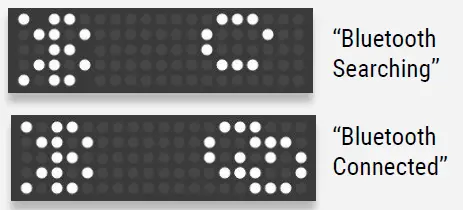
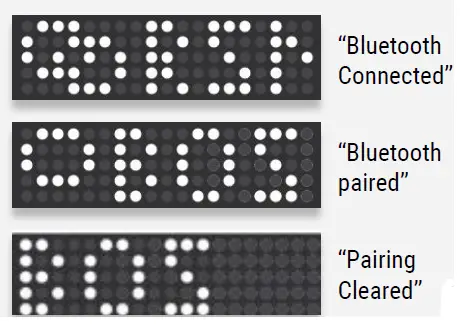
BLUETOOTH STATUS AT RADIO
CLEAR PAIRING FROM RADIO
- Press Top Button (i) to navigate to view the Bluetooth Status information.
- Press volume +/- to cycle through the list
- To clear a pairing, long press the side button while on the device name “friendly ”
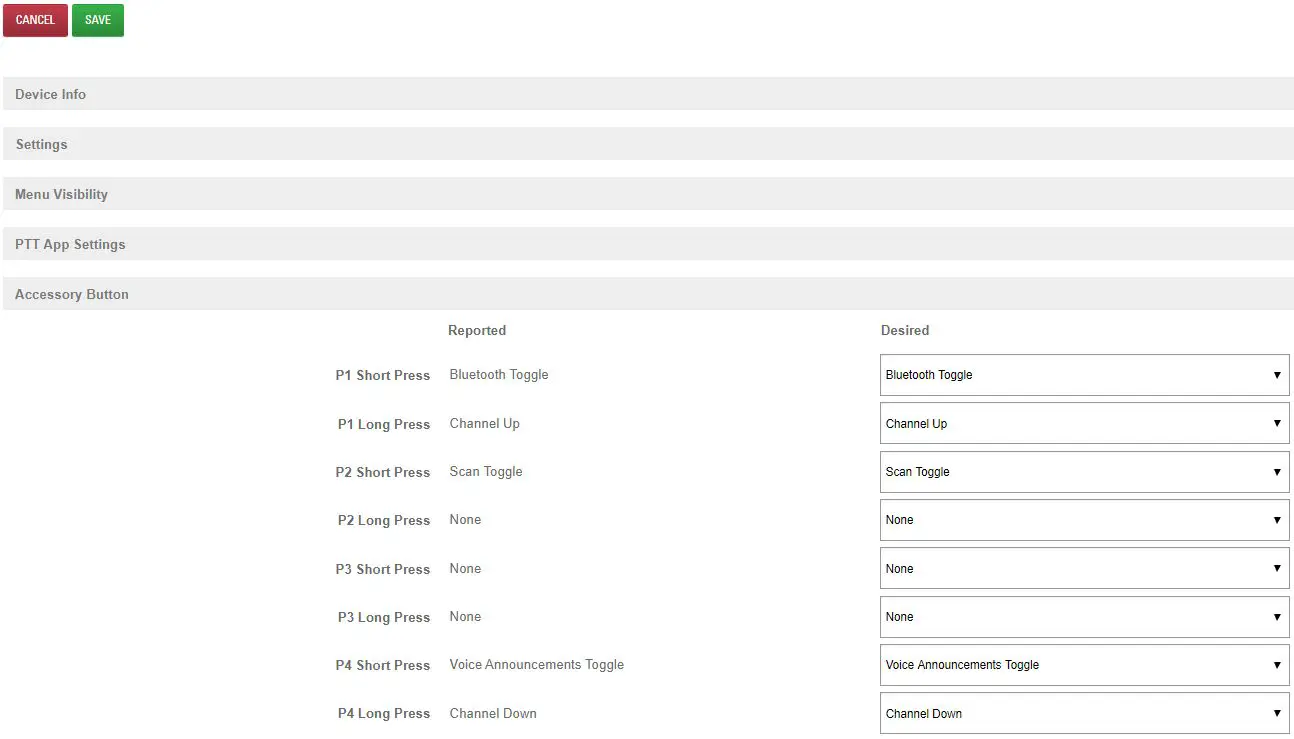
- From Wave On Cloud portal, select desired WAVE or SLN1000
- Select “Accessory Button” configuration.
- Configure desired button
COMPATIBILITY WITH MXP600 and R7
- WM500 0.0 onwards is compatible with MXP600 and R7.
- Should your WM500 is not 0.0 (or R04.00.00), please upgrade the RSM with the Accessory Manager application (click here)
FAQ
- How do I change the voice announcement language of my WM500?
- Step 1: Upgrade Accessory Manager apps to V1.0.11 and beyond from Google Play Store.
- Step 2: Upgrade the WM500 software version to R04.00.00 via Accessory Manager apps.
- Step 3: Update language options accordingly (available to select French, Dutch, and English).
- Do we have Accessory Manager available in Apple App Store?
- It is currently in the development stage, and shall be available in Q1-2022.
- What happen if WM500 is facing the following reconnection behavior with R7 radio?
- a. Radio display shows “Connecting Failed”.
- b. WM500 Bluetooth LED indication shows solid blue.
- c. WM500 prompts bad bonk audio when the button is pressed.
- d. WM500 prompts a “Disconnected” audio notification.
Recovery method: Power off WM500, power cycle R7 radio, and clear WM500 pairing info from R7 radio. Perform a fresh pairing between WM500 and R7 radio.


 Installation Guide")


