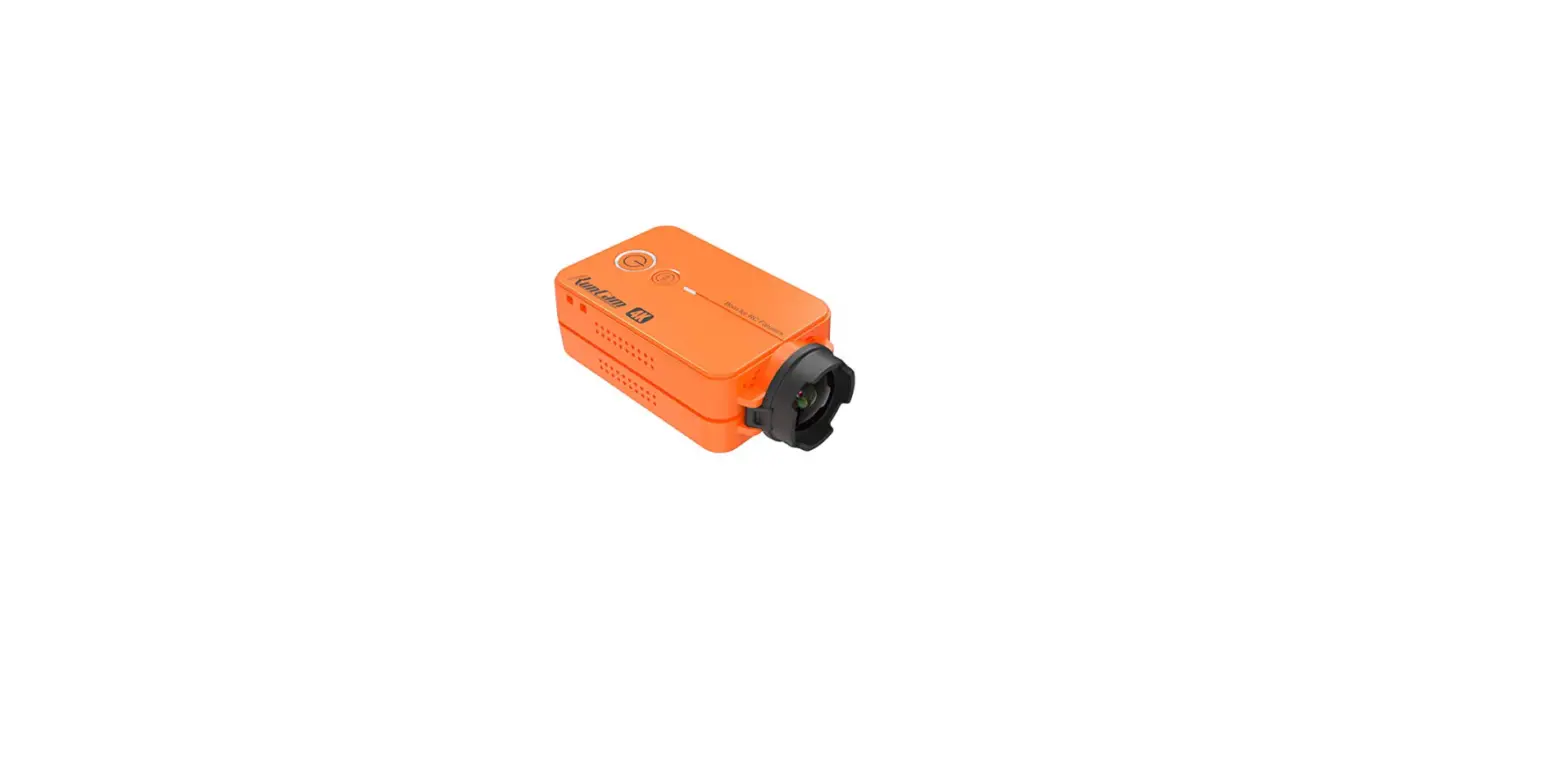
4K Version 4K Version Sports Action Camera
RunCam 2 4K Version
User Manual
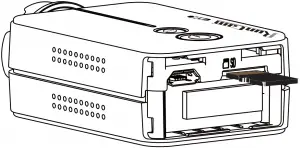
Instruction Diagram
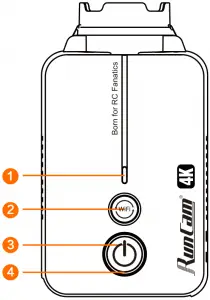 1 WiFi/Mode Light (LED1)
2 WiFi/Mode Button
3 Power/Shutter Button
4 Power/Shutter Light (LED2)
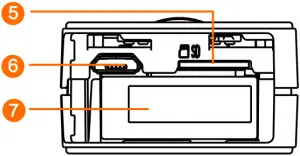
5 MicroSD Card Slot
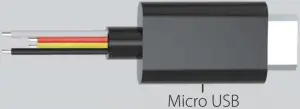
6 Micro-USB
7 Battery Holder
Charging
Micro USB port supports DC 5-17V power supply. A DC 5V 1~2A charger is recommended. The Red LED will turn on during charging and turn off when charging is complete. It takes about 2 hours to get fully charged.
Low Battery Warnings
When powered on, if the charge is less than 15%, the Green LED will continue to flash for 5 seconds.
Basic Camera Operation
| Power On/Off | – Long press the Power/Shutter button, with LED2 (Blue) on and three beeps, camera is turned on. – Long press the Power/Shutter button, with LED2 (Blue) off and 5 beeps, camera is turned off. |
| Video Mode | LED2: (Blue) – In standy mode, short press the Power/Shutter button, with one beep and LED2 starting blinking per second, camera starts recording. – In video mode, short press the Power/Shutter button, with 2 beeps and LED2 staying blue, camera get back to standby mode. |
| Mode Switching | – Long press the WiFi/Mode button, the camera cycles among the photo mode (LED 2 turns green), video mode (LED2 turns blue) and OSD mode (LED1 turns orange). |
| Photo Mode | LED2: (Green) – In standby mode, short press the Power/Shutter button, with one beep and LED2 blinking one time, one photo is done. |
| WiFi On/Off | -Turn on WiFi In standby mode, short press the WiFi/Mode button, with LED1 (Blue) blinking per second, camera is ready for connection. Default WiFi SSID: RC2-4K_xxxxxx Password: 1234567890 LED1 (Blue) stays on if WiFi is connected. -Turn off WiFi Under connection or ready for connection status, short press the WiFi/Mode button, with LED1 (Blue) turning off, WiFi is turned off. |
| Low Power Alarm | If power capacity is lower than 15%, every time you turn on the camera, LED2 (Green) will blink 5 seconds and the buzzer beeps 5 times for alarm. |
| Reset | -In standy mode, Triple-click the WiFi/Mode button in one second, with both LEDs blinking blue three times (interval of 500ms) and 5 beeps, camera will be re-set to factory default setting. |
| Forced Shutdown | When the camera behaves abnormal and both buttons don’t give any reaction, simultaneously press both buttons to shut down the camera. |
| Abnormal Condition | – Card error (no card, card full and low-speed card, etc) LED2 (Blue) keeps blinking (interval of 200ms) – WiFi connection fail LED1 (Blue) will be off after WiFi is turned on. – Boot abnormal After turned on, if LED2 (Green) keeps blinking (interval of 200ms), buttons give no reaction, it indicates the lens module is failed to be recognized. Camera needs to be forced shutdown and restart. If encryption detection failed, camera will turn off automatically. Camera needs to be restarted. |
| OSD Mode | LED1 (Orange) In OSD mode, short press the Power/Shutter Button to select next item and long press the WiFi/Mode button to exit the current page. |
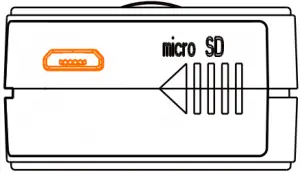
• microSD Card
Insert the microSD card as indicated by the icon next to the card slot.
Use brand name memory cards (sold separately) that meet these requirements:
- microSD, microSDHC, or microSDXC
- U3 recommended (2.7K60 / 1080P120 requires U3 or above; other resolutions require U1 or above)
- Capacity up to 128GB
NOTICE: Use carefully when handling memory cards. Avoid liquids, dust, and debris. As a precaution, power off the camera before inserting or removing the card. Check manufacturer guidelines regarding use in acceptable temperature ranges.
Abnormal SD Card Status: If the blue light continues to flash quickly after powering on, it indicates that the SD card is not inserted, or full or cannot be recognized.
Connection to Computer
 – – –
– – –  – – –
– – –
After turning on the camera, connect it to the computer via USB cable, then it will be recognized as a removable disc.
NOTICE: If the camera can not be recognized by the computer after connecting, please make sure that a microSD card is well inserted. If the information on microSD card can not be read normally, please try with another micro USB cable or USB port on the computer.
Firmware Upgrade
To ensure that the camera performs optimally, please use the latest firmware.
Update method here: https://runcam.com/download/RC2-4K4kversion.
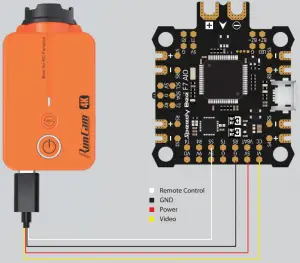
Flight Controller Connection and Control.
USB TV-out cable Instruction:
![]() Remote control wire:
Remote control wire:
It can be soldered to an unoccupied S or LED pad on the Flight Controller to achieve remote control of your camera.
![]() Ground wire
Ground wire
Power ground wire/Remote control signal ground wire
![]() Video wire
Video wire
It can be soldered to VI pad on the Flight Controller or Video-in pad on the VTX to transmit the video signal to VTX.
![]() Power wire
Power wire
It supports external power input of DC 5-17V.
Take Flight Controller Speedy Bee-F7 for example
Solder the remote control wire from the USB TV-out cable to S5 pad on Speedy Bee-F7, GND to any G pad, Video wire to VI pad and Power cable to 5V pad.
CLI Setting
For example: if you solder remote control wire to S5 pad as mentioned above, you need to do three steps to generate CLI interface
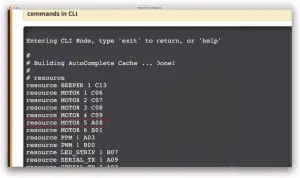
1. Connect to the ground station of your flight controller to enter the CLI interface and then type in command ![]()
2. Find ![]() and get pinio
and get pinio ![]()
3. Type in command as below
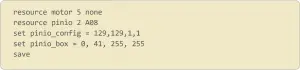
Remote Controller Setting
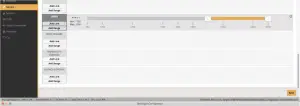
1. Mode Setting
Connect to the Ground station of BetaFlight, navigate to the Modes interface and find Mode USER2. Assign Mode USER2 to SD switch on the controller. Here we chose AUX3. Thus the SD switch on the controller is corresponding to AUX 3. Assign USER2 to Aux3. Please choose the second level or third level switch to achieve the setting.The camera can be controlled by the SD switch to record or change mode if the interface is configured as showed below.
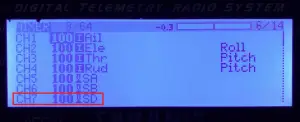
2. Assign channel to switch of the controller (FrSKY X9D)
Choose Model on the controller and then enter the MIXER interface to assign channel to switch. Taking opentx 2.2.0 for example. CH7 is assigned to SD.
3. Test
Set SD to the bottom, toggle the switch one time, camera starts/stops recording; toggle thrice, camera switch to phote mode.
Video Bitrate and Codec
| Resolution | Video Quality | Codec | ||
| High | Medium | Low | ||
| 4K@30fps | 60Mbps | 50Mbps | 40Mbps | H.264 |
| 2.7K@60fps | 60Mbps | 50Mbps | 40Mbps | |
| 2.7K@30fps | 60Mbps | 50Mbps | 40Mbps | |
| 1080P@120fps | 60Mbps | 50Mbps | 40Mbps | |
| 1080P@60fps | 30Mbps | 22Mbps | 18Mbps | |
Parameter
| Image Sensor | SONY (8MP) |
| Video Resolution | 4K@30fps/2.7K@60fps/2.7K@30fps/1080P@120fps/1080P@60fps |
| Video File Format | MP4 |
| Video saved while power-off suddenly | Supported |
| Interface | Micro USB |
| Serial Port | USB serial converter |
| WiFi | Supported |
| Max Micro SD Card Supported | Max. 128GB U3 recommended (2.7K60/2.7K50/1080P120 requires U3 or above; other solutions require U1 or above) |
| Buzzer | Supported |
| Microphone | Supported |
| Micro- USB power input | Accepts DC 5~17V |
| Battery Capacity (measured upon fully charged) | 850mAh 4.35V (replaceable battery) |
| FOV(Adjustable) | Large: 155°/ Middle: 142°/ Small: 130° |
| Shutter | Auto 1/30 1/50 1/60 1/100 1/120 1/240 |
| ISO | Auto 100 200 400 800 1600 3200 |
| Working current | Max 500mA@ DC 5V |
- Technical Support
Please visit: https://support.runcam.com


