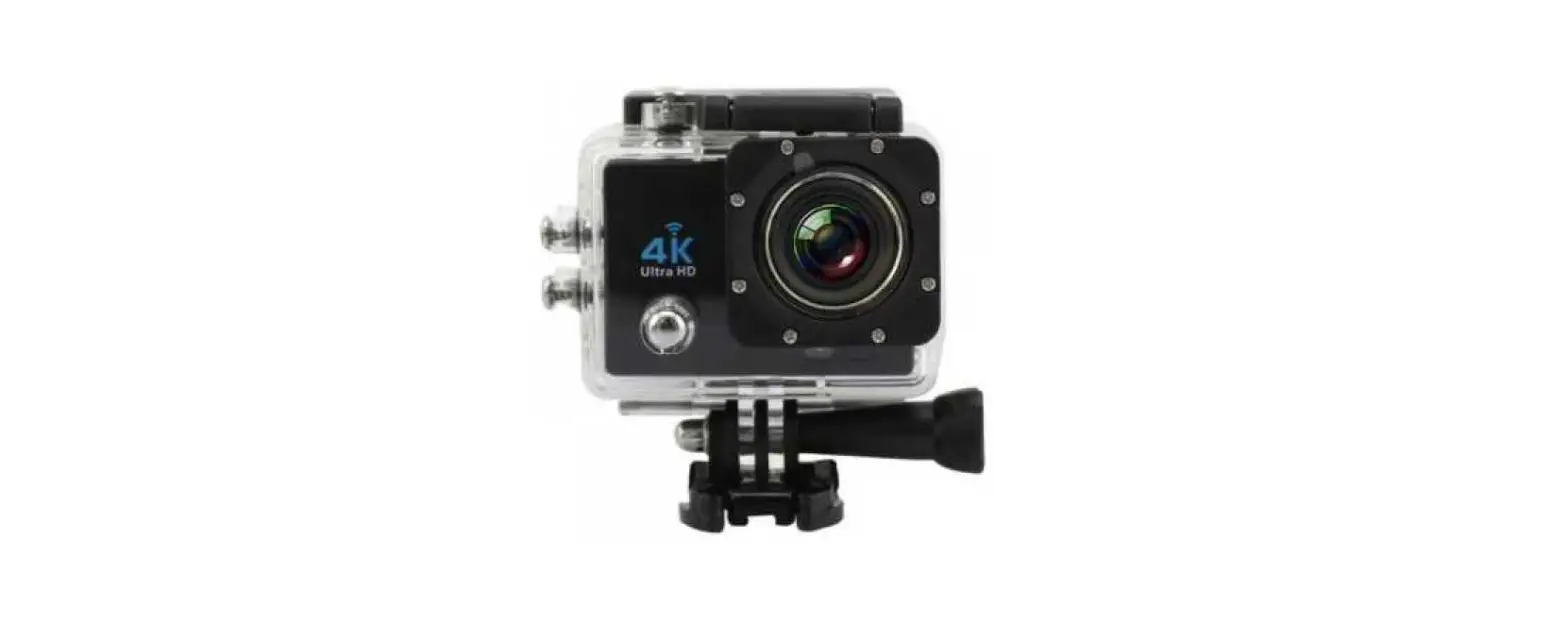

Cameras V3.9 4K Ultra HD Action Camera
CAUTIONS
- Keepitsafefromfallinganddropping.
- Donotplaceheavyobjectsonthecamera.
- Keepitdistancefromanystrongmagneticinterferenceobjectslikeelectricalmachinetoavoidstrongradiowaves thatmightbedamagingtheproductandaffectthesoundorimagequality.
- Keep the camera away from water and liquids (unless equipped with waterproof case). This may cause the the cameratomalfunction.
- Don’texposetheproductdirectlytohightemperaturesover55°C.
- WerecommendusinghighqualityMicroSDCardforthebestresults.PleaseformatthemicroSD,microSDHCand
microSDXCmemorycardonthecamerabeforeusingandrestartthecameraafterformatting. - Don’tplaceyourMicroSDcardnearstrongmagneticobjectstoavoiddataerrororloss.
- Removethebatterybeforeusingasadashcamera.
- Incaseofoverheating,unwantedsmokeorunpleasantsmellfromthedevice,unplugitimmediatelyfromthepower outlettopreventhazardousfire.
- Keepitsafetyfromchildrenwhileoncharging.
- Donotusethecamerawhenitislowpower.
- Donotusethecamerawhileitisincharging.
- Storedthedeviceinacool,dryanddustfreelocation.
- Donotattempttoopenthecaseofthecameraormodifyitinanyway,ifthecamerahasbeendetached,thewarranty willbevoid.
INTRODUCTION
ActionCameraisahigh-definitiondigitalmotionvideorecordingdevice,createdtoreachmarketdemand.Ithasa widevarietyoftheleadingfeaturesfordigitalvideorecording,photoshooting,audiorecordingwithscreendisplayanddetachablebattery.Bestsuitableforvehiclerecording,outdoorsports,homesecurity,divingandmorerelated activities.Allowingyoutoenjoythemomentswhilecapturingeverysceneanytime,anywhere.
THE BACIS
Tips:
- Inordertocaptureaclearvideoorphoto,pleasetearoffthelensprotectionfilmofthewaterproofshellbeforeuse.
- Inordertoensurethewaterproofperformance,pleasemakesurethatthewaterproofshellwhethersealwellbeforeuse.IfthewhiteSiliconeringofwaterproofshellcannotsealwell,pleasestopusethiswaterproofshell.
- please dry it in time after use, otherwise the waterproof shell metal button will dust and reduce the waterproof performance
- Waterproof shell is vulnerable product, we strongly recommend,accordingtotheusage oftheenvironmentand frequency,toreplacethewaterproofshellintime.
- Whenusethecamerawiththewaterproofinlowtemperature,suchasWinter,RainyDay,Underwaterandsoon,please dotheantifoggingtreatmentsoastoavoidtheblurredvideo.
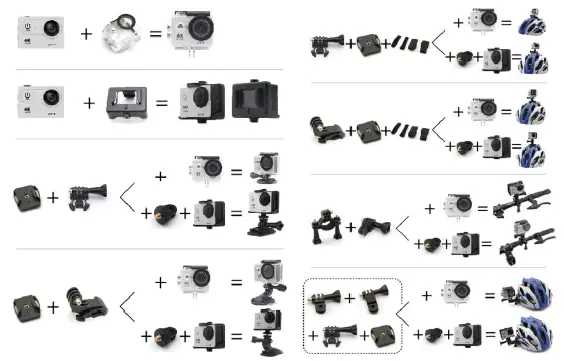
MOUNTING YOUR CAMERA
Attachyourcameratohelmets,gearandequipment.
GETTING STARTED
- HELLO Congratulationonyournewcamera!Thisusermanualwillhelpyoulearnthebasicsofcapturinglife’smostincredible moments!
- To power ON: PressandholdthePower/Mode Button forsecondstothescreenon.
- To power OFF: PressandholdthePower/Mode Button forsecondstothescreenoff.
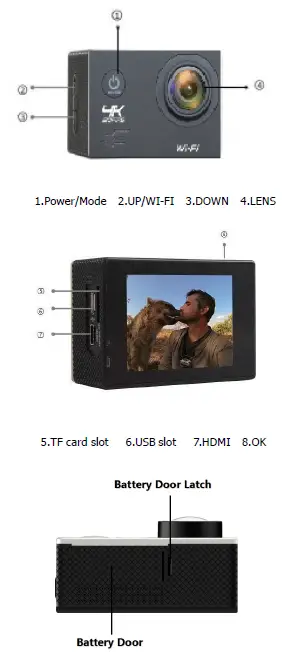
OVERVIEW
Turn camera ON and repeatedly press the Power/Mode Button to cycle through camera modes and settings. The modeswillappearinfollowingorder:
SETTINGS
RepeatedlypressthePower/Mode Button toSettingMenu,usetheUP orDown Buttontocyclethroughthevarious options,andpresstheShutter/Select Button toselectdesiredoption. 
Video Setting
- Video Resolution: 4K30/2.7K30/1080p60/1080p30/720p120 EIS: Off/On
- Looping Video: Off/1Min./3Min./5Min.
- Time-Lapse Video: Off/1Sec./5Secs./10Secs/30Sec./60Sec. Slow Motion: Off/1080P/720p
- Audio Record: Off/On
- Photo Setting:
- Photo Resolution: 16M/12M/8M/5M
- Time-Lapse Photo: Off/2Sec./10Sec.
- Burst Photo:Off/3photos/5photos
- General Setting:
- Volume: 0~10
- Beep: Off/On
- Exposure: -2.0~0~+2.0
- White Balance: Auto/daylight/cloudy/fluoresc./fluoresc.1/fluoresc.2/Incandesc
- IOS: Auto/ISO100/ISO200/ISO400/ISO800/ISO1600/ISO3200
- Effect: Normal/Sepia/B&W/Negative
- Contrast:-100~100
- Saturation: -100~100
- Sharpness:-100~100
- System Setting:
- Language:English
- Car Mode:Off/On
- Power Off: Off/1Min/5Min
- Date & Time: ___Y___M___D 00:00:00
- Date Format:None/YYYYMMDD/MMDDYYYY/DDMMYYYY
- Stamp: Off/On
- Frequency: 50Hz/60Hz
- Upside Down:Off/On
- Screen Saver:Off/30sec./1min./3min.
- Format: YES/NO
- Reset: YES/NO
- FW Version:
Exit: PresstheshutterbuttontoexitTips:Toensureyoursettingsucceed,pleaserestartyourcameraaftersetting.
VIDEO MODE
- Video Torecordvideo,verifythecameraisindifferentVideoModes andsetthedesiredvideoresolution, iftheVideo iconin yourcamera’sLCDisnotshowing,pressthePower/Mode Buttonrepeatedlytothenmenusettingandselectthe desiredoptionintheVideo Settingmenu(suchas Looping Video/Time-lapse Video/Slow Motion etc)
- To Start Recording: TopresstheShutter/Select Button.ThecameraStatus LightandaRed Dotonthescreenwillflashwhilerecording.
- To Stop Recording:TopresstheShutter/Select Button.ThecameraStatus LightandaRed Dotonthescreenstopflashingtoindicate recordinghasstopped
- To Turn On/Off the audio record: TopresstheDown Button.TheMIC iconwillshowthestatusintherightcornerofthescreen.
Tips:
- Thiscameraautomaticallystopsrecordingwhenthebatteryisoutofpower.Yourvideowillsavedbeforethecamera powersoff.
- ThiscameraautomaticallystopsrecordingwhentheSDcardisfull,iftheloopingrecordfunctionisturnoff.
PHOTO MODE
Photo Tocapturephoto,indifferentPhoto Modes andsetthedesiredphotoresolution,ifthephotoiconinyourcamera’s LCDisnotshowing,pressthePower/Mode Buttonrepeatedlytothenmenusettingandselectthedesiredoptioninthe Photo Settingmenu(suchasTime-lapse Photo/Burst Photo)
To capture a photo: PresstheShutter/Select Button.Thecamerawillemitthecamerashuttersound.
Time Lapse Photo TocaptureTime Lapse Photoseries,verifythecameraisinTime Lapse Photo mode.IftheTime Lapse Photo icon onyourcamera’sLCDscreenisnotappear,pressthePower/ModeButtonrepeatedlytothePhoto Setting Menu,then selectthedesiredoptionoftheTime Lapse PhotoinSettingMenu.
To capture a Burst Photo series: PresstheShutter/Select Button,thecamerainitiatesa countdownandemitsa shuttersoundeachtimeaphotoistaken.
Burst Photos TocaptureaBurst Photo series, verify the camera is in Burst Photo mode.If the
Burst Photo iconon your camera’sLCDscreendoes not appear,pressthePower/ModeButtonrepeatedlytothePhoto Setting Menu,thenselect thedesiredoptionoftheBurstPhotoinSettingMenu.
To capture a Burst Photo series: PresstheShutter/Select Button,thecamerawillemitshuttersound
PLAYBACK
Playing back Videos and PhotosVerifythecameraisinVideoorPhotoPlaybackmenu.PresstheUP/DOWN Button tocyclethevideosorphotosand thenPresstheShutter/Select Button toplaybackthedesiredoptions, toexitplaybackmode,pressthePower/Mode Button tothemainpreviewmenu,pressthePower/Mode Button again toswitchsettingmodes
Tips: Thecameramightnotbecompatiblewiththefilesfromdifferentsolutioncamera.
STORAGE/MICRO CARDS
Thiscameraiscompatiblewith8GB,16GB,32GB,64GB(selected)capacitymicroSD,microSDHCandmicroSDXCmemorycard.YoumustuseamicroSDcardwithaCLASS10(80M/S)speedratingatleast.Wecommendusingbrand-name memorycardsformaximumreliabilityinhighvibrationactivities
Tips: pleaseformatthemicroSD,microSDHCandmicroSDXCmemorycardonthecamerabeforeusing. Pleaserestartthecameraafterformatting.
BATTERY
Charging the battery Tochargethebattery
- ConnectthecameratoUSBpowersupply.
- ThechargingstatuslightremainsONwhilethebatteryischarging.
- ThechargingstatuslightwillturnOFFwhenthebatteryisfullycharged.
- Chargingtime: 3.5hours
- Pleasemakesurethecameraisshuttleddownwhilecharging.
- Chargeonlywith5Voutputcharger.
- Removethebatterybeforeusingasadashcamera.
- Donotstoreintemperatureabove140°F/60°C.
- Donotdisassemble,crush,damageordisposeofinfire.
- Donotuseswellingbattery.
- Stopusingthebatteryafterimmersedinwater.
- pleasedonothrowthecameraoritsbatterytothegarbage,findaspecificrecyclingpointforit.
Wi-Fi APP
Connect to the Wi-Fi App
TheWi-FiAppletsyoucontrolyourcameraremotelyusingasmart phone or tablet. Features include full camera control,livepreview,playbackandsharingofselectedcontentandmore.DownloadtheLIVE DV App ortoyoursmartphoneortabletfromtheGooglePlayorAppleAppStore. PressthePower/Mode ButtontopowerthecameraON. MakesuretheWi-Fiisturnoninthecamerasettingmenu. PresstheUp/Wi-Fi ButtontoturnonWi-Fi. Inyoursmartphoneortablet’sWi-Fisetting,connecttothenetworkcalled“LiveDV” followedbyaseriesofnumbers. Enterthepassword”12345678” OpentheLIVE DV App onyoursmartphoneortablet.* pressandholdtheUp/Wi-Fi ButtontoturnofftheWi-Fi.
TheLIVE DV Appiscompatiblewithsmartphoneandtabletlistedbelow: For Apple IOS * iPhone5,5s,6(plus),6s(plus),7(aboveIOS9) * iPhoneAir&Mini(aboveIOS9)
ForAndroid *Android4xQuad-Coredevices
App available on:

FCC Warning
Changes or modifications not expressly approved by the party responsible for compliance could void the user’s authority to operate the equipment. This equipment has been tested and
found to comply with the limits for a Class B digital device, pursuant to Part 15 of the FCC Rules. These limits are designed to provide reasonable protection against harmful interference in a residential installation. This equipment generates uses and can radiate radio frequency energy and, if not installed and used in accordance with the instructions, may cause harmful interference to radio communications. However, there is no guarantee that interference will not occur in a particular installation. If this equipment does cause harmful interference to radio or television reception, which can be determined by turning the equipment off and on, the user is encouraged to try to correct the interference by one or more of the following measures:
- Reorient or relocate the receiving antenna.
- Increase the separation between the equipment and receiver.
- Connect the equipment into an outlet on a circuit different from that to which the receiver is connected.
- Consult the dealer or an experienced radio/TV technician for help.
This device complies with part 15 of the FCC Rules. Operation is subject to the following two conditions: (1) This device may not cause harmful interference, and (2) this device must accept any interference received, including interference that may cause undesired operation. The device has been evaluated to meet general RF exposure requirements.


