
NETCAMCENTER NCC WiFi PoE Injector 30W
Product Information
- Product Name: NCC-WiFi-PoE-Injector-30W
- Dimensions: L x W x H
- Weight: Not specified
- WiFi: 2.4GHZ or 5GHZ wireless network with PSK credentials
- PoE: Power over Ethernet
- Power Consumption: 30W
- Operating Temperature: Not specified
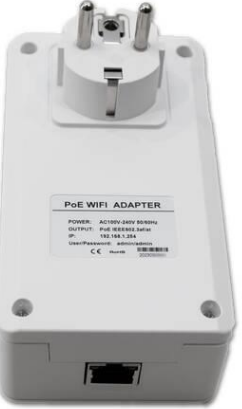
- Input Voltage: 100 ~230 VAC 50/60hz Power Outlet
Product Usage Instructions
- Ensure that you have all the pre-requirements ready before starting the installation.
- Connect the WiFi PoE Injector to your PC or Laptop using the provided network cable.
- Power on the WiFi PoE Injector and start your PC or Laptop.
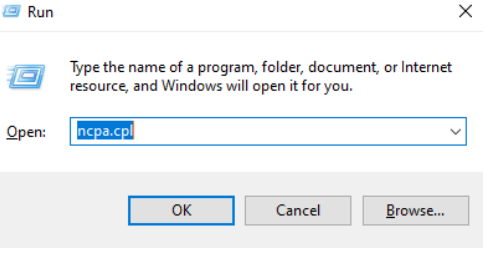
- In Windows, press the Windows key + R ( + R).
- Type “ncpa.cpl” and press enter.
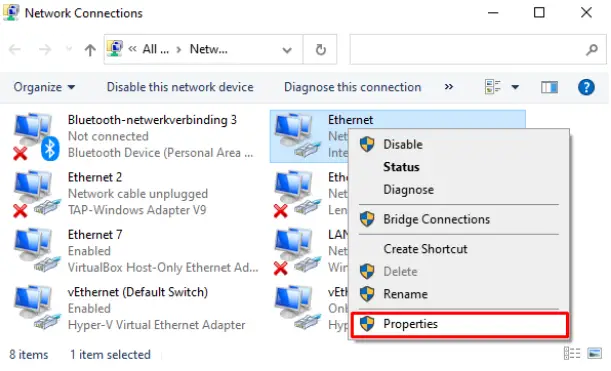
- Right-click on the network interface where you have connected the Wifi PoE Injector to and select Properties.
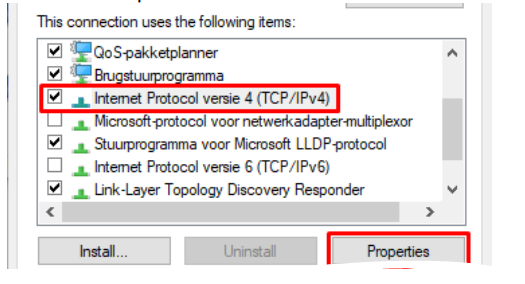
- Select “Internet Protocol Version 4 (TCP/IPv4)” and click Properties.
- Set the following fixed IP settings, and click OK on both the
IP settings and Interface properties.- IP Address: 192.168.1.254
- Subnet Mask: 255.255.255.0
- Default Gateway: Leave blank
- Preferred DNS Server: Leave blank
- Alternate DNS Server: Leave blank
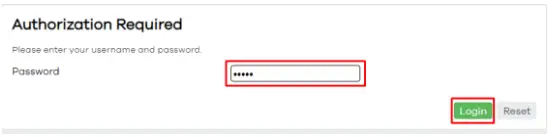
- The IP address should now be set. Open an internet browser and navigate to 192.168.1.254 and login using the password “admin”.
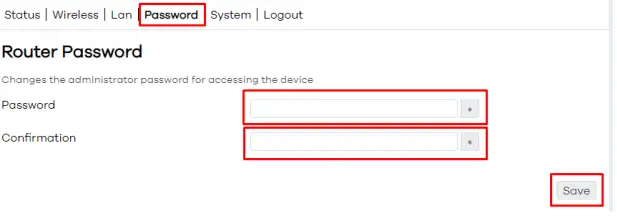
- We recommend changing the password before continuing by going to “Password” and choosing a safe password. Click save.
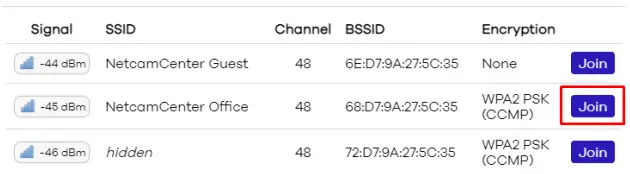
- Go to “Wireless”, select country and frequency, and click on “Scan”. Click “Join” button for the desired network.
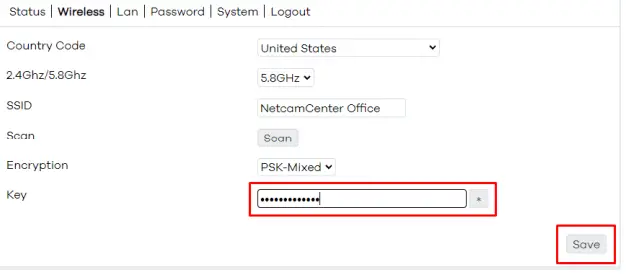
- Set the password for the selected network, if needed set the country, frequency, and encryption. Click “Save”.
- The device will now initialize the connection. This can take up to 90 seconds.
- Click “Status” and check if the network is connected.
- Under “LAN”, you can change the IP address if required.
- Disconnect the Wifi PoE Injector from your PC or Laptop and connect the desired network equipment.
Note: In case of malfunctions or support questions, you can send an e-mail to: [email protected]
Factory Reset
To initiate a factory reset, press and hold the power button for 5 seconds.
LED Indicators
- Power Indicator: When connected to an outlet, the LED will burn continuously.
- WiFi / WPS Indicator:
- Off: No WiFi connection, configure the device.
- Blinking Slow: WiFi Connected
- Blinking Fast: WPS configuration in progress
- Steady: Initializing device
Installation Pre-requirements
- 1 x NCC-WiFi-PoE-Injector-30W
- 1 x CAT5 Patch Cable 1meter
- 1 x Installation Manual
Before you start
Installation Pre-requirements
Before you start you will need to prepare the following:
- PC or Laptop, Windows preferred.
- 100 ~230 VAC 50/60hz Power Outlet
- 2.4GHZ or 5GHZ wireless network with PSK credentials.
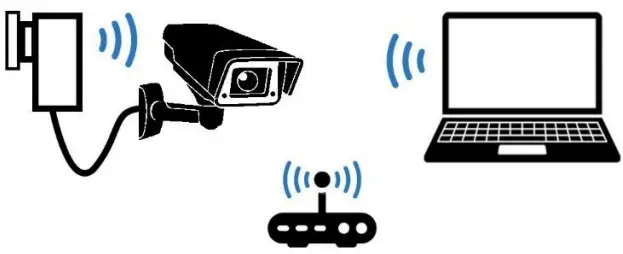
System overview
Network Topology
Quick Setup
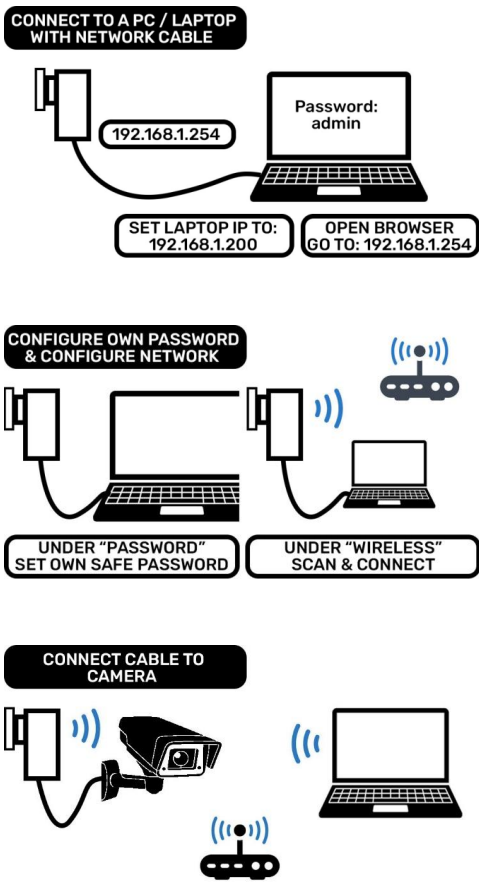
Installation
Make sure you have all pre-requirements ready before you start.
- Connect the WiFi PoE Injector to the PC or Laptop with the network cable.
- Power on the WiFi PoE Injector and start the PC or Laptop.
- In Windows: hit the Windows key + R (
 + R)
+ R) - Type “ncpa.cpl” and press enter.

- Right click with your mouse on the network interface where you have connected the Wifi PoE Injector to and select “Properties”:

- Select “Internet Protocol Version 4 (TCP/IPv4)” and click “Properties”

- Set the following fixed IP-settings, and click “OK” on both the IP-settings and Interface properties.

- The IP-address should now be set. Open a internet browser and navigate to
“192.168.1.254” and login using the password “admin”
- We prefer to change the password before continuing, go to “Password” and choose a safe password. Click save.

- Go to “Wireless”, select country and frequency and click on “Scan”, click “Join”-button for the desired network.

- Set the password for the selected network, if needed set the country, frequency and encryption. Click “Save”

- The device will now initialize the connection. This can take up to 90 seconds.
- Click “Status” and check if the network is connected.

- Under “LAN” you can change the IP-address if required.
- Disconnect the Wifi PoE Injector from you PC or Laptop, and connect the desired network equipment.


Factory reset
Press and hold the power button ![]() for 5 seconds. The device will now initiate a factory reset.
for 5 seconds. The device will now initiate a factory reset.
LED Indicators
| Power indicator, when connected to an outlet the LED will burn continuous. | |
| Wifi / WPS indicator OFF: No WiFi connection, configure the device. Blinking slow: WiFi Connected Blinking fast: WPS configuration in progress Steady: Initializing device |
Specifications
| Product | NCC-WiFi-PoE- Injector-30W |
| Dimensions (L x W x H) | 126 x 70 x 42mm |
| Weight | 220g |
| WiFi | 2.4Ghz / 5.8Ghz 802.11a/b/g/n/ac |
| PoE | IEEE802.3af/at (30W) |
| Power Consumption | Min 6 Watt / Max 36 Watt |
| Operating Temperature | -20ºC to 40ºC |
| Input voltage | 100 ~ 240 VAC 50/60hz |
Support
In case of malfunctions or support questions, you can send an e-mail to: [email protected]


