![]()
K 2 Universal Edition


Register your product
www.kaercher.com/welcome

59689000 (03/23)
Safety
Please read these original operating instructions and the enclosed safety instructions prior to the initial use of your device. Proceed accordingly. Keep both booklets for future reference or subsequent owners.
Proper use
This high pressure cleaner is designed for domestic use only.
– for cleaning machines, vehicles, buildings, tools, facades, terraces, gardening tools, etc. by means of a high-pressure water jet (if necessary, with additional cleaning agents).
Symbols on the machine
 The high pressure jet must not be directed at persons, animals, live electrical equipment or at the appliance itself.
Protect the appliance against frost. The appliance must not be directly connected to the public drinking water network.
Safety Devices
![]() CAUTION
CAUTION
Safety installations serve the protection of the user and may not be modified or bypassed.
Appliance switch
The appliance switch prevents unintentional operation of the appliance.
Lock trigger gun
The lock locks the lever of the trigger gun and prevents the accidental start of the device. Auto-stop function
If the lever on the trigger gun is released, the pressure switch turns off the pump, the high-pressure jet stops. If the lever is pulled the pump is turned on again.
Environmental protection
 The packaging material can be recycled. Please arrange for the environmentally appropriate disposal of the packaging.
![]() Old appliances contain valuable recyclable materials that should be recycled properly. Please arrange for the environmentally appropriate disposal of the old devices.
Old appliances contain valuable recyclable materials that should be recycled properly. Please arrange for the environmentally appropriate disposal of the old devices.
Electrical and electronic devices often contain components which could potentially pose a danger to human health and the environment if handled or disposed of incorrectly. However, these components are necessary for the proper operation of the device. Devices marked with this symbol must not be disposed of with regular household rubbish.
 Cleaning operations which produce oily waste water, e.g. engine washes, underbody washes, may only be carried out using washing stations equipped with an oil separator.
Notes about the ingredients (REACH)
You will find current information about the ingredients at:
www.kaercher.com/REACH
Description of the Appliance
The scope of delivery of the device (depending on the model) is illustrated on the packaging. These operating instructions describe all possible options.
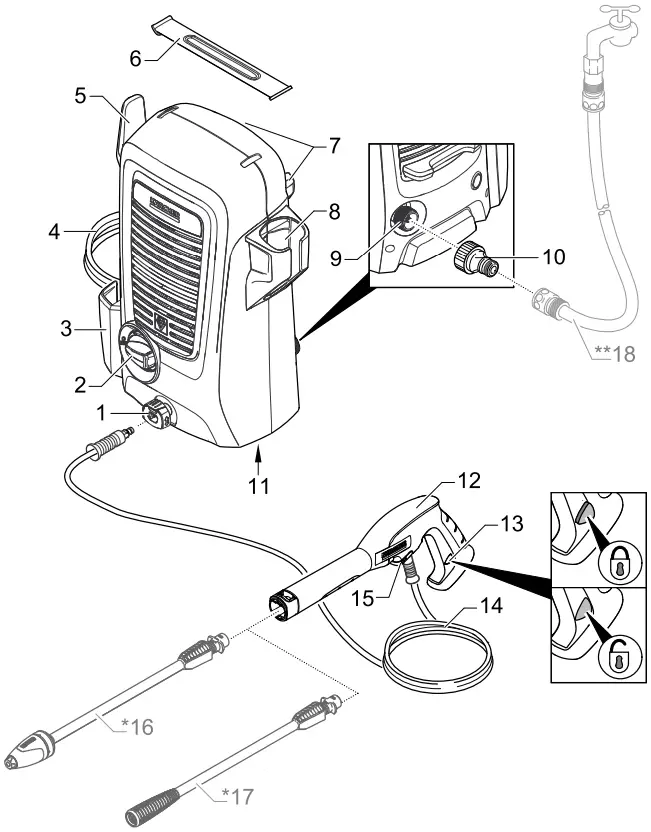
Illustrations on Page 2
1 High pressure connection
2 Appliance switch ,,0/OFF” / ,,I/ON”
3 Storage for mains cable
4 Mains cable with mains plug
5 Storage for high pressure hose
6 Carrying handle
7 Storage for spray lance
8 Storage for trigger gun
9 Water connection with integrated sieve
10 Coupling element for water connection
11 Nameplate
12 Trigger gun
13 Lock trigger gun
14 High pressure hose
15 Clamp for high pressure hose
* Optional
16 Spray lance with Dirtblaster
For strong contaminations.
17 Spray lance with high pressure nozzle
For normal cleaning tasks.
** Additionally required
18 Fabric-reinforced water hose with commercially available coupling.
- Minimum diameter, 1/2 inches (13 mm).
- Minimum length 7.5 m.
Installation and Startup
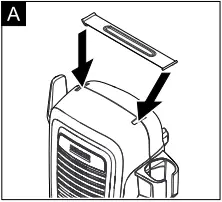
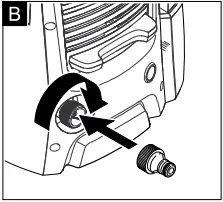
Illustrations on Page 3![]() Illustration [A] [B]
Illustration [A] [B]
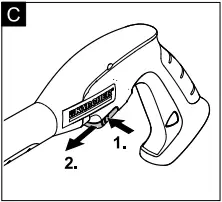
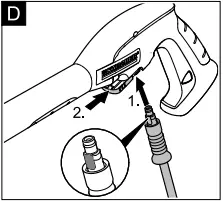
Mount loose parts delivered with appliance prior to start-up.![]() Illustration [C] [D]
Illustration [C] [D]
Pull out the clamp from the trigger gun and plug the high-pressure hose into the trigger gun.
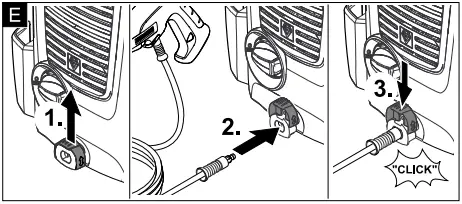
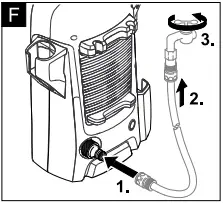
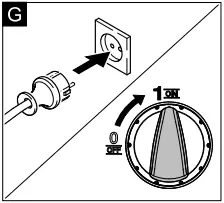
Push the clamp in until it locks. Check the secure connection by pulling on the high-pressure hose.![]() Illustration [E] [F] [G]
Illustration [E] [F] [G]
Start up
ATTENTION
Impurities in the water can damage the high-pressure pump and the accessories. For protection, the use of the KÄRCHER water filter (optional accessory, order no. 4.730-059) is recommended.
Operation
![]() CAUTION
CAUTION
Dry running of more than 2 minutes leads to damage of the high-pressure pump. If the appliance does not build up pressure within 2 minutes, switch the appliance off and proceed in accordance with the instructions in Chapter “Troubleshooting”.
High pressure operation
![]() CAUTION
CAUTION
Keep a distance of at least 30 cm when using the jet for cleaning painted surfaces to avoid damage.
ATTENTION
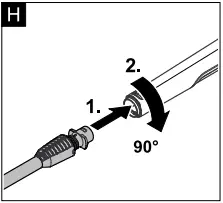
Car tyres, paint or sensitive surfaces such as wood should not be cleaned with the dirt blaster, as there is a risk of damage.![]() Park the appliance on an even surface.
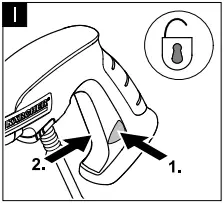
Park the appliance on an even surface.![]() Illustration [H] [I]
Illustration [H] [I]
Cleaning
Interrupting operation
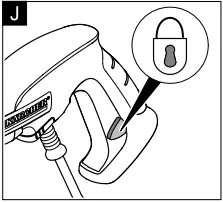
![]() Illustration [J]
Illustration [J]
Release the lever of the trigger gun and lock it.![]() During longer breaks (more than 5 minutes), also turn the appliance off using the “0/OFF” switch.
During longer breaks (more than 5 minutes), also turn the appliance off using the “0/OFF” switch.
Finish operation
![]() CAUTION
CAUTION
Only separate the high-pressure hose from the trigger gun or the device when there is no pressure in the system.![]() Release the lever of the trigger gun.
Release the lever of the trigger gun.![]() Turn off the appliance “0/OFF”.
Turn off the appliance “0/OFF”.![]() Disconnect the mains plug from the socket.
Disconnect the mains plug from the socket.![]() Turn off tap.
Turn off tap.![]() Press the lever on the trigger gun to release any remaining pressure in the system.
Press the lever on the trigger gun to release any remaining pressure in the system.![]() Lock the lever of the trigger gun.
Lock the lever of the trigger gun.![]() Detach the appliance from the water supply.
Detach the appliance from the water supply.
Transport and storage
![]() CAUTION
CAUTION
Risk of personal injury or damage!
Mind the weight and storage of the appliance during transport.
When transporting by hand
![]() Lift appliance by the carrying handle and carry it.
Lift appliance by the carrying handle and carry it.
When transporting in vehicles
![]() Secure the appliance against shifting and tipping over.
Secure the appliance against shifting and tipping over.
Storing the Appliance
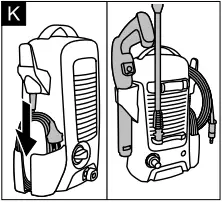
![]() Park the machine on an even surface.
Park the machine on an even surface.![]() Illustration [K]
Illustration [K]
Stow the power cord and the remaining accessories on the appliance.
Prior to extended storage periods, as during the winter, also observe the instructions in the Care section.
Frost protection
ATTENTION
Appliances and accessories that are not completely drained can be destroyed by frost. Completely drain appliance and accessories and protect them against frost.
To avoid damage:![]() Completely drain all water from the appliance:
Completely drain all water from the appliance:
Switch the appliance on with detached high pressure hose and detached water supply (max. 1 minute) and wait, until no more water exits at the high pressure connection. Turn off the appliance.![]() Store the appliance and the entire accessories in a frost free room.
Store the appliance and the entire accessories in a frost free room.
Maintenance and care
The appliance is maintenance free.
Care
![]() DANGER
DANGER
Risk of electric shock.![]() Prior to all work on the appliance, switch off the appliance and pull the power plug.
Prior to all work on the appliance, switch off the appliance and pull the power plug.
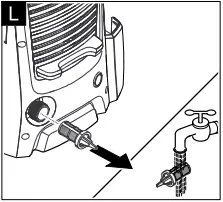
Clean the sieve in the water connection
Clean the sieve in the water connection regularly.
ATTENTION
The sieve must not be damaged.![]() Remove coupling from the water connection.
Remove coupling from the water connection.![]() Illustration [L]
Illustration [L]
Pull the sieve out (e.g. using flat pliers), clean under running water and then reinsert it.
Troubleshooting
![]() DANGER
DANGER
Risk of electric shock.![]() Prior to all work on the appliance, switch off the appliance and pull the power plug.
Prior to all work on the appliance, switch off the appliance and pull the power plug.
Appliance is not running
![]() Push the lever of the trigger gun, the device will switch on.
Push the lever of the trigger gun, the device will switch on.![]() Check whether the voltage indicated on the type plate corresponds to the voltage of the mains supply.
Check whether the voltage indicated on the type plate corresponds to the voltage of the mains supply.![]() Check the mains connection cable for damages.
Check the mains connection cable for damages.
Pressure does not build up in the appliance
![]() Completely open the water tap.
Completely open the water tap.![]() Appliance ventilation: Switch the appliance on with the high-pressure hose detached and operate (max. 2 minutes) until the water exits the high-pressure connection without bubbles. Switch off appliance and reconnect high-pressure hose.
Appliance ventilation: Switch the appliance on with the high-pressure hose detached and operate (max. 2 minutes) until the water exits the high-pressure connection without bubbles. Switch off appliance and reconnect high-pressure hose.![]() Pull out the sieve in the water connection using flatnose pliers and clean under running water.
Pull out the sieve in the water connection using flatnose pliers and clean under running water.
Strong pressure fluctuations
![]() Clean high-pressure nozzle: Remove dirt and debris from the nozzle bore, using a needle and rinse through with water from the front.
Clean high-pressure nozzle: Remove dirt and debris from the nozzle bore, using a needle and rinse through with water from the front.![]() Check water flow quantity.
Check water flow quantity.
Appliance is leaking
![]() Slight leakage from the appliance pump is normal. If the leakage increases contact the authorized customer service.
Slight leakage from the appliance pump is normal. If the leakage increases contact the authorized customer service.
Accessories and Spare Parts
Only use original accessories and spare parts, they ensure the safe and trouble-free operation of the device. For information about accessories and spare parts, please visit www.kaercher.com.
Warranty
The warranty terms published by the relevant sales company are applicable in each country. We will repair potential failures of your appliance within the warranty period free of charge, provided that such failure is caused by faulty material or defects in manufacturing. In the event of a warranty claim please contact your dealer or the nearest authorized Customer Service center. Please submit the proof of purchase.
Addresses can be found under: www.kaercher.com/dealersearch
Technical specifications
| Electrical connection | |
| Voltage | 220-240 V 1~50-60 Hz |
| Power consumption | 6 A |
| Protection class | IPX5 |
| Protective class | II |
| Mains fuse (slow-blow) | 10 A |
| Water connection | |
| Max. feed pressure | 1,2 MPa |
| Max. feed temperature | 40 °C |
| Min. feed volume | 8 l/min |
| Performance data | |
| Working pressure | 7,4 MPa |
| Max. permissible pressure | 11 MPa |
| Water flow rate | 5,2 l/min |
| Max. flow rate | 6,0 l/min |
| Recoil force of trigger gun | 11 N |
| Dimensions and weights | |
| Length | 280 mm |
| Width | 182 mm |
| Height | 390 mm |
| Typical operating weight | 4,5 kg |
| Values determined as per EN 60335-2-79 | |
| Hand-arm vibration value Uncertainty K | 1,6 m/s² 0,6 m/s² |
| Sound pressure level LpA Uncertainty KpA | 78 dB(A) 3 dB(A) |
| Sound power level LWA + Uncertainty KWA | 93 dB(A) |
Subject to technical changes.
EU Declaration of Conformity
We hereby declare that the machine described below complies with the relevant basic safety and health requirements of the EU Directives, both in its basic design and construction as well as in the version put into circulation by us. This declaration shall cease to be valid if the machine is modified without our prior approval.
Product: High pressure cleaner
Type: 1.673-xxx
Relevant EU Directives
2006/42/EC (+2009/127/EC)
2014/30/EU
2011/65/EU
2000/14/EC
Applied harmonized standards
EN 60335-1
EN 60335-2-79
EN 62233: 2008
EN 55014-1:2017
EN 55014-2: 2015
EN 61000-3-2: 2014
EN 61000-3-3: 2013
EN IEC 63000: 2018
Applied conformity evaluation method
2000/14/EC: Appendix V
Sound power level dB(A)
Measured: 91
Guaranteed: 93
The signatories act on behalf of and with of the authority of the company management.

H. Jenner
Chairman of the Board of Management
S. Reiser
Director Regulatory Affairs & Certification
Documentation supervisor:
S. Reiser
Alfred Kärcher SE & Co. KG
Alfred-Kärcher-Straße 28-40
71364 Winnenden (Germany)
Tel.: +49 7195 14-0
Fax: +49 7195 14-2212
Winnenden, 2022/02/01
 THANK YOU!
![]() Register your product and benefit from many advantages.
Register your product and benefit from many advantages.
![]() Rate your product and tell us your opinion.
Rate your product and tell us your opinion.


Alfred Karcher SE & Co. KG
Alfred-Karcher-Str. 28-40
71364 Winnenden (Germany)


