![]() Read Carefully Before Use
Read Carefully Before Use
Keep for Future Reference
Electric Adjustable
Height Desk
User Manual
Safety Information
![]() Warning!
Warning!
- DO NOT assemble or use if any parts are missing or damaged.
- ALWAYS ensure the desk is placed on flat level ground and is connected to a grounded outlet before use.
- DO NOT place the desk in any excessively humid or wet environment to avoid the risk of electrical shock.
- DO NOT place the desk in direct sunlight or next to a heat source.
- DO NOT attempt to repair the desk yourself. Contact customer service or use trained electrical technicians for any service.
- ALWAYS switch off the power and disconnect from the power outlet before servicing, moving or cleaning the desk.
Specifications
| Material | MDF, Steel |
| Min./Max. Height | 28–45 in. (70–115 cm) |
| Input Power | 110–240V/50–60Hz AC |
| Output Power | 24V DC |
| Wattage | 70W |
| Max. Speed | 1 tips (2.5 cm/s) |
| Operating Temperature Range | 32–104°F (0–40°C) |
| Max. Sound | 50 dB |
| Weight Capacity | 220 lb. (100 kg) |
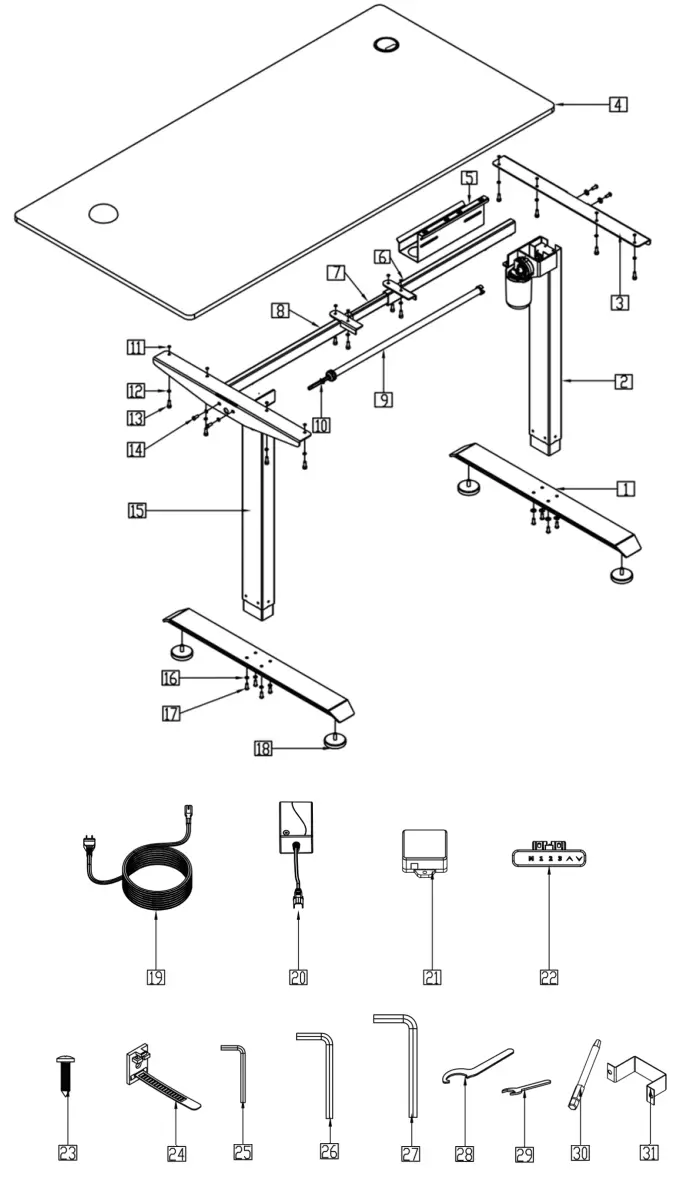
Product Diagram
| No. | Name | Qty. |
| 1 | Base | 2 |
| 2 | Lifting Column (Right) | 1 |
| 3 | Bracket | 2 |
| 4 | Desktop | 1 |
| 5 | Wiring Channel | 1 |
| 6 | The frame (Right) | 1 |
| 7 | Extendable Rod | 1 |
| 8 | The frame (Left) | 1 |
| 9 | Transmission Tube | 1 |
| 10 | Hexagonal Bar | 1 |
| 11 | Rubber Pad | 14 |
| 12 | M5 Washer | 13 |
| 13 | M5×16 Bolt | 18 |
| 14 | M6×10 Bolt | 5 |
| 15 | Lifting Column (Left) | 1 |
| 16 | M6 Washer | 14 |
| 17 | M6×16 Bolt | 9 |
| 18 | Foot Pad | 4 |
| 19 | Power Cord | 1 |
| 20 | Power Adapter | 1 |
| 21 | Control Box | 1 |
| 22 | Handset | 1 |
| 23 | ST5×18 Screw | 20 |
| 24 | Tie | 2 |
| 25 | 2 mm Hex Wrench | 1 |
| 26 | 4 mm Hex Wrench | 1 |
| 27 | 8 mm Hex Wrench | 1 |
| 28 | Wrench | 1 |
| 29 | 8 mm Wrench | 1 |
| 30 | 4 mm Hex Bit | 1 |
| 31 | Power Adapter Pylon | 1 |
Assembly
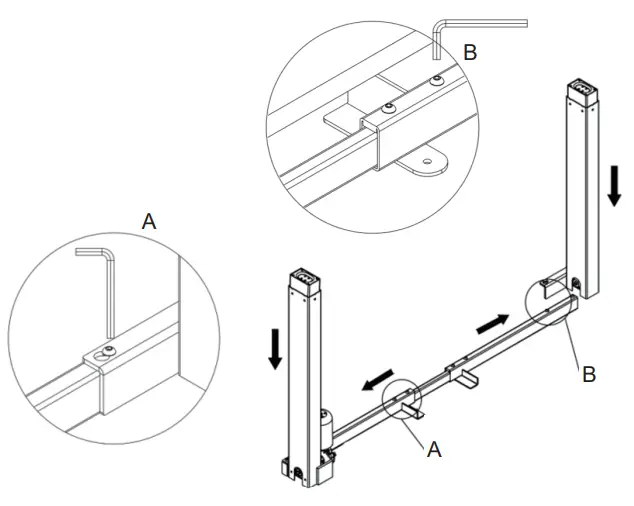
- Loosen the preassembled screws in the middle of the frame (6, 8), pull the frame open, then retighten the screws as shown in Fig. A.
- Put the two lifting columns (2, 15) onto the frame over the preassembled screws. Slide the column brackets so that the screws enter the narrow parts of the bracket screw holes.
Retighten the screws as shown in Fig. B.
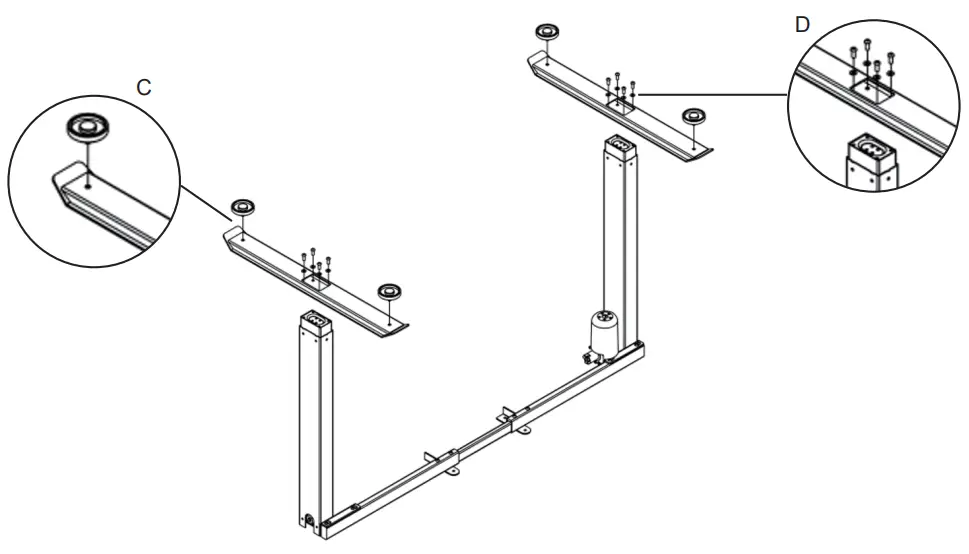
- Screw in the foot pads (18) into the bases (1) as shown in Fig. C.
- Install the bases onto the lifting columns with the M6×16 bolts (17) and M6 washers (16) as shown in Fig. D.

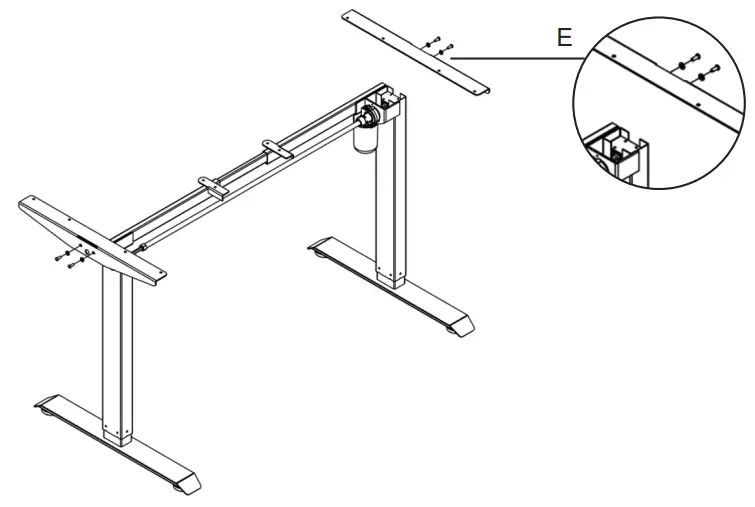
- Turn the assembled frame over and stand it upright. Install the brackets (3) onto the frame with the M6×10 bolts (14) and M6 washers as shown in Fig. E.

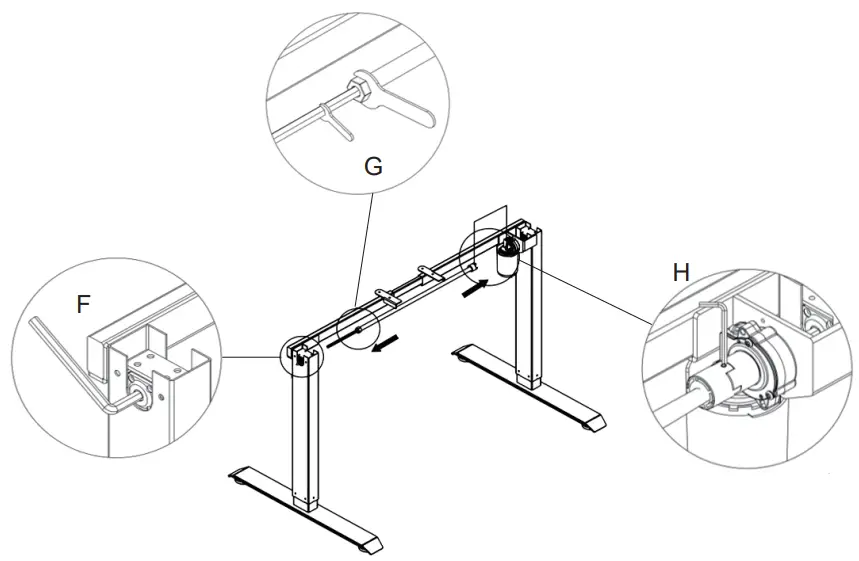
- Connect the transmission tube (9) to the frame by first placing both ends into the openings on the insides of the columns. Loosen the black plastic knob on the transmission tube to pull out and extend the hexagonal bar (10) to fit the length of the frame. Use the 8 mm hex wrench (28) to turn and adjust the hex opening in the column as shown in Fig. F. Once inserted into the column, use the 18 mm wrench (29) to tighten the hexagonal bar in place with the black knob as shown in Fig. G. At the other end uses the 2 mm hex wrench (26) to secure the transmission bar in place as shown in Fig. H.

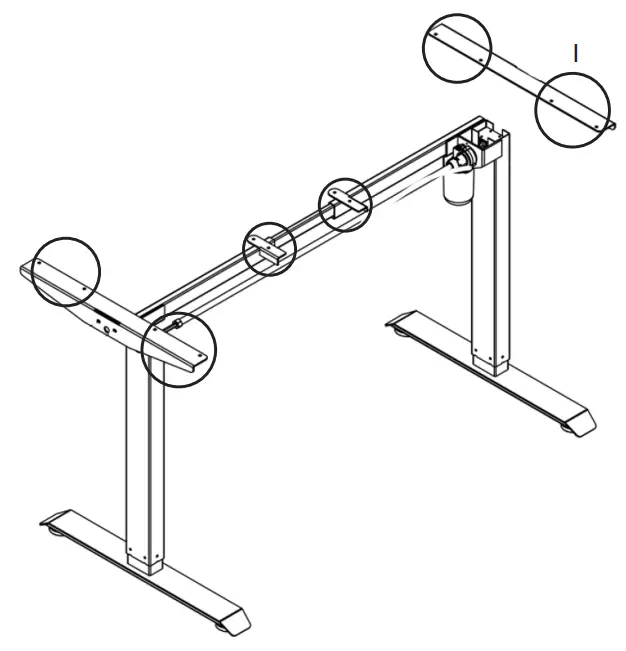
- Peel off the protective tape on the rubber pads (11) and stick them around the openings on top of the frame brackets as shown in Fig. I.

- Place the desktop (4) upside down on the assembly area with the frame on top, ready for attachment. Adjust the length of the frame if needed to align the openings in the frame with the ones in the desktop. Loosen the black knob on the hexagonal bar and the screws on the frame, lengthen or shorten the frame, and repeat the process as shown in previously mentioned Fig. A, B, F, and G.

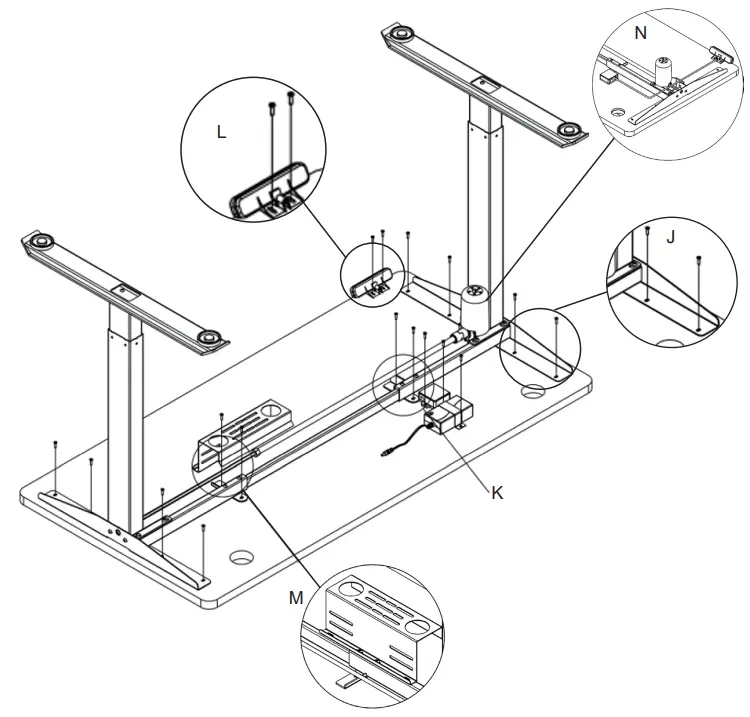
- Fix the frame to the desktop using the M5×16 bolts (13) and M5 washers (12). Tighten as shown in Fig. J. You can use the 4 mm hex wrench (27) or the 4 mm hex bit (31) and a power tool (not included) to tighten.
- Attach the power adapter (20) to the frame using the power adapter pylon (32) and M5×16 bolts. Attach the control box using the same screws next to the power adapter and connect them, as shown in Fig. K. Plug the motor cord into the control box.
- Attach the handset (22) as shown in Fig. L and plug the other end of the cord into the control box as shown in Fig. M.
- Plug the power cord into the power adapter, then use the ties (25) to tie any loose wires together that would otherwise hang down haphazardly once the desk is turned upright.
- Loosen the preassembled screws on the frame next to the control box to attach the wiring channel (5), then retighten as shown in Fig. M.

- The 20 ST5×18 screws (24) are included for optional use if you choose to use a seperate desktop instead.

Operation
Plug the power cord in. The handset will display 70.0, the current height of the desktop in centimeters.
| Press to enter the menu settings (see below). | |
| Press once and press a number key to set the current height in memory. | |
| Press & hold to raise the lifting columns. Release to stop. | |
| Press & hold to lower the lifting columns. Release to stop. | |
 | Press to move the desk to a preset height. |
Reset
Pressing to the lowest setting ![]() and
and ![]() continuing to hold resets the desk’s stored data.
continuing to hold resets the desk’s stored data.
Child Lock
Pressing and holding ![]() and
and ![]() together locks the desk’s controls. The handset should display LOC. Repeat this procedure holding and together to unlock the desk’s controls. Also note that, if the lifting columns are used for more than 5 minutes consecutively, the mechanism will lock for 18 minutes to prevent overheating.
together locks the desk’s controls. The handset should display LOC. Repeat this procedure holding and together to unlock the desk’s controls. Also note that, if the lifting columns are used for more than 5 minutes consecutively, the mechanism will lock for 18 minutes to prevent overheating.
Menu
Press and hold ![]() until the handset displays S–. Press
until the handset displays S–. Press ![]() again to enter the settings menus. In these menus,
again to enter the settings menus. In these menus, ![]() and
and ![]() cycle through your options and change values,
cycle through your options and change values, ![]() confirms and saves your choices, and 1 escapes to the previous menu without saving changes.
confirms and saves your choices, and 1 escapes to the previous menu without saving changes.
| Code | Function | Choices | Notes |
| 1Un | Unit Selection |  | Press |
| Select | |||
| 2br | Brightness Selection | Press | |
| Select | |||
| 3Fu | Sensitivity while Rising | L0–L9 | Press |
| 4Fd | Sensitivity while Lowering | L0–L9 | Press |
| 5SH | Height Range |  | Press |
| 6Hc | Height Control | 01–02 | Press |
| In manual mode, the | |||
| In automatic mode, pressing either button begins continuous movement until any key is pressed or the desk’s high or low position is reached. |
| 7H | Bounce Height | 05–20 | Press |
| The bounce height is the amount the desk arises from one single press of the ‘up’ button. | |||
| 8r | Restore Factory Defaults |  | Press |
| 9d | Fatigue Test Mode | PR_ | This setting is only for product testing at the factory. |
Troubleshooting
| Problems | Possible Solutions |
| HOT | Allow 18 min. for the motor to cool. Ensure the ambient temp. does not exceed the desk’s range. If the error is still displayed when the motor is well-cooled, unplug the desk and then plug it in again. |
| RESET | Follow the reset procedure described above. |
| E01 | Remove excessive weight from the desk. Check that all cables are correctly and firmly connected. |
| E06 | Follow the reset procedure described above. |
| E07 | Remove excessive weight from the desk. |
| E08 | Ensure the power supply is within the correct voltage range and consistent. |
| E09 | Ensure the power supply is within the correct voltage range and consistent. |
| E10 | Check that the handset is well connected to the control box. Disconnect and reconnect it while the control box has power. |
Maintenance
- Turn off and unplug the desk before cleaning.
- Periodically clean the desk and control any dust that may accumulate with a soft cloth.
Do not use any liquids or chemicals. - Periodically inspect the desk for any sign of wear or damage. Have any problems been repaired or replaced before further use? Contact customer service or use a trained electrical technician.
Contact Us
Thank you for choosing our products! If you have any questions or comments, contact us and we’ll resolve your issue ASAP!


