![]()
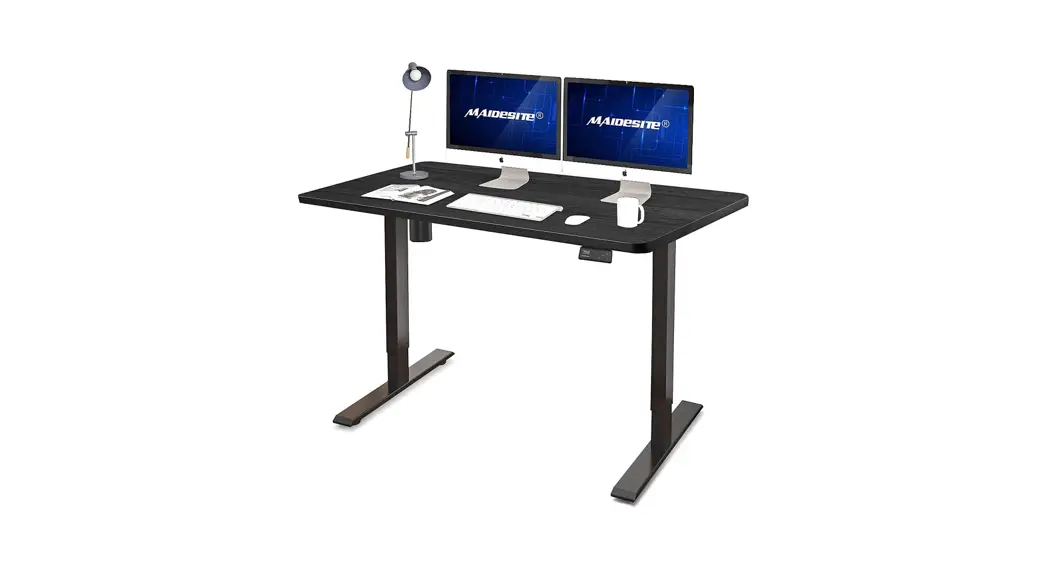
Electric Height Adjustable Desk
User Manual
ATTENTION
Please pay attention to the following points during the installation and use process. Please read them patiently, thank you!
1. Please be sure to follow the installation instruction in the product manual (or please watch the product installation video on our YouTube channel: Maidesite Office).
2. The left leg of the frame is a high-precision component, please hold it gently during the installation to prevent bumping.
3. Please confirm whether the black control box is firmly installed under the desktop (otherwise the anti-collision system will falsely stop the desk movement). At the same time, please make sure that all plug-in cables are inserted tightly.
4. Please follow the steps below to reset the desk before the first time: (1) Press and hold the DOWN button for at least 5 seconds, until the LED display shows “RST”. (2) Press and hold the DOWN button again, the desk will move down slightly, followed by moving up slightly. The display will show numerical heights and your desk is ready to use!
Warm prompt
 | Make sure no obstacles are in the desk’s path. Make sure the desktop is not touching any walls. Make sure all cords are appropriate length to accommodate the change in height. | |  | Pinch point keep hands and fingers clear. |
| Keep children away from electric height-adjustable desks, control units, and handsets. There is a risk of injury and electric shock. | |
| Keep all electrical components away from liquids. | |
| Do not sit or stand on the desk frame. Do not crawl or lie under the desk frame. | |
| Do not place any objects taller than 20″ underneath the desk. | |
| Do not open any of the components – the Legs, Control Box, or Switch. There is a danger of electric shock. | |
 | This product is designed with a duty cycle of 10% (2 min. on, 18 min. off). | |
| In the event of a power outage or if the power cord is unplugged, a manual reset may be necessary – see USE section. | |
MUSE / LIABILITY
This height-adjustable desk has electric motors and is designed for use in dry work areas only. The desk height is adjustable so that it can be positioned at the most ergonomically suitable height. Any other use is at the user’s risk. Under no circumstances does the manufacturer accept warranty claims or liability claims for damages caused by improper use or handling of the desk frame.
IMPORTANT: Please read this manual carefully. If this desk is sold, please provide this manual to the buyer.
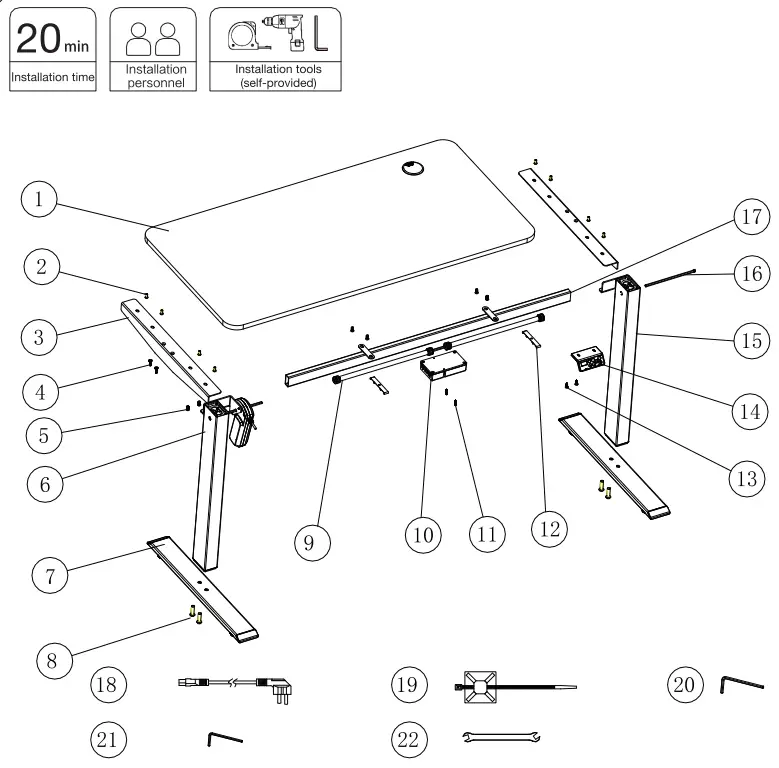
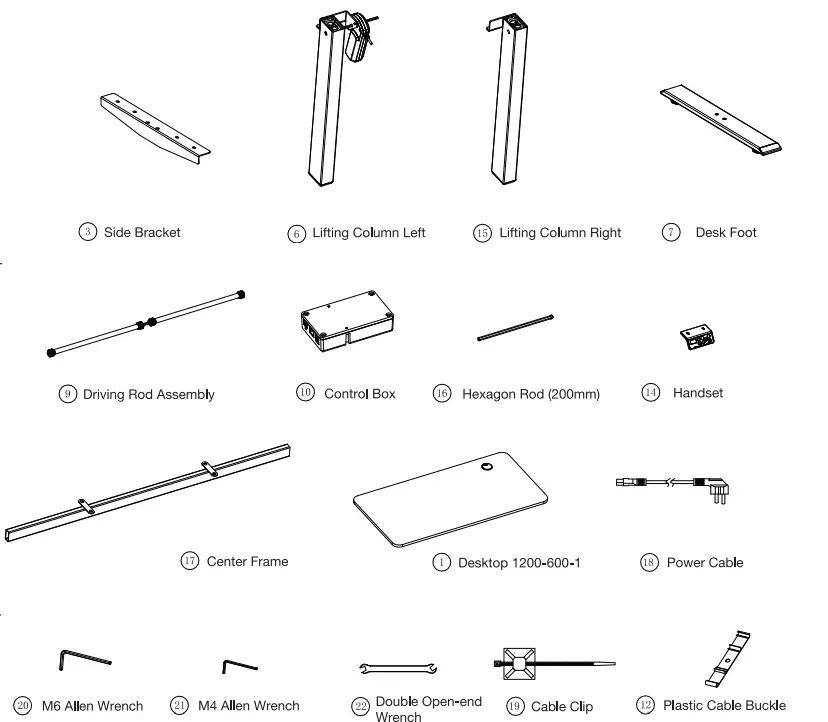
list of spare parts

| Parts | Quantity | |
| 1 | Desktop 1200-600-1 | 1 |
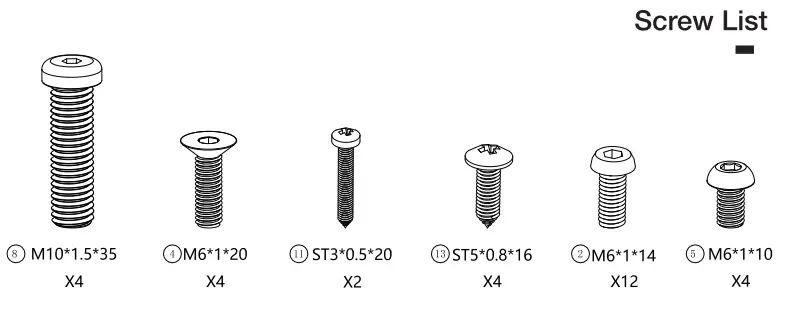
| 2 | M6*1*14 Machine Screw | 12 |
| 3 | Side Bracket | 2 |
| 4 | M6*1*20 Machine Screw | 4 |
| 5 | M6*1*10 Machine Screw | 4 |
| 6 | Lifting Column Left | 1 |
| 7 | Desk Foot | 2 |
| 8 | M101 .5*35 Machine Screw | 4 |
| 9 | Driving Rod Assembly | 1 |
| 10 | Control Box | 1 |
| 11 | ST3*0.5*20 Wood Screw | 2 |
| 12 | Plastic Cable Buckle | 2 |
| 13 | ST5*0.8*16 Wood Screw | 4 |
| 14 | Handset | 1 |
| 15 | Lifting Column Right | 1 |
| 16 | Hexagon Rod (200mm) | 1 |
| 17 | Center Frame | 1 |
| 18 | Power Cable | 1 |
| 19 | Cable Clip | 4 |
| 20 | M6 Allen Wrench | 1 |
| 21 | M4 Allen Wrench | 1 |
| 22 | Double Open-end Wrench | 1 |
Package Contents


ASSEMBLY

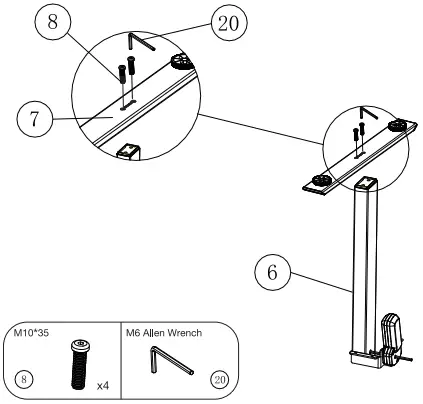
STEP 1: Insert two (2) M10*35 Machine Screws (#8) (4 in total) through holes in the bottom of the Desk Feet (#7) and into holes in the bottom of the Lifting Column Left (with Motor) (#6). Rotate each screw for only a few turns with the M6 Allen Wrench (#20) provided. After both M10*35 Machine Screws (#8) are inserted, tighten both screws. Repeat this step for the Lifting Column Right (#15).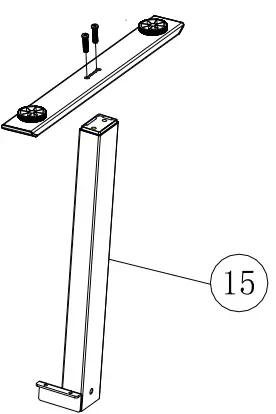
We recommend that you choose a flat and smooth floor or use a soft mat while assembling to prevent injury or scratches to the desktop and the table frame. i (Please do NOT test the lifting column separately until the control box is fixed.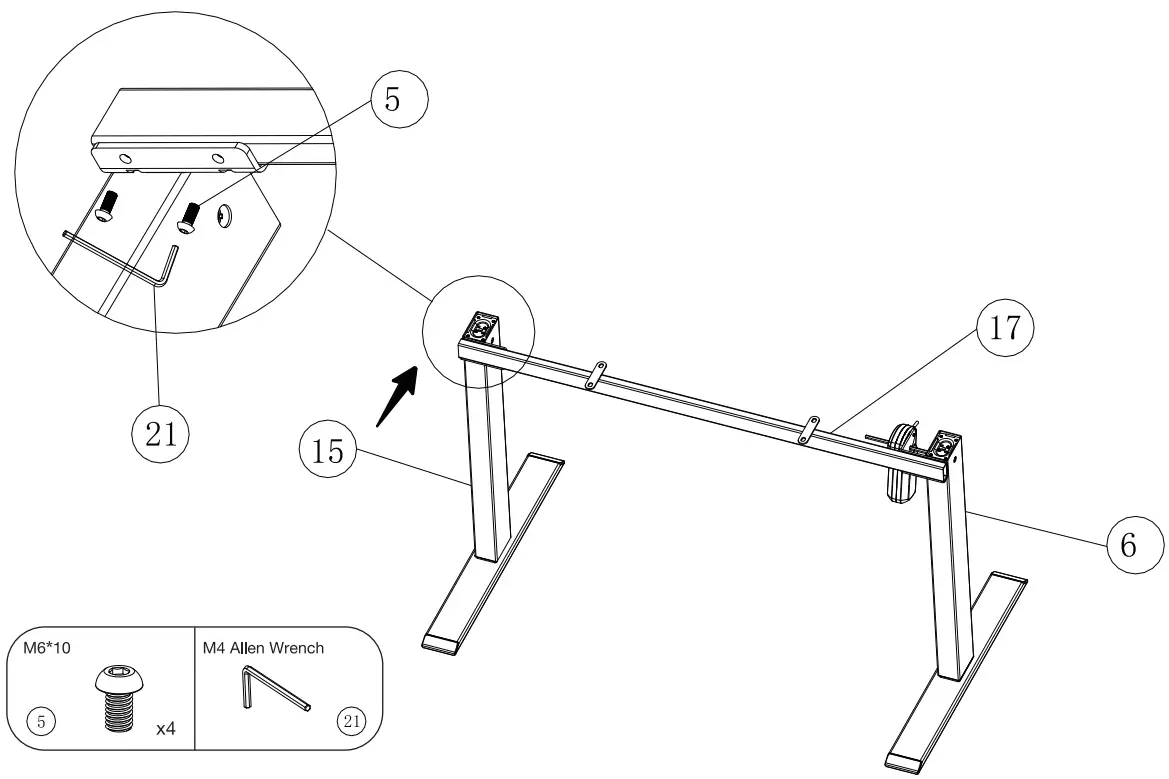 STEP 2: Place the Frame (#17) on the top of the leg assembly. Line up the holes on the Lifting Column Left (with Motor) (#6) and the Lifting Column Right (#15) with the holes on the Frame (#17). Using the supplied M4 Allen Wrench (#21), insert two (2) M6*10 Machine Screws (#5) (4 in total) through the holes in the Lifting Column Left (with Motor) (#6), going into one end of the Center Frame (#17) and rotate each screw for only a few turns. After both two (2) M6*10 Machine Screws (#5) are inserted, tighten both two (2) screws. Repeat this step for the Lifting Column Right (#15) and the other end of the Center Frame (#17).Note: Pay attention to the assembly direction of the left and right lifting columns.
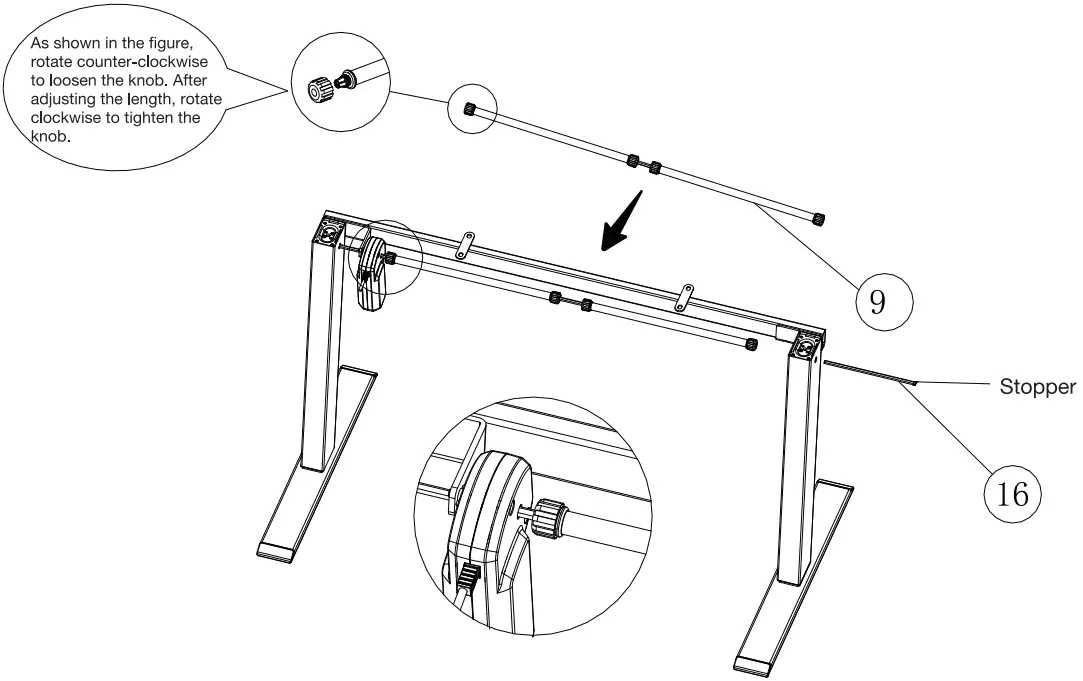 STEP 3: Rotating counter-clockwise to loosen the end of the Driving Rod Assembly (#9) and insert it into the hexagon rod on the motor side in the direction of the arrow. Pass the Hexagon Rod (#16) (with the stopper on the outside) through the Right Lifting Column(R) in the direction of the arrow (pre-inserted into the Lifting Column).
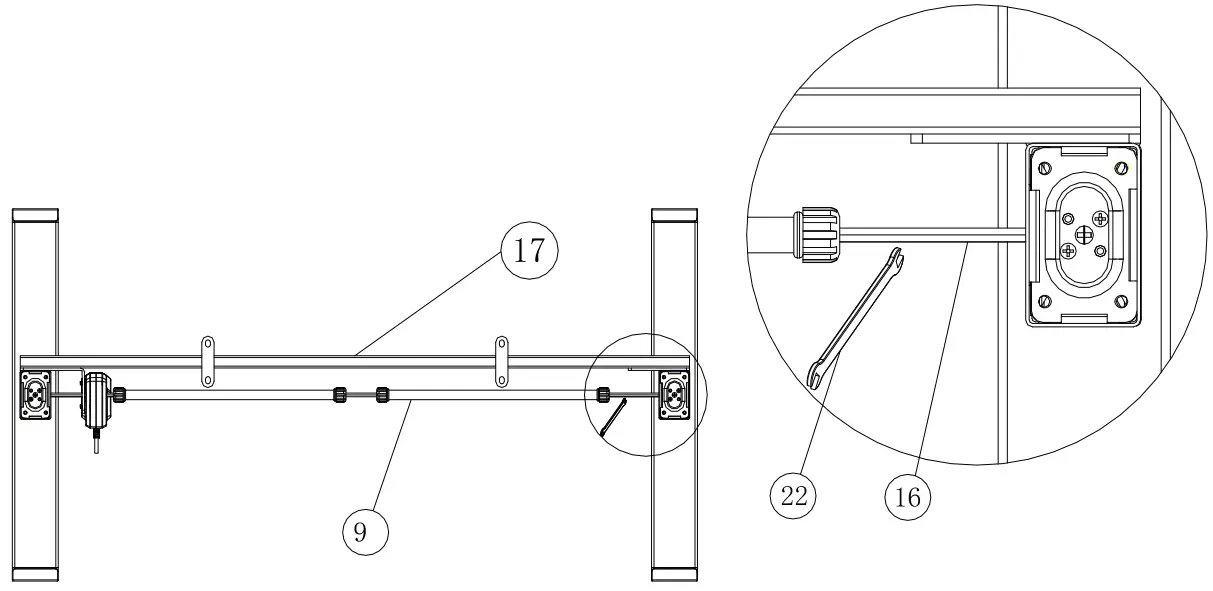 STEP 4: As shown in the figure, stretch the Driving Rod Assembly (#9) to a suitable length. Use the Double Open-end Wrench (#22) provided to adjust the angle of the Hexagon Rod (#16) and insert it into the Driving Rod Assembly (#9). The stopper will cling to the Lifting Column Right. After adjusting the position, tighten knobs on both sides of the Driving Rod Assembly clockwise to fix the whole structure.
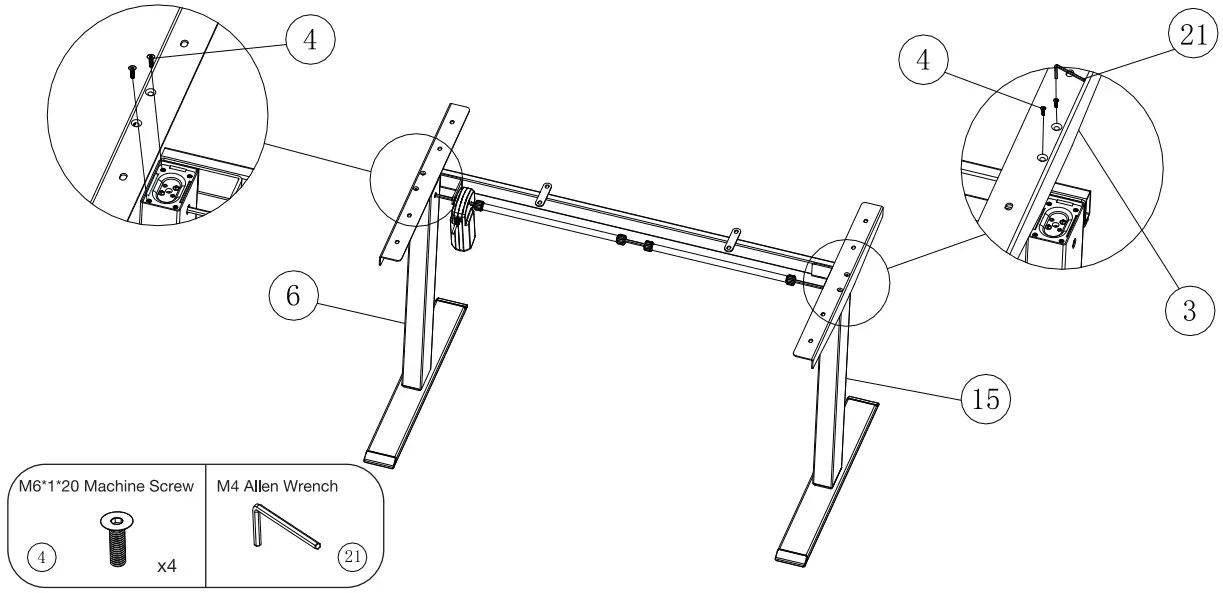 STEP 5: Place one of the Side Brackets (#3) on the top of the Lifting Column Left (with Motor) (#6). Line up the holes on the Side Bracket (#3) with the holes on the Lifting Column Left (with Motor) (#6). Insert two (2) M6*1*20 Machine Screws (#4) (4 in total) into these holes and tighten both screws with the M4 Allen Wrench (#21) provided. Repeat this step for the Lifting Column Right (#15) and the other piece of the Side Brackets (#3).
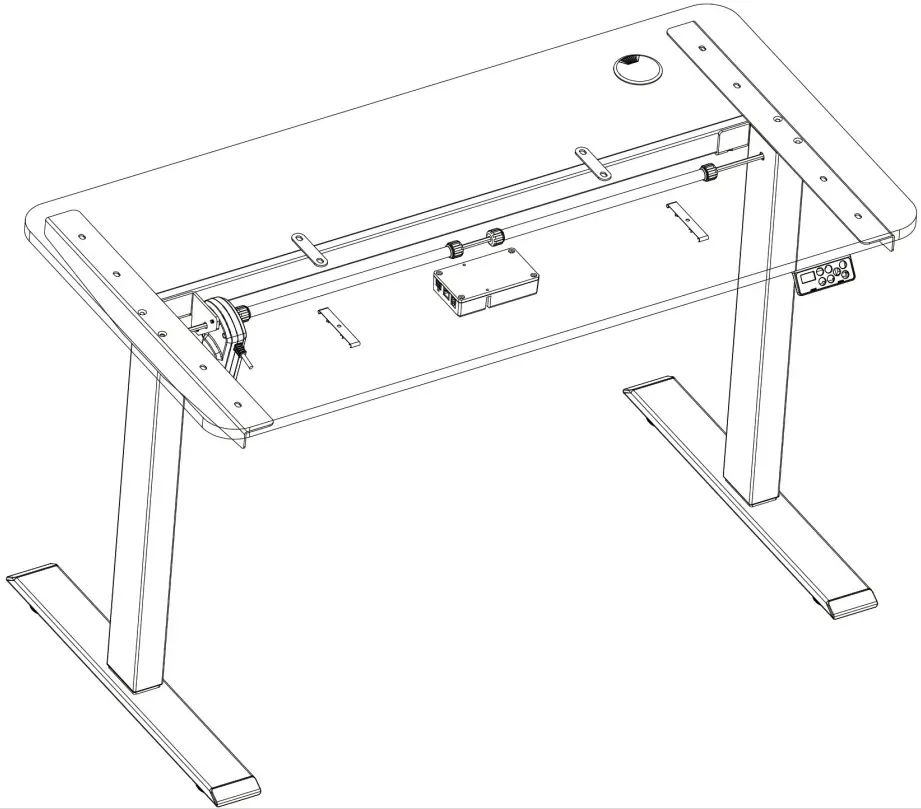
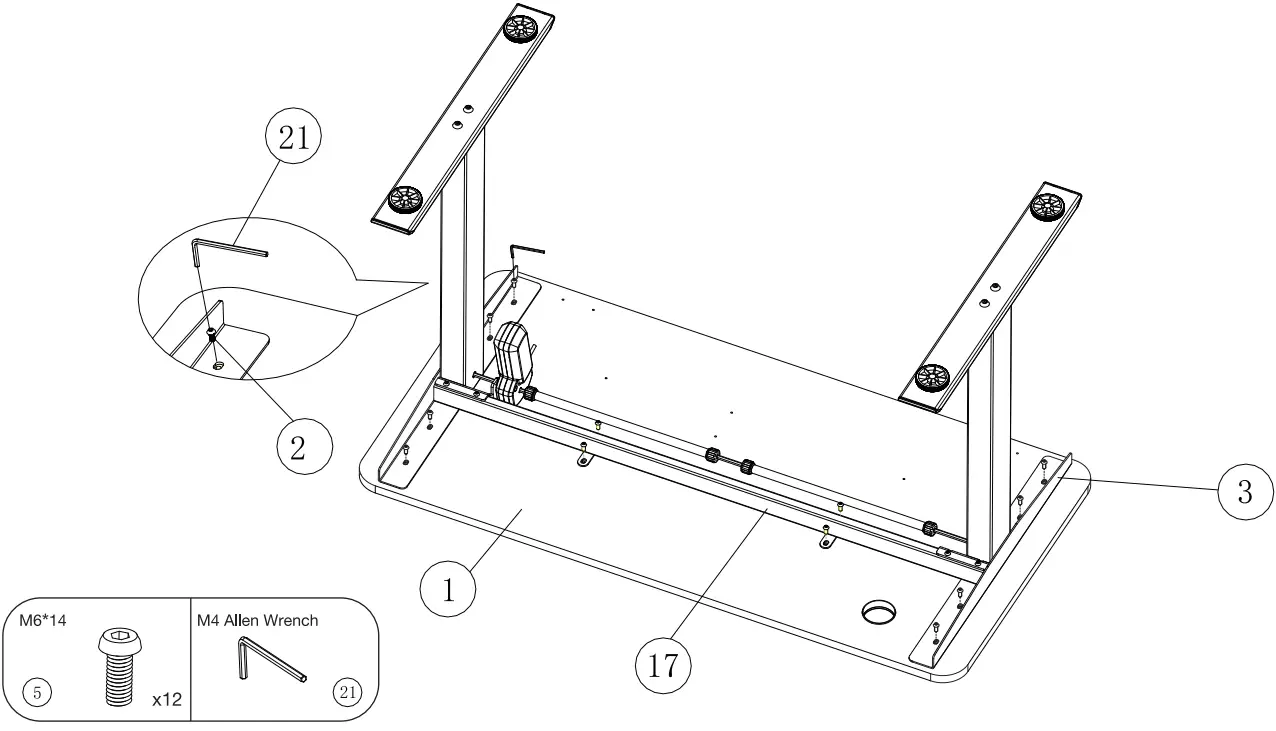 STEP 6: Place the desktop (#1) on a flat floor (with pre-drilled holes facing up). Place the desk frame upside down on the desktop (#1). Line up the pre-drilled holes on the Desktop (#1) with the holes on the Side Brackets (#3) and the holes on the Center Frame (#17). As the figure shows, secure the Side Brackets (#3) and the Center Frame (#17) on the underside of the Desktop (#1) with an M4 Allen Wrench (#21) and twelve (12) M6*1*14 Machine Screws (#2).
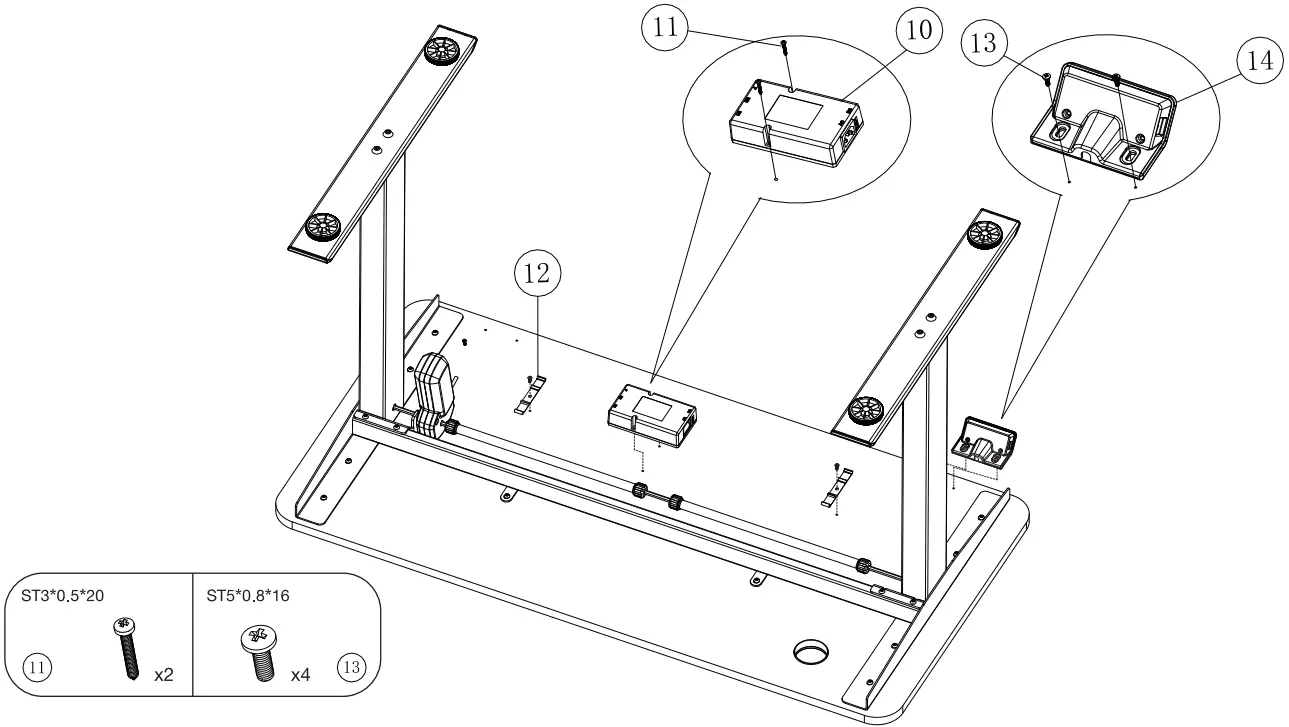 STEP 7: Attach the Control Box (#10) on the underside of the Desktop with two (2) ST3*0.5*20 Wood Screws (#11). Please note pre-drilled holes and the direction of the Control Box. The motor socket should face toward the Lifting Column Left (with Motor). Attach the Plastic Cable Buckle (#12) and the Handset (#14) on the underside of the Desktop with four (4) ST5*0.8*16 Wood Screws (#13) (4 in total). Pre-drilled holes are provided.
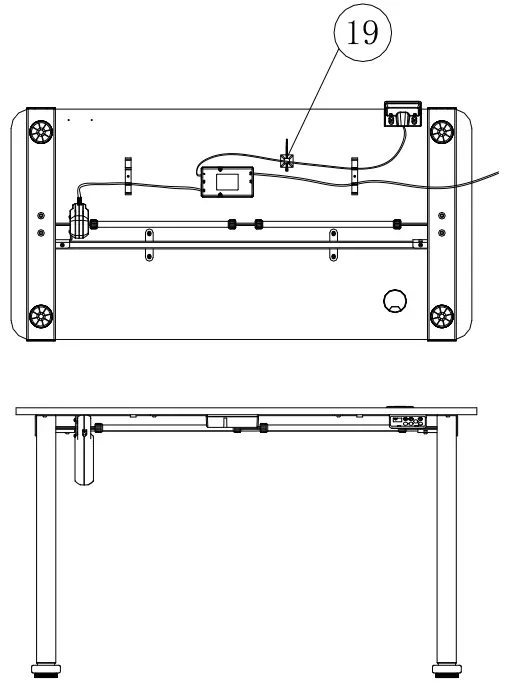 (As the control box comes with the anti-collision function, we recommend that you test the operation of columns after completing the assembly process (control box fixed under the Desktop). Otherwise, it might falsely alarm.
 STEP 8: Connect the Power Cord, the Handset, and Lifting Columns to the Control Box. Use the Cable Clips (#19) to secure the cables so they do not sag. Grab the DESK FRAME (not the desktop) and flip the desk onto its feet. Ask one friend (or more) to help. Make sure the desktop is horizontal and the two sides of the desktop are at the same height from the ground. Follow instructions to RESET the desk prior to use.
Instructions
 CAUTION
Please ensure that no objects (walls) will interrupt the movement of the desk, and all cables of relevant devices are sufficiently long.
Reset the desk (RST Mode):
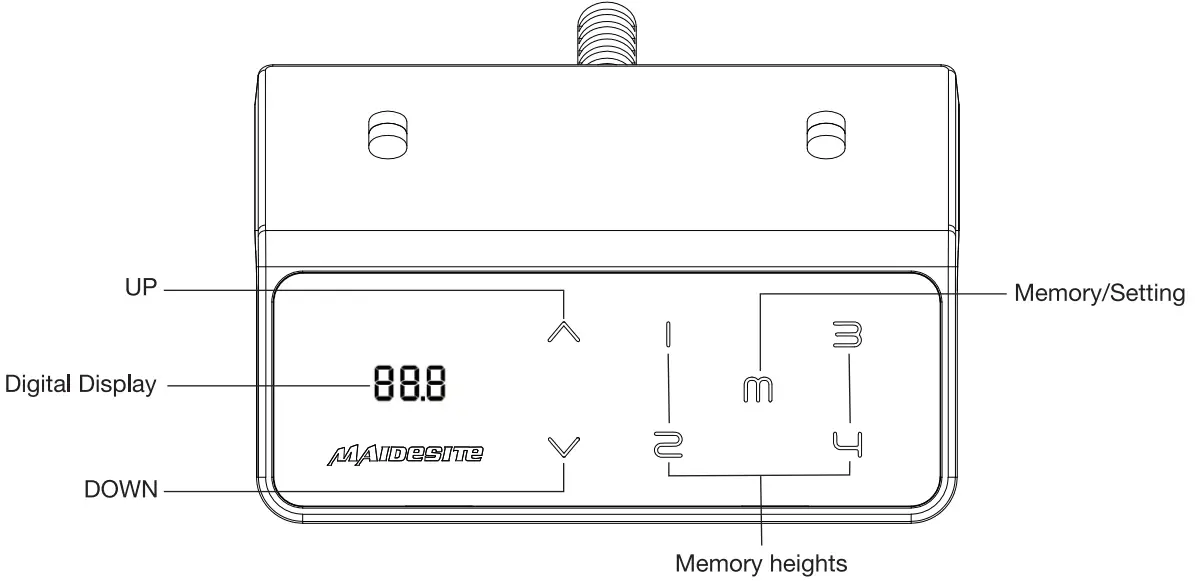
Enter the RST mode: Hold the ‘DOWN’ key for 5s while the desktop is at the lowest position (otherwise lower the desktop first). The digital display shows RST. Now the system enters RST mode.
Quit the RST mode: Hold the ‘DOWN’ key again until the desktop moves down slightly and then moves up slightly. The display shows the current height. The system quits RST mode.
| Column Detection Error (E07-E09): | |
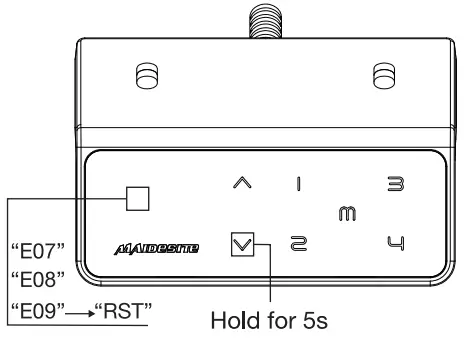 | The digital display shows error E07/E08/E09. Hold the ‘DOWN’ key for 5s: the digital display shows RST. Release and hold the ‘Down’ key again to lower the desktop until it hits the lowest position and moves up slightly. The display shows the current height. |
| Set the upper limit: | |
 | Touch the ‘M’ key: the display shows ‘S-‘.Touch the ‘UP’ key: the display flashes. Touch and hold the ‘M’ key for 2s until the display shows ‘999’. The upper limit is now stored. |
| Set the lower limit: | |
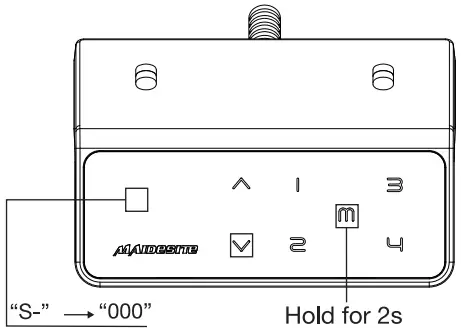 | Touch the ‘M’ key: the display shows ‘S-‘. Touch the ‘DOWN’ key: the display flashes. Touch and hold the ‘M’ key for 2s until the display shows ‘000’. The lower limit is now stored. |
| Delete height limits: | |
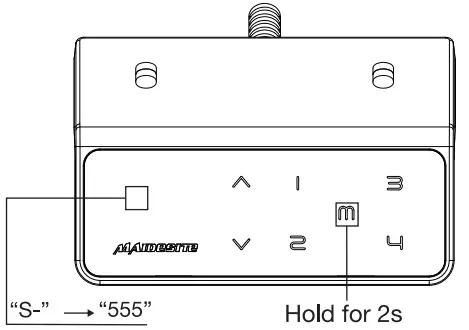 | Touch the ‘M’ key: the display shows ‘S-‘. Touch and hold the ‘M’ key for 2s until the display shows ‘555’. Both upper and lower limits are deleted. |
| Change the RESET height: | |
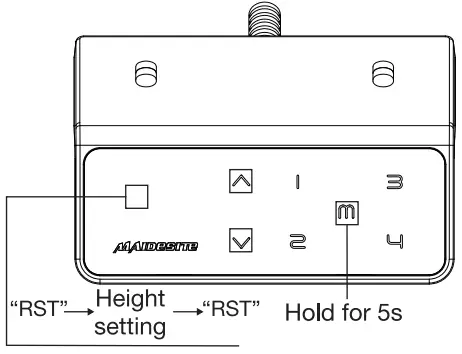 | Enter the RST model (see instructions above). Touch and hold the ‘M’ key for 5s: the display shows the preset height and the screen flashes. Touch and hold the ‘UP’ key or ‘DOWN’ key to change the value. The display switches back to ‘RST’ if no operation is detected for 5s, indicating the change is successful. Quit the RST model (see instructions above). |
| Switch the movement mode of the memory height: | |
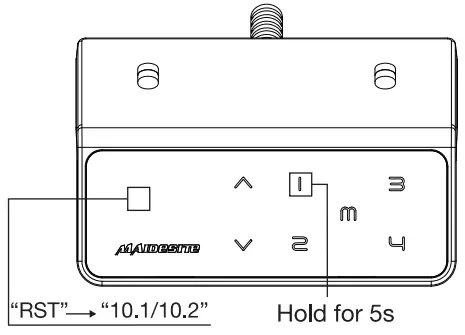 | Enter the RST model (see instruction above). Touch and hold the ‘1’ key for 5s, the display shows one of the following: ‘10.1’ : One-touch movement (Default),’10.2′ : Constant-touch movement. Toggle between two options. The display switches back to ‘RST’ if no operation is detected for 5s, indicating the change is successful. Quit the RST model (see instruction above). |
| Change height unit: | |
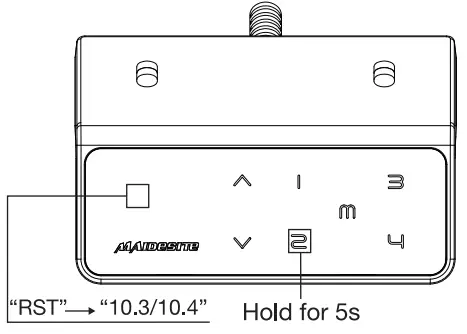 | Enter the RST model (see instruction above). Touch and hold the ‘2’ key for 5s, the display shows one of the following:’10.3′ : height display in centimeters (Default), ‘10.4’ : height display in inches. Toggle between two options. The display switches back to ‘RST’ if no operation is detected for 5s, indicating the change is successful. Quit the RST model (see instruction above). |
| Change the anti-collision sensitivity: | |
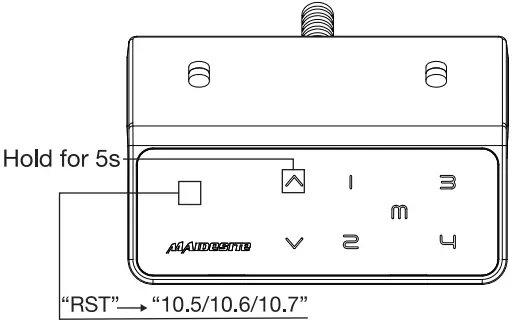 | Enter the RST model (see instruction above). Touch and hold the ‘UP’ key for 5s, the display shows one of the following: ‘10.5’ : Detect 10kg force (Default, most sensitive), ‘10.6’ : Detect 15kg force’10.7′ : Detect 20kg force. Toggle between three options. The display switches back to ‘RST’ if no operation is detected for 5s, indicating the change is successful. Quit the RST mode (see instruction above). |
| Set memory height: | |
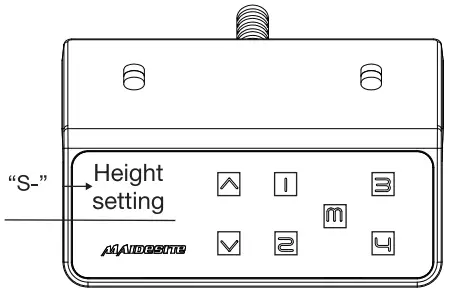 | Touch the ‘M’ key: the display shows ‘S-‘.Touch one of the number keys, the current height will be stored to that key. |
| USB Charging port: | |
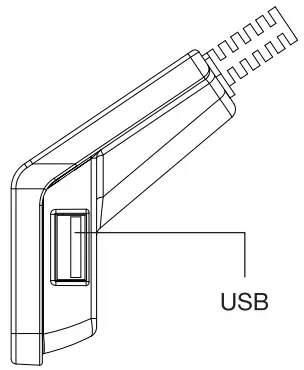 | Output: DC 5V/0 8A |
Troubleshooting:
1. If you encountered the following problem, problem, please try RESET: Abnormal Operation The display shows an error message E0x but all cable connections are normal. The display shows RST.
2. The display shows H01: unplug the power, and let the system cool down for 20 minutes.
![]() For assembly assistance, feel free to contact us:
For assembly assistance, feel free to contact us:
Email: [email protected]
Phone:3234165995
Website: magnesite. us YouTube.
Maidesite Office WhatsApp: +86 130 6789 1923
Facebook: Maidesite Standing Desk


