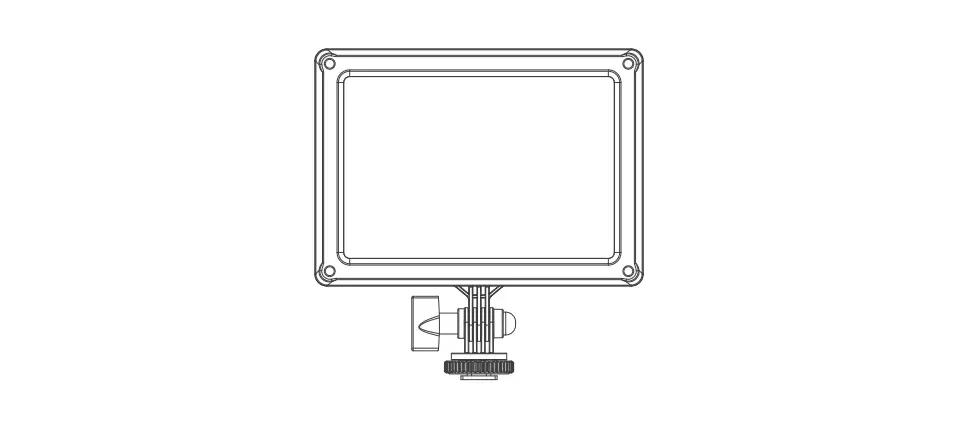
NANLITE MixPad II 11C RGBWW LED Panel Light
Technical Data
- Rated Power: 13W
- Input Voltage/Current: DC7.2-15V
- Color temperature: 2700K-6500K
- CRI: Average 95
- TLCI: Average 98
Product Details
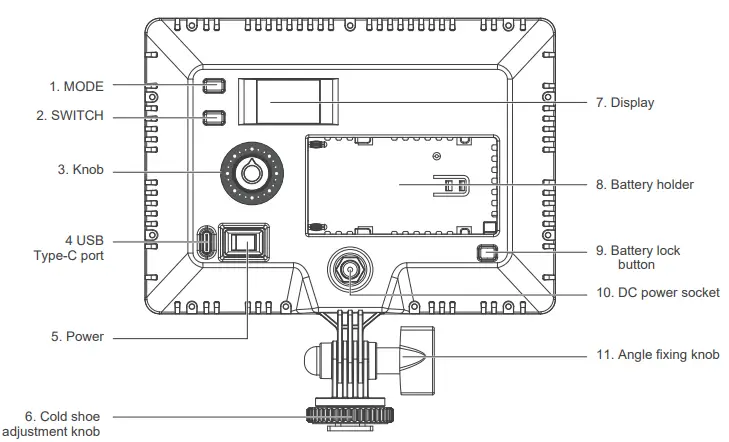
Detailed Description
- MODE: Switch between modes CCT-HARD, CCT-SOFT, HSI, EFFECT and MENU.
- SWITCH: Switch selected options.
- Knob: For selecting options and adjusting option values.
- USB Type-C port: For firmware updates.
- Power: Power on/off.
- Cold shoe adjustment knob: For connecting the fixture on light sand or onto camera equipment.
- Display: Menu and option display.
- Battery holder: For installing Sony NP-F, NP-FM lithium battery
- Battery lock button: For locking or removing the battery.
- DC power socket: DC power input port.
- Angle fixing knob: For adjusting the illumination direction of fixture.
Usage
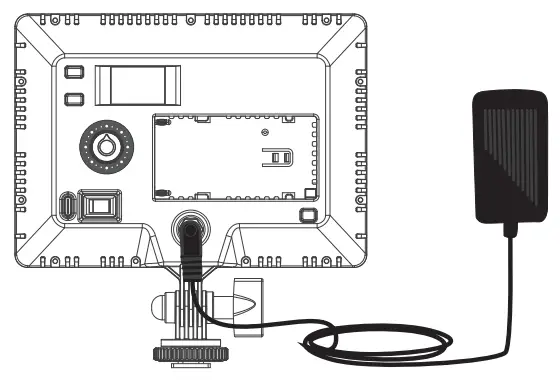
- Connection between the light fixture and power adapter
 Note:
Note:- When connect the power supply, please make sure the power and voltage should be consistent with the provide power supply.
- The power adapter is sold separately.
- Connection between the light fixture and battery
 Note: The battery is sold separately.
 - MixPad II 11C has built-in bluetooth.
 Note:
Note: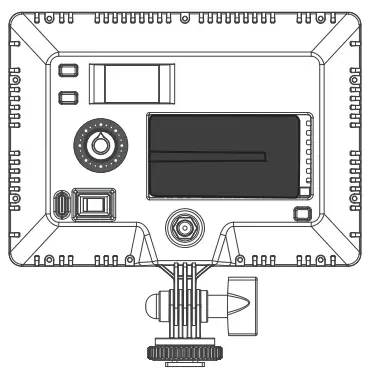 Note: The battery is sold separately.
Operating Instructions
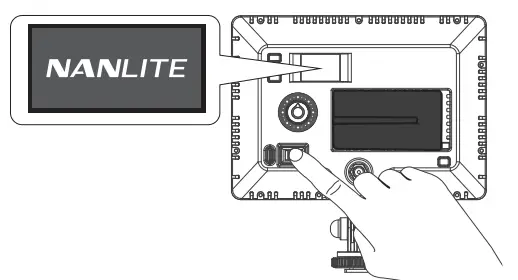
- Press “Power” button to turn on, “NANLITE” logo will be displayed on start up.

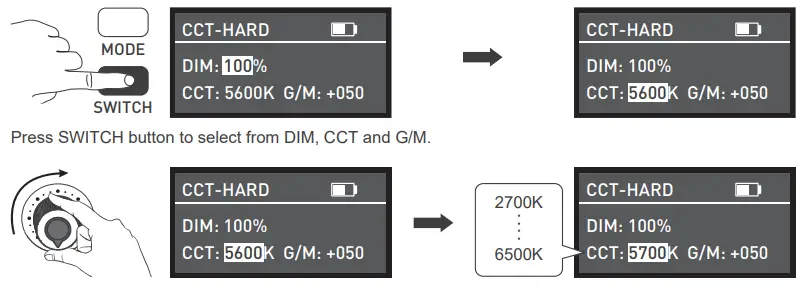
- MODE button: Press to switch between modes CCT-HARD, CCT-SOFT, HSI, EFFECT and MENU.

- CCT-HARD
mode, press SWITCH button to select from DIM, CCT and G/M, rotate the knob to set the parameters of the corresponding options. - DIM rang: 000%…100%, CCT range: 2700K… 6500K, G/M range: -100…+100.

Rotate the knob to set the parameters of the corresponding options.
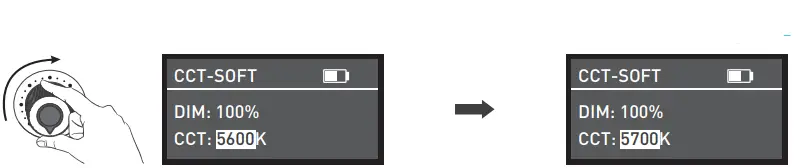
Note: In other modes, the adjustable range of DIM, CCT and G/M are the same as CCT-HARD mode. - CCT-SOFT
mode, press SWITCH button to select from DIM and CCT, rotate the knob to set the parameters of the corresponding options.

Rotate the knob to set the parameters of the corresponding options. - HSI mode,
press SWITCH button to select from DIM, HUE and SAT, rotate the knob to set the parameters of the corresponding options.
Press SWITCH button to select from DIM, HUE and SAT
Rotate the knob to set the parameters of the corresponding options.
Note: In other modes, the adjustable range of DIM, HUE and SAT are the same as HSI mode. - EFFECT mode, rotate the knob to select the desired special effect, it can be adjusted circularly.
MixPad $ 11C has built-in effects including Hue Loop, CCT Loop, INT Loop, CCT Flash, HUE Flash, CCT Pulse, Hue Pulse, Storm, Police Car, TV, Paparazzi, Candle/Fire, Disco, Bad Bulb, Firework, Explosion and Welding.
Rotate the knob to select the desired special effect.
- HUE LOOP
For HUE LOOP settings, press SWITCH button to select from DIM, HUE and SPD (SPD range: 02S…30S), rotate the knob to set the parameters of the corresponding options.
Press SWITCH button to select from DIM, HUE and SPD
Rotate the knob to set the parameters of the corresponding options. - CCT LOOP
For CCT LOOP settings, press SWITCH button to select from DIM, CCT and SPD (SPD range: 02S…30S), rotate the knob to set the parameters of the corresponding options.
Press SWITCH button to select from DIM, CCT and SPD
Rotate the knob to set the parameters of the corresponding options. - INT LOOP.
For INT LOOP settings, press SWITCH button to select from DIM, SPD (SPD range: 02S…30S) and CLR (CCT and HUE), rotate the knob to set the parameters of the corresponding options. Press SWITCH button to select from DIM, SPD and CLR
 Rotate the knob to set the parameters of the corresponding options.
 - CCT FLASH
For CCT Flash settings, press SWITCH button to select from DIM, CCT, G/M and INTVL (INTVL range: 0.1S…10.0S), rotate the knob to set the parameters of the corresponding options. Press SWITCH button to select from DIM, CCT, G/M and INTVL
- HUE FLASH
For HUE FLASH settings, press SWITCH button to select from DIM, HUE, SAT and INTVL (INTVL range: 0.1S…10.0S), rotate the knob to set the parameters of the corresponding options. Press SWITCH button to select from DIM, HUE, SAT and INTVL
 Rotate the knob to set the parameters of the corresponding options.
 - CCT PULSE
For CCT PULSE settings, press SWITCH button to select from DIM, CCT, G/M and PULSES/M
(PULSES/M range: 001…240), rotate the knob to set the parameters of the corresponding options. Press SWITCH button to select from DIM, CCT, G/M and PULSES/M.
 Rotate the knob to set the parameters of the corresponding options.
 - HUE PULSE
For HUE PULSE settings, press SWITCH button to select from DIM, HUE, SAT and PULSES/M (PULSES/M range: 001…240), rotate the knob to set the parameters of the corresponding options. Press SWITCH button to select from DIM, HUE, SAT and PULSES/M
- STORM
For STORM settings, press SWITCH button to select from DIM, CCT and INTVL (INTVL range: 01S…60S), rotate the knob to set the parameters of the corresponding options. Press SWITCH button to select from DIM, CCT and INTVL
- POLICE CAR
For POLICE CAR settings, press SWITCH button to select from DIM, CLR (B/RB/BW/RBW) and SPD (SPD range: 001…100), rotate the knob to set the parameters of the corresponding options.

- TV
For TV settings, press SWITCH button to select from DIM, CCT, G/M and SPD (SPD range: 001…100), rotate the knob to set the parameters of the corresponding options. Press SWITCH button to select from DIM, CCT, G/M and SPD
 Rotate the knob to set the parameters of the corresponding options.
 - PAPARAZZI
For PAPARAZZI settings, press SWITCH button to select from DIM, CCT, G/M and SPD
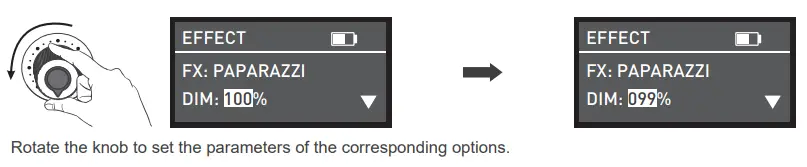
(SPD range: 001…100), rotate the knob to set the parameters of the corresponding options.

- CANDLE/FIRE
For CANDLE/FIRE settings, press SWITCH button to select from DIM, CCT, G/M and SPD (SPD range: 001…100), rotate the knob to set the parameters of the corresponding options.
 Rotate the knob to set the parameters of the corresponding options.
 - DISCO
For DISCO settings, press SWITCH button to select from DIM, COLOR (COLOR range: 03, 06, 09, 12, 15, 18, 21, 24) and SPD (SPD range: 001…100), rotate the knob to set the parameters of the corresponding options.
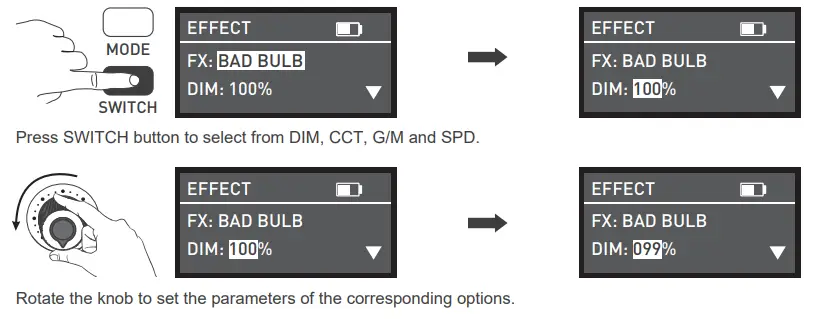
- BAD BULB
For BAD BULB settings, press SWITCH button to select from DIM, CCT, G/M and SPD
(SPD range: 001…100), rotate the knob to set the parameters of the corresponding options.
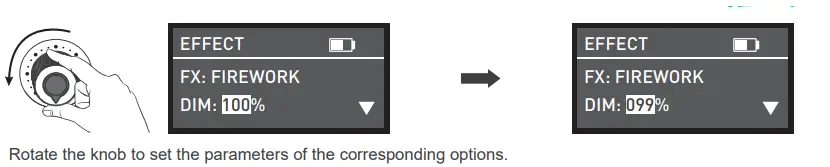
- FIREWORK
For FIREWORK settings, press SWITCH button to select from DIM, COLOR (COLOR range: 03, 06, 09, 12, 15, 18, 21, 24), SPD (SPD range: 001…100) and DECAY (DEACY range: 001…100), rotate the knob to set the parameters of the corresponding options.

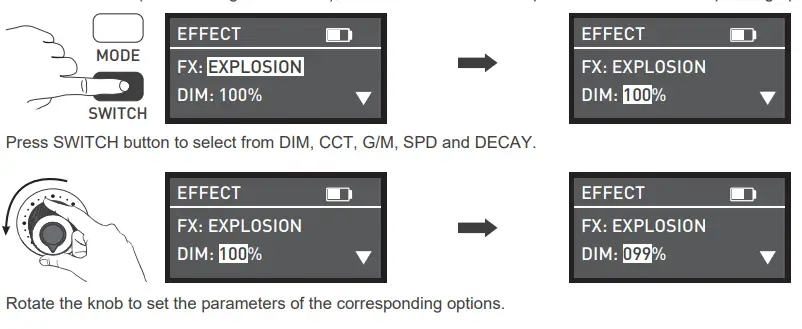
- EXPLOSION
For EXPLOSION settings, press SWITCH button to select from DIM, CCT, G/M, SPD (SPD range: 001…100) and DECAY (DEACY range: 001…100), rotate the knob to set the parameters of the corresponding options.
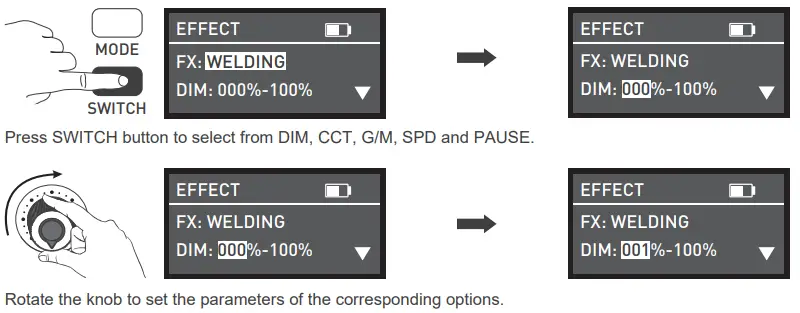
- WELDING
For WELDING settings, press SWITCH button to select from DIM, CCT, G/M, SPD (SPD range: 001…100) and PAUSE, rotate the knob to set the parameters of the corresponding options. The Pause includes “OFF” and “ON”. When the status is “ON”, the fixture will go out.
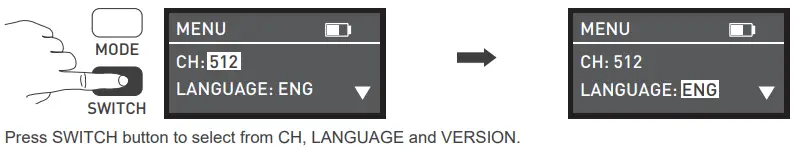
- MENU
Press SWITCH button to select from CH, LANGUAGE and VERSION, rotate the knob to set the CH (001…512), set the LANGUAGE (Chinese and English) and check the firmware version of your fixture.
 Lighting effects and additional functionality maybe added with future firmware releases, for details of these please see www.nanlite.com.
- CCT-HARD
- Press power button to turn off the light


 Press SWITCH button to select from DIM, SPD and CLR
 Rotate the knob to set the parameters of the corresponding options.
 Press SWITCH button to select from DIM, CCT, G/M and INTVL
 Press SWITCH button to select from DIM, HUE, SAT and INTVL
 Rotate the knob to set the parameters of the corresponding options.
 Press SWITCH button to select from DIM, CCT, G/M and PULSES/M.
 Rotate the knob to set the parameters of the corresponding options.
 Press SWITCH button to select from DIM, HUE, SAT and PULSES/M
 Press SWITCH button to select from DIM, CCT and INTVL


 Press SWITCH button to select from DIM, CCT, G/M and SPD
 Rotate the knob to set the parameters of the corresponding options.
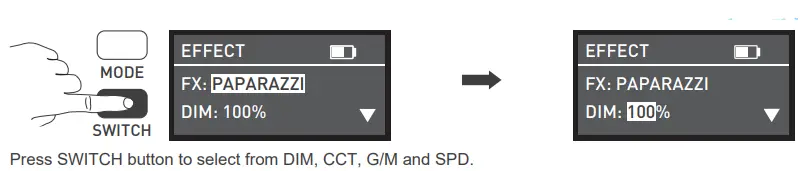

 Rotate the knob to set the parameters of the corresponding options.
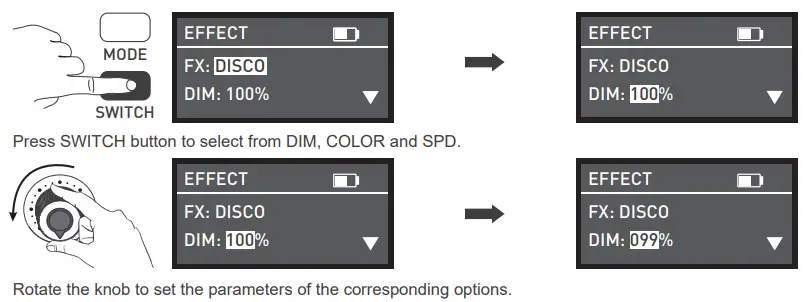

 Lighting effects and additional functionality maybe added with future firmware releases, for details of these please see
 Safety
- Please open the package to check for damage caused in transit, if damaged please do not use and contact place of purchase or manufacturer as soon as possible.
- Do not use a power cord with damaged insulation. Do not unplug hard or drag the power cord directly.
- Make sure that the power supply voltage used matches the voltage specified by the light before installation.
- When cleaning or not using the light, please turn it off.
- Keep the light safely stored and away from children.
Notice
- Do not place any object on the light emitter.
- Keep the light away from direct contact with liquids.
- Don’t place the light near flammable substances like alcohol or gasoline.
- When cleaning the light, please wipe off debris or dirt by using a dry cloth with clean water or neutral cleanser.
- The light should be operated safely where it won’t be at risk of getting wet or under extreme temperature.
- Don’t repair the light by yourself. Attempts to self repair will void warranty, for repairs please return to place of purchase.
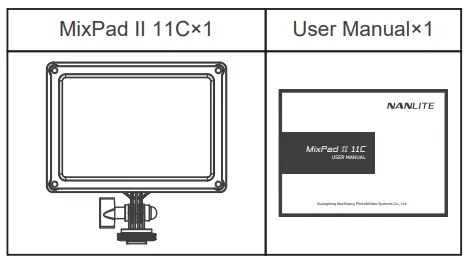
What’s in the box? Please kindly check.
General Fault Detection and Diagnosis
| Fault Detection | Diagnosis |
| The light won’t start up. | Long press the ‘Power’ button, if it does not display “NANLITE” Logo, connect to a power source and try again. |
| The display is on but no light output. | Please check if the intensity is set to zero or if the light is in storm/welding mode. |
| The light is flickering. | (1) Please ensure the unit is not being operated in extreme temperatures. (2) Ensure the fixture is not in EFFECT mode. |
| If the failure is not resolved after troubleshooting, please contact place of purchase. | |
This manual and all stats within it were produced under controlled conditions, and are accurate at time of print. Any future changes to design/technical data can be found at www.nanlite.com.
call:+86-754-85751187
mail: [email protected]
call:+86-754-85300887
location: Zhanglin,324,Dongli Chenghai Shantou Guangdong China


