
SC T DKM01 DVI Repeater
Introduction
DKM01 is a DVI extender that can not only carry DVI signal but USB, analog audio, RS232 ones using a cost-effective Ethernet cable with transmission distance up to 140M. You can easily control a PC where is far away from you while having an additional DVI monitor along side using the loop-out port at TX unit. It is an ideal solution for industrial, hospital, and education fields.
Features
- Resolution up to 1080p or 1920×1200@60Hz.
- Signal extension up to 140M over CAT6, 120M over CAT5e.
- Built in DVI loop-out port at TX unit..
Optional Model: SR01X Gigabit Ethernet Repeater
- Extend TCP/IP signal for extra 120meters.
- Chainable with multiple SR01X for long-distance transmission.
- Plug and play for easy installation.
Installation view
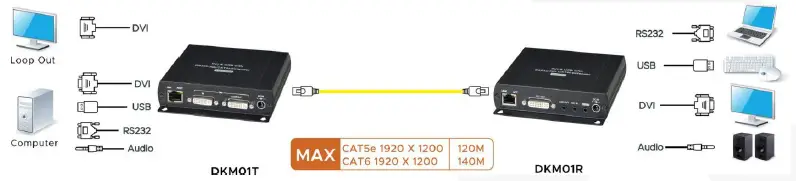
Work with SR01X Gigabit Ethernet repeater
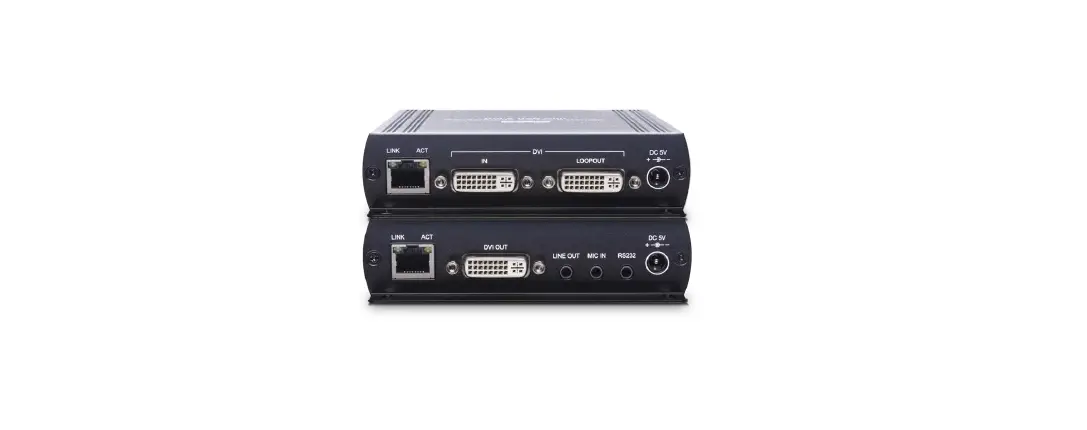
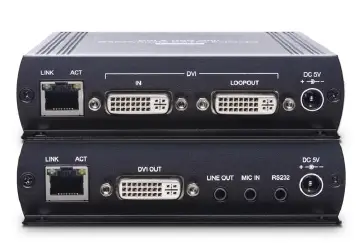
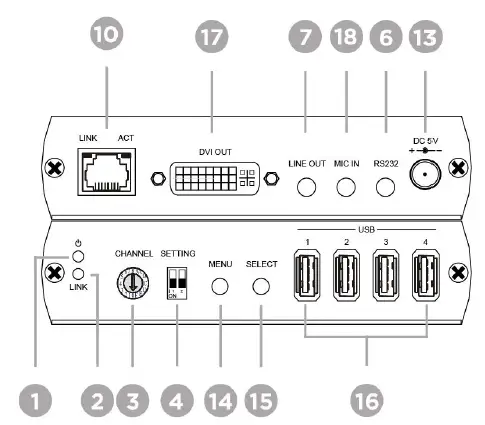
Panel View
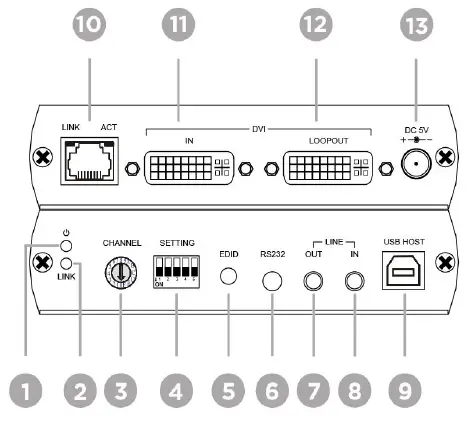
Interface/ Function
- Power LED To Indicate the status of power
- LINK LED To Indicate the status of data transmission
- Rotary Switch To set up the grouping function
- DIP Switch To set up the grouping, EDID, RS232 functions
- EDID To set up EDID function
- RS232 To connect an RS232 device
- LINE OUT To connect a 3.5mm jack for a speaker
- LINE IN To connect a 3.5mm jack for a microphone
- USB HOST To connect a USB-B cable
- RJ45 Connector To connect a DKM01T/R
- DVI IN To connect a DVI source
- DVI LOOP OUT To connect a DVI display
- Power Jack To connect a DC5V 2A power adapter

- MENU To check the status of MAC, IP, Baud Rate and EDID
- SELECT To set up Baud Rate
- USB To connect 4 ports of USB devices (ie. Keyboard, mouse)
- DVI OUT To connect a DVI display
- MIC IN To connect a 3.5mm jack for Microphone
Description
- LED Indication Status:
Power On Link On Green ON Blue On - RJ45 Indication Status:
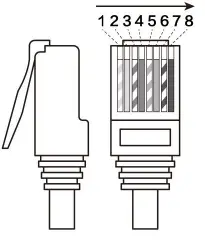
Link On Data Transferring Green ON Yellow On - RJ45 Pinout
Pin Color Data 1 Orange-white DATA0 + 2 Orange DATA0 – 3 Green-white DATA1 + 4 Blue DATA2 + 5 Blue-white DATA2 – 6 Green DATA1 – 7 Brown-white DATA3 + 8 Brown DATA3 – 
- RS232 Define


DB9 (F)/3.5mm STEREO PHONE JACK
| RS232 | 3.5 mm Phone Jack | RS232 | 3.5 mm Phone Jack | |||||
| Footprint | Define | Footprint | Define | Footprint | Define | Footprint | Define | |
| Pin 2 | TX | Pin 1 | RX | Pin 2 | RX | Pin 1 | RX | |
| Pin 3 | RX | Pin 2 | TX | Pin 3 | TX | Pin 2 | TX | |
| Pin 5 | GND | Pin 3 | GND | Pin 5 | GND | Pin 3 | GND | |
Enable RS232 function
| DKM01T | ||
| SWITCH | RS232 / Settings | |
| SW2 | RS232 On (Default) | OFF↑ |
| SW3 | OFF↑ | |
| DKM01R | ||
| SWITCH | RS232 / Settings | |
| SW2 | RS232 On (Default) | OFF↑ |
- Press “Menu” button of Rx (DKM01R) to select “Baud Rate”
- Press “Select” button of Rx (DKM01R) to choose Baud Rate parameter 3.2.4 Press “Menu” button again to confirm the parameter
- Supported Baud rates: 115200, 38400, 19200, 14400, 9600, 4800, 2400, 1200
- Grouping Set up the switch of Tx and Rx (DKM01T/R) to choose a group.
SWITCH Group / Settings SW1 Group 0
OFF↑ Group 1
ON↓ SW2 OFF↑ OFF↑ - Set up the rotary switch (the switch of Tx and Rx should be at the same position)
- Remove the power jack and plug it in again.
- EDID Copy Based on your requirement, you can set up EDID from either TX or RX.
- Remove all the DVI cables.
- Set up the DIP switch of Tx.
SWITCH EDID Mode / Settings SW4 1080p (Default)
OFF↑ Copy the resolution from Rx side
ON↓ Copy the resolution from TX loop out side
OFF↑ SW5 OFF↑ OFF↑ ON↓ Press EDID Button of the DKM01T to confirm the change.
- You can also set up EDID from RX (DKM01R) to copy the resolution of connected
- monitor from RX side as below.
Step 1 Press “MENU” button from RX to select EDID. Step 2 Press “Select” button from RX to confirm the change.
Trouble Shooting
- We strongly recommend using high-quality CAT5e, CAT6 UTP/STP/FTP cable. Improper installation may cause unstable connection, and video & audio interruption.
- DKM01 transmission data rate up to 850Mbps Max.
- Do not connect general LAN to avoid data transmission slow down other LAN devices. 。
- Analog audio of Rx (MIC IN) is mono sound for microphone use only, not stereo audio (Line in)
- Every port of USB at receiver side has max output power at 500mA, and 4 ports of USB can
Package Include
| No. | Item | Amount |
| 1 | DKM01T (Tx) | 1 |
| 2 | DKM01R (Rx) | 1 |
| 3 | USB A/B cable | 1 |
| 4 | DB9 male to 3.5mm phone jack cable | 1 |
| 5 | DB9 female to 3.5mm phone jack cable | 1 |
| 6 | DC 5V 2A power adapter | 2 |
| 7 | Screw | 8 |
| 8 | Screw plug | 8 |
| 9 | Rubber gasket | 2 |
Specification
| ITEM NO. | DKM01T | DKM01R |
| Support | ||
| Compliance | HDCP 1.4, USB 2.0, USB 1.1, USB 1.0 | |
| Max. Video Resolution | 1920 x 1200@60 Hz | |
| Max. Transmission Distance | 140M over CAT6 or Greater | |
| Video Bandwidth | 10.2 Gbps | |
| Ports & Interfaces | ||
| Video Input | 1 x DVI-D (Digital Only) | 1 x RJ45 |
| Video Output | 1 x RJ45 | 1 x DVI-D (Digital Only) |
| Video Loop-out | 1 x DVI-D (Digital Only) | |
| Analog Audio Input | 1 x (3.5mm) Stereo Phone Jack (Line In) | 1 x (3.5mm) Stereo Phone Jack (Mic In) |
| Analog Audio Output | 1 x 3.5mm Stereo Phone Jack | 1 x 3.5mm Stereo Phone Jack |
| USB Interface | 1 x USB 2.0 Type B | 4 x USB Type A |
| RS232 Interface | 1 x (3.5mm) Phone Jack | 1 x (3.5mm) Phone Jack |
| Power | ||
| Power Supply | DC 5V 2A | DC 5V 2A |
| Power Consumption | 1000mA | 400mA |
| Ambient Temperature | ||
| Operation | -20 to 60℃ | |
| Storage | -20 to 85℃ | |
| Humidity | Up to 95% | |
| Physical Characteristics | ||
| Dimensions | 125 x 140 x 30mm | 125 x 140 x 30mm |
| Weight | 400g | 385g |


