
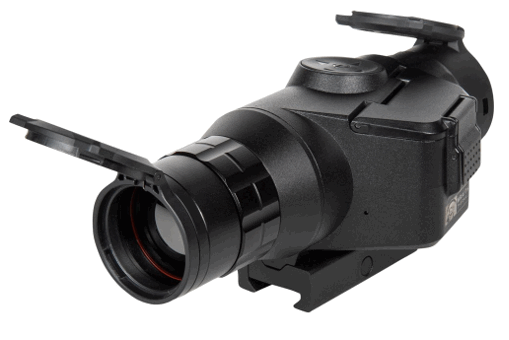
![]() SM17001 Wraith Mini Thermal Riflescope
SM17001 Wraith Mini Thermal Riflescope
User Manual
ABOUT SIGHTMARK®
While Sightmark’s MAKE YOUR MARK tagline perfectly illustrates our mission to provide uncompromising accuracy in virtually any environment, to us, those three words mean quite a bit more.
MAKE YOUR MARK represents our commitment; first, to those who serve; second, to our Constitutional right to bear arms, the right ensuring all others remain intact; and finally, every single professional and recreational shooting enthusiast embracing and sharing our Pro-2nd Amendment lifestyle.
MAKE YOUR MARK also symbolizes our desire to build more than a brand people know they can trust. It represents our higher calling to build an honorable, unapologetic legacy, truly appreciative of the fabric of a free society to pass on to future generations. Only accomplishing the latter truly embodies the gravity of what MAKE YOUR MARK means to us.
In the spirit of gratitude for those who preserve freedom as we know it to be, MAKE YOUR MARK is a call to action.
One we take seriously when it comes to developing products worthy of our brand and our lifetime warranty. The same brand countless professionals rely upon for performance in the best and most assuredly, worst of times.
WRAITH MINI THERMAL
The Wraith Mini Thermal offers the same peerless quality of Sightmark’s Wraith Mini digital night vision models on a digital thermal riflescope. The new Wraith Mini Thermal comes equipped with a powerful 384×288 sensor resolution which enhances imaging algorithms to create a crisp picture, a 1024×768 OLED display, a built-in video recorder with sound to capture the best moments of a hunt and a battery life of 3.5 hours on video mode and 4.4 hours on preview mode, the Wraith Mini Thermal proves to be a durable thermal scope with enhanced imaging
capabilities and a long battery life for the field.
With its 1440 yard detection range, 2x optical magnification and 1-8x digital zoom, the Wraith Mini Thermal is optimized for medium range engagements. Far from delicate, its durable luminism housing and ability to resist temperatures from -4°F to 122°F as well as its USB charging capability make it great for rugged hunting environments.
FEATURES:
- 384×288 Thermal Resolution
- Lightweight and Compact
- OLED Display, Built-in Recording w/ Sound
- 5 Color Palettes
- 9 Reticle Colors
- 10 Reticles
- 5 Weapon Profiles
INCLUDED:
- Flip-up Caps
- Removable Throw Lever
- Rubber Eyecup
- 2x CR123A Batteries
- USB Cable
| TECHNICAL SPECIFICATIONS | SM13140 |
| Sensor Resolution | 384×288 |
| Sensor Type | Thermal sensor |
| Display Resolution | 1024×768 |
| Display Type | OLED |
| Magnification (x) | 2x Optical |
| Digital Magnification (x) | 8-Jan |
| Objective Lens | 35mm |
| Pixel Pitch (µm) | 17 |
| Spectral Range (μm) | 14-Aug |
| NEDT (50 Hz, 300 K, F/1) (mK) | 40 |
| Detection Range (yds/m) | 1000/914 |
| Field of View º | 13º |
| Built-In Video Recorder Availability | Yes |
| Maximum Memory Card Supported (Gb) | 256 |
| Power Supply (v) | 6 |
| Battery type | 2xCR123A |
| Battery life (hours) | 3.5 (Video) – 4.4 (Preview) |
| External Power Supply | 5V via USB |
| Body Material | Aluminum |
| Mount Type | Picatinny (not included) |
| Length (in/mm) | 6.653/169 |
| Width (in/mm) | 3.031/77 |
| Height (in/mm) | 2.913/74 |
| Weight (oz) | 19.3 oz |
| Operating Temperature | -4 – 144ºF /-20C – 50ºC |
DIAGRAM
 Objective Lens
- Focus Adjustment
- Controls
- Eyepiece (Diopter Adjustment)
- Battery Compartment
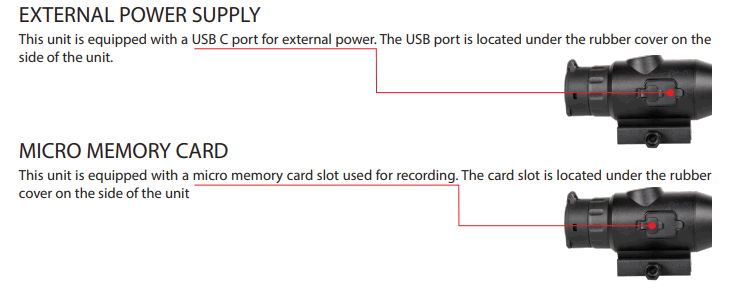
- Card Slot
- USB Port
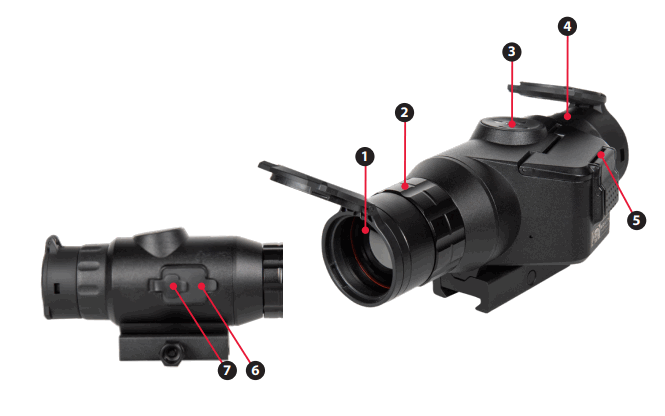 Objective Lens
INSTALLING THE BATTERY
The Sight ark Wraith Mini Thermal uses two CR123A batteries. It is recommended to use batteries of the same type and same charge for best performance.
To install new batteries:
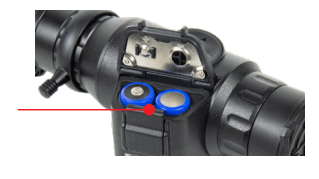
- Press the battery door release button.
- Insert batteries into slots by orientation indicated.
- Press battery cap closed until strong snap.
- Confirm latch fully engaged.
MOUNTING
The unit is fitted with a Picatinny mount.
To attach:
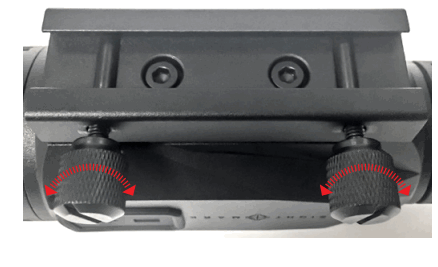
- Loosen the mount thumbscrews.
- Place mount on to Picatinny rail aligning the bolts with the Picatinny rail slots. Check eye relief and adjust to the proper position.
- Tighten thumbscrew to 20-25 inch pounds. Do not over tighten.
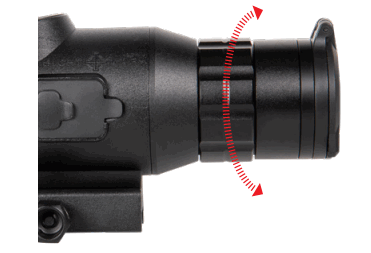
DIOPTER ADJUSTMENT
Look through the unit at the screen while the unit is on. If the text and icons are not clear, rotate the diopter adjustment until the icons and text become clear. The diopter adjustment should only ever need to be set once per user.
To adjust diopter:
- Locate the diopter adjustment. (4)
- Turn the adjustment left or right until the display becomes focused.(Use icons or numbers on the display to check screen focus as the actual image through the viewfinder may need to be focused as well.)
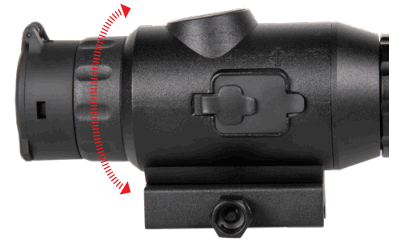
FOCUS ADJUSTMENT
To adjust focus:
- Locate the focus adjustment. (2)
- Turn the adjustment left or right until the image becomes focused.
VIEWFINDER
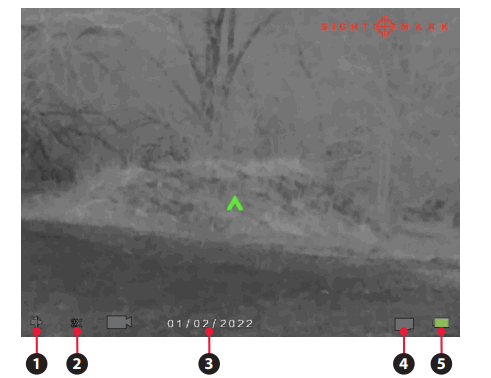
- Profile

- Magnification 1x2x3x4x5x6x7x8x
- Date
- Memory card status

- Battery status

CONTROLS
Digital Zoom – Use the up and down arrows to adjust the magnification. This unit has a digital magnification range up to 8x.
Manual Calibration – Press the left button to manually calibrate the sensor.
Color Mode – Hold the left button to toggle between color modes.
Menu/Power – To power on the unit hold the power button until the unit turns on. To turn it off hold until the display shuts off. To access the menu, click the button and the menu will open.
Video Record/Photo – Use the right button to start/stop recording or take a photo.
ZEROING THE RIFLESCOPE
- Boresight the rifle to get the riflescope close to zero. For more information on bore sighting see https://sightmark.com/pages/thermal_menu
- Take 1 to 3 shots on a paper target while aiming at the center.
- Open the menu and go to Reticle Settings and then Reticle Zero.

 Reticle Settings Reticle Zero
 - While keeping the crosshair on the point of aim (the center of the target in this case) use the arrows to move the red adjustment reticle to the bullet hole or the center of the grouping of bullet holes if you took 3 shots.
- Press the center button to save and exit the menu.
- Take 1 to 3 additional shots. The scope should now be zeroed. If these shots were not on target restart, from step 3.
The numbers shown on screen represent the offset from the center of the screen. They are not needed for the zeroing process, but may be useful for re-adjusting back to a known zero if you save these numbers.
CHANGING THE RETICLE STYLE AND COLOR
- Open the menu and go to Reticle Settings. Reticle Settings
- Select either Reticle Color or Reticle Style and press the center button.Reticle ColorReticle Style
- Use the up and down buttons to choose a reticle or color and press the center button to save and exit the menu.
WEAPON PROFILES
The Wraith Mini Thermal has five weapon profiles. These profiles store the reticle setting.
To edit profiles:
- Open the menu and go to Weapon Select. Weapon Select
- Select a profile number and click the right button.

- Use the up, down, left and right buttons to adjust the characters to show the desired caliber and grain. This is just to help remember what each profile is.
- All reticle and zeroing changes will be applied to the last profile selected.

WEAPON PROFILES (cont.)
To select a profile:
- Open the menu and go to Weapon Select. Weapon Selec
- Select a profile number and click the center button.
- All reticle and zeroing changes will be applied to the last profile selected.
RESOLUTION SETTINGS
To change resolution setting:
- Open the menu and go to Settings and then Resolution.

2. Use the up or down button to select the desired resolution.
3. Use the center button to save and exit the setting.
VIDEO RECORDING AND PHOTO MODE
To switch between video recording and photo mode:
- Open the menu and go to Settings and then Record Mode.
 Settings
  Record Mode
2. Use the up or down button to select either photo or video.
3. Use the center button to save and exit the setting.
VIDEO RECORDING AND PHOTO MODE (cont.)
Take a video/photo:
- When looking through the unit either, a photo or video symbol will be displayed in the lower left of the screen.
- Press the right button to take a photo/start recording video.
- Press a second time to stop recording.
To watch playback of videos:
- Open the menu and go to Playback.
 Playback
 - Use the up and down arrows to look through the existing photos and videos.
- Press the center button to watch the video.
BRIGHTNESS SETTINGS
To Adjust Brightness:
- Open the menu and go to Brightness. Brightness
- Move the brightness slider up or down to adjust the brightness.
- Press the center button to save the setting and exit the menu.
TIME AND DATE
To set the time/date:
- Open the menu.
- Go to settings and then Time/Date.

- Select Time Set or Date.
- Adjust Time/Date using up, down, left, and right buttons. Settings Time/Date
- Press the center button to save and exit.
FIRMWARE
To update the firmware:
- Confirm the batteries are full and/or connect external power.
- Download the latest firmware from our website at https://sightmark.com/pages/thermal_menu
- Copy the firmware file to the root of your micro memory card. The file should not be placed in a folder in the card.
- Confirm the filename has not been altered or renamed.
- Insert the micro memory card into the riflescope card slot.
- Open the menu.
- Go to Settings and then Firmware.
- Select Firmware Update.
- When update is complete the unit will shut off. This can take a few minutes
To perform a factory data reset:
- Open the menu using the center button.
- Go to Settings and then Factory Data Reset.

- Use the arrow buttons to navigate to Yes and select it with the center button.
Warning: This will completely reset the unit to factory settings including all reticle zero settings.
SLEEP MODE
The unit is equipped with a sleep mode feature. This lets the unit conserve battery while also allowing the unit to quickly reactivate.
To activate sleep mode:
- Hold the down button for 4-5 seconds when the unit is on and not inside a menu. The screen should turn off.
To activate the unit when in sleep mode: - Press the power button and the unit should quickly turn on.
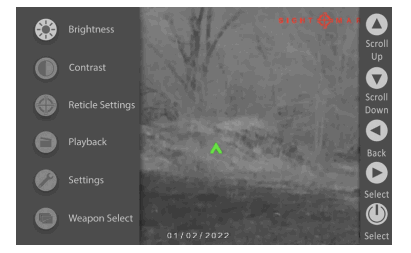
Use the up and down buttons to scroll through and the center button to select. The left button can be used to exit menus.
- Brightness
- Reticle Settings
a. Reticle Color
b. Reticle Style
c. Reticle Zero - Playback
Use the up and down button to scroll through pictures and video, click the center button to play back video files. Use the left button to exit Playback. - Settings
a. Resolution
b. Record Mode
i. Video
ii. Photo
c. Format Card
i. Are you sure? (Format Card)
ii. Cancel
d. Factory Data Reset
i. Yes
ii. No
e. Firmware
i. Firmware Version
ii. Firmware Update
f. Time and Date
i. Time Format
1. 12 Hour
2. 24 Hour
ii. Time Set
iii. Date - Weapon Select
a. Profile 1
b. Profile 2
c. Profile 3
d. Profile 4
e. Profile 5
MAINTENANCE
Proper maintenance of the Sightmark Wraith is recommended to ensure longevity. Attempts to disassemble or repair the unit will void the warranty. It is recommended that when the unit becomes dirty that it is wiped down with a dry or slightly damp cloth. Blow dirt and debris off all optics and then clean lenses with a lens cleaning cloth. To remove oils or dried water spots, apply a small amount of denatured alcohol to a lens cloth or cotton swab. Clean the surface of the lens and let dry. Finally use your breath to clean the lens once more. No further maintenance is required.
TROUBLESHOOTING
Never ship back a product without getting proper authorization beforehand. Doing so could result in losing the product due to a multitude of reasons, i.e. sending it to the wrong address and other problems associated with unexpected packages.
The unit will not turn on:
- Check the polarity of the batteries. Reinstall the batteries if necessary.
- Clean the battery compartment contacts with denatured alcohol and a cotton swab.
- Install fresh batteries.
The image is dark:
1. Make sure the lens caps on the objective lens is opened. Adjust the display brightness accordingly to obtain a bright, clear image.
There are light or black dots on the display:
1. The presence of dots on the display is caused by sensor production technology and is not a defect. No action is required.
The image is not in focus:
- Make sure there is no dust or condensation covering the objective lens or eyepiece.
- Adjust the focus ring near the objective lens to adjust focus for different viewing distances.
- Make sure to adjust the diopter setting on the eyepiece for your specific vision.
The image is flickering:
- This is common if the unit is viewing or pointing in the direction of a bright light source. Cease viewing the bright light source immediately. If flickering in normal dark conditions the unit may need to be returned for service.
FIRMWARE UPDATING
Visit https://sightmark.com/pages/thermal_menu for updates and instructions.
SIGHTMARK WARRANTY
Please visit www.sightmark.com for warranty details and information.
![]() This device complies with Part 15 of the FCC Rules. Operation is subject to the following two criteria: (1) This device may not cause harmful interference, and (2) This device must accept any interference received, including interference that may cause undesired operation.
This device complies with Part 15 of the FCC Rules. Operation is subject to the following two criteria: (1) This device may not cause harmful interference, and (2) This device must accept any interference received, including interference that may cause undesired operation.
Warning: Changes of modifications to this unit is not expressly approved by the party responsible for compliance could void the user’s authority to operate the equipment.
NOTE: This equipment has been tested and found to comply with the limits for a Class B digital device, pursuant to part 15 of the FCC Rules. These limits are designed to provide reasonable protection against harmful interference in a residential installation. This equipment generates, uses and can radiate radio frequency energy and, if not installed and used in accordance with the instructions, may cause harmful interference to radio communications. However, there is no guarantee that interference will not occur in a particular installation. If this equipment does cause harmful interference to radio or television reception, which can be determined by turning the equipment off and on, the user is encouraged to try to correct the interference by one or more of the following measures:
- Reorient or relocate the receiving antenna.
- Increase the separation between the equipment and receiver.
- Connect the equipment into an outlet on a circuit different from that to which the receiver is connected.
- Consult the dealer or an experienced radio/TV technician for help.


