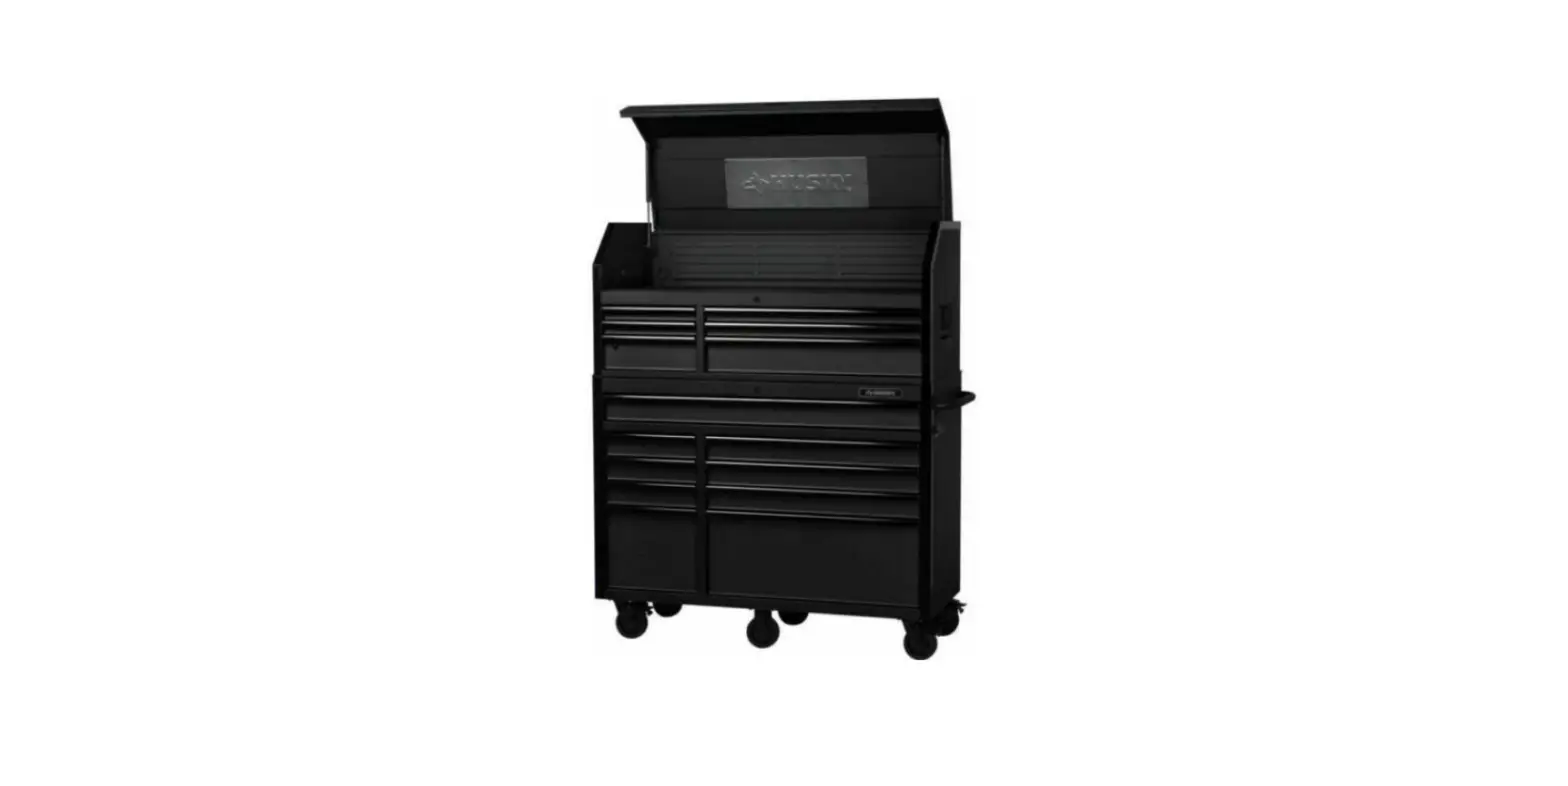
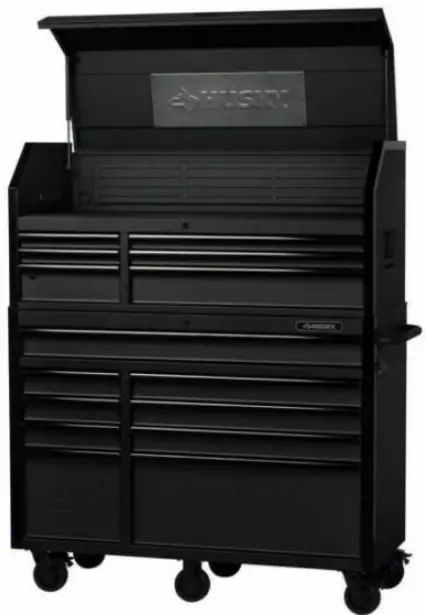
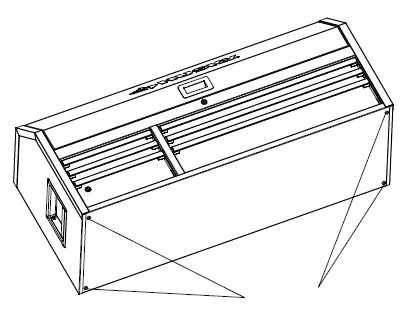
Husky H52CH6TR9HD Drawer Tool Chest And Cabinet Set
THANK YOU
We appreciate the trust and co dence you have placed in Husky through the purchase of thi s chest/cabinet. We strive to continually create quality products designed to enhance your home. Visit us online to see our full line of products available for your home improvement needs. Thank you for choosing Husky!
Safety Information
- Do not pull this unit, push it when moving.
- Use the brakes when this product is not being moved. This prevents the product from rolling.
- Secure this product properly before moving it with a forklift.
- Do not tow the product with power equipment.
- Do not alter this product in any manner. For example, do not weld external lock bars or attach electrical equipment.
- When locking a chest/cabinet , close the drawers completely in order for the lock bars to work properly.
CAUTION:- Do not attach or mount this product to a vehicle. This may cause personal injury or product damage. Mounting this product to any vehicle in any manner will void warranty.
- Do not stand on this product. You may fall which may cause personal injury.
- Be careful when opening more than one drawer. The product may become unstable and tip, which may cause personal injury or product damage.
- Keep the product on level surfaces. The product may become unstable and tip if stored or moved on an unlevel surface, which may cause personal injury or product damage.
- Lock the drawers before moving this product. The drawers could come open and make the product unstable and tip, which may cause perso nal or product damage.
- Be careful when closing the cover. Remove hands before the cover closes completely to prevent personal injury.
- Extension cord
- Follow all Extension cord manufacturer’s Warnings and Instructions.
- Do NOT insert extension cord through hole without grommet in place.
- Only use a three-wire extension cord with all three prongs intact. Never remove the round grounding prong.
- Extension cord must be connected to a 125 Volt GFCI protected outlet with proper ground. If GFCI outlet is not available, use an extension cord with GFCI protection built in.
- Check the insulation and plugs of extension cord before using. Do NOT use cord if it is worn or damaged.
- Do NOT overload extension cord.
- Remove extension cord from the hole before moving or transporting storage chest.
- Only use an extension cord that is rated for outdoor use.
- Do NOT connect extension cord to outlet that also sup-plies critical safety equipment with power.
- Electrical Shock Hazard
- Do not plug cord into outlet with wet hands.
- Do not use this tool chest near a bathtub, a shower, or a swimming pool.
- Chest/Cabinet plugs must match the outlet.
- Never modify the plug in any way.
- Do not use any adapter plugs with earth (grounded) chest power strips.
- Unmodified plugs and matching outlets will reduce the risk of electric shock.
- Avoid body contact with earthed or grounded surfaces. There is an increased risk of electric shock if your body is earthed or grounded.
CAUTION: RISK OF ELECTRICAL SHOCK: This unit has two power supply cords. Make sure all cords are unplugged before any servicing or cleaning.
WARNING: Changes or modifications to this unit not expressly approved by the party responsible for compliance could void the user’s authority to operate the equipment.
FCC STATMENT
NOTE: This device complies with Part 15 of the FCC Rules. Operation is subject to the following two conditions: (1) this device may not cause harmful interference, and
(2) this device must accept any interference received, including interference that may cause undesired operation.
NOTE: This equipment has been tested and found to comply with the limits for a Class B digital device, pursuant to Part 15 of the FCC Rules. These limits are designed to provide reasonable protection against harmful interference in a residential installation. This equipment generates, uses and can radiate radio frequency energy and, if not installed and used in accordance with the instructions, may cause harmful interference to radio communications.However, there is no guarantee that interference will not occur in a particular installation. If this equipment does cause harmful interference to radio or television reception, which can be determined by turning the equipment off and on, the user is encouraged to try to correct the interference by one or more of the following measures:
- Reorient or relocate the receiving antenna.
- Increase the separation between the equipment and receiver.
- Connect the equipment into an outlet on a circuit different from that to which the receiver is connected.
- Consult the dealer or an experienced radio/TV technician for help.
Warranty
The manufacturer warrants the product to be free from defects in materials and workmanship for a period of five (5) years from date of purchase. This warranty applies only to the original consumer and only to products used in normal use and service. If this product is found to be defective, the manufacturer’s only obligation, and your exclusive remedy, is the repair or replacement of the product at the manufacturer’s discretion, provided that the product has not been damaged through misuse, abuse, accident, modifications, alteration neglect or mishandling. This warranty shall not apply to any product that is found to have been improperly installed, set-up, or used in any way not in accordance with the instructions supplied with the product. This warranty shall not apply to a failure of the product as a result of an accident, misuse, abuse, negligence, alteration, faulty installation, or any other failure not relating to faulty material or workmanship. This warranty shall not apply to the finish on any portion of the products such as surface and/or weathering, as this is considered normal wear and tear. The manufacturer does not warrant and specifically disclaims any warranty, whether express or implied, of fitness for a particular purpose, other than the warranty contained herein. The manufacturer specifically disclaims any liability and shall not be liable for any consequential or incidental loss or damage, including but not limited to any labor/expense costs involved in the replacement or repair of said product. Contact the Customer Service Team at 1-888-HD-HUSKY or visit www.huskytools.com.
Specifications
| Maximum weight per (chest drawer) | 120 lbs. |
| Maximum weight per (cabinet drawer) | 120 lbs. |
| Maximum product weight, including contents (chest ) | 900 lbs. |
| Maximum product weight, including contents (cabinet) | 1600 lbs. |
NOTE: Begin product assembly close to t nal intended location of your chest/cabinet. This product is heavy and may be di cult to move after assembly.
Package Contents
HARDWARE INCLUDED
NOTE: Hardware not shown to actual size.
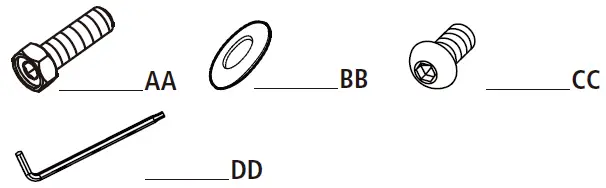
| Part | Description | Quantity |
| AA | M8 x 25 bolt | 24 |
| BB | Washer | 24 |
| CC | M6 x 16 bolt | 6 |
| DD | Hex key | 1 |
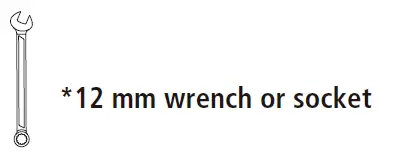
ALTERNATIVE TOOLS FOR ASSEMBLY (Not Included)
- NOTE: Chest Keys are attached to gas strut.
- NOTE: Cabinet Keys are inside top drawer.
- NOTE: Privacy Drawer Keys are inside drawer.
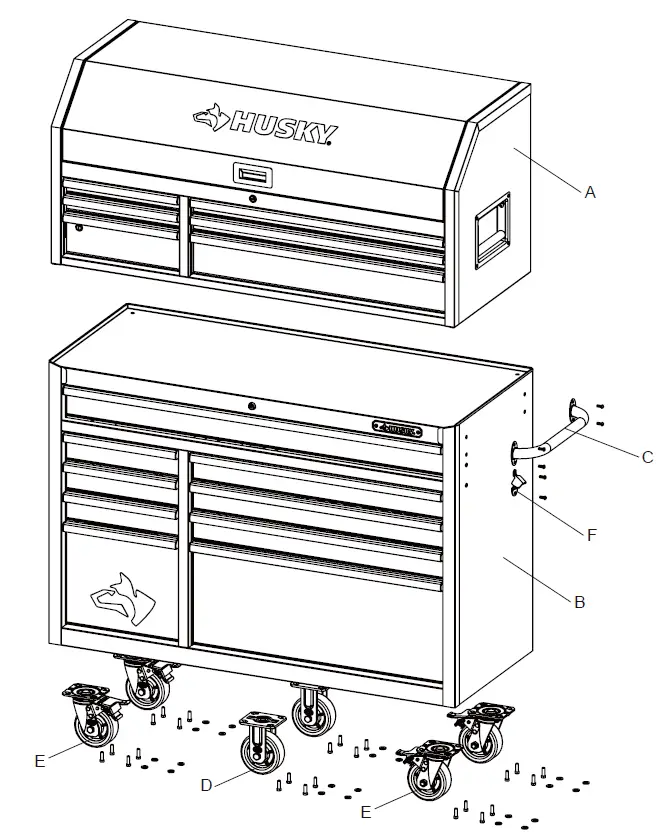
| Part | Description | Quantity |
| A | Chest | 1 |
| B | Cabinet | 1 |
| C | Cabinet handle | 1 |
| D | Fixed caster | 2 |
| E | Swivel caster | 4 |
| F | Bottle opener | 1 |
Assembly
CAUTION: Two people are recommended for assembly.
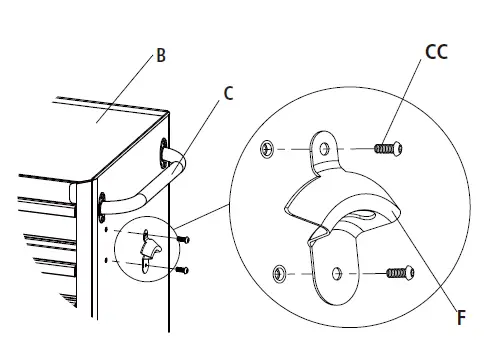
- Attaching the cabinet handle
- Position the cabinet handle (C) over the holes on the cabinet (B).
- Attach with the bolts (CC) and tighten with supplied hex key (DD).
NOTE: The holes in the cabinet are tapped and do not require nuts.
NOTE: There are holes to mount handle on both sides of cabinet, but only one handle is provided.
- Attaching the bottle opener
- Position the bottle opener (F) over the holes on the cabinet (B).
- Attach with the bolts (CC) and tighten with supplied hex key (DD).
CAUTION: Do not over tighten the screws.
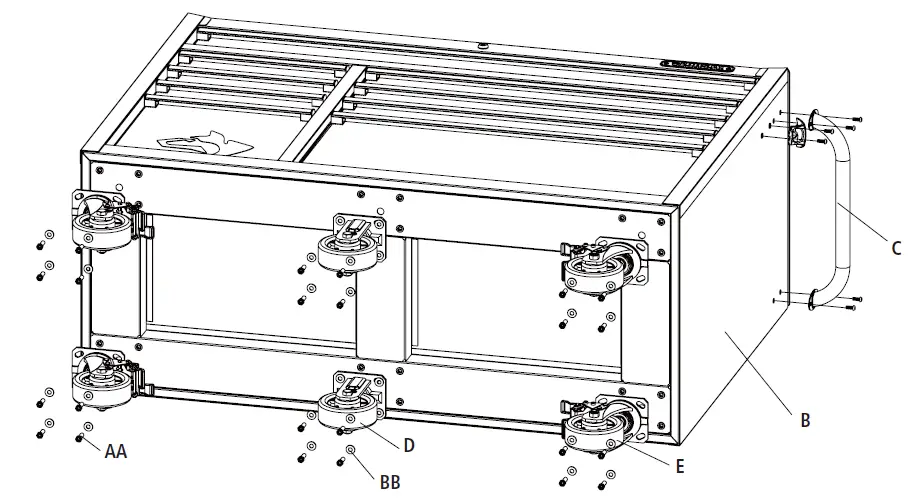
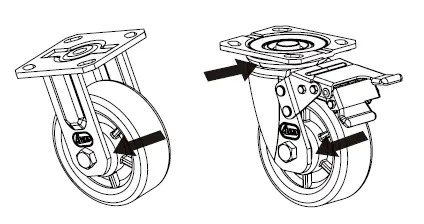
- Attaching the casters
CAUTION: Do not over tighten the bolts.- Be sure the drawers are locked and lay the cabinet (B) on its top. Use packaging material to protect the finish.
- CASTER CONFIGURATION #1: UNIT WILL PRIMARILY BE STATIONARY
- Attach 2 swivel casters (E) to the cabinet (B), on the same side as the handle (C) and attach the other 2 swivel casters (E) to the opposite side of the cabinet (B). Insert bolts (AA) through washers (BB) and swivel caster (E) into the cabinet (B).
- Attach 2 fixed casters (D) to the center of the cabinet (B) by inserting bolts (AA) through the washers (BB) and the fixed casters (D) into the cabinet (B).

- CASTER CONFIGURATION #2: UNIT WILL BE MOVED FREQUENTLY
- Attach 2 swivel casters (E) to the cabinet (B), on the same side as the handle (C) and attach the other 2 swivel casters (E) to the center of the cabinet (B). Insert bolts (AA) through washers (BB) and swivel caster (E) into the cabinet (B).
- Attach 2 fixed casters (D) to the side opposite of the handle (C) by inserting bolts (AA) through the washers (BB) and the fixed casters (D) into the cabinet (B).
- Tighten all casters with supplied hex key (DD) or 12 mm wrench/socket.
- Return the cabinet (B) to its upright position.

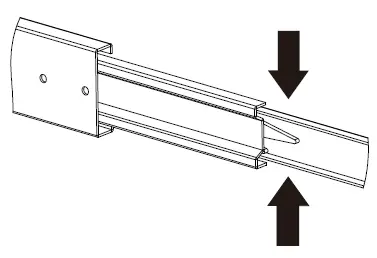
- Attaching Plastic Feet (Optional)
- Insert plastic foot into hole on bottom of chest. Repeat for other 3 feet.
NOTE: 4 Plastic Feet are located in bag found in top till.
- Insert plastic foot into hole on bottom of chest. Repeat for other 3 feet.

Operation
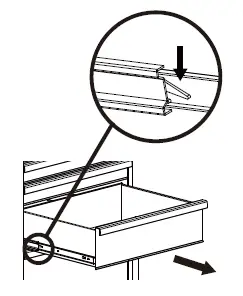
- Removing the drawers
- Fully extend the empty drawer.
- Push up the one release lever while pulling down on the other release lever.
- Pull the drawer outward until it is released from the drawer slide.

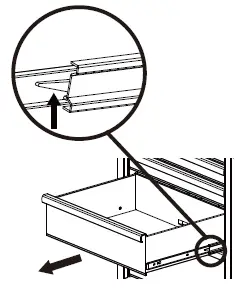
- Re-inserting the drawers
- Extend the drawer slides.
- Insert the brackets on each side of the drawer into the slots in the slides, being careful that they are properly positioned.
- Once properly inserted, completely close the drawer to set the slides in their proper positions.

- Usage of top till rubber grommet
- When passing cords into the box, be sure to always enter box from the rear. After head of cord is in place, slightly pull back 2-3” to ensure weather resistant ”star bursts” are facing toward the outside of box. Never push the cord from inside box so that mating plug points are exposed to the environment.
- BE SURE TO FOLLOW ALL ELECTRICAL SAFETY PRECAUTIONS.

Cordless Power Tool Battery Chargers
- See Charger’s Owner’s Manual for proper use and care of charger and batteries. Follow all Warnings and Instructions provided with your battery charger.
- Place chargers and electrical connections in till.
- Chargers are Dry location use only. Do NOT expose to liquid, vapor, or rain. Should your charger become wet. Do NOT attempt to use. Unplug extension cord from supply before handling wet charger or cords.
- Only use chargers and batteries that are intact and operating properly.
- Do NOT touch metal prongs when plugging charger into extension cord.
- Do NOT place or attempt to charge lead acid, car type batteries in storage chest.
Maintenance
- Caster maintenance
- Grease the casters annually using high-quality bearing grease.

- Periodically clean the drawer fronts, drawer trim, and other surfaces with a mild detergent and water.
- Remove grease and oil with a standard nonflammable cleaning fluid.
- Grease the casters annually using high-quality bearing grease.
- Drawer maintenance
- Lubricate the slides semi-annually with high-quality bearing grease.

- Lubricate the slides semi-annually with high-quality bearing grease.
Replacement Parts
For assistance with replacement parts please call 1-888-HD-HUSKY.
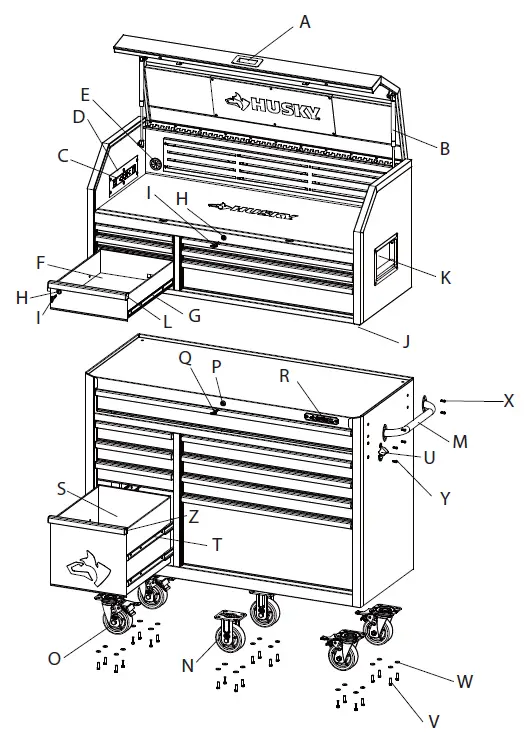
| Part | Description | Quantity |
| A | Lid Handle | 1 |
| B | Gas Strut | 2 |
| C | Outlet | 2 |
| D | Outlet Panel Cover | 2 |
| E | Rubber Grommet | 4 |
| F | Drawer Liner | 7 |
| G | Drawer Slide | 12 |
| H | Lock | 2 |
| I | Key | 4 |
| J | Plastic Foot | 4 |
| K | Side Handle | 1 |
| L | Drawer Handle Cap | 12 |
| Part | Description | Quantity |
| M | Cabinet Handle | 1 |
| N | Fixed Caster | 2 |
| O | Swivel Caster | 4 |
| P | Lock | 1 |
| Q | Key | 2 |
| R | Badge | 1 |
| S | Drawer Liner | 9 |
| T | Drawer Slide | 22 |
| U | Bottle Opener | 1 |
| V | Caster Bolt | 24 |
| W | Caster Washer | 24 |
| X | Handle Bolt | 4 |
| Y | Bottle Opener Bolt | 2 |
| Z | Drawer Handle Cap | 18 |
Questions, problems, missing parts? Before returning to the store call
Husky Customer Service
8 a.m. – 7 p.m., EST, Monday-Friday
9 a.m. – 6 p.m., EST, Saturday
1-888-HD-HUSKY
HUSKYTOOLS.COM
Retain this manual for future use.


