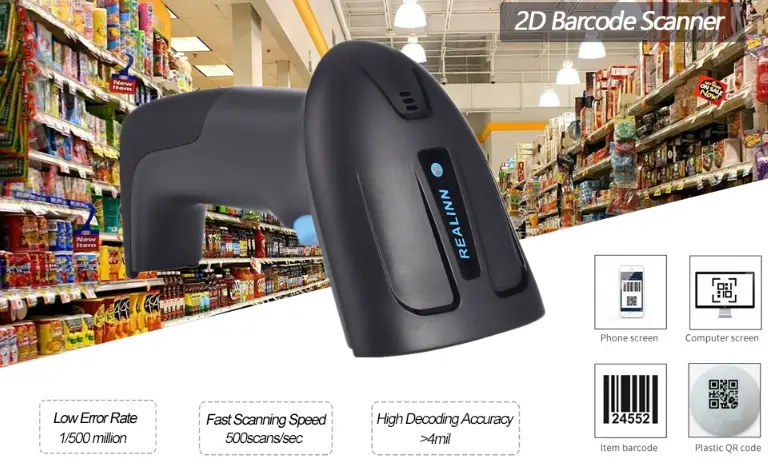
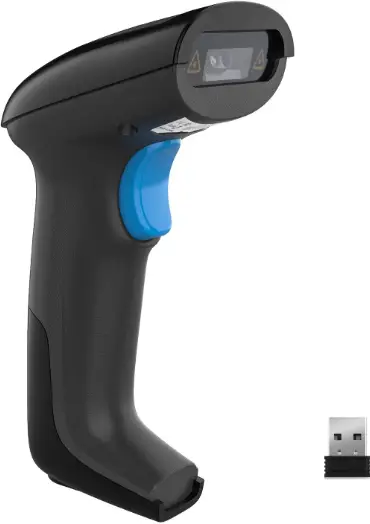
REALINN RL6200W 2D Wireless Barcode Scanner
Working Mode
- 2.4G Match Operation:
2.4G receiver has been matched by default, plug in the receiver and scan the “2.4G” setting code to use. If you need to match it again, first unplug the receiver, then re-plug the receiver into the computer, scan the “2.4G Mode” setting code within 20 seconds, the match is successful.
- Bluetooth Match Operation:
2.4G Mode Scan the “Bluetooth HID Mode” setting code, the blue indicator flashes quickly, turn on the device’s Bluetooth option, click “Scanner xxx”, the blue indicator becomes steady on, the match is successful.
- Bluetooth BLE Mode:
Scan the “Bluetooth BLE Mode” setting code. (Developers use, general users scan carefully)


Bluetooth BLE Mode Only to Bluetooth products)
| To show and hide iOS keyboard Only to Bluetooth products) | |
 iOS keyboard Show/Hide |  Double click show/hide iOS keyboard–ON/OFF |
Upload mode
Three Upload Mode: Instant Upload Mode, Storage Mode, Non-losing Mode
- Instant upload mode
Instant upload data to your computer- Upload successfully: the buzzer ranged”.
- Upload failed: the buzzer ranged-di-di”.

- Storage Mode
In storage mode, the barcode will be stored in scanner’s own memory and will not come up on your computer instantly. The barcode comes up on your computer only when you scan the settings code “upload data” within the wireless transmission range.
Note: During use, if data cannot be uploaded, please confirm whether it is set to storage mode.
- Non-losing Mode
The barcode will be uploaded to the receiver in real-time when the scanner is in wireless transmission range. When the scanner is out of the wireless transmission range, the data will be stored in scanner’s own memory . After scanner is reaching the wireless transmission range,scan “Upload Data” setting barcode, the lost data which are stored will be uploaded to the computer automatically.
Note: Before using the non-losing mode, it is better to scan the code “Clear Data” to clear the data of scanner.


 Show Total Storage Show Total Storage |  Upload Data |
 High Upload Speed(*default) |  Low Upload Speed |
Clear Data | |
POWER SUPPLY
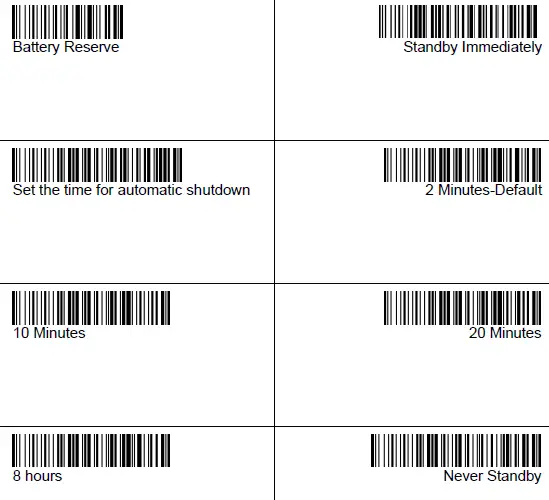
- Set the time for automatic shutdown
For example, if you want to set the power off time to be 20 Minutes. First scan “Set the time for automatic shutdown ”, then scan “20 Minutes”.
Interface setup | |
| USB-HID*Default | USB virtual COM |
| Note: In USB virtual COM mode, the scanner needs to work with driver and serial software. Please contact us if you need to set it to USB virtual COM mode, we will send you the driver and the serial software. | |

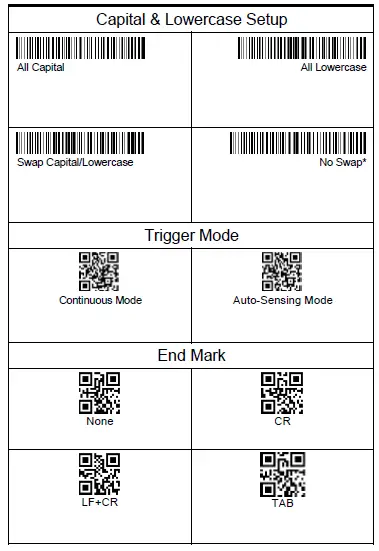
LAUNGAUGE SETUP

Add Prefix | |
| Display Prefix-OFF | Display Prefix-ON |
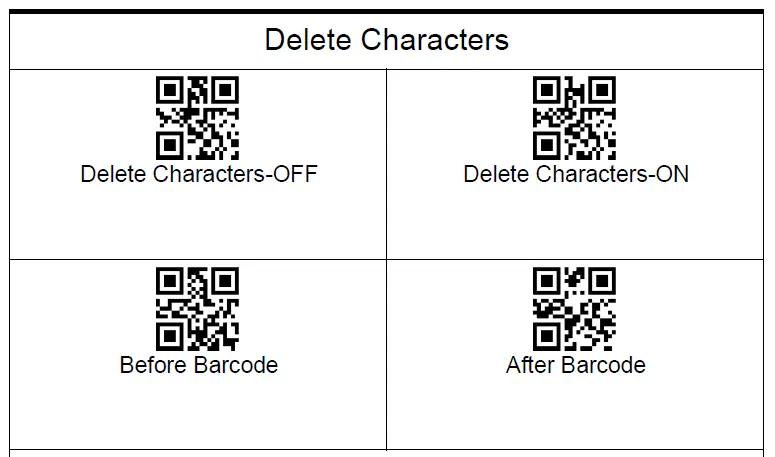
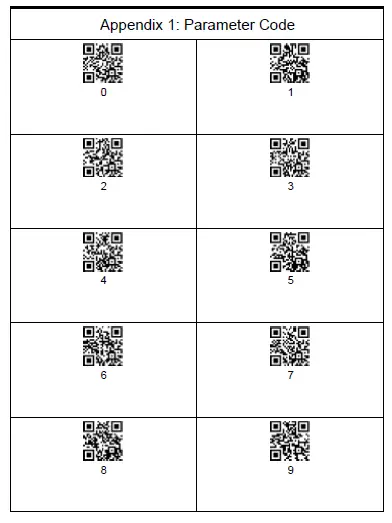
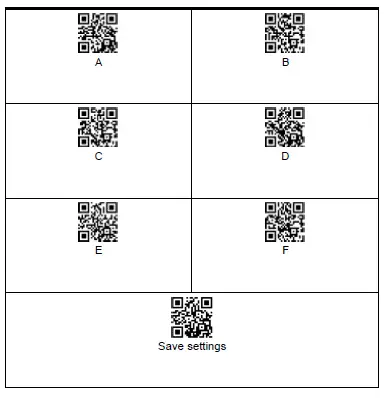
 Add Prefix E.g. The bar code content is “123456789”, add X and Y before the bar code(Check ASCII Barcode Table, X=58, Y=59), ”XY123456789” will be shown. Please scan the following code in order: “Display Prefix-ON”>”Add Prefix”>Parameter Code”5″,”8″,”5″,”9″>”Save settings” | |

Add Suffix | |
| Display Suffix-OFF | Display Suffix-ON |
 Add Suffix E.g. The bar code content is “123456789”, add X and Y after the bar code(Check ASCII Barcode Table, X=58, Y=59), ”123456789XY” will be shown. Please scan the following code in order: “Display Suffix-ON”>”Add Suffix”>Parameter Code”5″,”8″,”5″,”9″>”Save settings” | |


 Appendix 2:ASCII
Hex | Dec | Description | Hex | Dec | Description | Hex | Dec | Description |
| 00 | 0 | NUL | 2B | 43 | + | 56 | 86 | V |
| 01 | 1 | SOH | 2C | 44 | , | 57 | 87 | W |
| 02 | 2 | STX | 2D | 45 | — | 58 | 88 | X |
| 03 | 3 | ETX | 2E | 46 | 。 | 59 | 89 | Y |
| 04 | 4 | EOT | 2F | 47 | / | 5A | 90 | Z |
| 05 | 5 | ENQ | 30 | 48 | 0 | 5B | 91 | [ |
| 06 | 6 | ACK | 31 | 49 | 1 | 5C | 92 | \ |
| 07 | 7 | BEL | 32 | 50 | 2 | 5D | 93 | ] |
| 08 | 8 | BS(Backspace) | 33 | 51 | 3 | 5E | 94 | ^ |
| 09 | 9 | HT(Tab) | 34 | 52 | 4 | 5F | 95 | _ |
| 0A | 10 | LF(CTRL J) | 35 | 53 | 5 | 60 | 96 | ` |
| 0B | 11 | VT(CTRLK) | 36 | 54 | 6 | 61 | 97 | a |
| 0C | 12 | FF(CTRLL) | 37 | 55 | 7 | 62 | 98 | b |
| 0D | 13 | CR(Enter) | 38 | 56 | 8 | 63 | 99 | c |
| 0E | 14 | SO(CTRL N) | 39 | 57 | 9 | 64 | 100 | d |
| 0F | 15 | SI(CTRLO) | 3A | 58 | : | 65 | 101 | e |
| 10 | 16 | DLE(CTRLP) | 3B | 59 | ; | 66 | 102 | f |
| 11 | 17 | DC1(CTRL Q) | 3C | 60 | < | 67 | 103 | g |
| 12 | 18 | DC2(CTRL R) | 3D | 61 | = | 68 | 104 | h |
| 13 | 19 | DC3(CTRL S) | 3E | 62 | > | 69 | 105 | i |
| 14 | 20 | DC4(CTRLT) | 3F | 63 | ? | 6A | 106 | j |
| 15 | 21 | NAK(CTRL U) | 40 | 64 | @ | 6B | 107 | k |
| 16 | 22 | SYN(CTRL V) | 41 | 65 | A | 6C | 108 | l |
| 17 | 23 | ETB(CTRL W) | 42 | 66 | B | 6D | 109 | m |
| 18 | 24 | CAN(CTRL X) | 43 | 67 | C | 6E | 110 | n |
| 19 | 25 | EM(CTRL Y) | 44 | 68 | D | 6F | 111 | o |
| 1A | 26 | SUB(CTRL Z) | 45 | 69 | E | 70 | 112 | p |
| 1B | 27 | ESC(ESC) | 46 | 70 | F | 71 | 113 | q |
| 1C | 28 | FS(CTRL \) | 47 | 71 | G | 72 | 114 | r |
| 1D | 29 | GS(CTRL ]) | 48 | 72 | H | 73 | 115 | s |
| 1E | 30 | RS(CTRL ^) | 49 | 73 | I | 74 | 116 | t |
| 1F | 31 | US(CTRL_) | 4A | 74 | J | 75 | 117 | u |
| 20 | 32 | (space) | 4B | 75 | K | 76 | 118 | v |
| 21 | 33 | ! | 4C | 76 | L | 77 | 119 | w |
| 22 | 34 | “ | 4D | 77 | M | 78 | 120 | x |
| 23 | 35 | # | 4E | 78 | N | 79 | 121 | y |
| 24 | 36 | $ | 4F | 79 | O | 7A | 122 | z |
| 25 | 37 | % | 50 | 80 | P | 7B | 123 | { |
| 26 | 38 | & | 51 | 81 | Q | 7C | 124 | | |
| 27 | 39 | ‘ | 52 | 82 | R | 7D | 125 | } |
| 28 | 40 | ( | 53 | 83 | S | 7E | 126 | ~ |
| 29 | 41 | ) | 54 | 84 | T | 7F | 127 | DEL |
| 2A | 42 | * | 55 | 85 | U |


