![]()
ASSEMBLY INSTRUCTIONS
Morris Large Lantern
Item # SK 5010
NOTICE:
This light fixture should be installed in accordance with all applicable, local installation codes, and by a person familiar with the construction and operation of it, as well as the hazards involved. Inspect items and contents carefully. If any damage or defect is found, do not install. Retain all packaging material until installation is complete and approved.
TOOLS REQUIRED (NOT INCLUDED):
| Phillips Screwdriver Slip Joint Pliers Wire Strippers Slotted Screwdriver | Measuring Tape Chain Pliers Wire Cutters |
- Carefully remove all parts from the box. Place on a clean, soft surface.
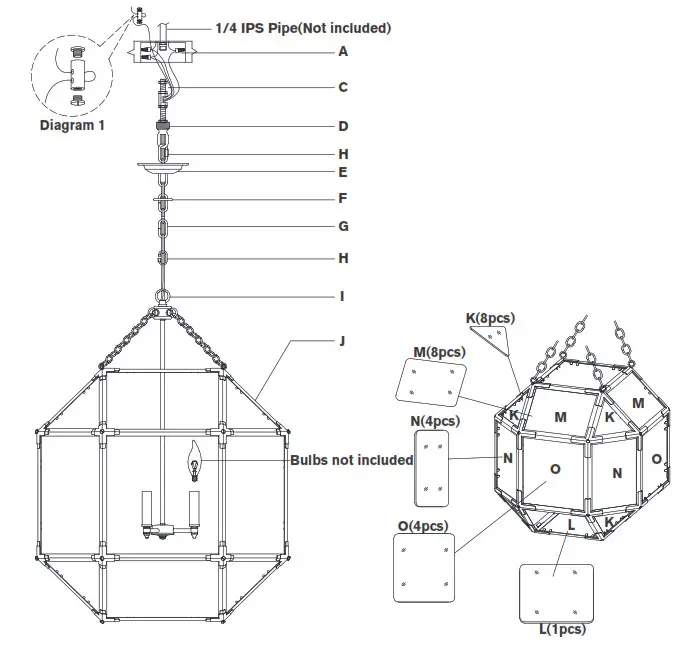
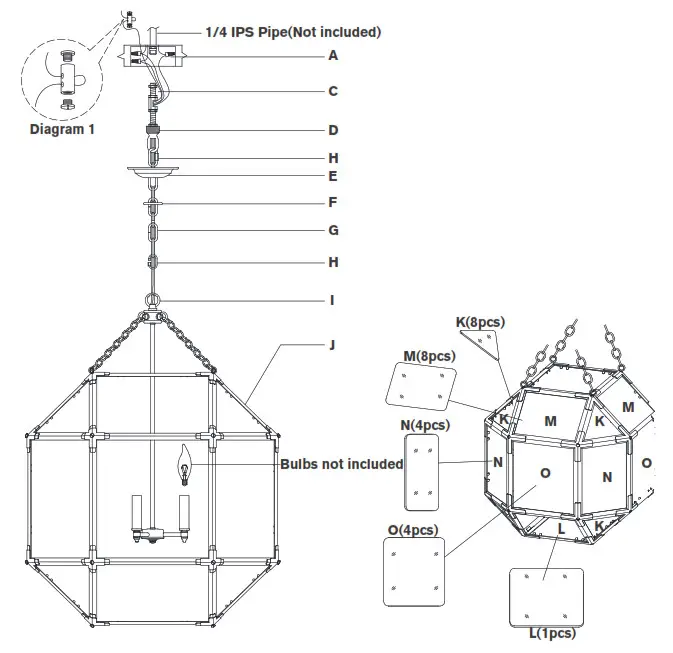
- It is recommended to install a 1/4 IPS threaded pipe, secured to a structural member of the building (not included). Then install a threaded pipe to the receiver on the fixture and tighten with a wrench.
NOTE: Item must be supported independently of the junction box due to hanging weight. - Remove collar loop (D) from the chain (G) and secure to a threaded receiver attached to the structural member by tightening the locknut.
- Install canopy (E) to collar loop (D) and secure with collar ring (F).
- Attach glass panel (L) on the bottom of the fixture body (J) and secure by bending metal tabs.
- Attach glass panels (K & M & N & O) on the side of the fixture body (J) and secure by bending metal tabs.
- Insert bulbs into the sockets.
- Determine desired overall length and amount of chain (G) needed. Shorten chain using chain pliers. (Keep extra chain)
- Attach chain (G) to collar loop (D) and fixture loop (I) using quick links (H). Secure quick links (H).

- Thread fixture wire and ground wire through the chain (G).
NOTE: When you reach the collar loop (D), ensure there is no tension vh on the wires. Cut excess wires, being sure to leave about 12” to reach the junction box. - Separate two sides of the molded wire and strip insulation on each 5/8″.
- Loosen collar ring (F) and let canopy (E) slip down the chain (G) carefully.
- Twist all fixture wires together. Slip through the center hole of the collar loop (D).
NOTE: Untwist wires and separate to prepare for connection. - Loosen cable lock and install to end of safety cable. Run safety cable through the junction box and around a structural member of the building. Insert cable through cable lock and tighten the ends with a screwdriver to secure. (See diagram 1)
- Connect fixture ground wire to the supply ground wire (usually green or bare copper) using wire nut (A).
NOTE: It is imperative that the fixture is grounded. - Connect fixture neutral wire (ribbed) to the supply neutral wire (usually white) using wire nut (A).
- Connect fixture hot wire (smooth with markings) to the supply hot wire (usually black) using wire nut (A).
CAUTION: Do not reverse the hot and neutral connections. - Make sure all wire connections are tight and tuck them into the junction box.
- Install canopy (E) to collar loop (D) and secure with collar ring (F).
Care Instructions: Clean only with a soft dry cloth or feather duster. Do Not use abrasive or chemical agents.