8BitDo DIY for MD User Manual
Instructions – M30 Modkit
* Please handle it with care.
We are not responsible for any damage caused in use.
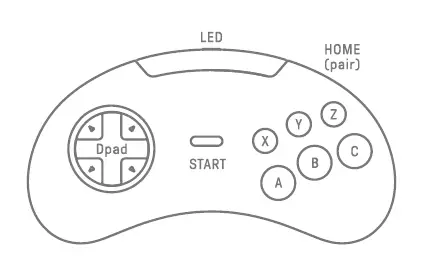
Press START to turn on the controller
Press and hold START for 3 seconds to turn off the controller
Press and hold START for 8 seconds to force turn off the controller
Bluetooth Connection
Switch
1. Press START +Yto turn on the controller, LED will blink4 times per cycle.
2. Press and hold MODE for 3 seconds to enter pairing mode. LED will rapidly blink.
3. Go to your Switch Home Page to click on Controllers, then click on Change Grip/Order and wait for controller to sync up. LED will become solid when connection is successful.
4. Controller will auto reconnect to your Switch with the press of START once it has been paired.
- When connected to your Switch, DOWN+HOME = Switch HOME button.
Android
1. Press START +B to turn on the controller, LED will blink once per cycle.
2. Press and hold MODE for 3 seconds to enter pairing mode. LED will rapidly blink.
3. Go to your Android device’s Bluetooth setting, pair with [8B itdo M30 Mod kit]. LED will become solid when connection is successful.
4. Controller will auto reconnect to your Android device with the press of START once it has been paired.
Windows
1. Press START +X to turn on the controller, LED will blink twice per cycle.
2. Press and hold MODE for 3 seconds to enter pairing mode. LED will rapidly blink.
3. Go to yourWindows device’s Bluetooth setting, pair with [8Bitdo M30 Modkit]. LED will become solid when connection is successful.
4. Controller will auto reconnectto yourWindows device with the press of START once it has been paired
MacOS
1. Press and hold START +A to turn on the controller, LEO will blink 3 times per cycle.
2. Press and hold MOOE for 3 seconds to enter pairing mode. LEO will rapidly blink.
3. Go to yourmacOS device’s Bluetooth setting, pair with [Wireless Controller]. LEO will become solid when connection is successful.
4. Controller will auto reconnectto yourWindows device with the press of START once it has been paired.
8Bitdo Retro Receivers and use Adapter
1. Press START +B to turn on the controller, LED will blink once per cycle.
2. Press both PAIR button on the receiver/Adapter and MOOE on the controllerto sync them.
3. Both LEDs on the receiver/Adpter and controller will become solid when connection is successful.
Press and hold HOT KEY for 3 seconds to map\ OPAD and other buttons, LED will blink once in red when successful:
HOME+ UP: DPAD = DPAD
HOME+ LEFT: DPAD = LEFT JOYSTICK
HOME+RIGHT: DPAD = RIGHT JOYSTICK
HOME+ DOWN: Swap A-B and X-Y
- Works only before connecting anything.
Battery
| Status | LED Indicator |
| Low battery mode | Red LED blinks |
| Battery charging | Red LEO stays solid |
| Battery fully charged | LED turns off |
Support
Please visit http://support.Bbitdo.com/for further information and additional support.
FAQ – Frequently Asked Questions
It is compatible with Switch, Windows 10, Android, macOS, Raspberry Pi.
It will auto reconnect to any device with the press of START once it has they paired successfully.
When connected to Switch, you can find on these controllers:
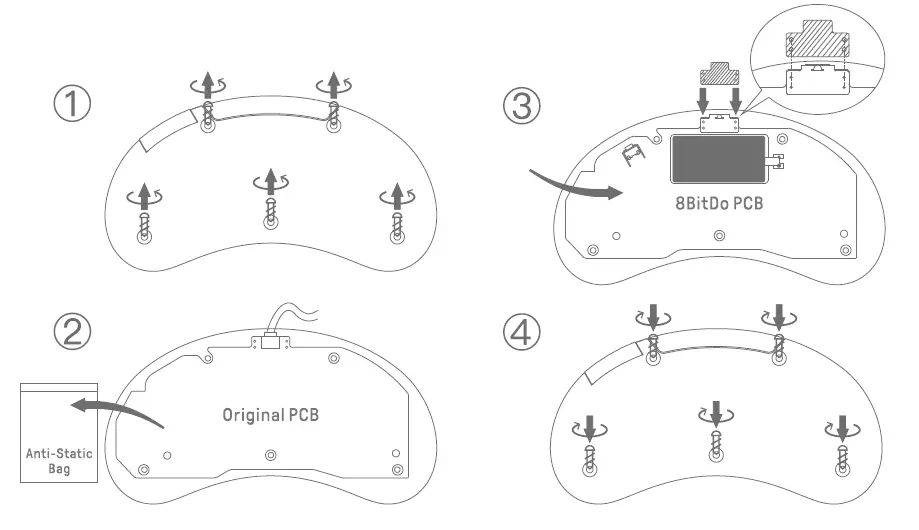
A. Download the Firmware Updater from https://support.8bitdo.com/firmware-updater.html first
B. Connect the board to your computer via a USB cable
C. Choose the right file for your kit to run
Yes, you can map the buttons. This is what you can do if the buttons are incorrectly mapped:
LEFT + HOME : set Dpad as left analogue stick
Up + HOME : reset Dpad
Right + HOME : set Dpad as right analogue stick
*Press and hold any of the key combinations above for 5 seconds to map the buttons.
*LED will blink in red to indicate the success of each button mapping.
*You need to reset the buttons manually.
We suggest you use a phone power adapter to charge the battery.
It uses a 180mAh rechargeable battery. It takes about one and half an hour to fully and can last for about 10 hours.
Yes, you can. Just use the USB cable which comes with it to connect to Switch, Windows 10, macOS, Android and Raspberry Pi.
Download
8BitDo DIY for MD User Manual – [ Download PDF ]


