8BitDo DIY for SNES/SFC Classic User Manual
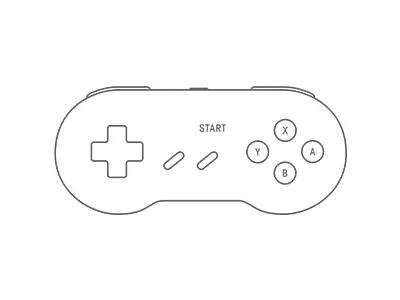
Instructions – SN30 Modkit
• Please handle it with care.
We are not responsible for any damage caused in use.

Press START to turn on the controller
Press and hold START for 3 seconds to turn off the controller
Press and hold START for 8 seconds to force turn off the controller
Bluetooth Connection
Switch
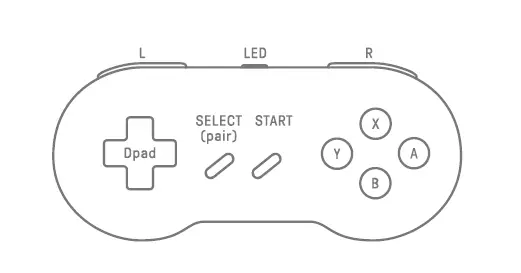
1. Press START+ Y to turn on the controller, LED will blink4 times per cycle.
2. Press and hold SELECT for 3 seconds to enter pairing mode. LED will rapidly blink.
3. Go to your Switch Home Page to click on Controllers, then click on Change Grip/Order and wait for controller to sync up. LED will become solid when connection is successful.
4. Controllerwill auto reconnect to your Switch with the press of START once it has been paired.
- When connected to your Switch, DOWN+SELECT = Switch HOME button.
Android
1. Press START+ B to turn on the controller, LED will blink once per cycle.
2. Press and hold SELECT for 3 seconds to enter pairing mode. LED will rapidly blink.
3. Go toyour Android device’s Bluetooth setting, pair with [8Bitdo SN30 Mod kit]. LED will become solid when connection is successful.
4. Controllerwill auto reconnect to your Android device with the press of START once it has been paired.
Windows
1. Press START+ X to turn on the controller, LEO will blink twice per cycle.
2. Press and hold SELECT for 3 seconds to enter pairing mode. LEO will rapidly
blink.
3. Go to your Windows device’s Bluetooth setting, pair with [8Bitdo SN30 Modkit]. LEO will become solid when connection is successful.
4. Controllerwill auto reconnect to your Windows device with the press of START once it has been paired
MacOS
1. Press and hold START+ A to turn on the controller, LED will blink3times per cycle.
2. Press and hold SELECT for 3 seconds to enter pairing mode. LED will rapidly blink.
3. Go to your macOS device’s Bluetooth setting, pair with [Wireless Controller]. LED will become solid when connection is successful.
4. Controller will auto reconnect to your macOS device with the press of START once it has been paired.
8Bitdo Retro Receivers and USB Adapter
1. Press START+ B to turn on the controller, LED will blink once per cycle.
2. Press both PAIR button on the receiver/Adapter and SELECT on the controller to sync them.
3. Both LEDs on the receiver/Adpter and controller will become solid when connection is successful.
Press and hold HOT KEY for 3 seconds to map OPAO and other buttons, LEO will blink once in red when successful:
SELECT+UP: DPAD=DPAD
SELECT+LEFT: DPAD=LEFT JOYSTICK
SELECT+ RIGHT: DPAD = RIGHT JOYSTICK
SELECT+DOWN: Swap A-B and X-Y
- Works only before connecting anything.
Battery
| Status | LED Indicator |
| Low battery mode | Red LED blinks |
| Battery charging | Red LEO stays solid |
| Battery fully charged | LED turns off |
- Built-in 230mAh li-on with 10 hours of play time.
- Rechargable via USB cable with 30 minute cherging time.
Support
Please visit http://support.8bitdo.com/for further information and additional support.
FAQ – Frequently Asked Questions
No, they can not be used interchangeably. The differences include the thickness of the board and the placement of the buttons.
When choosing the right kit to buy, please refer to the controller port of your controller:
A. The long and flat one is the original model
B. The short and narrow one is the Classic model
They are compatible with Switch, Windows 10, Android, macOS, Raspberry Pi.
They will auto reconnect to any device with the press of START once it has they paired successfully.
A. Download the Firmware Updater from https://support.8bitdo.com/firmware-updater.html first
B. Connect the board to your computer via a USB cable
C. Choose the right file for your kit to run
Note:
a. the cable included in the packaging and the circular port attached to the port are for power charging only.
b. be extra careful with power port during the procedure to avoid damaging it.
The cable included in the packaging and the circular port attached to the port are for charging the battery.
A. Open up the controller enclosure with the screwdriver provided in the packaging
B. Connect the board to your PC via a USB cable
C. LED turns on
If there is no LED, it means the power port is damaged
This can be caused by the dust collected around the buttons. Try to clean the START and SELECT buttons thoroughly, this should fix the issue.
Yes, you can map the buttons. This is what you can do if the buttons are incorrectly mapped:
LEFT + Select : set Dpad as left analogue stick
Up + Select : reset Dpad
Right + Select : set Dpad as right analogue stick
Down + Select : Swap A/B and X/Y mapping
*Press and hold any of the key combinations above for 5 seconds to map the buttons.
*LED will blink in red to indicate the success of each button mapping.
*You need to reset the buttons manually.
We suggest you use a phone power adapter to charge the battery.
It uses a 180mAh rechargeable battery. It takes about one and half an hour to fully and can last for about 10 hours.
No, you can not. The cable which comes with the board is a USB DC2.0 powering charging cable only.
Download
8BitDo DIY for SNES/SFC Classic User Manual – [ Download PDF ]


 User Manual")


