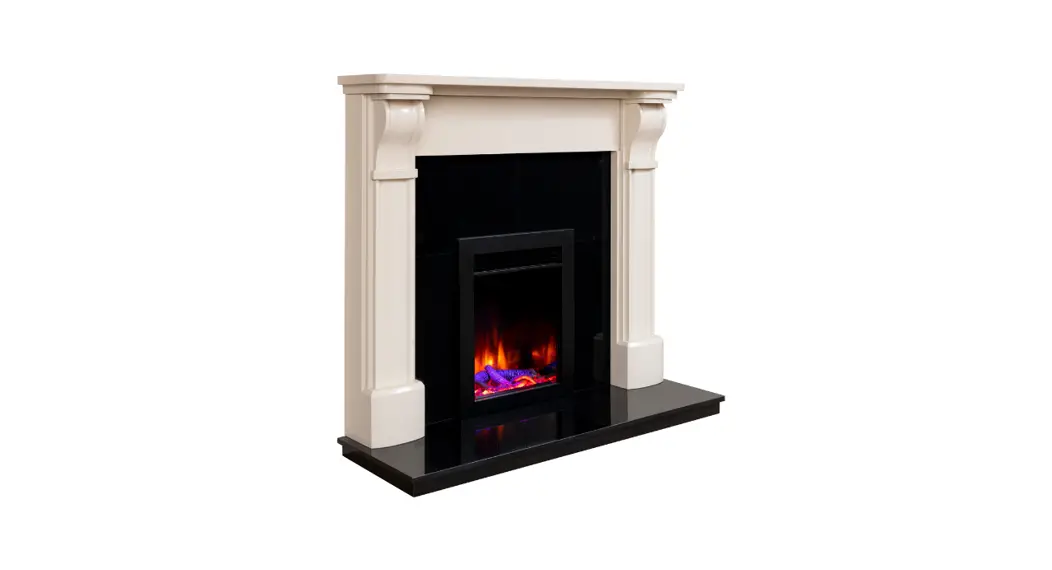
![]() Electric Fire of Distinction
Electric Fire of Distinction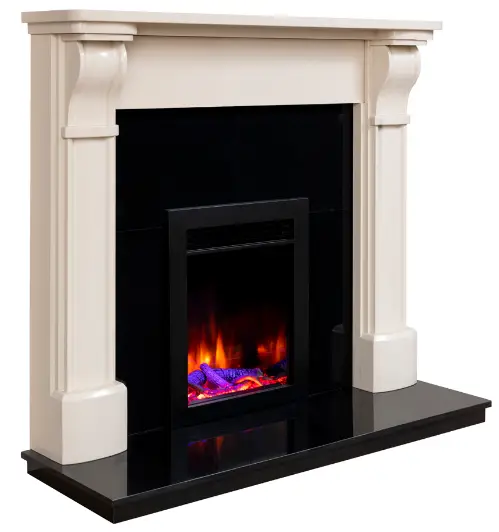
By Heat Design
Models: 400 / 450 / 530 / 600 / 750 / 1000 / 1250 / 1600 / 2000
Please read the instructions carefully before installation and keep for future reference.
Please Note: This product is for a well-insulated dwelling.
Important Electrical safety
Read all instructions fully before using this electric fire.
This electric fire is for INDOOR USE ONLY.
If installing the appliance into an existing Chimney the chimney MUST be blocked off / capped.
Do not locate the fire below or in front of a fixed socket outlet.
Warning DO NOT COVER the fan heater air inlet / outlet as it could cause possible fire.
Note the warning symbol on the fire.
Do not use the fire near a bath / shower / swimming pool.
Do not use the fire in areas where gasoline / paints / flammable liquids are stored, as they may catch fire.
This appliance must be securely fixed / recessed to an internal wall in the property. Keep all furniture / curtains etc as least 1 meter away from the fire.
The fire must be earthed.
After the fire’s installation the plug must be accessible.
Always disconnect the power supply before any cleaning / maintenance of the appliance.
Ensure the appliance is cool before proceeding.
If the power cord is damaged, it must be replaced by a qualified electrician or manufacturer service technician.
Do not run the power cord under a carpet / rug etc. Always ensure it is routed securely and it is not a trip hazard. Ensure the power cord is kept away from hot surfaces and areas.
Young children under 8 years old must always be supervised and must not play with the fire. The appliance is not a toy. Do not throw anything at the glass or strike the glass of the appliance.
The appliance must not be used by young children or the infirm, ensure a fire guard is fitted to protect from burns as the fire can get very hot.
The appliance must not be used through an external switching device such as a timer or connected to a circuit that is regularly on and off by a utility.
Do not use the appliance to dry clothes.
Do not use the appliance in small areas where there are persons are uncappable of leaving the area on their own, unless there is constant supervision.
This appliance is supplied with a 13Amp 3 pin moulded plug. The fire must only be connected to a 220/240V ac supply 50/60 Hz. Please note the main power lead wires are coloured coded to UK and Irish standards, see below.
Green / Yellow ………….(Earth / E![]() )
)
Blue………………(Neutral / N)
Brown…………….(Live / L)
Do NOT operate the appliance if it is damaged.
Technical Specifications
Heat Output per model
| Models | 400 | 450 | 530 | 600 | 750 | 1000 | 1250 | 1600 | 2000 |
| Maximum heat output | 1500 W | 1500 W | 1500 W | 1500W | 1500W | 1500 W | 1500W | 1500W | 1500W |
| Minimum heat output | 750 W | 750 W | 750 W | 750W | 750W | 750 W | 750W | 750W | 750W |
Voltage supply 220 / 240V 50/60Hz Power usage for LED lighting / per model
| Models | 400 | 450 | 530 | 600 | 750 | 1000 | 1250 | 1600 | 2000 |
| Flame LED output | 6W | 6W | 8 W | 8 W | 9.6 W | 12 W | 13W | 15 W | 18W |
| Fuel Bed LED output | 7 W | 7 W | 8 W | 8 W | 10 W | 12 W | 15W | 18 W | 20W |
| Down lighting LED output | 3 W | 3 W | 3 W | 3 W | 3 W | 4 W | 5W | 6.6 W | 8W |
| Front LED pulsing lights output | 1 W | / | 1.5 W | / | 1.5 W | 1.5 W | 1.5W | 2.0 W | 2.0W |
| Mood LED lighting output | / | / | / | / | 9.6 W | 9.6 W | 9.6W | 9.6 W | 9.6W |
Appliance Dimensions
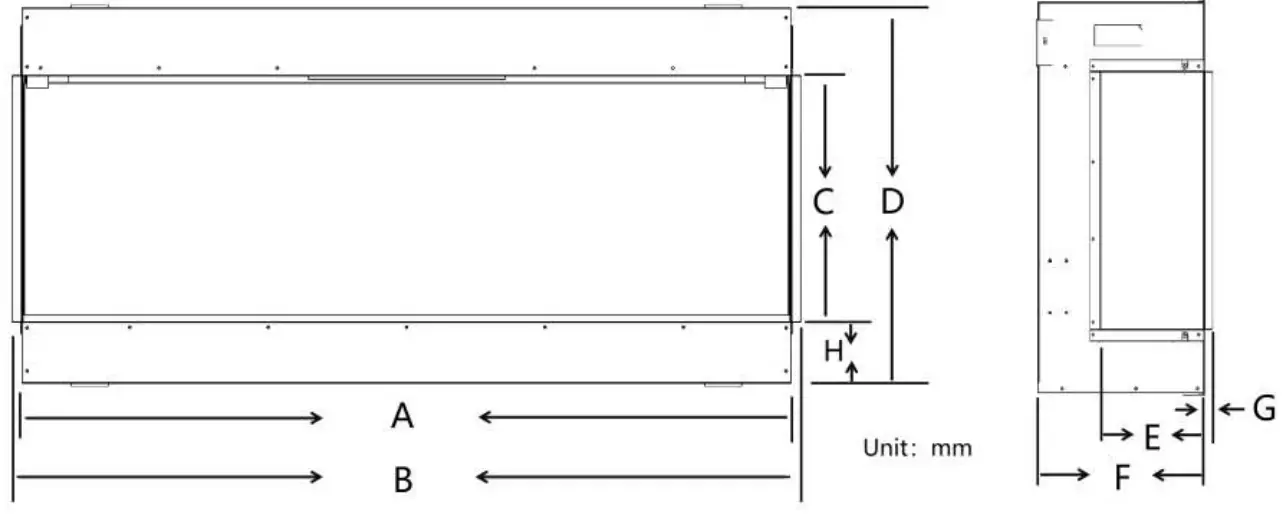
| Model | A | B | C | D | E | F | G | H |
| 400 | 400 | 532 | 410 | 613 | / | 315 | / | 51 |
| 450 | 410 | 430 | 285 | 580 | / | 268 | / | 180 |
| 530 | 520 | 632 | 285 | 460 | / | 315 | / | 51 |
| 600 | 610 | 560 | 415 | 488 | / | 235 | / | 25 |
| 750 | 750 | 782 | 595 | 804 | 187 | 301 | 14 | 99 |
| 1000 | 1000 | 1032 | 402 | 611 | 187 | 301 | 14 | 99 |
| 1250 | 1250 | 1282 | 402 | 611 | 187 | 301 | 14 | 99 |
| 1600 | 1600 | 1632 | 402 | 611 | 187 | 301 | 14 | 99 |
| 2000 | 2000 | 2032 | 402 | 611 | 187 | 301 | 14 | 99 |
Appliance Frame Dimensions
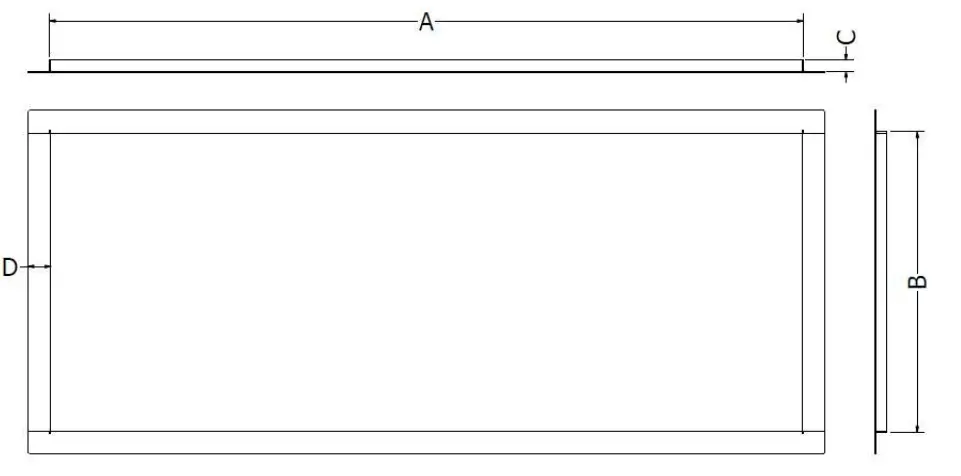
| Model | A | B | C | D |
| 1000 | 997 | 397 | 15 | 30 |
| 1250 | 1247 | 397 | 15 | 30 |
| 1600 | 1597 | 397 | 15 | 30 |
| 2000 | 1997 | 397 | 15 | 30 |
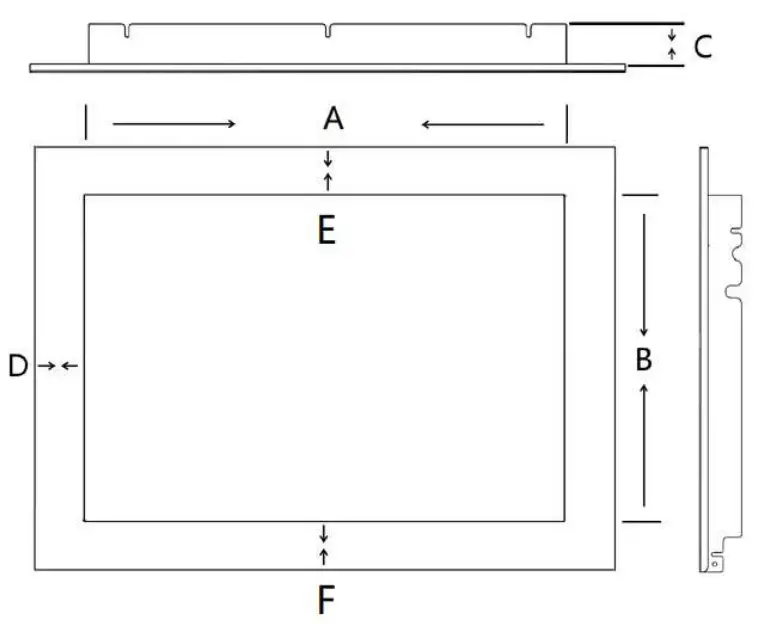
| Model | A | B | C | D | E | F |
| 400 | 400 | 490 | 45 | 66 | 72 | 51 |
| 530 | 520 | 360 | 45 | 51 | 51 | 51 |
Components
Before unpacking the fire inspect the carton for any damage, either caused by transport /water etc. If in doubt contact your local retailer, and do not use the appliance.
IMPORTANT
Keep any plastic packaging and small parts away from young children as they will pose a danger.
Carton Contents:
| Fire Chassis (fully assembled) | quantity 1 |
| Instruction manual | quantity 1 |
| Remote Control and battery | quantity 1 |
| Wall mounting bracket | quantity 1 |
| Lower mounting brackets | quantity 2 |
| Log set (18 pieces per set for 2000) | quantity 1 |
| Log set (12 pieces per set for 1600) | quantity 1 |
| Log set (11 pieces per set for 1250) | quantity 1 |
| Log set (9 pieces per set for 1000) | quantity 1 |
| Log set (5 pieces per set for 750) | quantity 1 |
| Log set (6 pieces per set for 600) | quantity 1 |
| Log set (9 pieces per set for 530) | quantity 1 |
| Log set (5 pieces per set for 450) | quantity 1 (Lombard Style) |
| Log set (7 pieces per set for 400) | quantity 1 |
| Base crystals (Boxed) | quantity 1 |
| Glass suction clamp | quantity 1 |
Operating Instructions
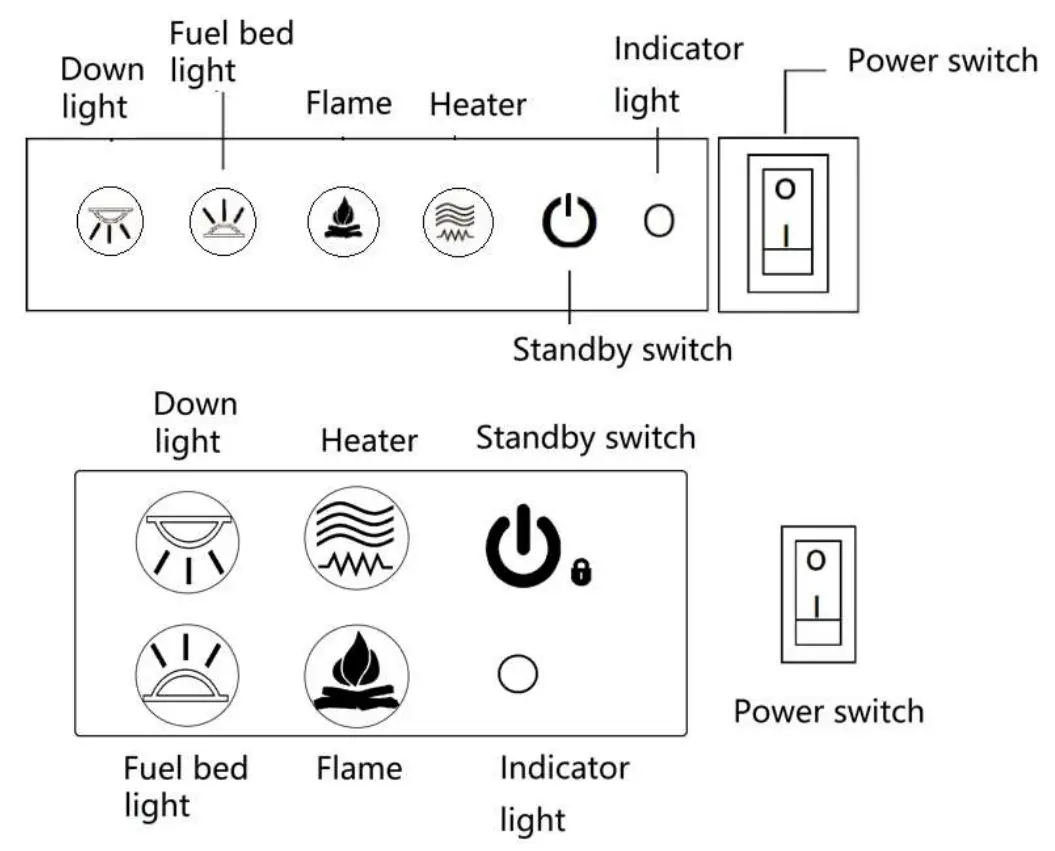
Pairing the remote to the appliance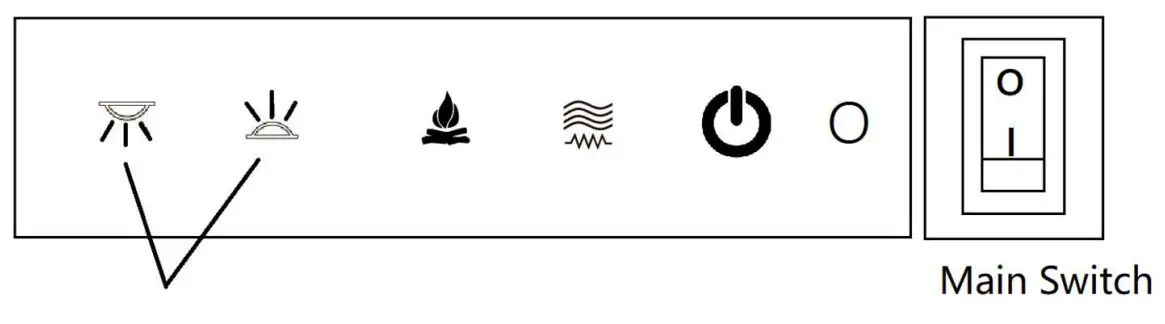 To pair the remote to the appliance, first turn on the main switch to put the fire in the standby mode. Press and hold the 2 buttons indicated for 5 seconds, then release and press the
 ![]() button on the remote to complete the pairing process. To ensure the pairing process has been successful simply press the
button on the remote to complete the pairing process. To ensure the pairing process has been successful simply press the ![]() button on the remote to turn the appliance on and off. If the appliance does not turn on / off repeat the process.
button on the remote to turn the appliance on and off. If the appliance does not turn on / off repeat the process.
Manual Operation
Main Power Switch
Push the main power switch to I, the main power indicator light will illuminate.
Manual Switch
Pressing the manual switch button turns the fire on and off.
Heater Button
Press the heater button once and the heater will turn on to half heat (750w). Press the heater button a second time and the heater increases to full heat (1500w). Press the heater button a third time and the heater will turn itself off.
Flame Button
Pressing the flame button will change the flame colour. There are four settings. Each time the button is pressed the flame colour and pattern will change colour.
Down Light Button
Pressing the down light button changes the colours. There are four different colour settings. There are four different modes in the down lighter setting,
- Pulse mode
- Colour change mode pulsing (ideally for a showroom setting)
- Colour change mode
- Solid state
To activate each mode simply press the down light button and hold for 3 seconds, and this indicates the mode change.
Fuel Bed Button
Pressing the fuel bed button changes the colours. There are fourteen different colour settings. There are fourteen different modes in the fuel bed setting,
- Pulse mode
- Colour change mode pulsing (ideally for a showroom setting)
- Colour change mode
- Solid state
To activate each mode simply press the down light button and hold for 3 seconds, and this indicates the mode change.
Remote Operation
Please Note
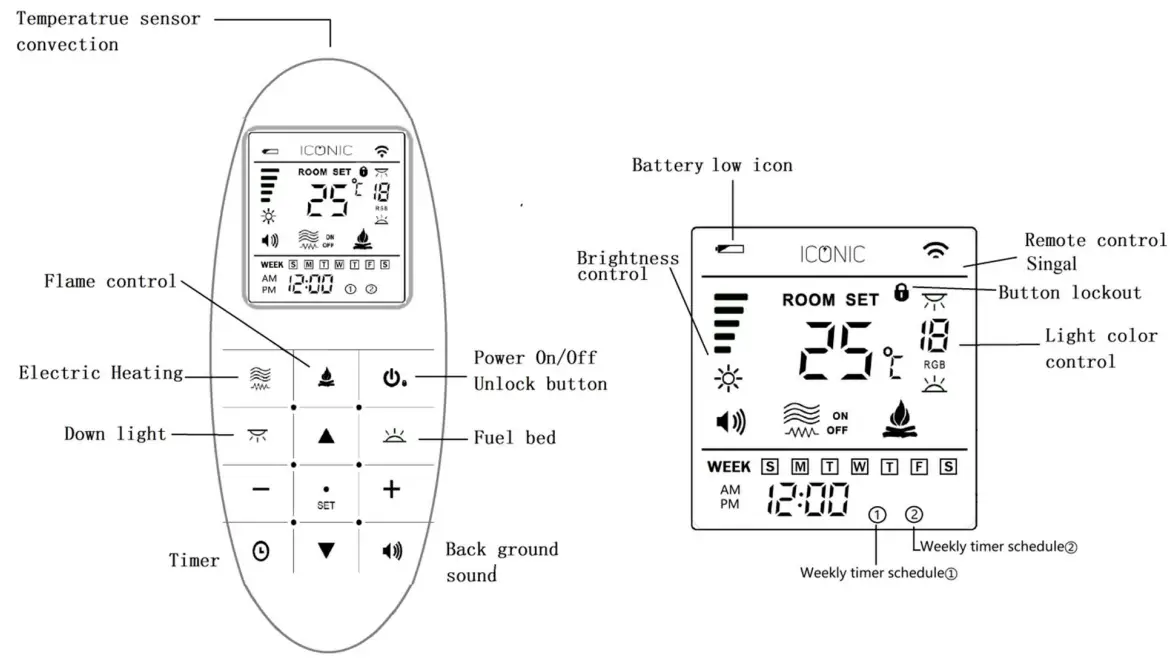
This is a thermostatic remote control. The remote control should always be in the same room as the electric fire with the screen facing up. Please do not cover the temperature sensor. Do not leave the remote control next to the fire or a warm area such as a window, this will relay false information to the fire and prevent the fire from turning on and off the heat.
If you need to control the electric fire manually, first turn off the remote control. This will stop the remote control overriding the manual control operation.
The remote will turn to safe mode after 60 seconds of not being used, you must press![]() to unlock the remote before use.
to unlock the remote before use.
1. Turning on/off the appliance
Turn the Rocker switch![]() to turn on the appliance. Press
to turn on the appliance. Press![]() to turn on or turn off the electric fire. If the screen displays,
to turn on or turn off the electric fire. If the screen displays,![]() please press
please press![]() to unlock the keypad.
to unlock the keypad.
2. Temperature setting
Press the![]() and
and![]() for setting temperature from. Press the SET button or stop using the remote for 3 seconds and it will automatically save the desired temperature. E.g., By setting the temperature to 20℃, when room temperature is lower than 18℃ the
for setting temperature from. Press the SET button or stop using the remote for 3 seconds and it will automatically save the desired temperature. E.g., By setting the temperature to 20℃, when room temperature is lower than 18℃ the
heater will automatically start. The program has been designed with± 2 ℃ tolerance.
3. Electric heating control
Press![]() button to turn on or turn off the electric heater. When
button to turn on or turn off the electric heater. When![]() symbol appears on the screen the heating is turned off, if
symbol appears on the screen the heating is turned off, if![]() symbol appears on the screen the heater is turned on and half power (750 W), and when
symbol appears on the screen the heater is turned on and half power (750 W), and when![]() symbol
symbol
appears on the screen, the heater is turned on at full power (1500 W)
4. SET button.
Press SET to save any adjustment or stop operating the remote for 3 seconds and it will automatically save the desired setting selected.
5. Flame effect
Press![]() button and the icon will flash on the remote. The flame adjustment is now active. Press the
button and the icon will flash on the remote. The flame adjustment is now active. Press the ![]() and
and![]() to adjust the flame brightness. There are 5 settings, full to no flame. Press
to adjust the flame brightness. There are 5 settings, full to no flame. Press ![]() and
and ![]() button to adjust the colours from number 1 to 4 and then press
button to adjust the colours from number 1 to 4 and then press![]() or stop operating the remote for 3 seconds and it will automatically save the desired setting selected.
or stop operating the remote for 3 seconds and it will automatically save the desired setting selected.
6. Down light effect
Press![]() button. The icon will flash on the remote. Press the
button. The icon will flash on the remote. Press the![]() and
and![]() to adjust the light brightness on the down light effect. There are 5 settings, full to no light. Press
to adjust the light brightness on the down light effect. There are 5 settings, full to no light. Press ![]() and
and ![]() button to adjust the colours from number 1 to 7 and then press
button to adjust the colours from number 1 to 7 and then press ![]() or stop operating the remote for 3 seconds and it will automatically save the desired setting selected.
or stop operating the remote for 3 seconds and it will automatically save the desired setting selected.
7.Fuel bed effect
Press![]() button. The icon will flash on the remote. Press the
button. The icon will flash on the remote. Press the ![]() and
and![]() to adjust the light brightness. There are 5 settings, full to no light. Press
to adjust the light brightness. There are 5 settings, full to no light. Press ![]() and
and ![]() button to adjust the colours from number 1 to 13 and then press
button to adjust the colours from number 1 to 13 and then press![]() or stop operating the remote for 3 seconds and it will automatically save the desired setting selected.
or stop operating the remote for 3 seconds and it will automatically save the desired setting selected.
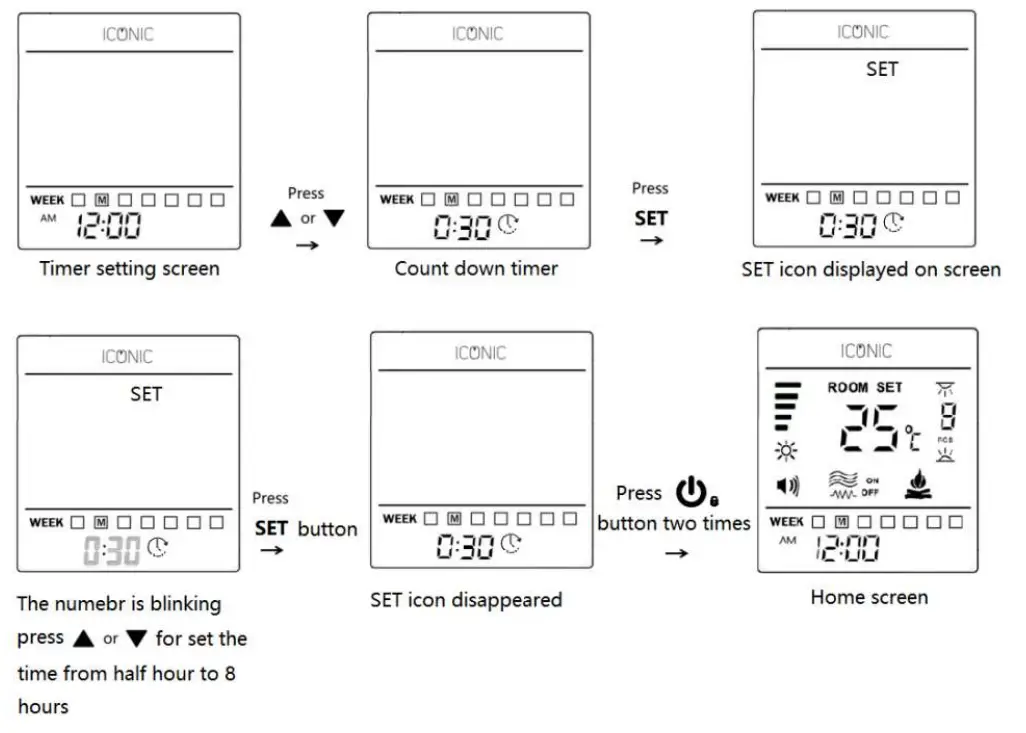
8.Timer
Press![]() button and hold for 5 seconds to set the time. From the home screen or from the OFF screen to timer screen setting:
button and hold for 5 seconds to set the time. From the home screen or from the OFF screen to timer screen setting: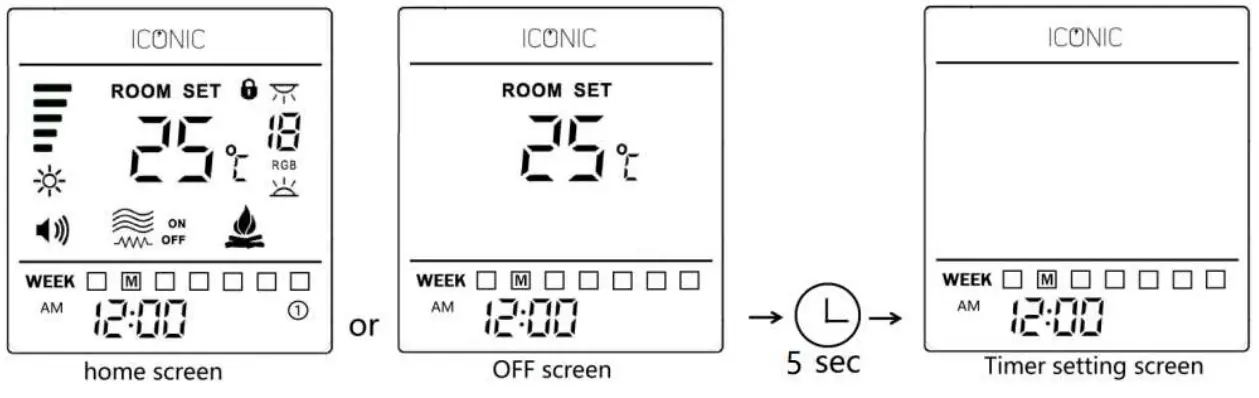
The timer settings can be set in the following sequence:
CLOCK / DAY → TIMER SCHEDULE ① → TIMER SCHEDULE ②![]() COUNT DOWN TIMER
COUNT DOWN TIMER
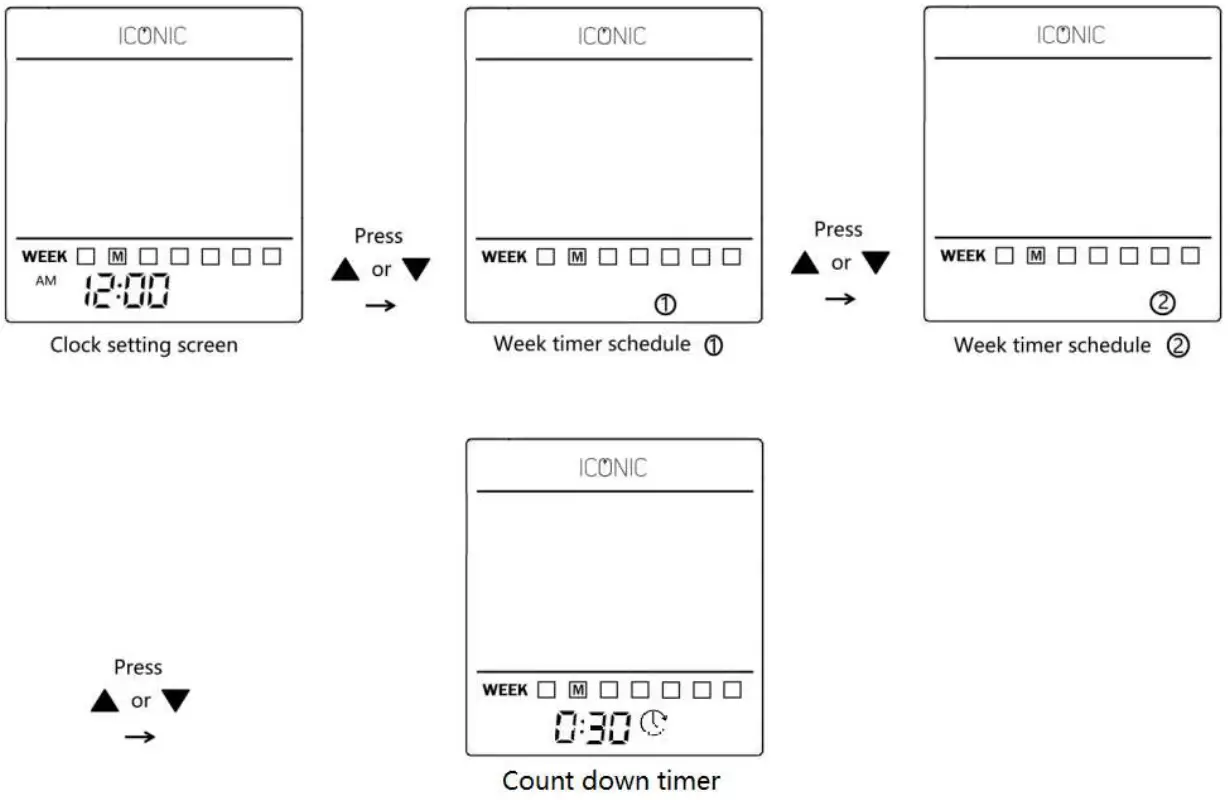
(1).The first screen that appears is the CLOCK setting screen:
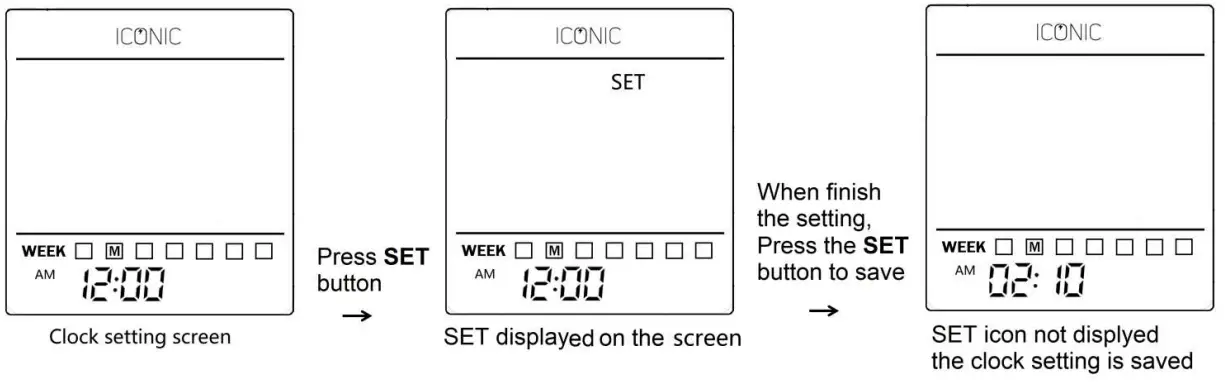
- Press the SET button, SET on the screen and the Hours will blink, Press UP or DOWN button to scroll the hour settings.
- Press the SET button, the Minutes will blink, Press UP or DOWN button to scroll the minute settings.
- Press the SET button, the DAYS will blink, Press UP or DOWN button to scroll the AY settings, from M(Monday) to S(Sunday).
- Press the SET button, SET icon is not on screen, save the setting and press the ON/OFF button to drop out the clock setting
 (2) The second screen that appears is the Weekly timer schedule ①
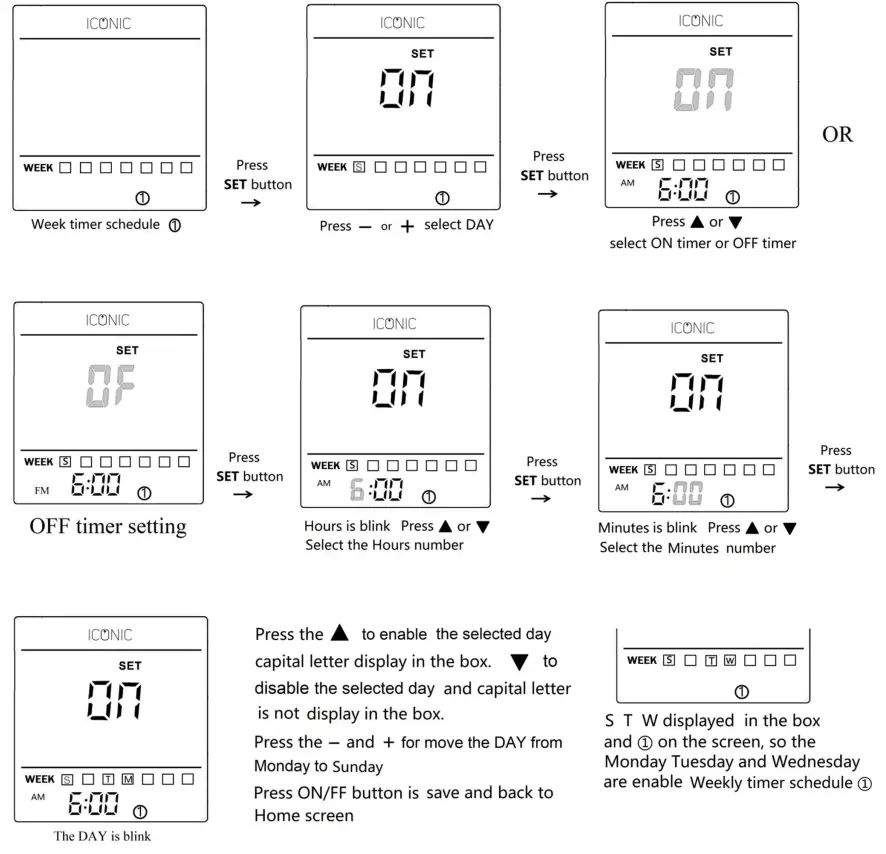
(3) The third screen that appears is the Weekly timer schedule ②
The setting procedure same as schedule ①.
(4) The fourth screen that appears is Countdown timer![]()
 Press the clock button
![]() when home screen, ① icon displayed on the screen, the weekly schedule ① will be enabled, press again clock button, ② icon displayed on the screen, the weekly schedule ② will be enabled. Press again clock button the
when home screen, ① icon displayed on the screen, the weekly schedule ① will be enabled, press again clock button, ② icon displayed on the screen, the weekly schedule ② will be enabled. Press again clock button the ![]() icon on displayed on the screen, the countdown timer is enabled. If no ① or ② and
icon on displayed on the screen, the countdown timer is enabled. If no ① or ② and ![]() displayed on the screen, the weekly timer schedule and countdown timer will be disabled
displayed on the screen, the weekly timer schedule and countdown timer will be disabled
If the countdown is enabled and the time setting is 30 minutes, 0:30 0:29 0:28 to 0:00 turning off the appliance.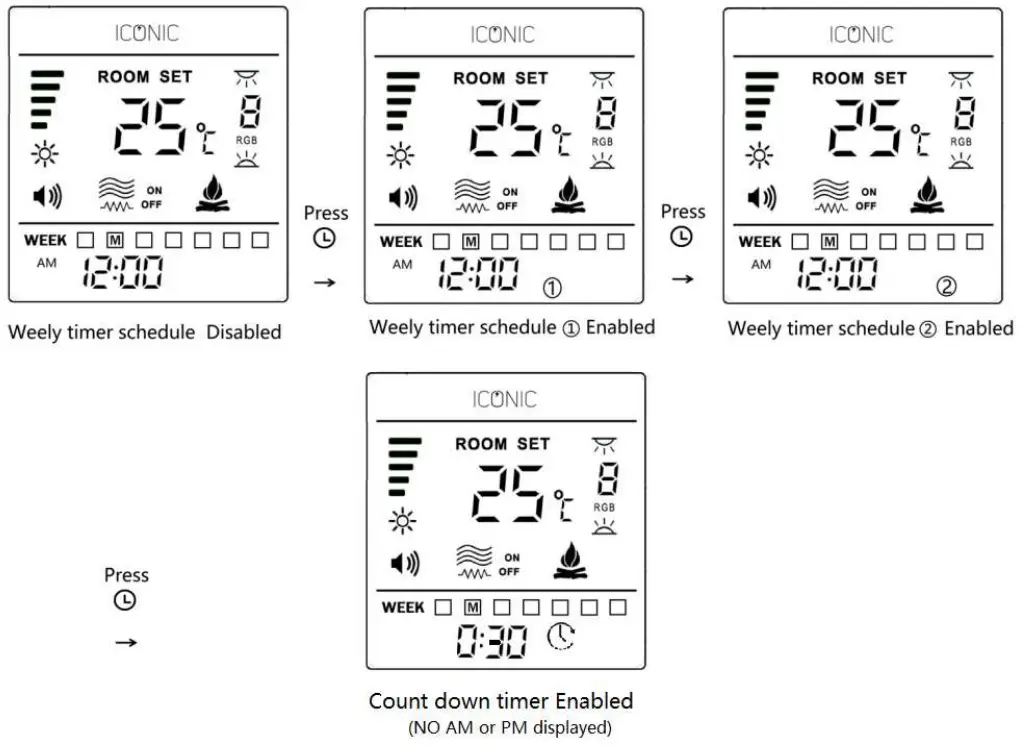
(4) Check your weekly timer schedule setting.![]() Press the clock button and hold 5 seconds, press
Press the clock button and hold 5 seconds, press ![]() or
or ![]() to check weekly schedule ① or weekly schedule ②if the DAY letter in the box so that day timer is enable. Several days can be selected together.
to check weekly schedule ① or weekly schedule ②if the DAY letter in the box so that day timer is enable. Several days can be selected together.
(5) Select the temperature setting range.
The factory setting temperature range is 5℃to 35℃,you can reset the temperature range to your preference.
Select the temperature setting range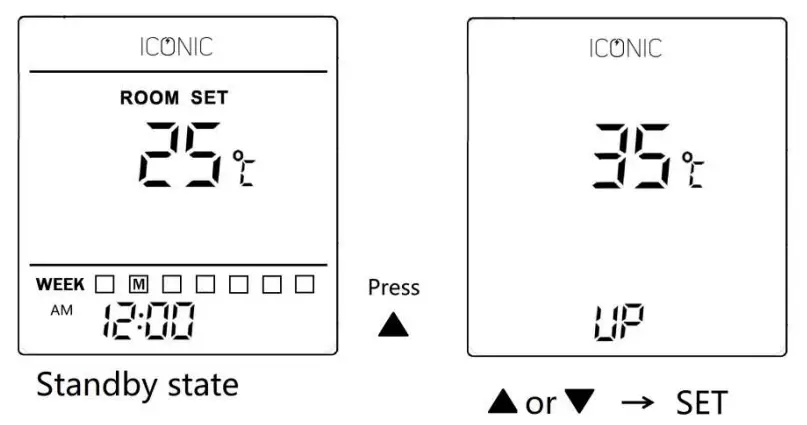 press
press ![]() or
or ![]() to select the upper temperature and then press SET button is save and back to standby state screen.
to select the upper temperature and then press SET button is save and back to standby state screen.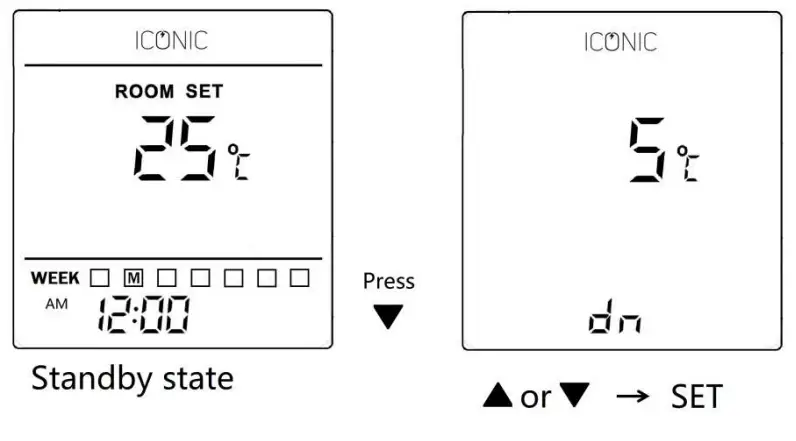 press
press ![]() or
or ![]() to select the lower temperature and then press SET button is save and back to standby state screen.
to select the lower temperature and then press SET button is save and back to standby state screen.
9 Background Volume
Press![]() button to adjust background volume. The three volume settings are
button to adjust background volume. The three volume settings are![]() .
.
10 Resetting the Remote control
If the remote control does not operate correctly, please take out the batteries to reset the remote to factory the setting. Open the back cover and remove the batteries. Ensure the correct polarity when reinstalling the batteries.
Maintenance
Always isolate the power from the mains and ensure the fire has cooled down before any cleaning or maintenance is undertaken.
Cleaning the appliance
Do not use abrasive cleaners on the appliance. Do not spray liquids directly onto the appliance. When cleaning the glass spray glass cleaner onto a cloth and then clean glass, buff dry with a lint free cloth. Carefully clean the air inlet and heater area with a cloth or vacuum on a regular basis. It is important that these areas are kept free from dust / pet hairs etc.
Battery Replacement
Replace the battery when the battery indicator is empty on the remote. Ensure to replace with the correct type of battery (1.5V AAA), Ensure the batteries are installed in the correct orientation.
Warranty
Your Iconic electric fire comes with a two-year parts and labour warranty as standard. The warranty starts from the date of purchase, if you wish to extend the warranty for an extra 12 months you must register the appliance on https://www.heatdesign.ie/register-iconicgas-fire-warranty/ . To avail of your warranty, you must upload proof of purchase (Receipt) from your local approved Iconic retailer. The warranty is not transferable.
All warranties will be null and void if unauthorised repairs / modifications are made to the electric fire / accidently damage caused by transit / improper installation / serial numbers missing or modified.
Heat Design shall not be liable for any consequential loss or damage whatsoever arising from or in connection with this electric fire.
Service calls and installation errors are not covered under manufacturer warranty. A call out charge will apply. T
his warranty is an addition and does not affect your statutory rights of consumers.
![]() Heat Design
Heat Design
Unit 60, Hawthorn Road, Western
Industrial Estate, Naas Road
Dublin 12. Email [email protected]
Rev 1.7 22/8/9


