![]() ST8 Gen2 Substitube Connected Sensor Low Bay
ST8 Gen2 Substitube Connected Sensor Low Bay
Instruction Manual
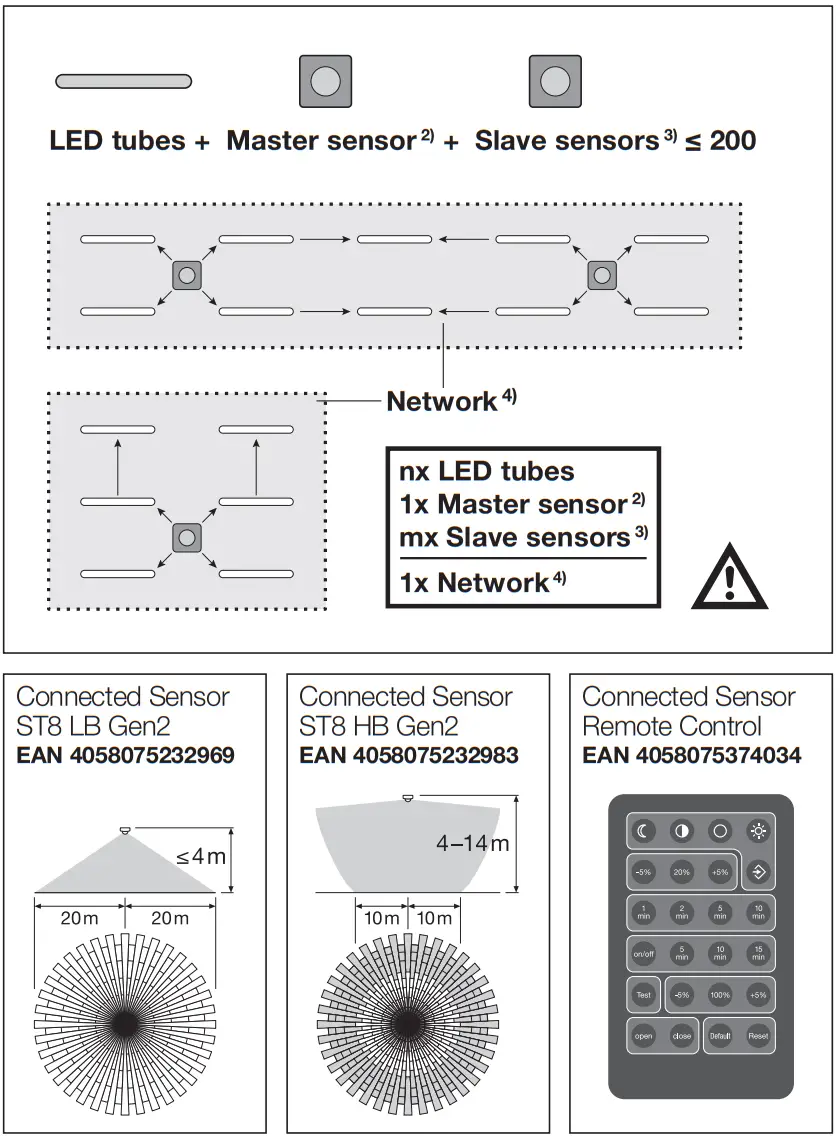
Connected Sensor ST8 HB Gen2 / EAN 4058075232983
ST8AU-0.6M 7,5W/840 220-240VCON / EAN 4058075187337
ST8AU-0.6M 7,5W/865 220-240VCON / EAN 4058075187351
ST8AU-1.2M 16W/840 220-240V CON / EAN 4058075187375
ST8AU-1.2M 16W/865 220-240V CON / EAN 4058075187399
ST8AU-1.5M 24W/840 220-240V CON / EAN 4058075187634
ST8AU-1.5M 24W/865 220-240V CON / EAN 4058075187658
ST8 Gen2 Substitube Connected Sensor Low Bay
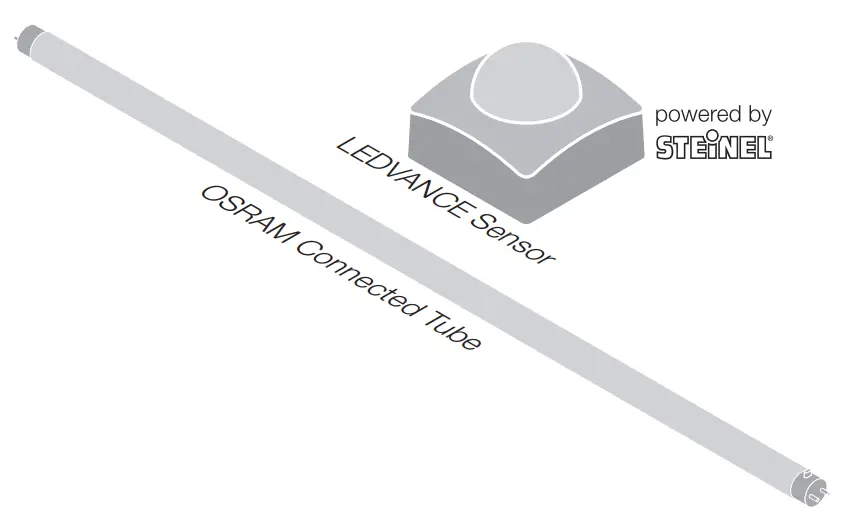
To have a connected system, please purchase both sensor and an LED tube.1)
www.ledvance.com/substitube-connected
Connected Sensor ST8 Gen2
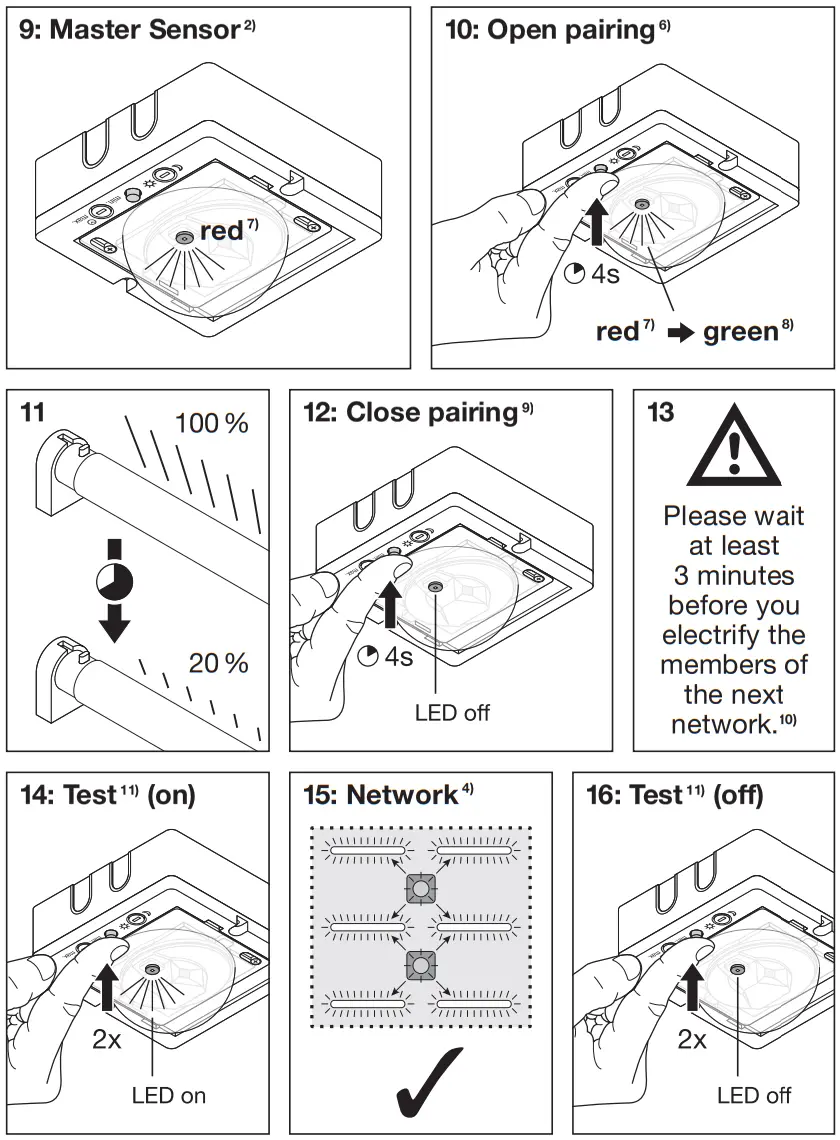
| Operation button functions”‘ | Action” | Impact”‘ |
| a)Pairing tubes and sensor=”‘ | Press the operation button on the master sensor for 4 sec.” Green LED | starts blinking’ |
| b)Pairing completion3i’ | Green LED will turn off 32! | |
| c)Test mode 2′. | Press the operation button on any sensor 2 times shortly’-“ | Paired tubes and sensors will start blinking constantly”‘ |
| Paired tubes and sensors will stop blinking 3C4 | ||
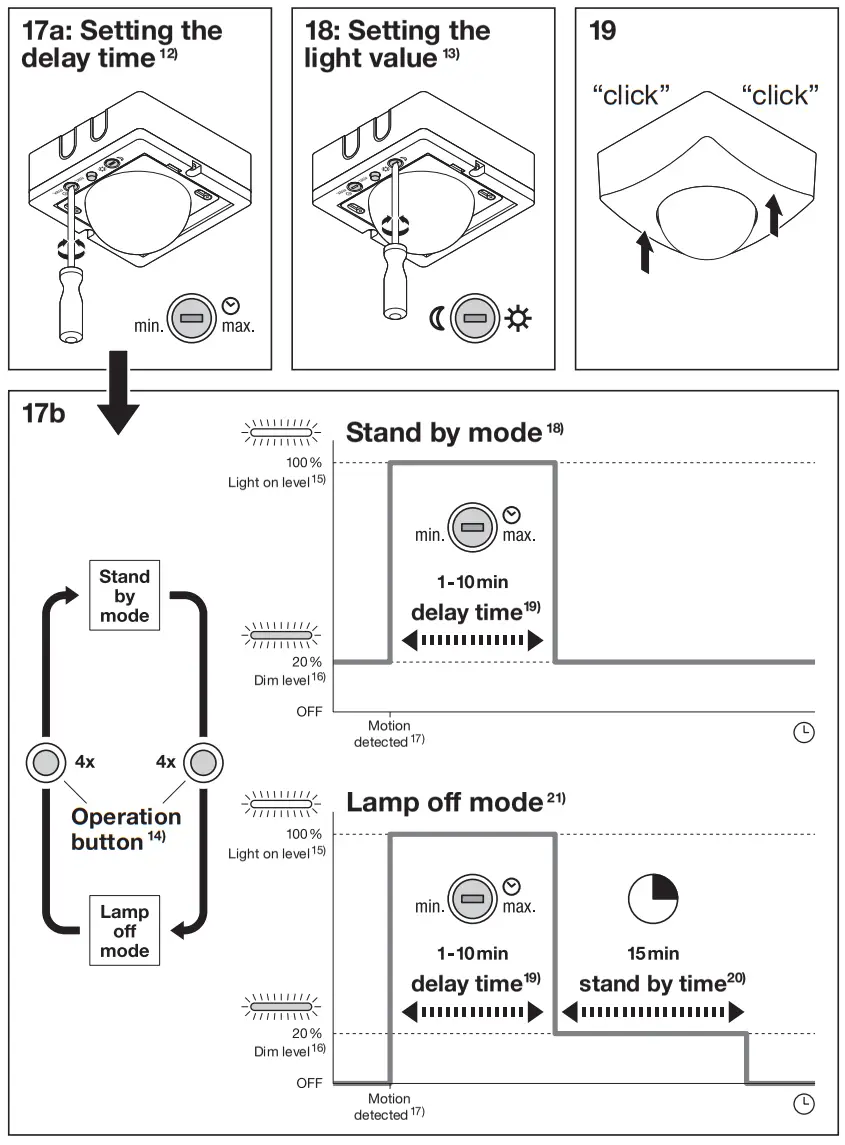
| d)Lamp off mode 37′ | Press 4 times shortly 3B’ | Lamp off mode will be activated: see fig 17b19 |
| e)Reset network with master sensors’ | Press the operation button on the master sensor 10 times shortly 41) | All devices will be set to factory settings and the whole network will be unpairec142, |
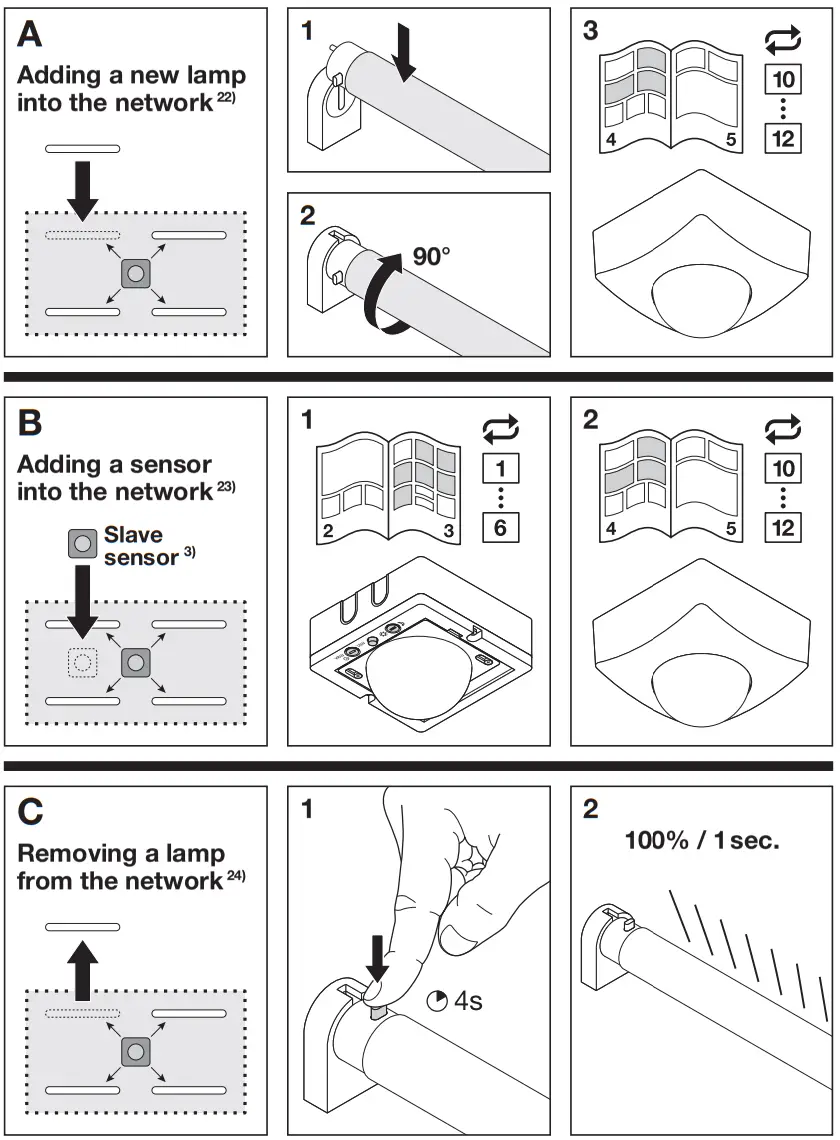
| f)Remove slave sensor from the network 43) | Press the operation button on the slave sensor 10 times shortly 44) | The slave sensor will be set back to factory settings: red light is permanently on” |
Hereby, LEDVANCE GmbH declares that the radio equipment is in compliance with Directive 2014/53/EU.
The full text of the EU declaration of conformity is available at the following internet address:
WWW.LEDVANCE.COM/CONSUMER/SMART/DECLARATION-OF-CONFORMITY/INDEX.JSP 46)
Wireless radio used in Zigbee lamps/luminaires/components 2400 – 2483.5 MHz, max. RF output power 9.5dBm. 47)
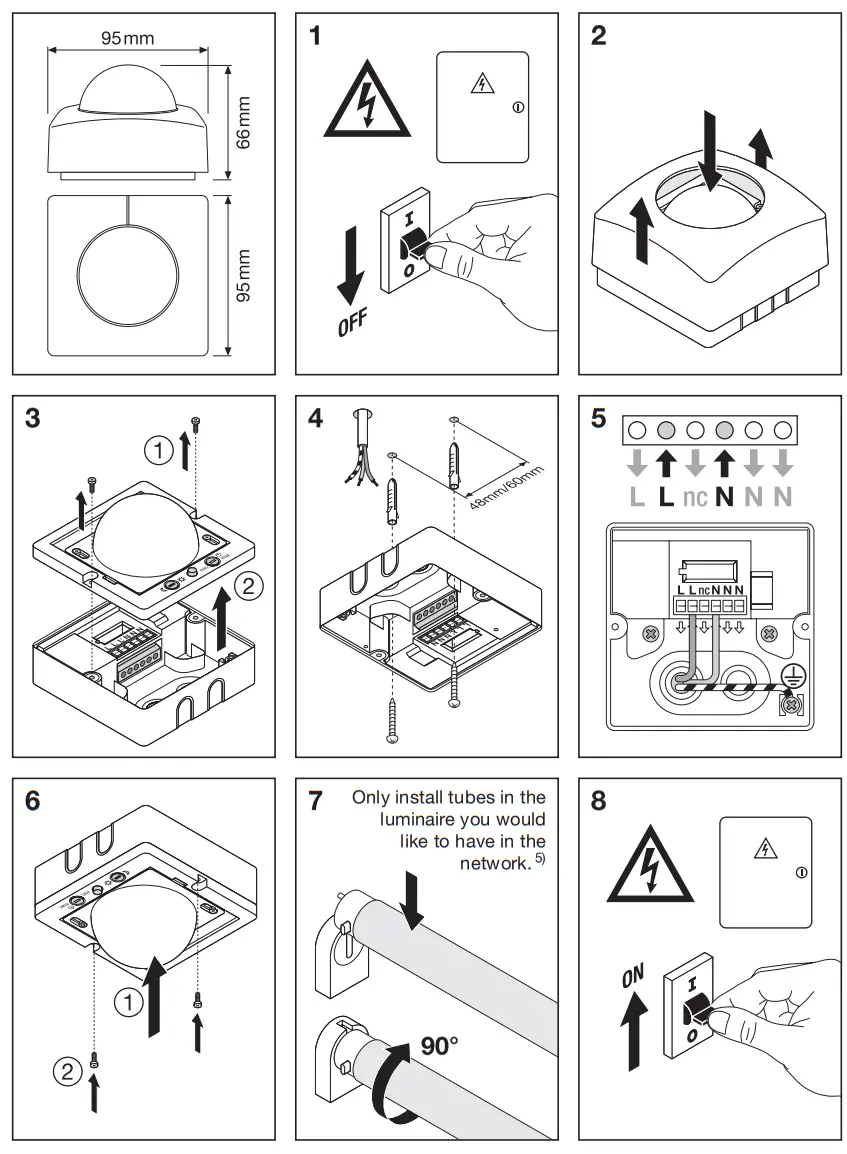
The product needs to be mounted on the ceiling for full functionality. A vertical position is not allowed.
Do not operate the sensor if it is damaged. Then the whole sensor must be replaced immediately.48)
Connected Sensor ST8 Gen2
1) To have a connected system, please purchase both sensor and LEDtube; 2) Master sensor; 3) Slave sensors; 4) Network; 5) Only install tubes in the luminaire you would like to have in the network; 6) Open pairing; 7) Red; 8) Green;9) Close pairing; 10) Please wait at least 3 minutes before you electrify themembers of the next network; 11) Test; 12) Setting the delay time; 13) Setting the light value; 14) Operation button; 15) Light on level; 16) Dim level; 17) Motion detected; 18) Stand by mode; 19) delay time; 20) stand by time; 21) Lamp off mode; 22) Adding a new lamp into the network; 23) Adding a sensor into the network; 24) Removing a lamp from the network; 25) Operation button functions;26) Action; 27) Impact; 28) Pairing tubes and sensor; 29) Press operation button on the master sensor for 4 sec.,; 30) Green LED starts blinking; 31) Pairing completion; 32) Green LED will turn off; 33) Test mode; 34) Press operation button on any sensor 2 times shortly; 35) Paired tubes and sensors will start blinkingconstantly; 36) Paired tubes and sensors will stop blinking; 37) Lamp off mode; 38) Press 4 times shortly; 39) Lamp off mode will be activated; see fig. 17b; 40) Reset network with the master sensor; 41) Press the operation button on the master sensor 10 times shortly; 42) All devices will be set to factory settings and the whole network will be unpaired; 43) Remove slave sensor from the network; 44) Press operation button on slave sensor 10 times shortly; 45) Slave sensor will be set back to factory settings; red light is permanently on; 46) Hereby, LEDVANCE GmbH declares that the radio equipment is in compliance with directive 2014/53/EU. The full text of the EU declaration of conformity is available at the following internet address: smartplus.ledvance.com/declaration-ofconformity; 47) Wireless radio used in Zigbee lamps/luminaires/components2400 – 2483.5 MHz, max. RF output power 9.5dBm; 48) Product needs to be mounted on the ceiling for full functionality. A vertical position is not allowed. Do not operate the sensor if it is damaged. Then the whole sensor must be replaced immediately.
![]()
![]() LEDVANCE GmbH
LEDVANCE GmbH
Steinerne Furt 62
86167 Augsburg, Germany
www.ledvance.com![]()
LEDVANCE Ltd, Aquila House
Delta Crescent, Westbrook, Warrington
WA5 7NR, United Kingdom


