![]() FJ3362G Touch Screen Weather Station
FJ3362G Touch Screen Weather Station
User Manual
Features
- Perpetual Calendar Up to Year 2099
- Day of week in 7 languages: English, German, Italian, French, Spanish, Netherlands and Danish
- Time in 12-hour or 24-hour format.
- Two daily alarms
- Automatic snooze function (OFF or 5~60min)
- Sunrise and sunset time (select city)
- Moon phases and tides
- Humidity: Indoor & Outdoor measurable range: 20%RH ~ 95%RH
- Temperature:
— Indoor temperature measurement ranges: -9.9°C (15°F) to 50°C (122°F)
— Outdoor temperature measurement ranges: -40°C (-40°F) to70°C (158°F)
— Temperature alternatively in °C or °F.
— Outdoor thermometer alert. - Minimum/maximum display for air humidity and temperature
- Display of indoor comfort and mold risk
- Outdoor temperature upper and lower limit alert and frost warning
- Wireless Outdoor Sensor:
— Wall Mount or Table Stand
— 433.92MHz RF transmitting frequency
— 60 meters transmission range in an open area
—Up to 3 wireless outdoor sensors can be connected. (One Wireless outdoor Sensor Included) - Atmospheric pressure:
— Atmospheric pressure measurement ranges: 600 hPa/mb to 1100 hPa/mb 17.72 inHg to 32.50 inHg
— Pressure alternatively in hPa/mb or inHg
—The histogram shows the historical trend of the 24-hour atmospheric pressure - The weather forecasting function
- Power Supply:
Weather Station:
Battery: 2 x LR6 AA
Equipment power input: DC 5V 1.2A (USB power cable)
Wireless Outdoor Sensor
Battery:2 x LR6 AA
Weather Station Appearance
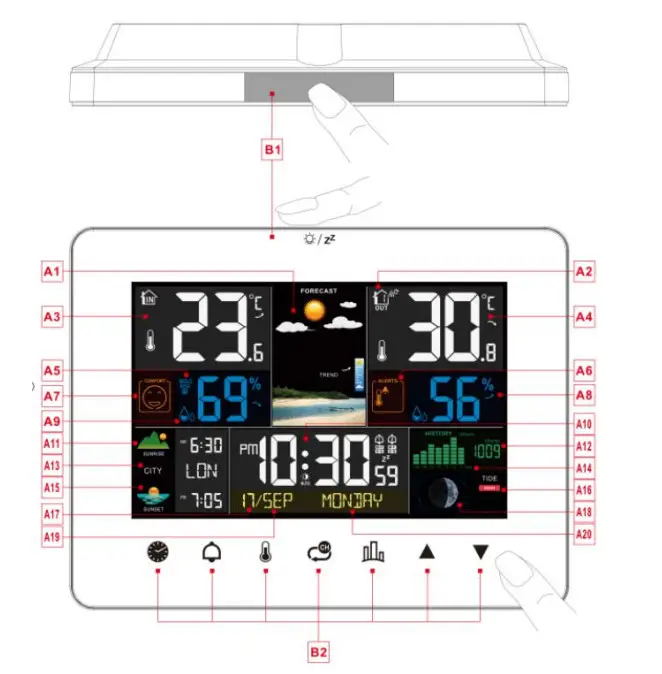 |  |
Part A-Positive LCD
| A1: Weather forecast | A2: Outdoor wireless channel and receiving icon |
| A3: Indoor Temperature | A4: Outdoor Temperature |
| A5: Mold Risk of Indoor | A6: Alert of Outdoor Temperature |
| A7:Comfort Index of Indoor | A8: Outdoor Humidity |
| A9: Indoor Humidity | A10: Time |
| A11: Sunrise time | A12: Atmospheric pressure |
| A13: Selected city | A14: Histogram of historical pressure trends |
| A15: Sunset time | A16: Tide level |
| A17: Date | A18: Moon phase |
| A19: Month | A20: WEEK |
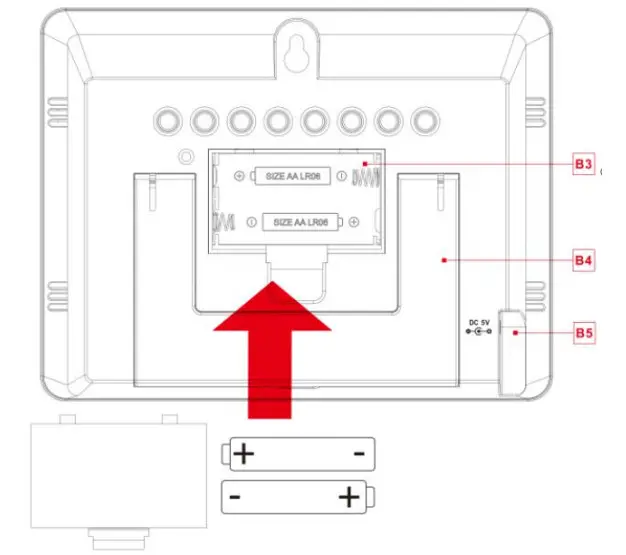
Part B – Back button and power
| B1: “ | B2: Touch keyboard |
| B3: The battery compartment | B4: Support frame |
| B5: Power supply socket |
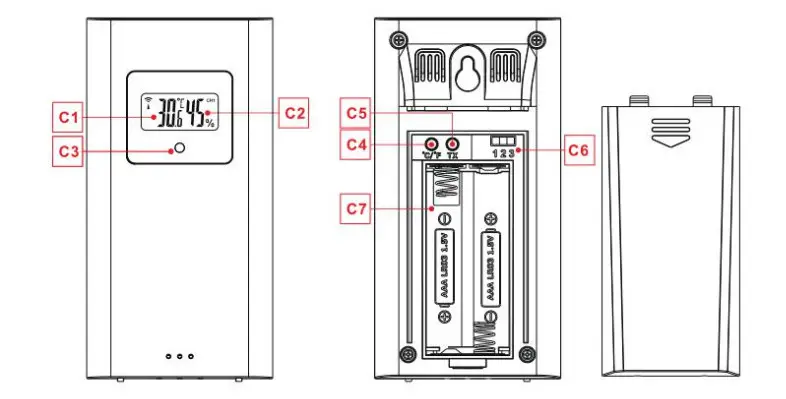
Part C –Wireless Remote Sensor:
C1: LCD display – Temperature
C2: LCD display – Humidity
C3: Transmit signal LED
C4: “°C/°F” button
C5: “TX” button
C6: “CHANNEL 1 or 2 or 3” switch
C7: The battery compartment
Initial Operation
- Open the weather station battery compartment, insert 2 x AA batteries observing polarity [ “+” and “ – “ marks]
- When the power is connected all the icons on the LCD display will light up for 3 seconds, you will hear the buzzer, and check the indoor temperature, humidity and pressure.
- Remove the battery compartment on the Wireless Remote Sensor, insert 2 x AA batteries observe the correct polarity (+ and – marks) and close the battery compartment
- The Weather Station will now start to make a connection to the outdoor remote sensor. This operation takes about 3 minutes and is displayed by a flashing reception RF antenna symbol in the “
 display area on the receiver.
Wireless Sensor Transmission
- When the Weather Station successfully receives signals from the Wireless Sensor, the temperature and humidity of the outdoor are displayed in the “ ” column of the weather station.
- The weather station can connect up to 3 channel wireless sensor registration. Touch the “
 button can switch the display of different channels of outdoor temperature and humidity. When displaying the symbol “
 “, it will cycle display channels 1,2, and 3 every 5 seconds.
 - If the Weather Station failed to receive a transmission from the outdoor sensor (“–” display on the LCD), touch and hold “the” location for 3 seconds to receive transmission manually. The “ ” will show an animation of the RF antenna symbol, and the Weather Station will re receive the wireless signal of the outdoor sensor.
Manual Time Setting
- Touch and hold down the “
 ” location for more than 2 seconds to enter the time and general settings, first set the operation beep. Touch “▲” and “▼” to set BEEP in ON or OFF.
 - Touch “ ” to confirm your setting, and switch to the temperature unit setting. Now touch “▲” and “▼” to set the temperature of the unit, the unit of temperature can be set to “°C” or “°F”
- Touch “ ” to confirm your setting, and switch to the pressure unit setting. Now touch “▲” and “▼” to set the pressure of the unit, the unit of t pressure can be set to “hPa” or “inHg”
- Touch “ ” to confirm your setting, and switch to the daylight saving time (DST) function setting, Now touch “▲” and “▼” to set the DST function to activate(ON) or close(OFF)
- Touch “ ” to confirm your setting, and switch to the 12/24 hour mode display setting. Now touch “▲” and “▼” to set the time displayed in 12-hour or 24-hour format
- Touch “ ” to confirm your setting, and switch to the hour setting. Now touch “▲” and “▼” to set the correct hour.
- Touch “ ” to confirm your setting, and switch to the minute setting. Now touch “▲” and “▼” to set the correct minute.
- Touch the “ ” button to confirm your setting, and switch to the year setting. Now touch “▲” and “▼” to set the correct year.
- Touch the “ ” button to confirm your setting, and switch to the month setting. Now touch “▲” and “▼” to set the correct month.
- Touch the “ ” button to confirm your setting, and switch to the date set. Now touch “▲” and “▼” to set the correct date.
- Touch “the button to confirm your setting, and switch to the language selection for the week and month displays setting. Now use the “▲” and “▼” buttons to select a language.
- Touch the “ ” button to confirm your setting, and switch to barometric pressure calibration mode. Now touch “▲” and “▼” to set the REL pressure value. If you do not set the real air pressure, the absolute air pressure will be displayed (ABS).
- Touch the “ ” button to confirm your setting, and switch to set the initial weather. Now touch “▲” and “▼” to select the current weather
- Touch “ ” to confirm your setting and to end the setting procedures, enter the clock mode
- During the time setting process, double-click the “ ” touch area to exit the setting mode directly.
F.Y.I.:
- After 20 seconds without pressing any button, the clock switches automatically from Set Mode to Normal Time Mode.
- There are 7 languages of Weekday: English, Deutsch, Français, Italian, Español, Nederlands and Dansk.
Week language display
| Language | Sunday | Monday | Tuesday | Wednesday | Thursday | Friday | Saturday |
| English | SUNDAY | MONDAY | TUESDAY | WEDNESDAY | THURSDAY | FRIDAY | SATURDAY |
| Deutsch | SONNTAG | MONTAG | DIENSTAG | MITTWOCH | DONNERSTAG | FREITAG | SAMSTAG |
| Francais | DIMANCHE | LUNDI | MARDI | MERCREDI | JEUDI | VENDREDI | SAMEDI |
| Italian | DOMENICA | LUNEDI | MARTEDI | MERCOLEDI | GIOVEDI | VENERDI | SABATO |
| Espanol | DOMINGO | LUNES | MARTES | MIERCOLES | JUEVES | VIERNES | SABADO |
| Nederlands | ZONDAG | MAANDAG | DINSDAG | WOENSDAG | DONDERDAG | FRIDAY | ZATERDAG |
| Dansk | SONDAG | MONDAY | TIRSDAG | ONSDAG | TORSDAG | FREDAG | LORDAG |
Month code display
| Language | January | February | March | April | May | June | July | August | September | October | November | December |
| English | JAN | FEB | MAR | APR | MAY | JUN | JUL | AUG | SEP | OCT | NOV | DEC |
| Deutsch | JAN | FEB | MAR | APR | MAI | JUN | JUL | AUG | SEP | OKT | NOV | DEZ |
| Francais | JAN | FEB | MAR | AVR | MAI | JUI | JUL | YOU | SEP | OCT | NOV | DEC |
| Italian | GEN | FEB | MAR | APR | MAG | GIU | JUG | AGO | SET | OTT | NOV | DIC |
| Espanol | ENE | FEB | MAR | ABR | MAY | JUN | JUL | AGO | SEP | OCT | NOV | DIC |
| Nederlands | JAN | FEB | MAA | APR | MEI | JUN | JUL | AUG | SEP | OKT | NOV | DEC |
| Dansk | JAN | FEB | MAR | APR | MAJ | JUN | JUL | AUG | SEP | OKT | NOV | DEC |
► In the setting time, you can touch and hold the “▲” and “▼” locations to quickly change the setting of the value
► The forecast of the weather station is based on the analysis of changes in air pressure. The atmospheric pressure is provided by the factory and has been adjusted to absolute pressure. Since air pressure usually decreases as altitude increases, public meteorological agencies always publish so-called relative air pressure. In order to obtain a comparable value, the relative air pressure has been adjusted to the topography of the country. You can adjust the air pressure of the weather station to the ratio of its location. For this, you must uniquely adjust the current air pressure of the weather station. Ask your local weather forecast service about the air pressure at sea level, or get the current value from the Internet. The above adjustment of the air pressure setting is based on this reason. When the air pressure is absolute air pressure, ABS PRESSURE is displayed, and when the air pressure is adjusted, it displays REL PRESSURE.
► If the daylight saving time system is not implemented in this area, please select ON or OFF according to whether the city in your area adopts daylight saving time, and the time of sunrise and sunset will also be determined according to daylight saving time
Setting the Daily Alarms
- Touch and hold down the “
 ” for more than 2 seconds to enter the alarm setting mode. First, enter the alarm ① hour setting. Now touch “▲” and “▼” locations to set the required hour.
 - Touch the “to confirm your setting, and switch to the alarm ① Minute sets. Now touch “▲” and “▼” to set the required minute.
- Touch the “ ” to confirm your setting, and switch to the alarm ① repeat setting. Now touch “▲” and “▼” to set the alarm repeat in “M-F” or “S-S” or “M-F” and “S-S”.
- Touch the “ ” to confirm your setting, and switch to the alarm ① snooze time setting. Now touch “▲” and “▼” to set the minute of snooze you need.
- Touch the “ ” to confirm your setting, and switch to the alarm ② hour setting. Now touch “▲” and “▼” to set the required hour.
- Touch the “ ” to confirm your setting, and switch to the alarm ② minute setting. Now touch “▲” and “▼” to set the required minute.
- Touch the “ ” to confirm your setting, and switch to the alarm ② repeat setting. Now touch “▲” and “▼” to set the alarm repeat in “M-F” or “S-S” or “M-F” and “S-S”.
- Touch the “ ” to confirm your setting, and switch to the alarm ② snooze time setting. Now touch “▲” and “▼” to set the minute of snooze you need.
- Touch the “ ” to confirm your setting and to end the setting procedure.
- During the time setting process, double-click the “
 touch area to exit the setting mode directly.
F.Y.I.:
- If the alarm is repeatedly set to M-F, the alarm function will be activated from Monday to Friday, the Saturday and Sunday will be invalid. If alarm is repeatedly set to S-S, and the alarm function will be activated on Saturday and Sunday and will expire from Monday to Friday. When the alarm is repeatedly set to M-S (display both M-F and S-S), the alarm function will be activated throughout the week.
- The snooze time setting range: is 5 ~ 60MIN, OFF. When set to OFF, it means no snooze function.
Alarm Switch ON and OFF
- Touch the “” once to display ALARM ① time. And then touch the “▲” button to turn the alarm ON or OFF. Touch the “again to display ALARM ② time. Also, touch the “▲” location to turn the alarm ON or OFF.
- If alarm ① or alarm ② turn ON, the “
 or “
or “ ”icon will display. The repeat of the alarm icon at the same time is also displayed.
 - If alarm ① or alarm ② turn OFF, the“ ” or “ ” icon disappears, and the alarm 1 or alarm 2 functions is closed.
F.Y.I.:
- The alarm will sound for 2 minutes if you do not deactivate it by pressing any button. In this case the alarm will be repeated automatically after 24 hours.
- The rising alarm sound (crescendo, duration: 2 minutes) changes the volume 4 times whilst the alarm signal is heard.
Switching OFF the Alarm Signal
- The alarm sound when the trigger, touch any button except “ or touch and hold the “ ” for more than 2 seconds to stop the alarm signal.
Snooze Function
- When the time is up to the alarm, touch the “location, the alarm signal stops, and enter the SNOOZE mode.
After the snooze time is counted, the alarm will ring again. - In snooze mode, touch any button except “or touch and hold the “ ” for more than 2 seconds to exit the snooze mode.
F.Y.I.:
When the snooze function is set to OFF, when the time is up to the alarm, touch the “![]() icon location does not have this snooze function.
icon location does not have this snooze function.
Moon Phases and Tide Indicator
- The Moon icon and tide indicator of the Weather Station will also display 12 different Moon phases and 3 kinds of tide phases according to the set calendar.

City Sunrise and Sunset Setting
► Touch the “![]() ” once to enter the city selection mode. In the city selection mode, now touch the “▲” and “▼” to select the correct city according to the three-character code of the city corresponding to the table below
” once to enter the city selection mode. In the city selection mode, now touch the “▲” and “▼” to select the correct city according to the three-character code of the city corresponding to the table below
No. | Country | city | code | No. | country | city | code |
| 1 | Germany(DE ) | Berlin | BER | 126 | Cordoba | COR | |
| 2 | Bremen | BRE | 127 | Eivissa Ibiza | IBZ | ||
| 3 | Köln | KOE | 128 | La Coruña | LCO |
| 4 | Dortmund | DOR | 129 | Las Palmas | LPA | ||
| 5 | Dresden | DRE | 130 | Leon | LEO | ||
| 6 | Düsseldorf | DUS | 131 | Madrid | MAD | ||
| 7 | Erfurt | ERF | 132 | Malaga | MAL | ||
| 8 | Frankfurt | FRA | 133 | Palma de Mallorca | PDM | ||
| 9 | Freiburg | FRE | 134 | Salamanca | SAL | ||
| 10 | Hamburg | HAM | 135 | Sevilla | SEV | ||
| 11 | Hannover | HAN | 136 | Valencia | VAL | ||
| 12 | Hof | HOF | 137 | Zaragoza | ZAR | ||
| 13 | Kaiserslautern | KAI | 138 | Sweden(SE) | Gothenburg | GOT | |
| 14 | Kassel | KAS | 139 | Karlstad | KAR | ||
| 15 | Kiel | KIE | 140 | Stockholm | STO | ||
| 16 | Leipzig | LEI | 141 | Switzerland( | Basel | BAS | |
| CH) | |||||||
| 17 | Magdeburg | MAG | 142 | Berne | BNE | ||
| 18 | München | MUN | 143 | Chur | CHU | ||
| 19 | Nürnberg | NUR | 144 | Geneva | GNV | ||
| 20 | Osnabrück | OSN | 145 | Lucerne | LUC | ||
| 21 | Passau | PAS | 146 | Lugano | LUG | ||
| 22 | Regensburg | REG | 147 | Sion | SIO | ||
| 23 | Rostock | ROS | 148 | St. Gallen | SGL | ||
| 24 | Saarbrücken | SAA | 149 | Zurich | ZUR | ||
| 25 | Stuttgart | STU | 150 | United | Aberdeen | ABD | |
| Kingdom(G | |||||||
| B) | |||||||
| 26 | Ulm | ULM | 151 | Belfast | BEL | ||
| 27 | Würzburg | WUR | 152 | Birmingham | BIR | ||
| 28 | Austria(AT) | Bregenz | BRZ | 153 | Cardiff | CAR | |
| 29 | Graz | GRZ | 154 | Glasgow | GLW | ||
| 30 | Innsbruck | INN | 155 | London | LON | ||
| 31 | Linz | LNZ | 156 | Manchester | MAN | ||
| 32 | Salzburg | SLZ | 157 | Newcastle upon Tyne | NEC | ||
| 33 | Vienna | WIE | 158 | Plymouth | PLY | ||
| 34 | Villach | VIL | 159 | Lithuania | Vilnius | VNO | |
| (LT) | |||||||
| 35 | Wels | WEL | 160 | Bulgaria | Sofia | SOF | |
| (BG) | |||||||
| 36 | Belgium(BE) | Antwerp | ANT | 161 | Romania | Bucharest | BUH |
| (RO) | |||||||
| 37 | Bruges | BRG | 162 | Cyprus | Nicosia | NIC | |
| (CY) | |||||||
| 38 | Brussels | BRU | 163 | Northen | Belfast | BFS | |
| Ireland(NI) | |||||||
| 39 | Libramont | LIB | 164 | United | Washington DC | WDC | |
| States(US) | |||||||
| 40 | Liege | LIE | 165 | New York | NYC | ||
| 41 | Bosnia | Sarajevo | SAR | 166 | Los Angeles | LAS | |
| &Herzegovin | |||||||
| a(BA) | |||||||
| 42 | Croatia(HR) | Split | SPL | ||||
| 43 | Zagreb | ZAG | 168 | Houston | HOU | ||
| 44 | Czech(CZ) | Brno | BRN | 169 | Phoenix | PHO | |
| 45 | Prague | PRG | 170 | San Antonio | SAO | ||
| 46 | Denmark(DK ) | Aalborg | ALB | 171 | San Diego | SDO | |
| 47 | Copenhagen | KOB | 172 | Dallas | DAL | ||
| 48 | Odense | ODE | 173 | San Francisco | SFO | ||
| 49 | Finland(FI) | Helsinki | HEL | 174 | Philadelphia | PHL | |
| 50 | France(FR) | Ajaccio | AJA | 175 | Charlotte | CHA | |
| 51 | Biarritz | BIA | 176 | Seattle | SEA | ||
| 52 | Bordeaux | BOR | 177 | Denver | DEN | ||
| 53 | Brest | BRT | 178 | Boston | BOS | ||
| 54 | Cherbourg-Octeville | CHE | 179 | Detroit | DET | ||
| 55 | Clermont-Ferrand | CMF | 180 | Nashville | NAS | ||
| 56 | Dijon | DIJ | 181 | Memphis | MEM | ||
| 57 | Lille | LIL | 182 | Portland | PTL | ||
| 58 | Lyon | LYO | 183 | Oklahoma city | OKC | ||
| 59 | Marseille | MRS | 184 | Las Vegas | LVG | ||
| 60 | Metz | MET | 185 | Milwaukee | MWK | ||
| 61 | Nantes | NAN | 186 | Kansas City | KAN | ||
| 62 | Nice | NCE | 187 | Atlanta | ATL | ||
| 63 | Orleans | ORL | 188 | Miami | MIA | ||
| 64 | Paris | PAR | 189 | Virginia beach | VAB | ||
| 65 | Perpignan | PER | 190 | Oakland | OAK | ||
| 66 | Rouen | ROU | 191 | Minneapolis | MIN | ||
| 67 | Strasbourg | STR | 192 | New Orleans | NOL | ||
| 68 | Toulouse | TOU | 193 | Cleveland | CLE | ||
| 69 | Greece(GR) | Athens | AHN | 194 | Tampa | TAM | |
| 70 | Hungary(HU) | Budapest | BUD | 195 | Honolulu | HON | |
| 71 | Ireland(IE) | Dublin | DUB | 196 | St.Louis | SLS | |
| 72 | Italy (IT) | Ancona | ANC | 197 | Pittsburgh | PIT | |
| 73 | Bari | BAR | 198 | Cincinnati | CIN | ||
| 74 | Bolzano | BOZ | 199 | Lincoln | LIN | ||
| 75 | Cagliari | CAG | 200 | Orlando | ORD | ||
| 76 | Florence | FIR | 201 | Buffalo | BUF | ||
| 77 | Foggia | FOG | 202 | Richmond | RMD | ||
| 78 | Genoa | GEN | 203 | Columbia | COL | ||
| 79 | Lecce | LEC | 204 | Little Rock | LRC | ||
| 80 | Messina | MES | 205 | Columbus | CLS | ||
| 81 | Milan | MIL | 206 | Grand Rapids | GRS | ||
| 82 | Naples | NAP | 207 | Salt Lake City | SLC | ||
| 83 | Palermo | PAL | 208 | Providence | PVD | ||
| 84 | Parma | PRM | 209 | Manchester(NH) | MNH |
| 85 | Perugia | PEG | 210 | San Diego | SDG | ||
| 86 | Rome | ROM | 211 | Santa Fe | SFE | ||
| 87 | San Remo | SRE | 212 | Bismarck | BIS | ||
| 88 | Triest | TRI | 213 | Reno | REN | ||
| 89 | Turin | TUR | 214 | New Haven | NHV | ||
| 90 | Venice | VEN | 215 | Baltimore | BAL | ||
| 91 | Verona | VER | 216 | South Carolina (SC) | SCR | ||
| 92 | Liechtenstein | Vaduz | VDZ | 217 | Savannah | SAV | |
| (LI) | |||||||
| 93 | Luxemburg(L | Luxembourg | LUX | 218 | Canada(CA) | Ottawa | OTT |
| U) | |||||||
| 94 | Monaco(MC) | Monte Carlo | MCM | 219 | Quebec City | QUC | |
| 95 | Netherlands( | Amsterdam | AMS | 220 | Edmonton | EDM | |
| NL) | |||||||
| 96 | Arnhem | ARN | 221 | Calgary | CLY | ||
| 97 | Eindhoven | EIN | 222 | Vancouver | VAN | ||
| 98 | Groningen | GRO | 223 | Montreal | MON | ||
| 99 | Rotterdam | ROT | 224 | Toronto | TOR | ||
| 100 | The Hague | DHA | 225 | Mexican | Mexico City | MEX | |
| 101 | Norway(NO) | Bergen | BGN | 226 | Panama | Panama City | PAN |
| 102 | Lillehammer | LLH | 227 | Brazil(BR) | Brasília | BRA | |
| 103 | Oslo | OSL | 228 | Belo Horizonte | BHZ | ||
| 104 | Poland(PL) | Cracow | KRA | 229 | Recife | REC | |
| 105 | Gdansk | GDA | 230 | Rio de Janeiro | RIO | ||
| 106 | Poznan | POZ | 231 | São Paulo | SPA | ||
| 107 | Warsaw | WAR | 232 | Salvador | SLV | ||
| 108 | Portugal(PT) | Faro | FAR | 233 | Argentina | Buenos Aires | BUE |
| 109 | Lisbon | LIS | 234 | Cordoba | CDB | ||
| 110 | Porto | POR | 235 | La Plata | LPL | ||
| 111 | Russian | St. Petersburg | PET | 236 | Mardel Plata | MAR | |
| Federation(R | |||||||
| U) | |||||||
| 112 | Moscow | MOS | 237 | Mendoza | MEN | ||
| 113 | Novosibirsk | NOV | 238 | Rosario | ROO | ||
| 114 | Kazan | KAZ | 239 | Chile | Santiago de Chile | SAN | |
| 115 | Volgograd | VOL | 240 | Colombia | Bogotá | BOG | |
| 116 | Yekaterinburg | YEK | 241 | Australia(AU | Canberra | CBR | |
| ) and New | |||||||
| Zealand(NZ) | |||||||
| 117 | Serbia(RS) | Belgrade | BEO | 242 | Melbourne | MEL | |
| 118 | Slovakia(SK) | Bratislava | BRV | 243 | Sydney | SYD | |
| 119 | Kosice | KOS | 244 | Wellington | WLG | ||
| 120 | Slovenia(SI) | Ljubliana | LUB | 245 | Adelaide | ADE | |
| 121 | Spain(ES) | Alicante | ALI | 246 | Brisbane | BRI | |
| 122 | Andorra | AND | 247 | Darwin | DRW | ||
| 123 | Badajoz | BAD | 248 | Hobart | HBA | ||
| 124 | Barcelona | BRC | 249 | Perth | PEH | ||
| 125 | Bilbao | BIL | 250 | Auckland | AKL | ||
| 251 | Christchurch | CHC |
- When selecting a city, you can touch and hold the “▲” and “▼” to quickly select, and you can quickly jump to the correct city according to the serial number in the table and the corresponding displayed value
- After selecting the city, touch the “
 ” to exit the selection mode and return to the normal mode
 - When your location is not in a city in the table, you can enter the city custom setting mode. Before entering this setting, you need to check the time zone, longitude and latitude of your city.
- Touch and hold the “ ” for more than 2 seconds to enter the “CUSTOMIZE” setting mode. Firstly, you need to set the 3 codes of the city, touch the “▲” and “▼” to set the first code. And then touch the “ ” to confirm your setting, and switch to the second code setting. Now touch the “▲” and “▼” to set the second code.
- Touch the “ ” to confirm your setting, and switch to the third code setting. Now touch the “▲” and “▼” to set the second code.
- Touch the “ ” to confirm your setting, and switch to the time zone setting of the city. Now touch the “▲” and “▼” to set the correct time zone.
- Touch the “ ” to confirm your setting, and switch to the longitude setting of the city. Now touch the “▲” and “▼” to set the correct longitude.
- Touch the “ ” to confirm your setting, and switch to the latitude setting of the city. Now touch the “▲” and “▼” to set the correct latitude.
- Touch the “ ” to confirm your setting and to end the setting procedure.
- During the time setting process, double-click the “ ” touch area to exit the setting mode directly.
- After selecting a city or setting a custom city, the sunrise time and sunset time are automatically calculated according to the location, time zone and current time of the selected city, and displayed in the corresponding area
Temperature & Humidity Detection
- Indoor temperature measuring range: -9.9°C (+14°F) ~ +50°C (+122°F). Outdoor temperature measuring range: 40°C (-40°F) ~ +70°C (+158°F). If the temperature reading is below range, the LL.L will be displayed. If the temperature reading is above range, the HH.H will be displayed.
- Indoor and outdoor humidity measuring range: 20%RH ~ 95%RH. 19%RH will display if the value is lower than 20%RH, and 96%RH will display if the value higher than 95%RH.
Displaying Temperature/Humidity and Temperature/Humidity Trend
- The current indoor temperature/humidity and the temperature/humidity trend (indoors) are shown in the LCD display.
- After successfully connecting with the remote sensor, the weather station can display the remote temperature/humidity and the temperature/humidity trend (remote)
- You may see the following displays:
 : The temperature/humidity is rising.
 : The temperature/humidity is falling.
 : The temperature/humidity is remaining constant.
Maximum/Minimum Temperature/Relative Humidity
- To toggle indoor/outdoor maximum, minimum temperature and humidity data, touch the “▼” location:
Once to show the maximum temperature and humidity values.
Twice to sow the minimum temperature and humidity values
Three times to return to the current temperature and humidity levels - To reset the maximum and minimum temperature and humidity, touch and hold down the “▼” more than 2 seconds.
Outdoor Temperature Alert Setting
- Touch and hold down the “
 ” for more than 2 seconds to enter the outdoor temperature alert setting. The first is the upper limit alert setting of the outdoor temperature. Now touch the “▲” and “▼” locations to set the upper limit alert value
 - Touch the “ ” button to confirm your setting, and switch to the lower limit alert value of outdoor temperature. Now touch the “▲” and “▼” locations to set the upper limit alert value
- Touch the “ ” button to confirm your setting and to end the setting procedure.
- When setting the upper and lower limit alerts for outdoor temperature, touch the “ ” location to switch the alert settings for setting the upper and lower outdoor temperature limits of different channels.
Temperature Alert
- Touch the “ ” once to turn ON or OFF the temperature alert function. After the temperature alert is turned ON, the alarm icon “
 ” will be displayed in the ALERTS box, indicating that the temperature alarm has been turned ON.
 - The outdoor temperature alert is independent for each channel, you need to set the corresponding channel, you need to touch the “” to convert to the channel number to be displayed, and then Touch the “ ” location to turn on or off the temperature alert
- When the temperature exceeds the set temperature range, an alarm will be activated and the weather station will emit three beeps continuously. At the same time, the temperature alarm in the alarm icon “ ” flashes, and its temperature value and the alarm upper limit icon “ ” or the lower limit icon “
 ” also flash.
  In addition, every time the temperature alarm is triggered after the temperature is updated, the weather station will issue a BI sound prompt.
 - In this alert mode, press any button to stop the alarm sound, and the warning is still displayed.
Temperature Frost Warning
- When the temperature of the outdoor sensor is –1°C (+30°F) to + 3°C (+ 37°F), the frost alarm will be activated, the frost alert icon “ ” flashing.
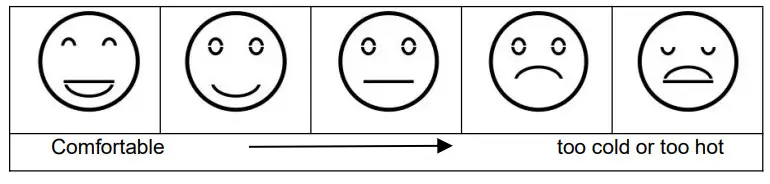
Comfort and Mildew Risk Instructions
- Indoor comfort level is calculated according to the indoor temperature and humidity, a total of 5 levels.

- The moldy risk display reads the indoor humidity to determine the moldy risk level. The weather station will display one of 4 indicators: HI (high) ME (medium) LO (low) and no risk (no arrow displayed).
Low battery Warning
- If the “
 ” column displays the battery icon “
 ”, you need to replace the weather station’s battery as soon as possible,
 - If the “” column is to display the battery icon “”, you need to replace the wireless sensor battery of your channel as soon as possible based on the channel display.
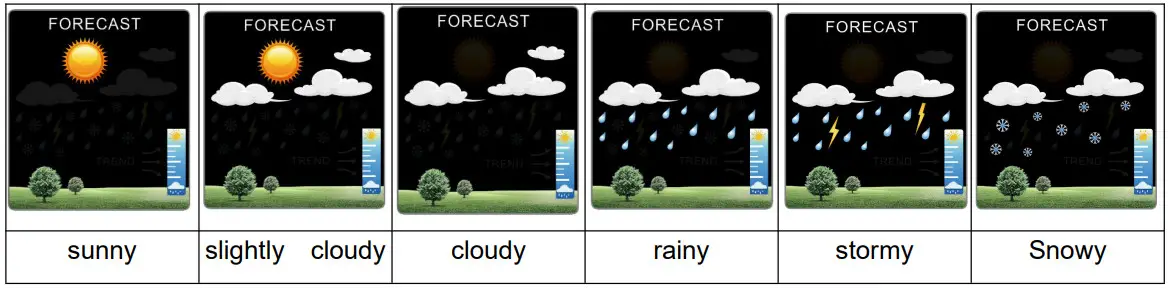
The Weather Forecast
- The weather station calculates a weather forecast for about the next 12 hours based on the barometric pressure trend. Of course, this forecast can‘t compare to that of professional weather services supported by satellites and high-performance computers, It provides only an approximate indication of the current weather development in a small local area. Please take the weather forecast from your local weather forecasting service into account as well as the forecast from your weather station. If there are discrepancies between the information from your device and from the local weather forecasting service, please take the advice of the latter as authoritative.
- The weather station displays the following weather icon:

F.Y.I.:
- The Snowy icon will only appear if the outdoor temperature is below -4℃ (+25℉) and the forecast would be rainy or stormy. By default, according to the temperature of CH1, when there is no signal in CH1, it is calculated according to the temperature of CH2. When there is no signal in CH1 and CH2, it is calculated according to the temperature of CH3.
- The weather station needs 7-10 days of air pressure calibration, the weather forecast will tend to be stable with an accuracy rate of 70%-75%.
- The forecast can be given for a radius of up to 12-20km.
- The weather station can display the barometric pressure trend.
- You may see the following displays:
⇑: The barometric pressure will rise.
No display: The barometric pressure will remain constant.
⇓: The barometric pressure will fall.
Background Lighting
- If the product is powered by batteries, touch the “field to lit backlight for 15 seconds.
- When the power supply of the product is inserted into the power supply adapter, the battery will automatically disconnect the power supply, and the backlight will always be bright. Touch the “ ” button to adjust the brightness of the backlight, you can adjust the 5 state: 4 different brightness backlight and close the backlight. When the backlight brightness is not at the maximum brightness, touch the “ field. The backlight turns to the highest brightness of 15 seconds.
- The weather station can also set the backlight to automatically dim at night. Touch and hold the “ ” field for more than 2 seconds, the icon “
 ” is displayed on the LCD display, The brightness of the backlight will vary according to the brightness of the ambient light. The darker the ambient light, the darker the brightness of the backlight.
 - In backlight auto mode, the backlight can be switched to the highest brightness for 15 seconds by touching the “field.


