![]()
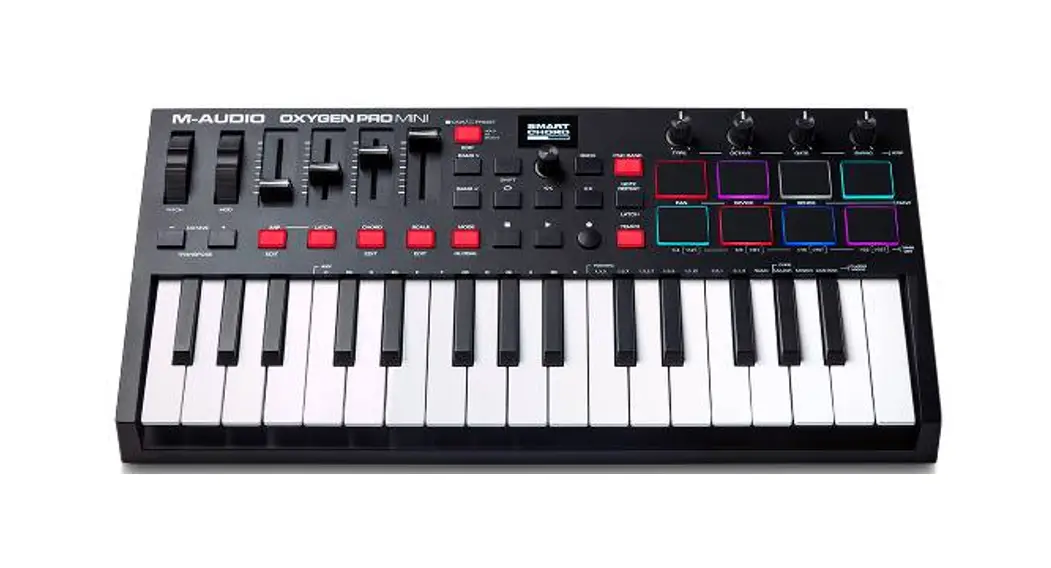
![]() Vboard 25 25 Keys Folding MIDI Keyboard
Vboard 25 25 Keys Folding MIDI Keyboard
User Manual
Introduction
Thank you for purchsing the MIDIPLUS Vboard 25, a 25 keys folding MIDI Keyboard features standard width keyboard, transport control, arpeggiator and smart scale. Built-in rechargeable battery and Bluetooth MIDI connectivity. Please read this manual before you start using, to help you quickly understand the basic operations and features of Vboard 25.
Package included:
- Vboard 25
- USB cable
- Cubase LE Registration paper
- MIDIPLUS Pasters
Important Notes:
Charging note:
- Vboard 25 built-in rechargeble battery for Bluetooth MIDI connection.
- The screen will blink and the Vboard 25 will turn off after 3 minutes when the battery is low power.
- Continual use of the Vboard 25 while the battery is low power may impair its performance and can decrease the life-span of the battery. Please connect and charge the Vboard 25 with a suitable power supply immediately.
- While the Vboard 25 charging, three flashing indicators will appear at the bottom of the screen. The three indicators will stop flashing once the Vboard 25 is fully charged.
- In order to save the batery power, the Vboard 25 will automatically turn off the power after 30 minutes of no operation.
Maintenance note:
- Please use dry and soft rag to wipe the Vboard 25 when cleaning. Do not use paint thinners, organic solvents, detergents or other wipes soaked in aggressive chemicals so as not to discolor the panel or keyboard.
- Please unplug the usb cable and turn off the Vboard 25 when the keyboard will not be used for long period of time or during a thunderstorm.
- Avoid using Vboard 25 near water or wet places, such as bathtub, pool, or similar places.
- Please do not place the Vboard 25 in an unstable place to avoid acciedental falling.
- Please do not place heavy objects on the Vboard 25.
- Please avoid placing Vboard 25 with poor air circulation.
- Please do not open inside of Vboard 25, avoid any metal falling may causing fire or electric shock
- Avoid spilling any liquid on the Vboard 25.
- Avoid using Vboard 25 in case of thunder or lightning
- Please do not expose Vboard 25 to scorchingsun
- Please do not use Vboard 25 when there is gas leakage nearby
Overview
1.1 The Top Panel 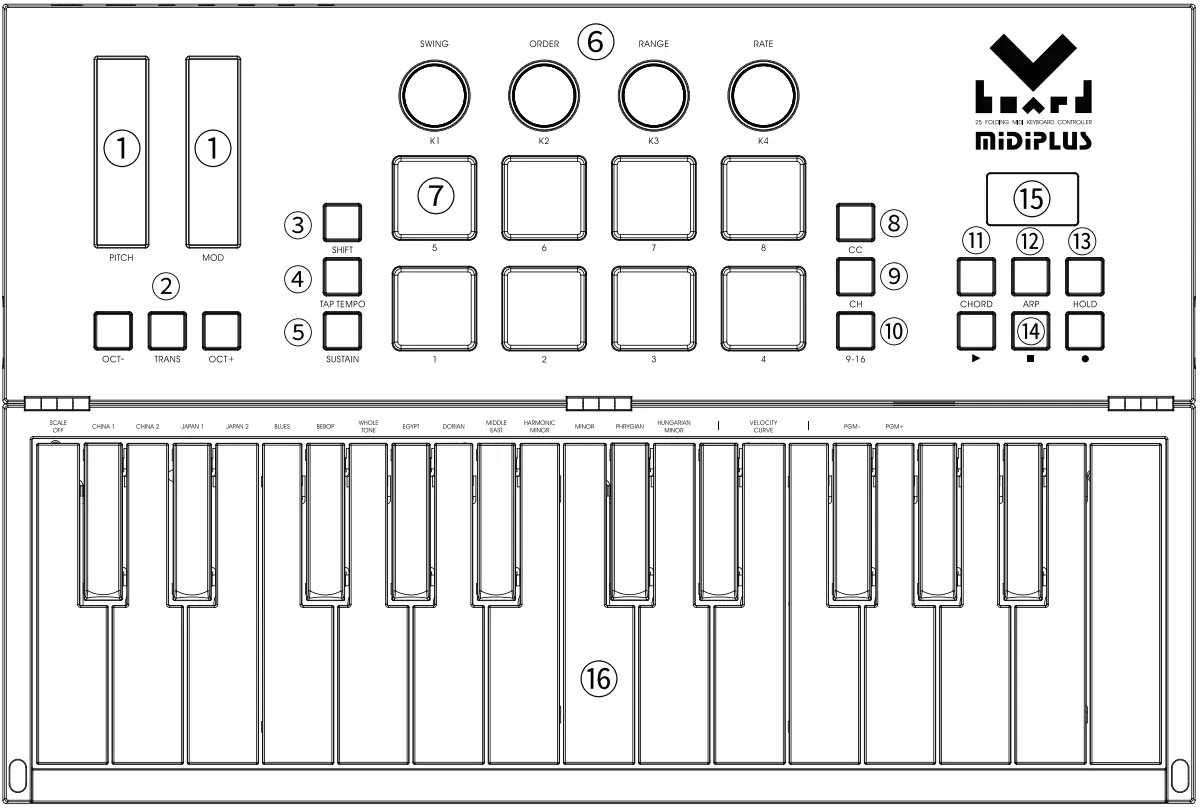
- Pitch and Modulation: Control the pitch bend and modulation parameters of your sound.
- Transpose and Octave: Activate keyboard’s semitone control and octave control.
- Shift: Activate keyboard’s alternative function.
- Tap Tempo: Tapping this button to set the tempo of arpeggiator.
- Sustain: Activate keyboard’s sustain.
- Knobs: Control DAW and software instrument parameters or arpeggiator.
- Pads: According to the pad modes, sends notes including velocity and poly aftertouch data, or sends MIDI CC data or change MIDI channel.
- CC: Toggle Pads to MIDI CC mode.
- CH: Toggle Pads to MIDI Channel mode.
- 9-16: Switch Pads to next bank (9-16).
- Chord: Activate keyboard’s chord mode.
- Arp: Activate keyboard’s arpeggiator.
- Hold: Allow the arpeggiated sequence to be played continuously even if the player has stopped sustaining the chord.
- Transport: Offers MMC and MIDI CC modes, controls your DAW’s transport or MIDI Learn functions.
- Displsy: Provides real time feedback of control information.
- Keyboard: Trigger notes on/off, and easy access to select scales when hold down the Shift button.
1.2 The Rear Panel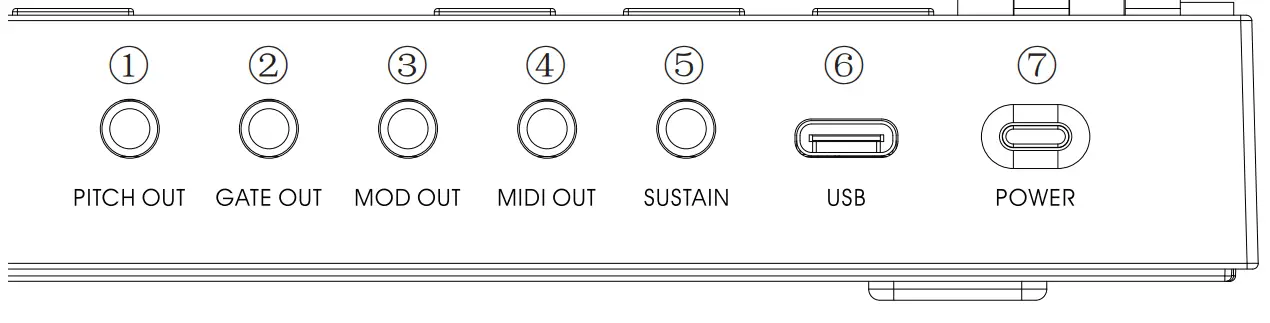
- Pitch Out: Sends control voltage to control the pitch on the target device.
- Gate Out: Sends trigger events that are generated by the note on / off activity on the keyboard, It is closely related to the Pitch Out connector.
- Mod Out: Sends control voltage to control the VCA (Voltage Controlled Amplifier) or VCF (Voltage Controlled Filter).
- MIDI Out: Sends MIDI data to external MIDI device.
- Sustain: Connect to a sustain pedal.
- USB: Connect to your computer, this port provides both power and MIDI data.
- Power: Turn on/off the power.
Guide
2.1 Ready to use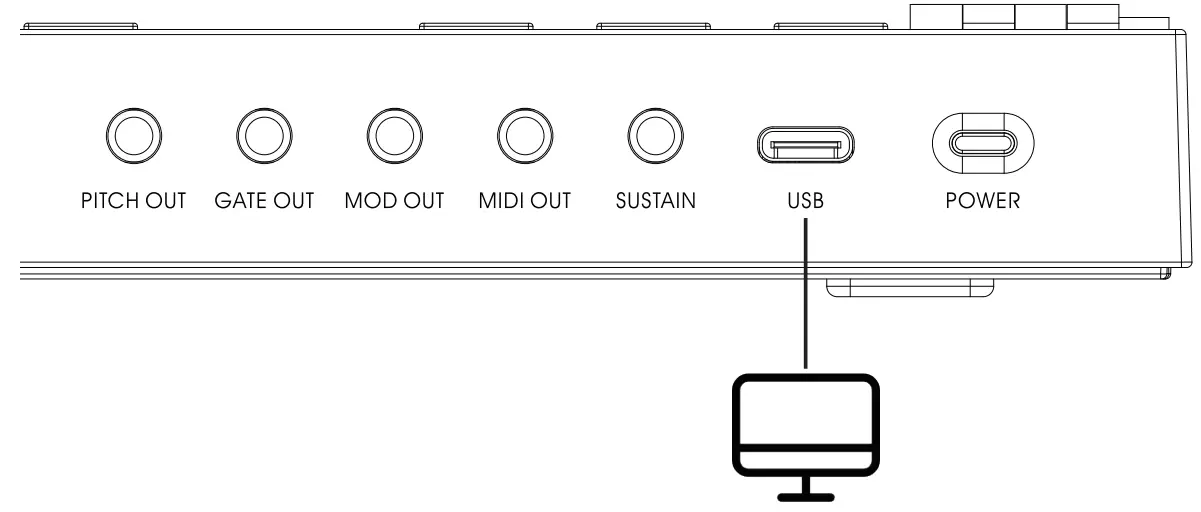 Use with computer: Connect Vboard 25 to your computer using the included USB cable. Hold down the Power button to turn on the power. Vboard 25 is a class-compliant USB device, so its drivers are automatically installed when connecting to a computer.
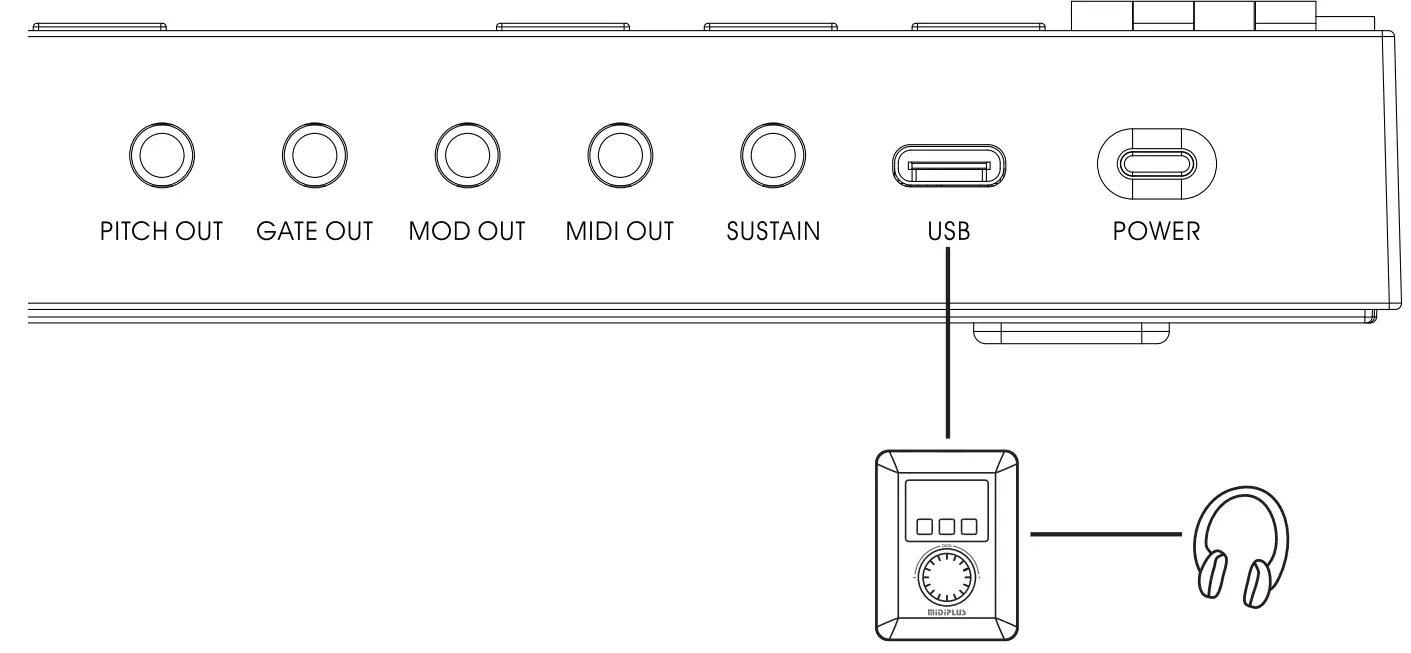 Use with MIDIPLUS miniEngine series sound engine: Connect Vboard 25 to the USB Host of miniEngine using the included USB cable, hold down the Power button to turn on the power. connect your speaker or headphone to miniEngine and turn on the miniEngine.
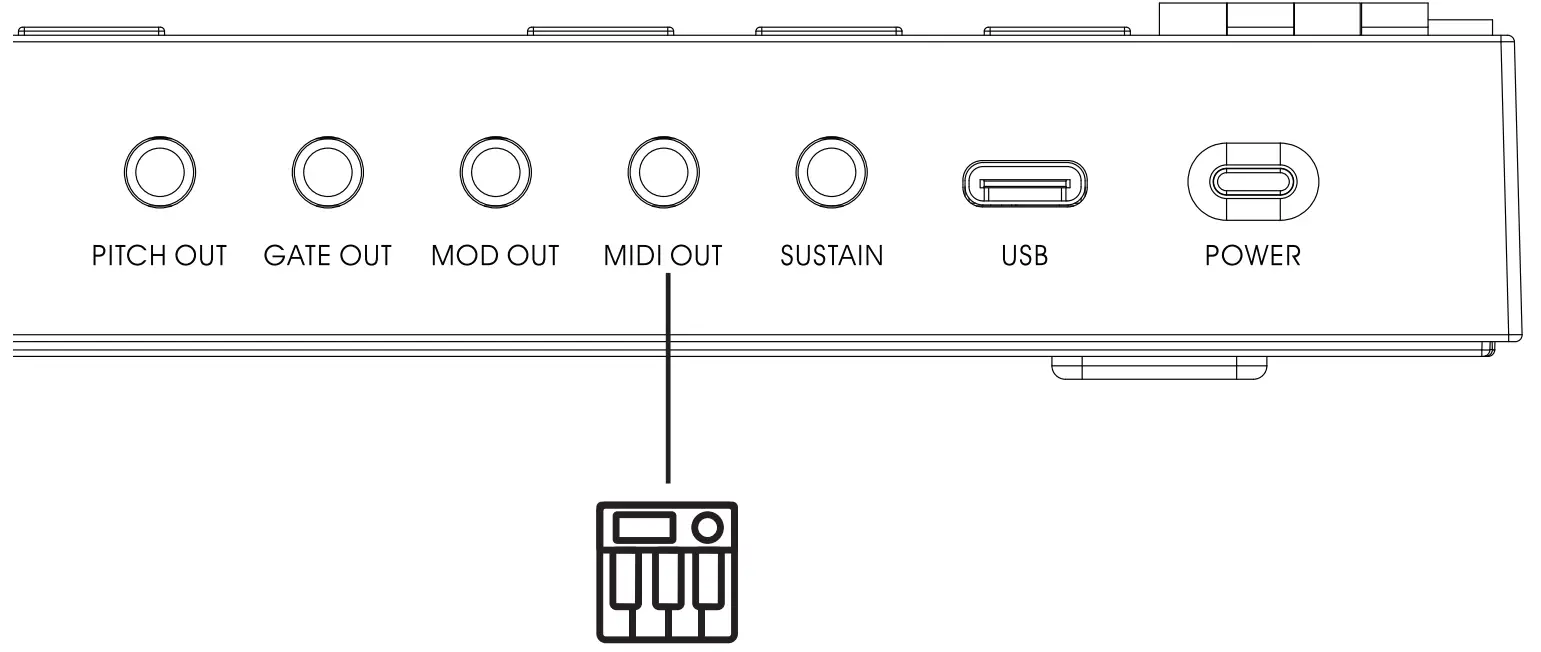 Use with external MIDI device: Connect to a USB 5V power adapter using the included USB cable, connect the MIDI OUT of Vboard 25 to MIDI IN of external MIDI device with a 5 pin MIDI cable.
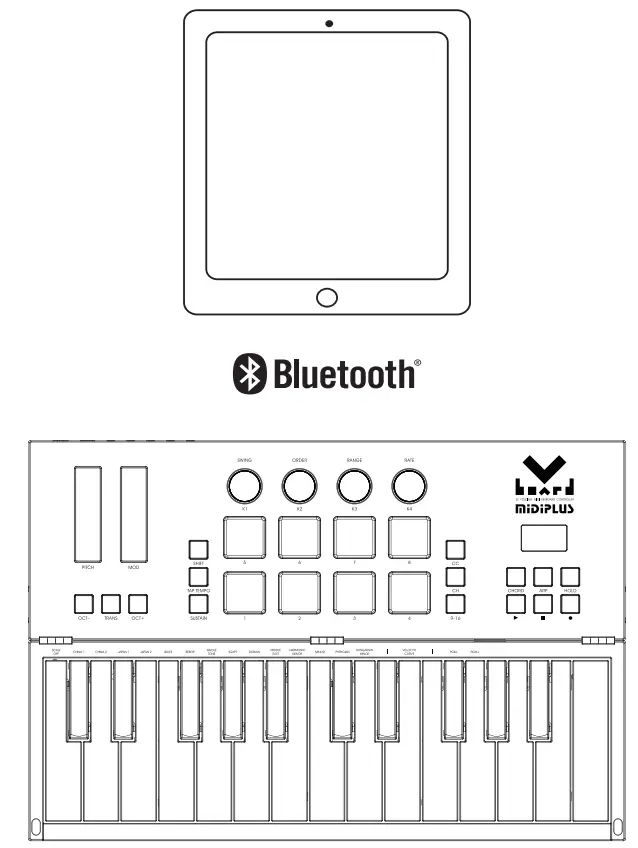 Use with iOS device: Hold down the power button to turn on the power, and turn on Bluetooth on your iOS device, lanuch the APP which support Bluetooth MIDI and connect Vboard 25 in setup menu. Please refer to 5. Bluetooth MIDI Connect(iOS).
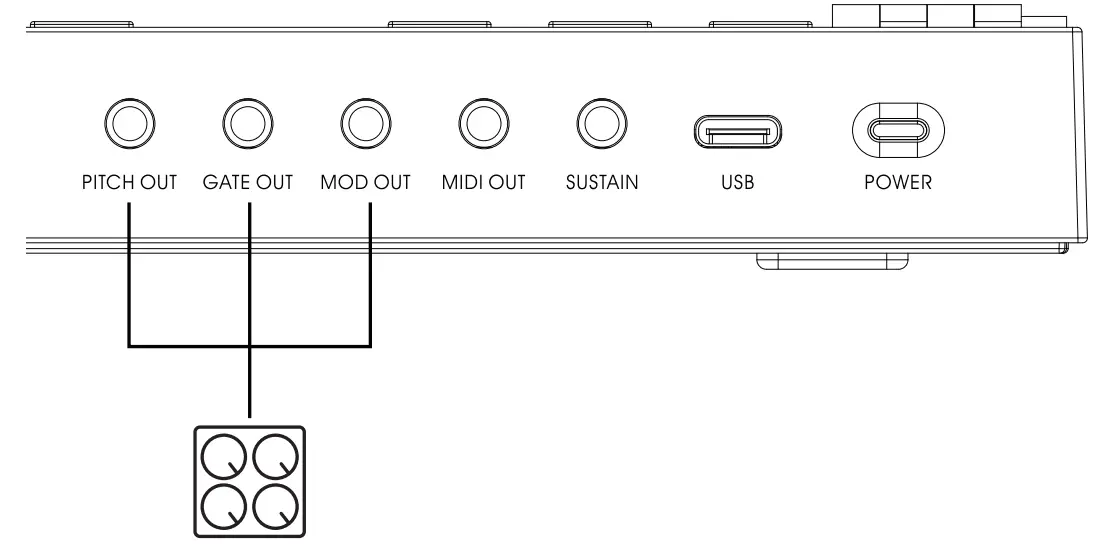 Use with analog synthesizer: Connect the Vboard 25’s pitch out, gate out and mod out to the analog synthesizer’s CV inputs using 1/8” TS cables, Vboard 25 can be power by the build-in battery.
2.2 Keyboard
Vboard 25 has 25 velocity sensitive keys for playing and sending note on/off messages. These keys also can be used as shortcuts to access edit more parameters when hold down the SHIFT button.
Scale Off ~ Hungarian Minor: Selecting the build in Smart Scale, when a scale is selected, the scale notes will be mapped on the white keys, for details please refer to 6.2 Scale List.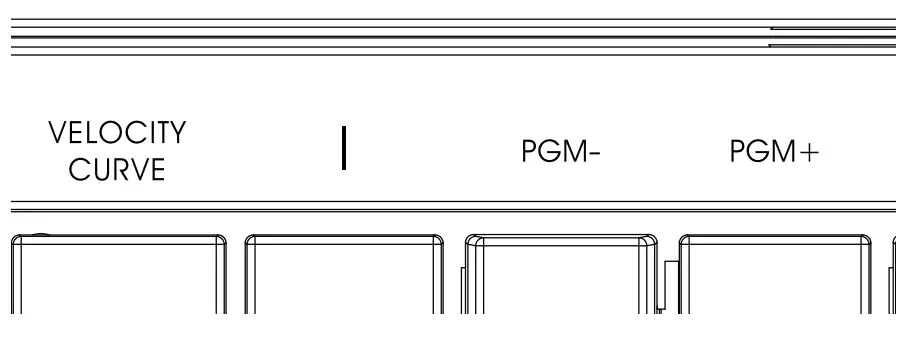 Velocity Curve: Switch the keyboard velocity response curve from Linear, Soft, Hard and Fixed, default is Linear.
PGM-/PGM+: Sending the Program change message from 0 and 127.
2.3 Pitch and Modulation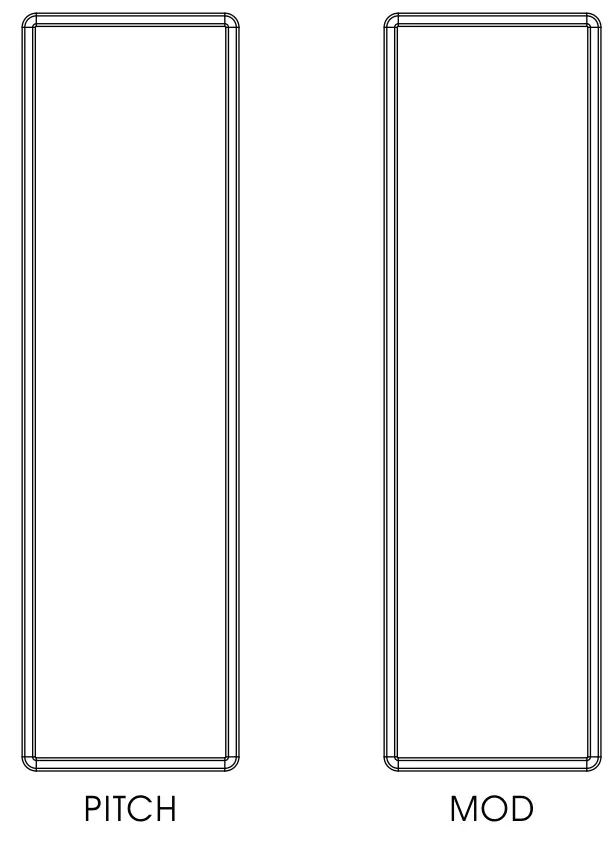
Two capacitive touch strips of Vboard 25 allows for real-time pitch bend and modulation control.
Sliding up or down on the Pitch touch strip will raise or lower the pitch of the selected tone. The range of this effect is set within the hardware or software instrument being controlled.
Sliding up on the Modulation touch strip increases the amount of modulation on the selected tone. The response depends on the settings of the instrument being controlled. Certain instruments or presets will not use the modulation parameter.
2.4 Octave and Transpose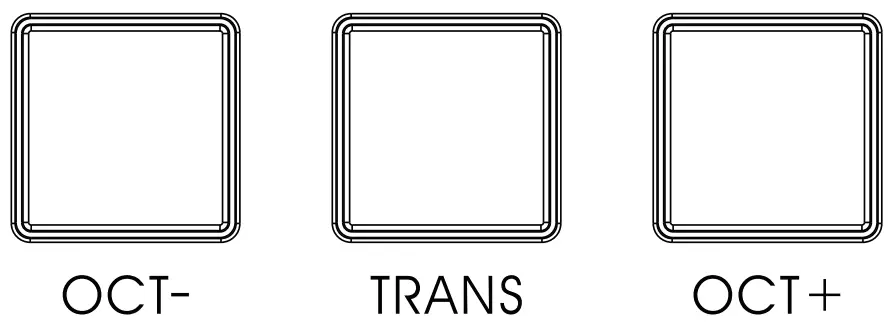 Octave: Pressing the OCT- or OCT+ button to shift the octave range of keyboard, when activated, the selected octave button will light up, pressing the OCT- and OCT+ buttons simultaneously will quickly reset the octave shift.
Transpose: Press and hold the TRANS button, then pressing the OCT- or OCT+ button to transpose, when activated, the TRANS button will light up, and this can be toggled on and off by pressing the TRANS button, when off, the TRANS button backlit will dimmer, the previously used transpose setting will be stored while the unit remains powered.
2.5 Knobs 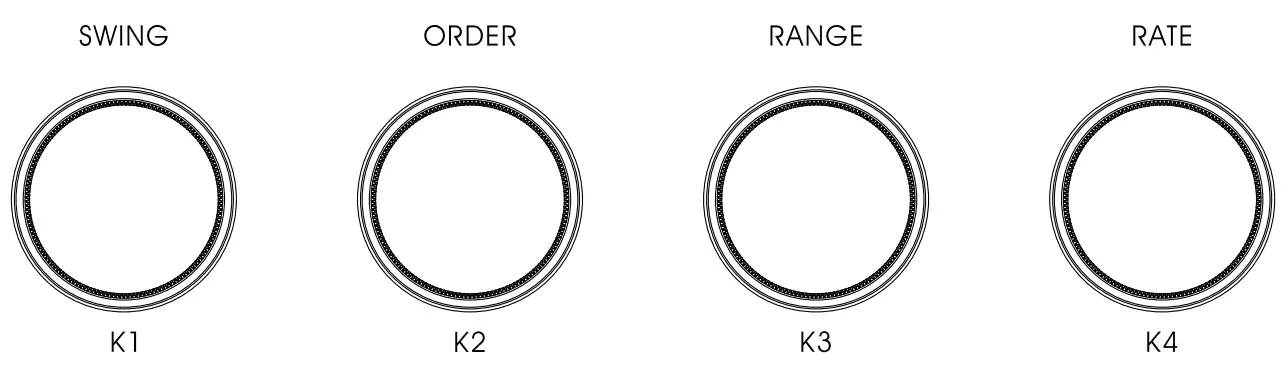 Vboard 25 features 4 assignable knobs, which has dual functions: turning knobs to send MIDI CC# message, or hold down the SHIFT button, then turning knobs to set the Swing, Order, Range and Rate of Arpeggiator (please refers to 2.9.1 Arpeggiator Control), the default MIDI CC# of knobs as below:
| Knobs | MIDI CC# (Default) |
| K1 | CC#93 |
| K2 | CC#91 |
| K3 | CC#71 |
| K4 | CC#74 |
2.6 Shift Hold down Shift button will activate the secondary functions of keyboard and knobs.
2.7 Sustain
Activate the Sustain button will add sustain effects to the keyboard, it has 2 working mode:
- Press Sustain once to activate sustain, press again to deactivate.
- Hold down Sustain to activate sustain, release to deactivate.
2.8 Chord mode To activate chord mode, just hold down the Chord button, and play your preferred chord (maximum of 10 notes) on the keyboard after the screen displays “EDI”. Once you release the Chord button, this chord can be played by pressing just one note. The lowest note of the chord selected is considered to be the bottom note, and is automatically transposed to any new note you play. Press the Chord button again to deactivate chord mode.
2.9 Arpeggiator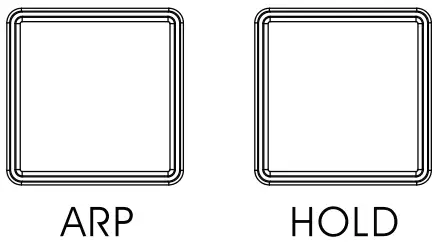 The Arpeggiator included 3 buttons: Arp, Hold and Tap Tempo, and 4 knobs: Swing, Order, Range and Rate. Press Arp button to activate Arpeggiator, it will automatically plays arpeggio when you playing any note on the keyboard.
2.9.1 Arpeggiator Control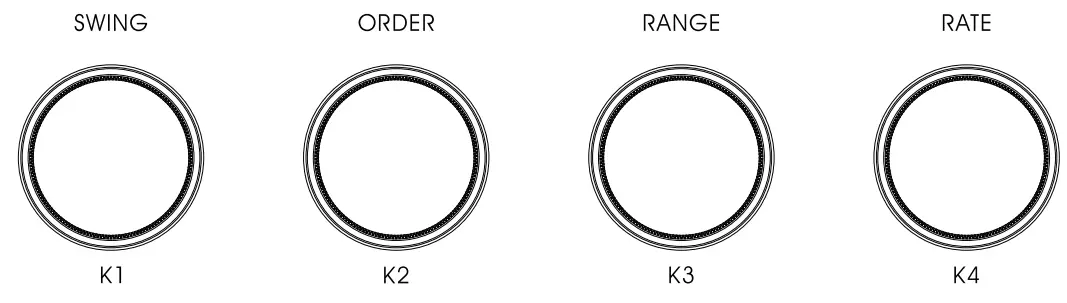 When hold down the Shift button, then turning the 4 knobs to control the Arpeggiator:
Swing: Change the timing of the arpeggiator, range from “51~75”, the screen display “off, 51 to 75”, default is “off”.
Order: Change the playing order of arpeggiator, you have the following choices: “Order”, “Up”, “Down”, “Up/Down”, and “Random”, the screen displays “ord up dn ud rnd” default is “ord”.
Order: Plays the current notes in the order they were originally played.
Up: Plays the current notes from lowest to highest.
Down: Plays the current notes from highest to lowest.
Up/Down: Plays the current notes from lowest to highest and back again.
Random: Plays the current notes in a random, non-repeating order
Range: Determine if the arpeggiator pattern is played only at its original pitch or across higher octaves when the pattern is repeated. From 1 to 4 octave, the screen display “o 1, o 2, o 3, o 4”, default is “o 1”.
Rate: Set the duration of each arpeggiator step. 1/4, 1/4 Triplet, 1/8, 1/8 Triplet, 1/16, 1/16 Triplet, 1/32, and 1/32 Triplet, the screen displays “4 4t 8 8t 16 16t 32 32t”, default is “4”.
Tap Tempo: Tapping this button to setting the tempo of Arpeggiator, range from 30 to 300 BPM, the default is 120 BPM.
Hold: Hold the arpeggiator pattern when you lift your hands from the keyboard.
2.10 Transport The Transport buttons of Vboard 25 has 2 working mode: MMC (MIDI Machine Control) and MIDI CC, When hold down the Shift button, then press the transport button to toggle the working mode, the DAW’s transport control settings please refers to 4. DAW settings, the default assignment of 3 buttons as below:
| Button | MMC mode | MIDI CC mode |
| ▶ | Play | CC# 46 |
| ■ | Stop | CC# 47 |
| ● | Record | CC# 48 |
2.11 Pads and Pad mode buttons
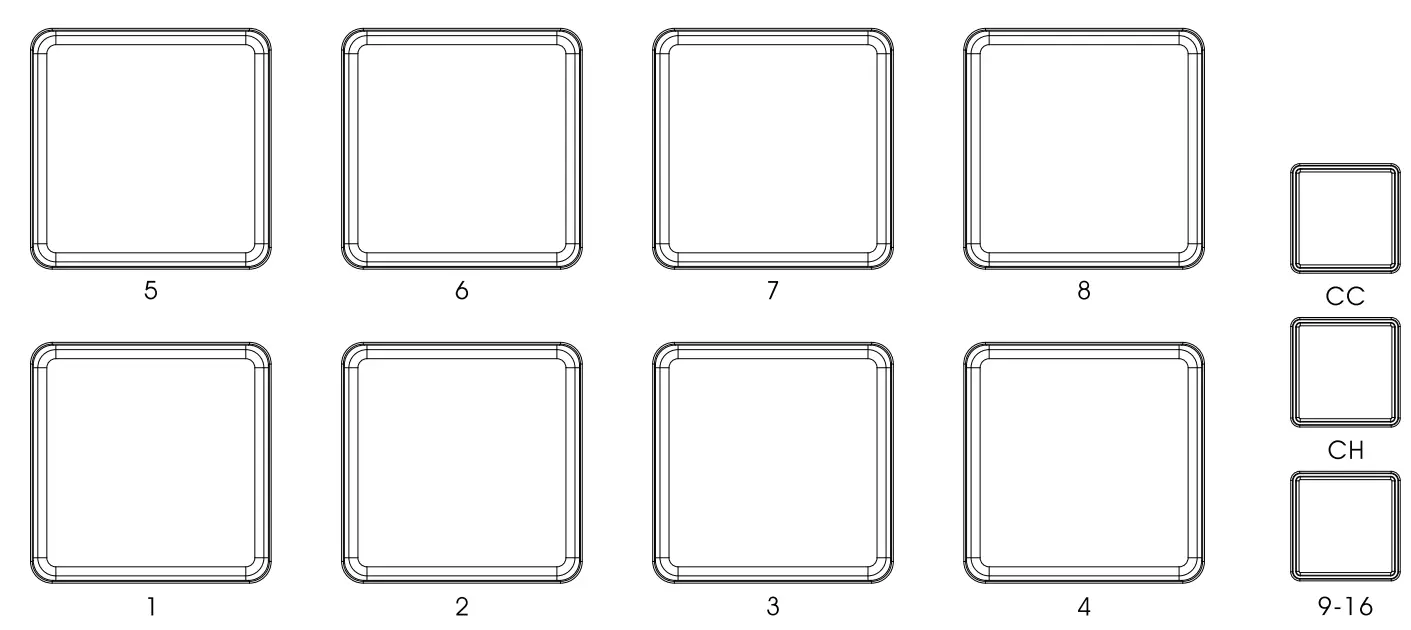
Vboard 25 features 8 velocity and pressure sensitive pad with backlit, they has 3 working modes included MIDI Note, MIDI CC and MIDI Channel.
The default is MIDI Note mode, 8 Pads sends MIDI note from C1 to G1, when activate the 9-16 button, 8 pads sends MIDI note from G#1 to D#2, as below: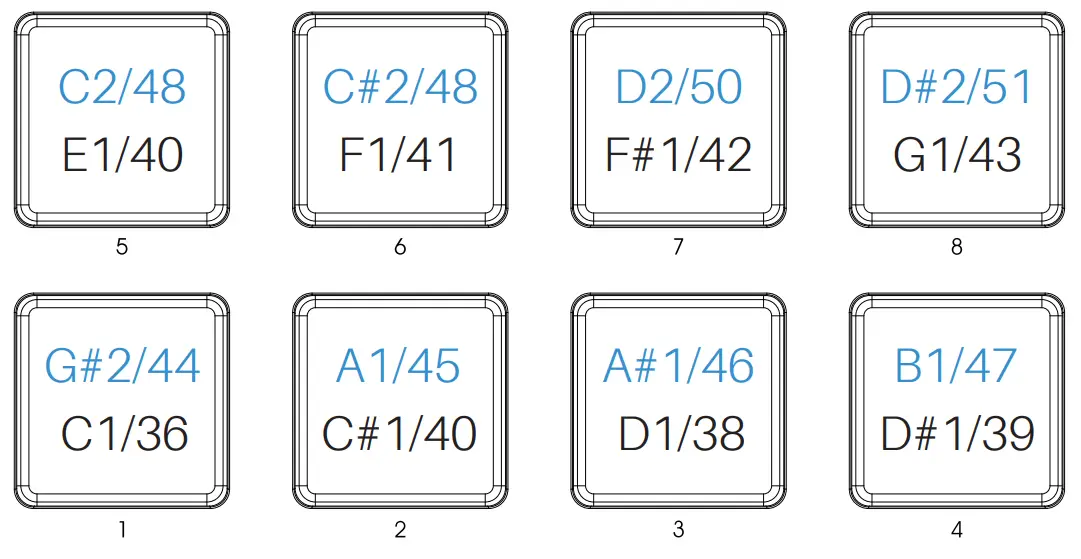 When activate the CC button toggles to MIDI CC mode, 8 pads sends MIDI CC# 16 to MIDI CC# 23, when activate the 9-16 button, 8 pads sends MIDI CC# 24 to MIDI CC# 31, as below:
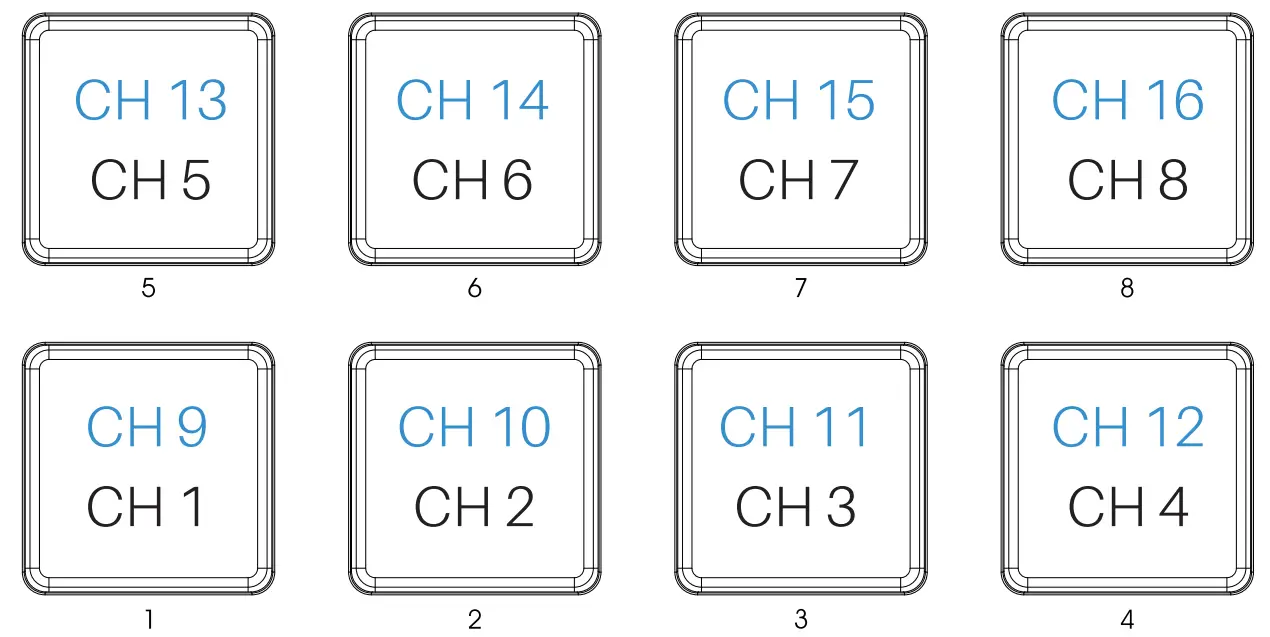
 When activate the CH button toggles to MIDI Channel mode, 8 pads switchs MIDI channel 1 to channel 8, when activate the 9-16 button, 8 pads switchs MIDI channel 9 to channel 16, as below:
Restore to Factory Settings
To perform a factory reset on your Vboard 25, please follow these steps:
- Turn off the power of Vboard 25,
- Hold down the “OCT+” and “OCT-” buttons simultaneously, then turn on the power,
- Release the “OCT+” and “OCT-” buttons when the screen displays “rEs”.
Note: Performing a factory reset will clear all your changes to the keyboard. Please operates carefully.
DAW Settings
Before starting, toggle the transport buttons to MMC mode (Please refer to 2.10 Transport).
4.1 Steinberg Cubase/Nuendo Pro(MMC)
- Go to menu: Transport > Project Synchronization Setup…

- Select the Machine Control and enable MMC Slave Active, set the MIDI Input and MIDI Output as Vboard 25, then set the MMC Device ID as 116

- Click on OK to finish setup

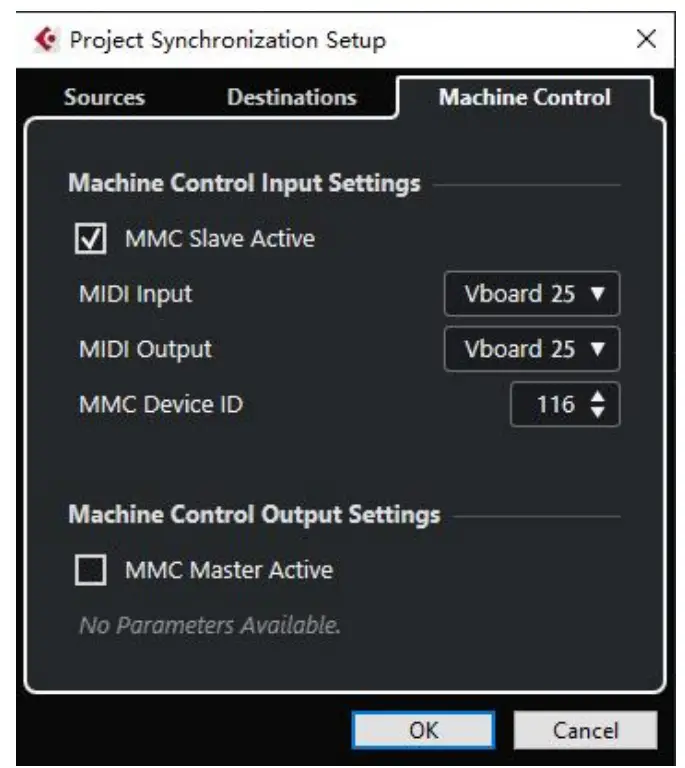
Note: Cubase LE/AI/Elements does not support MMC.
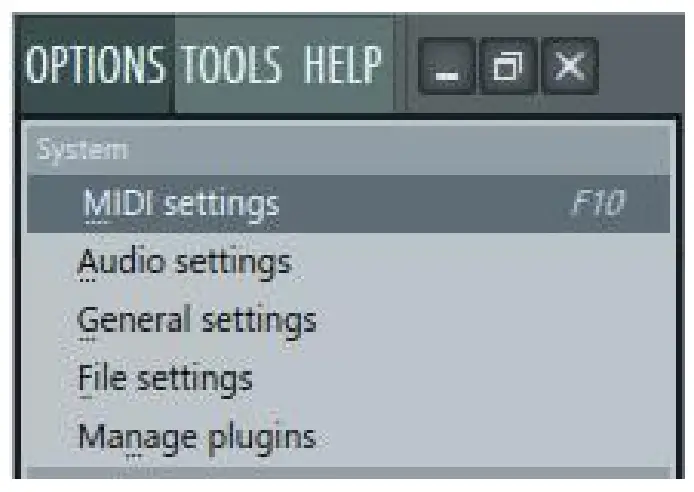
4.2 FL Studio(MMC)
- Go to menu: Options > MIDI settings (keyboard shortcut F10)

- In the Input tab, find and Enable Vboard 25, then close the window to finish setup

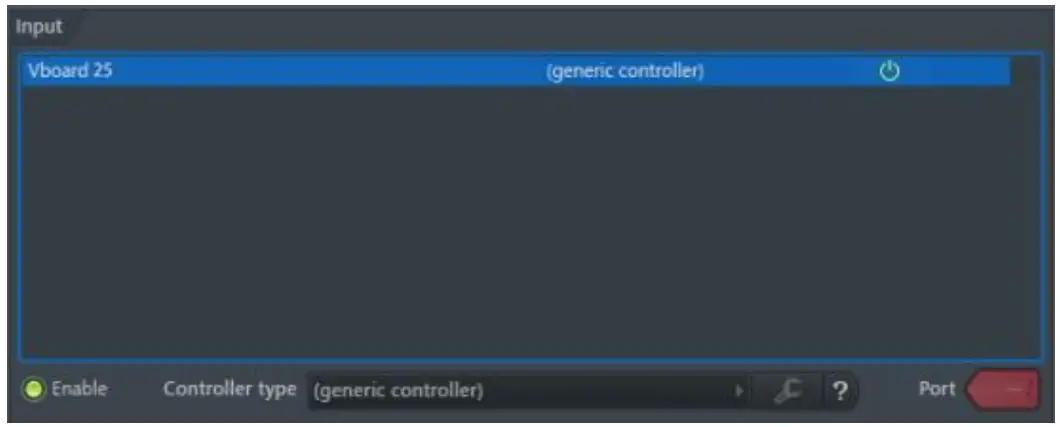
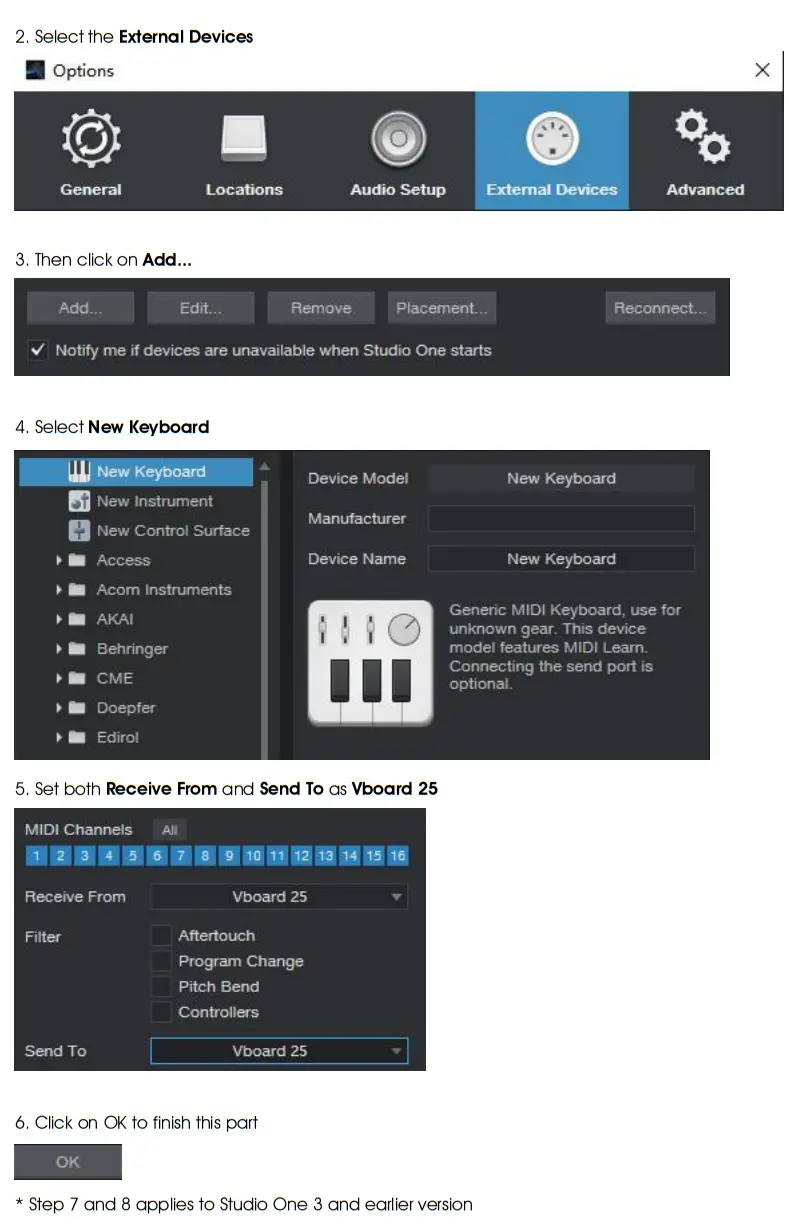
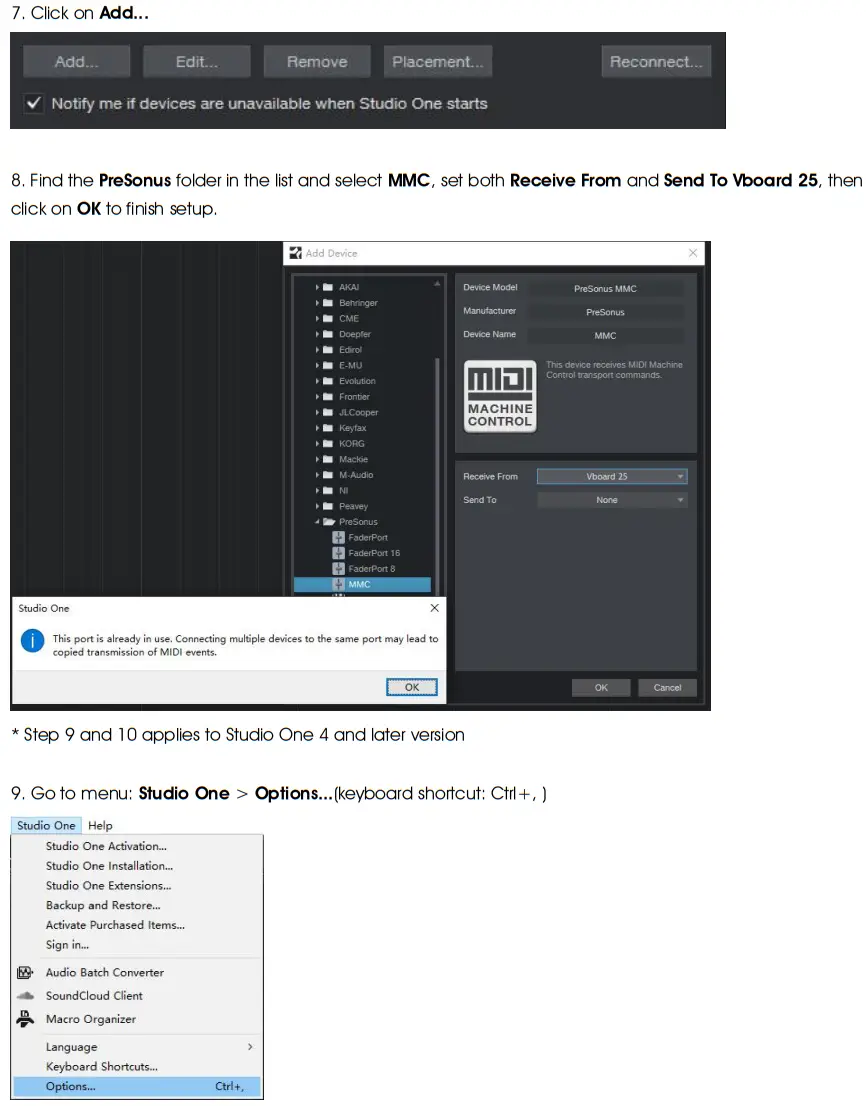
4.3 Studio One (MMC)
1. Go to menu: Studio One > Options…(keyboard shortcut: Ctrl+, )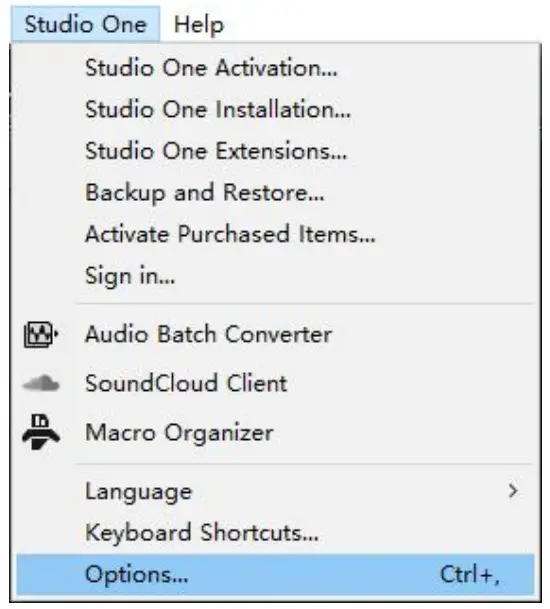
 10. Select the Advanced and select the Synchronization, enable the Sync to External Devices, set MIDI Machine Control is Vboard 25, then click on OK to finish setup.
 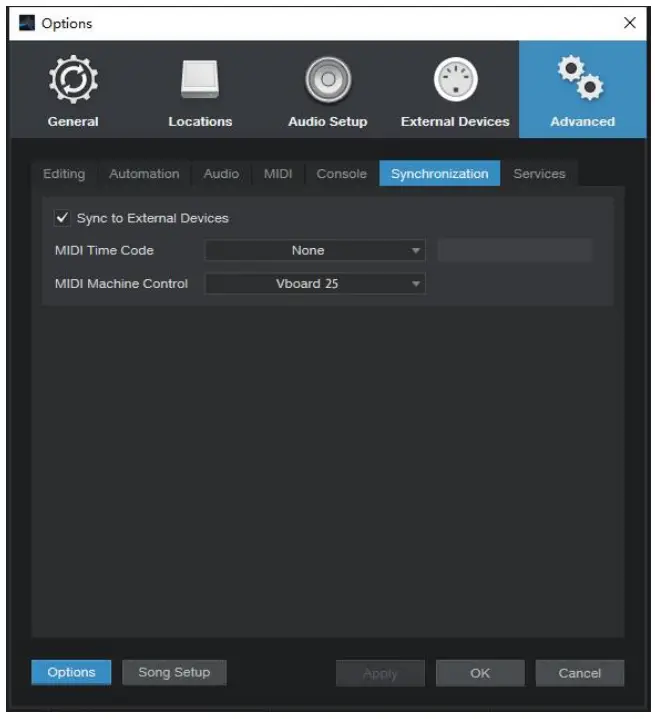 4.4 Pro Tools (MMC)
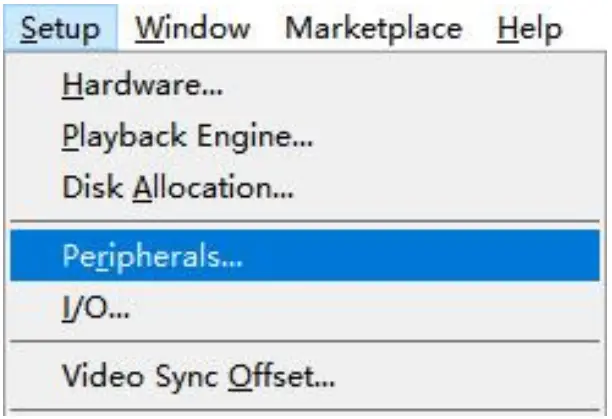
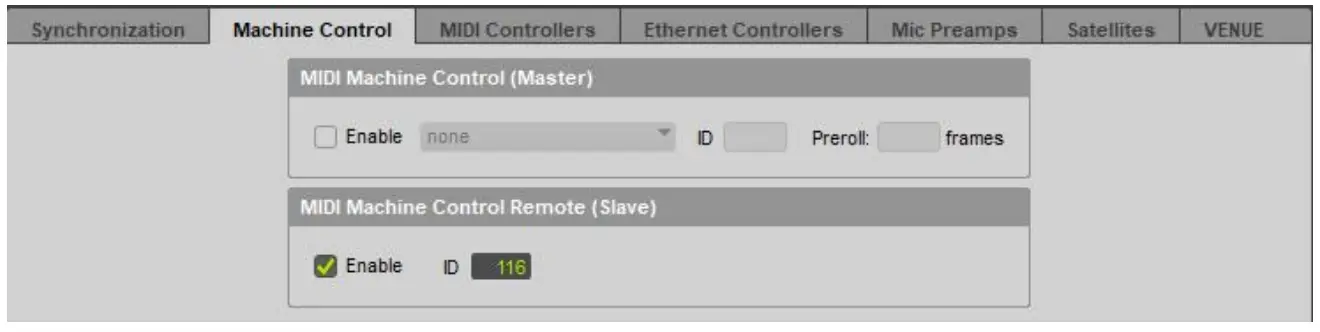
- Go to menu: Setup > Peripherals…

- In the pop-up window, click on the Machine Control tab, find the MIDI Machine Control Remote (Slave) and click it, set the ID as 116, then close the window to finish setup.

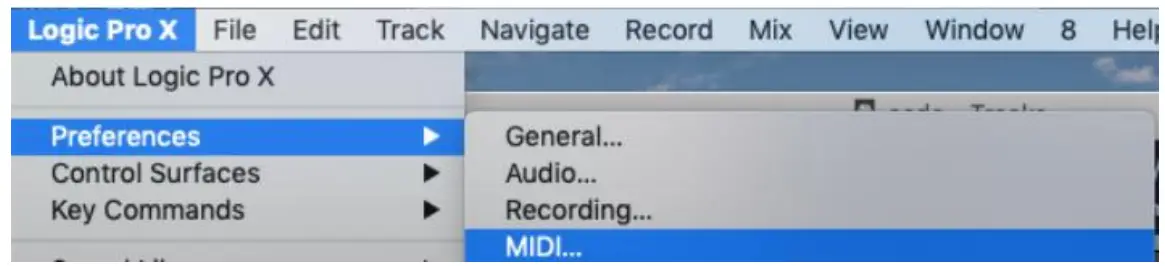
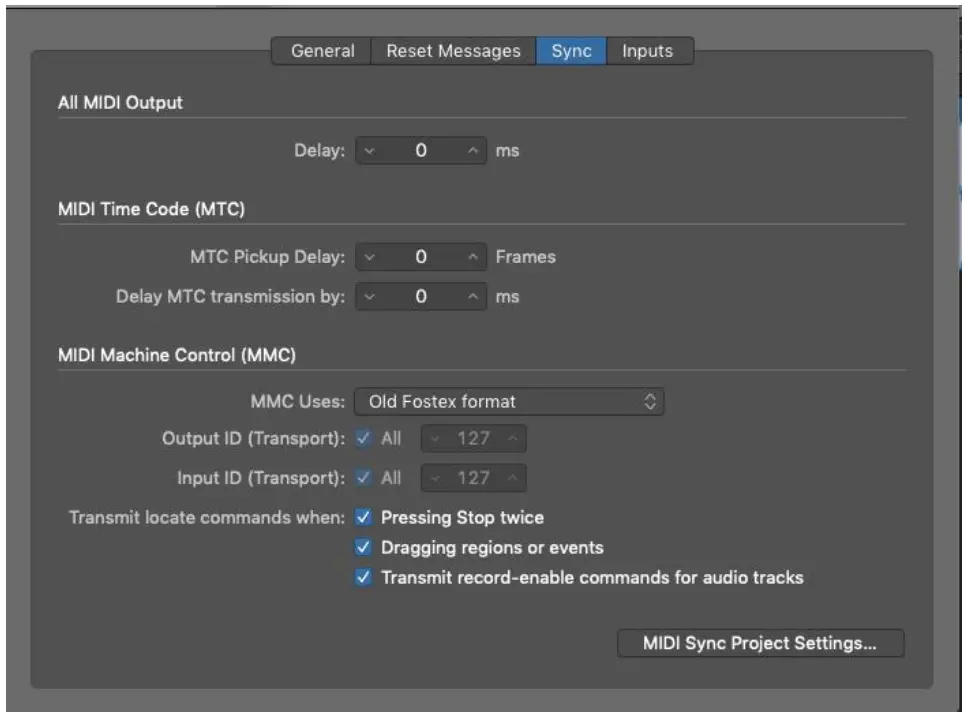
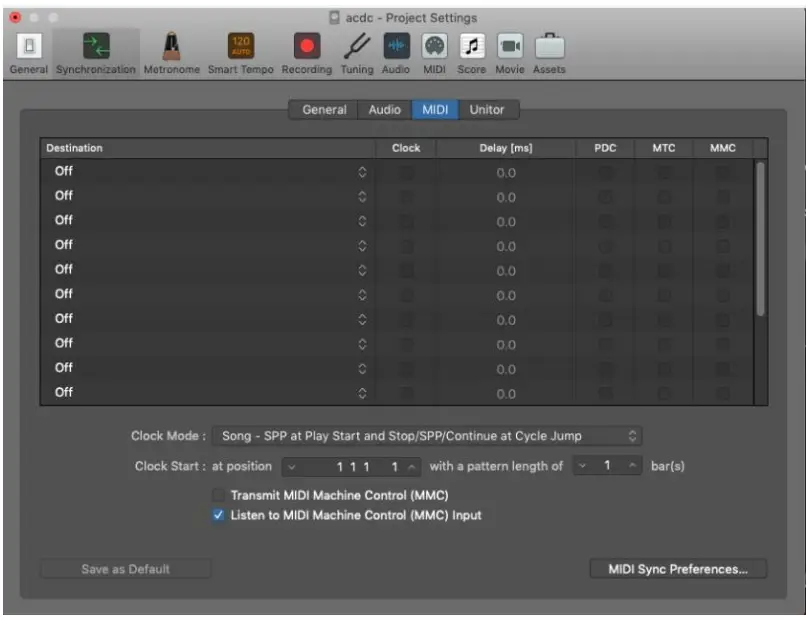
4.5 Logic Pro X (MMC)
- Go to menu: Control Surfaces > MIDI…

- Select the Sync window, find the MIDI sync Project Settings… and click on it

- Enable the Listen to MIDI Machine Control (MMC) Input , then close the window to finish setup.

4.6 Reaper (MMC)
- Go to menu: Options > Preferences… (keyboard shortcut: Ctrl + P)
 2. In the Preferences window, click on the MIDI Devices tab, find and right click on the the Vboard 25 from the Device list, select Enable input and Enable input for control messages, then close the window to finish setup.
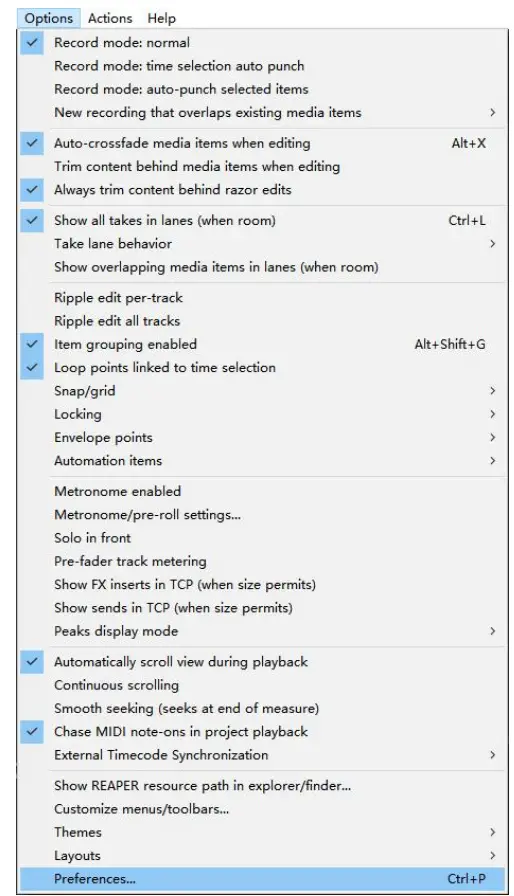 2. In the Preferences window, click on the MIDI Devices tab, find and right click on the the Vboard 25 from the Device list, select Enable input and Enable input for control messages, then close the window to finish setup.
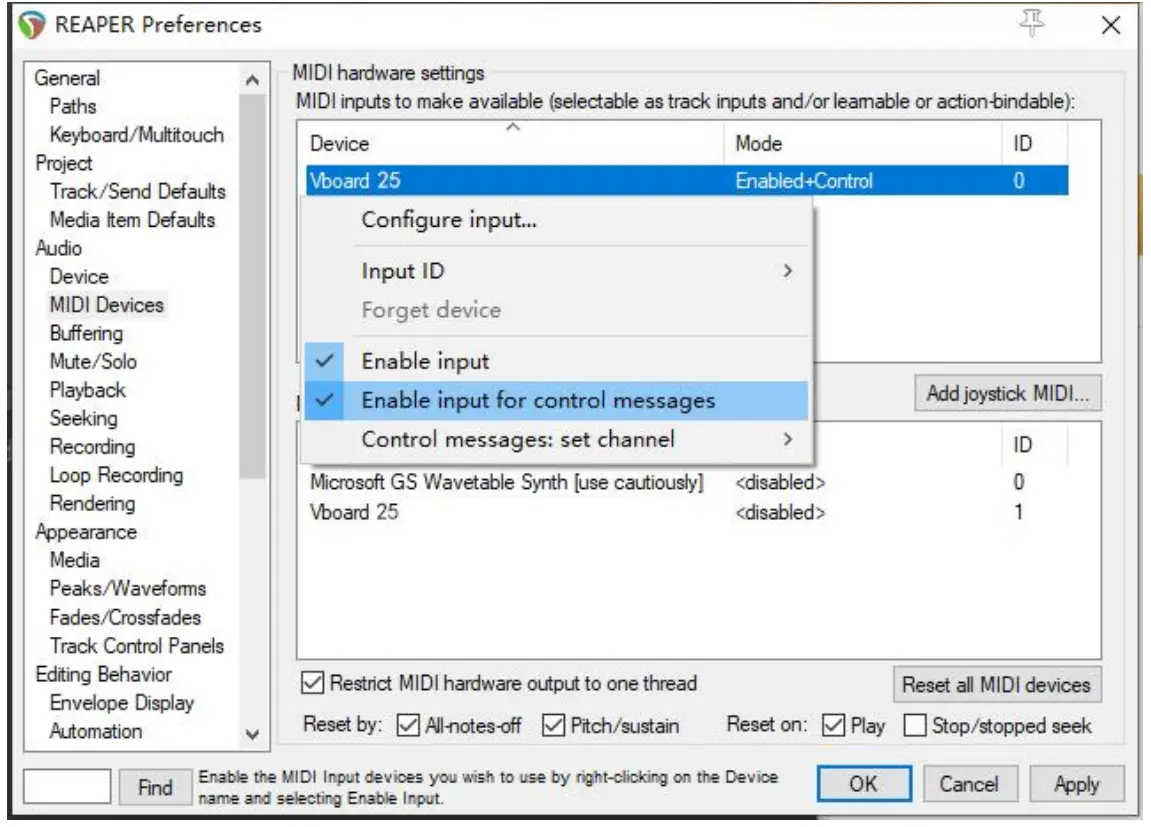
Bluetooth MIDI Connect(iOS)
1. Turn on the Bluetooth on your iOS device,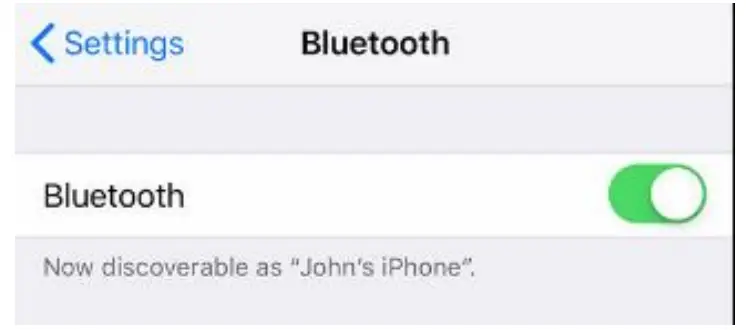 2. Open the App whitch support Bluetooth MIDI, take GarageBand as an example:
 3. After selected a instrument, click sitting in the upper right corner,
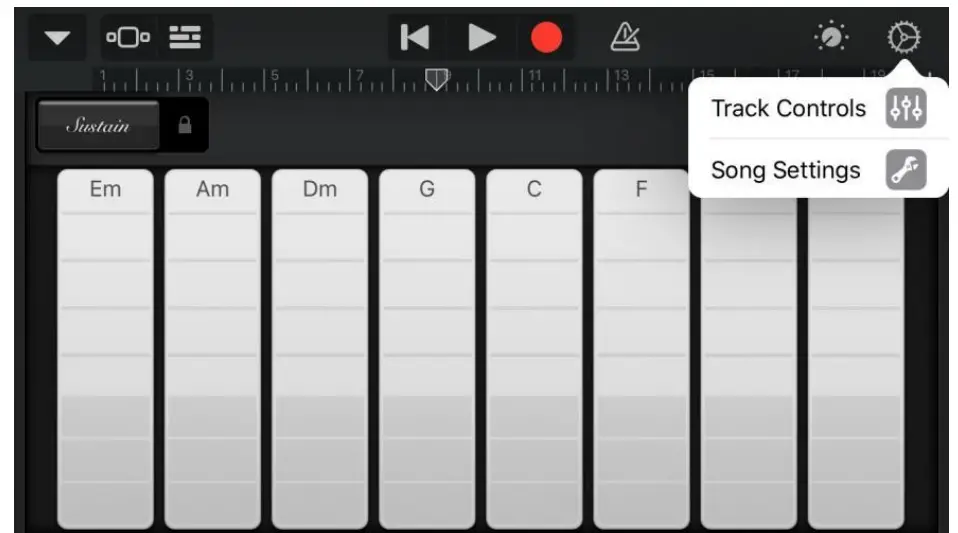 4. Tap on the Advanced menu
 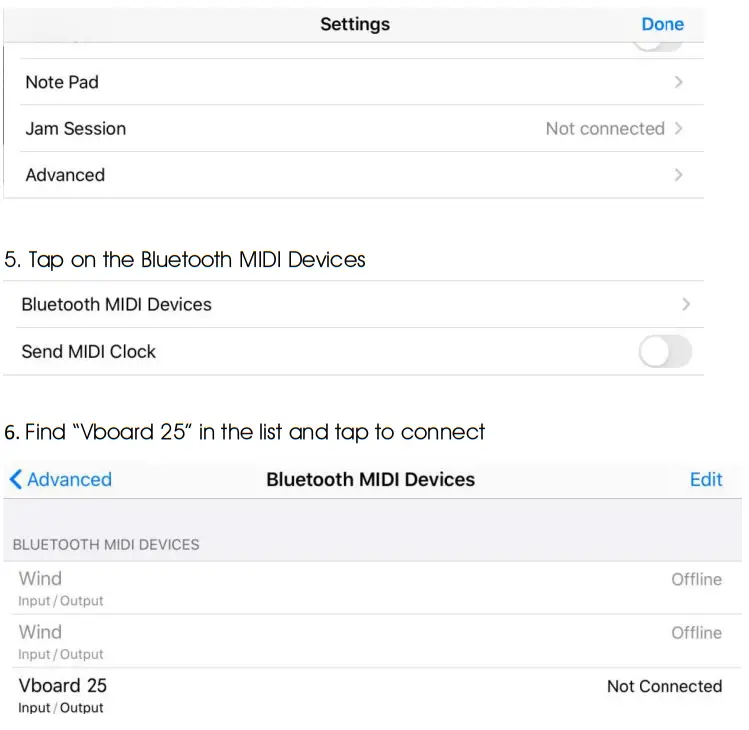 Note: Bluetooth MIDI communication has a certain delay, and its connection stability will be affected by transmission distance, environment, obstacles, data volume, devices and other factors. If you have requirements on Bluetooth latency and connection stability, it is recommended to connect you device through USB or MIDI cable.
Appendix
6.1 Specifications.
| Model | Vboard 25 |
| Keyboard | 25 notes keyboard with velocity sensitive |
| Maximum Polyphony Screen | 64 |
| Screen | Nixie tube |
| Buttons | 1 Power Switch, 2 Octave, 1 Trans, 3 Transport, 1 SHIFT, 1 Tap Tempo, 1 Sustain, 1 Pad CC, 1 Pad CH, 1 Pad 9 – 16, 1 Chord, 1 Arpeggiator and 1 Hold buttons. |
| Knobs | 4 Assignable Knobs |
| Pads | 8 velocity and pressure sensitive pads with backlit |
| Connectors | 1 USB Type C, 1 1 MIDI out, 1 Sustain, 1 Mod out, 1 Gate out and 1 Pitch out |
| Dimensions | Folding: 374 x 126 x 48 (mm) Unfolding: 374 x 250 x 29 (mm) |
| Net Weight | 1.07 kg |
6.2 Scales
| Display | Scale | Degree Formula |
 | – | – |
| China1 | C, D, E, G, A | |
| China2 | C, Eb, F, G, Bb | |
| Japan1 | C, Db, F, G, Bb | |
| Japan2 | C, D, Eb, G, Ab | |
| Blues | C, Eb, F, F#, G, Bb | |
| BeBop | C, D, E, F, G, A, Bb, B | |
| Whole Tone | C, D, E, F#, G#, Bb | |
| Egypt | C, Db, Eb, E, G, Ab, Bb | |
| Dorian | C, D, Eb, F, G, A, Bb | |
| Middle East | C, Db, E, F, G, Ab, B | |
| Harmonic Minor | C, D, Eb, F, G, Ab, B | |
| Minor | C, D, Eb, F, G, Ab, Bb | |
| Phrygian | C, Db, Eb, F, G, Ab, Bb | |
| Hung Min | C, D, Eb, F#, G, Ab, B |
6.3 MIDI CC List
| CC Number | Purpose | CC Number | Purpose |
| 0 | Bank Select MSB | 66 | Sostenuto On/Off |
| 1 | Modulation | 67 | Soft Pedal On/Off |
| 2 | Breath Controller | 68 | Legato Footswitch |
| 3 | Undefined | 69 | Hold 2 |
| 4 | Foot Controller | 70 | Sound Variation |
| 5 | Portamento Time | 71 | Timbre/Harmonic Intens |
| 6 | Data Entry MSB | 72 | Release Time |
| 7 | Main Volume | 73 | Attack Time |
| 8 | Balance | 74 | Brightness |
| 9 | Undefined | 75 ~ 79 | Undefined |
| 10 | Pan | 80 ~ 83 | General Purpose Controller 5 ~ 8 |
| 11 | Expression Controller | 84 | Portamento Control |
| 12 ~ 13 | Effect Controller 1 ~ 2 | 85 ~ 90 | Undefined |
| 14 ~ 15 | Undefined | 91 | Reverb Send Level |
| 16 ~ 19 | General Purpose Controller 1 ~ 4 | 92 | Effects 2 Depth |
| 20 ~ 31 | Undefined | 93 | Chorus Send Level |
| 32 | Bank Select LSB | 94 | Effects 4 Depth |
| 33 | Modulation LSB | 95 | Effects 5 Depth |
| 34 | Breath Controller LSB | 96 | Data Increment |
| 35 | Undefined | 97 | Data Decrement |
| 36 | Foot Controller LSB | 98 | NRPN LSB |
| 37 | Portamento LSB | 99 | NRPN MSB |
| 38 | Data Entry LSB | 100 | RPN LSB |
| 39 | Main Volume LSB | 101 | RPN MSB |
| 40 | Balance LSB | 102 ~ 119 | Undefined |
| 41 | Undefined | 120 | All Sound Off |
| 42 | Pan LSB | 121 | Reset All Controllers |
| 43 | Expression Controller LSB | 122 | Local Control On/Off |
| 44 ~ 45 | Effect Controller LSB 1 ~ 2 | 123 | All Notes Off |
| 46 ~ 48 | Undefined | 124 | Omni Mode Off |
| 49 ~ 52 | General Purpose Controller LSB 1 ~ 4 | 125 | Omni Mode On |
| 53 ~ 63 | Undefined | 126 | Mono Mode On |
| 64 | Sustain | 127 | Poly Mode On |
| 65 | Portamento On/Off |
6.4 MIDI DIN to 3.5mm TRS Adapter
Vboard 25 features a 3.5mm mini jack MIDI OUT, if you want to connect to the standard 5 pin MIDI IN, you need to use a 3.5mm TRS to MIDI DIN adapter, please note that there are 3 most common type adapter, make sure you are using the Type A, the MIDI-pin arrangement as below: 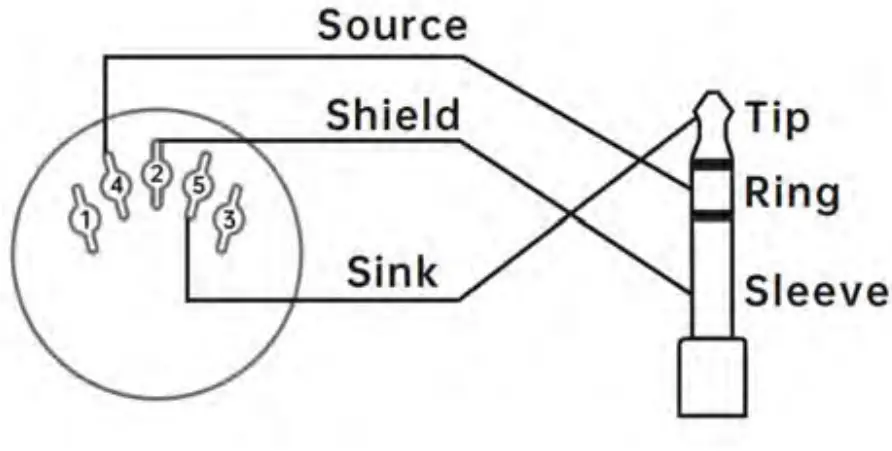
![]() MIDI 4 (Source) > TRS Ring
MIDI 4 (Source) > TRS Ring
MIDI 2 (Shield) > TRS Sleeve
MIDI 5 (Sink) > TRS Tip
www.midiplus.com


![Midiplus X Pro Mini Series Midi Keyboard User Manual [x4 Pro Mini, X6 Pro Mini]](https://static-data1.manualsee.com/1/img/304/59766/2021/02/Midiplus-X-pro-mini-Series-MIDI-Keyboard-User-Manual-X4-pro-mini-X6-pro-mini.jpg "Midiplus X Pro Mini Series Midi Keyboard User Manual [x4 Pro Mini, X6 Pro Mini]")


