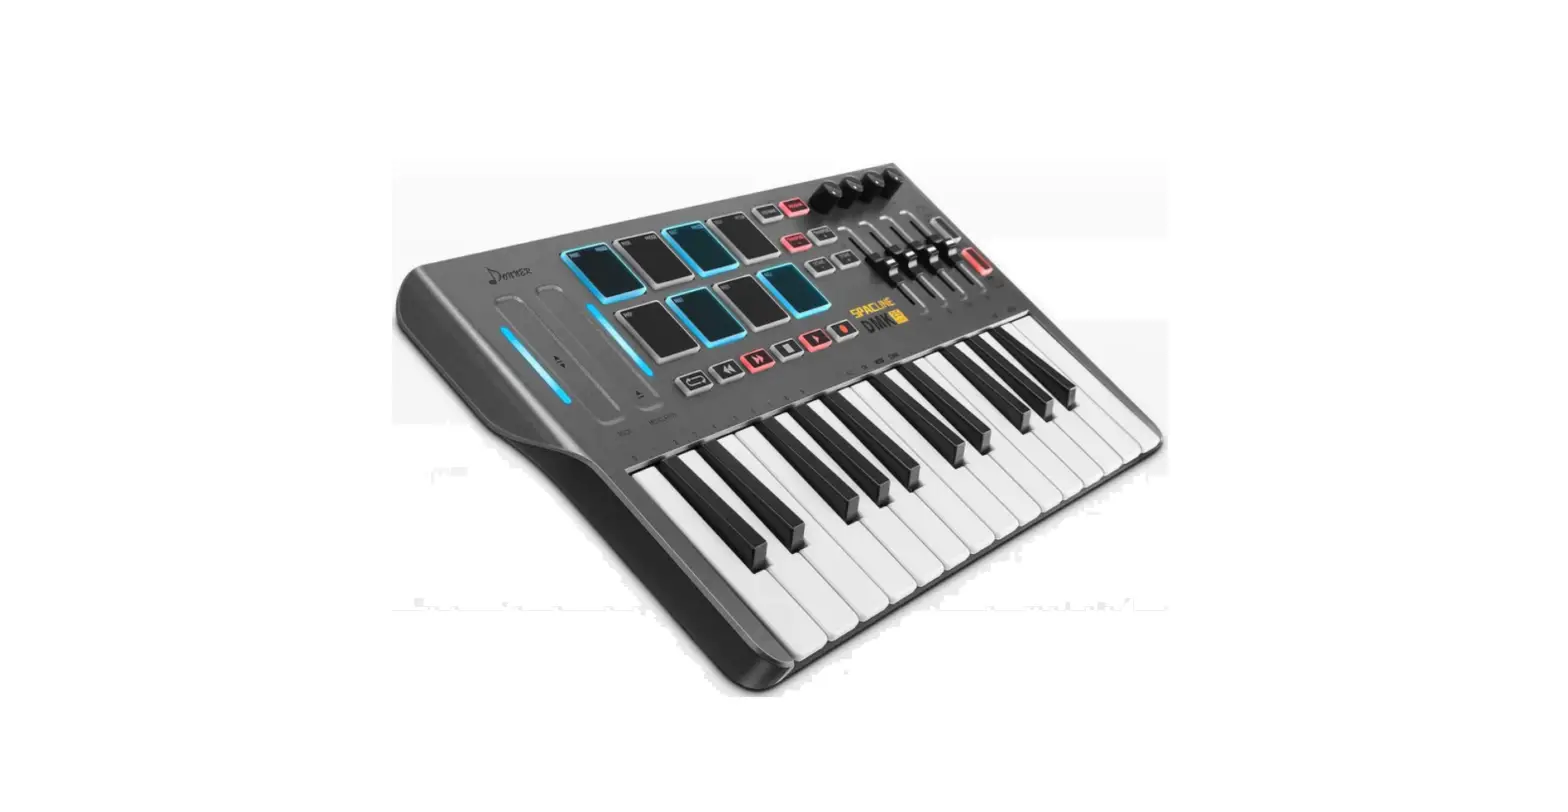
DONNER DMK-25 MIDI Keyboard Controller Owner’s Manual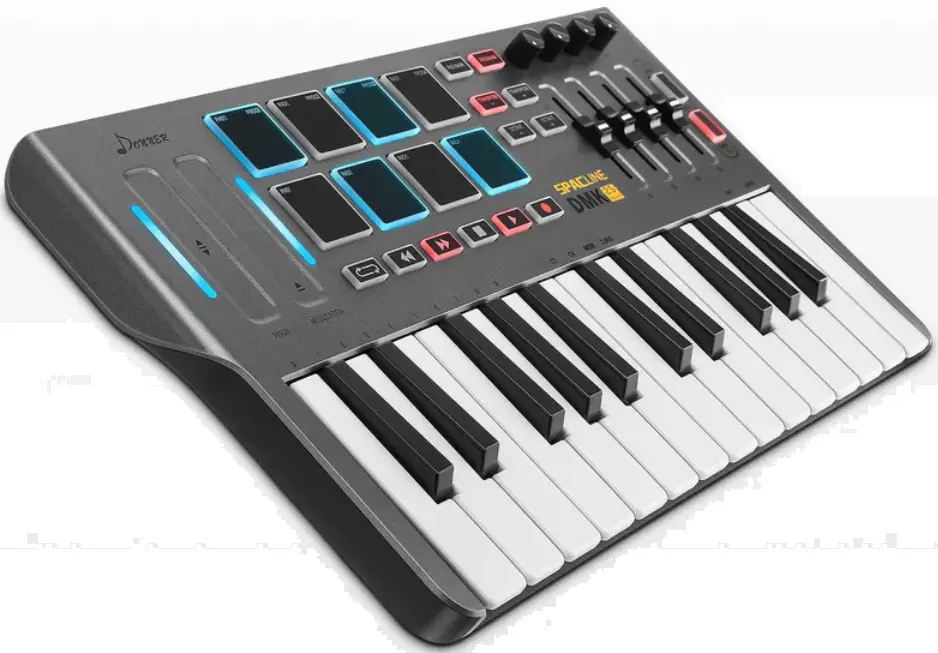
PACKAGE INCLUDES
- DMK-25 midi keyboard
- A standard USB cable
- Owner’s Manual
CONNECTABLE SOFTWARE
- Cubase/Nuendo
- audition
- Cakewalk/Sonar
- Pro tools
- FI stuido
- Garageband
- Logic
- Kontakt
- Reaper
- Reason
- Waveform
FEATURE
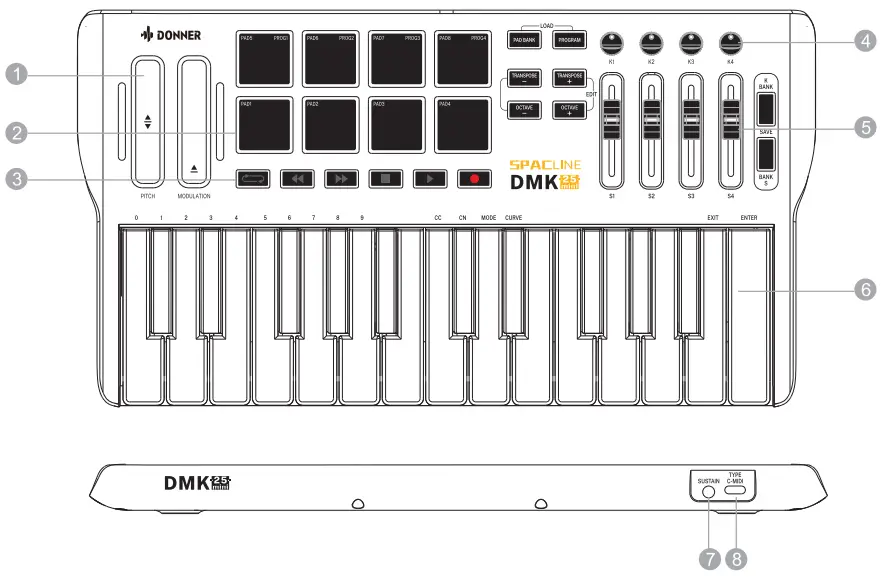
PITCH/MODULATION
Assignable Touch Bar, can be assigned to send Control Change message (hereinafter called the ‘CC’) or Pitch Bend Change message (hereinafter called the ‘Pitch’). The MIDI Channel is assignable for each of them . The range is 0-16. 0 is the Global channel, which will follow the Keyboard’s channel. 1-16 is the standard MIDI channel.
PAD
Assignable PAD, can be assigned to send Note Change message (hereinafter called the ’Note’) or Program Change message (hereinafter called the ’PC’). Use the [PAD Bank] to switch Bank A or Bank B. Use the [PROGRAM] to switch the pads to send Note or PC (PROGRAM CHANGE) message. You can change the PC signal to be emitted through the editor. The MIDI Channel is assignable for each of them . The range is 0-16 (the same as the Touch Bar).
TRANSPORT BUTTON
- Assignable Buttons, can be assigned to send CC messages.
- The MIDI Channel is assignable for each of them. The range is 0-16 (the same as the Touch Bar).
- The Buttons have 2 Modes, 0 for ToggIe,1 for Momentary.
- Toggle: The button “latches”; it sends its message continuously when it is first pressed and stops sending it when it is pressed a second time.
- Momentary: The button sends its message while being pressed and stops sending it when it is released.
KI-K4
- Assignable Knobs, can be assigned to send CC messages.
- Use the [K Bank] to switch Bank A or Bank B.
- The MIDI Channel is assignable for each of them . The range is 0-16 (the same as the Touch Bar).
S1-S4
- Assignable Sliders, can be assigned to send CC messages.
- Use the [S Bank] to switch Bank A or Bank B.
- The MIDI Channel is assignable for each of them .The range is 0-16 (the same as theTouch Bar).
KEYBOARD
- The MIDI Channel is assignable, The range is 1-16;
- 4 touch Curve, The range is 0-3;
- Use the | RANSPOSE +/-] to change the pitch up/down by semi-tone, the range is -12-12. Press the [TRANSPOSE +]and the [TRANSPOSE -] at the same time will set the transpose to 0;
- Use the [OCTAVE +/-] to change the pitch up/down by octave, the range is -3-3 .Press the [OCTAVE +] and the [OCTAVE -] at the same time will set the octave to 0;
- Multi-Function for EDIT,
SUSTAIN
- The sustain pedal interface can be connected to the pedal to achieve the sustain function.
The CC and CN values can also be modified via the editor. - The MIDI Channel is assignable, The range is 0-16 (the same as the Touch Bar)
USB INTERFACE
- The interface type is TYPE C, use a standard USB cable to connect to the computer, and connect the DAW software to load the audio source can be used.
- Note that when the connected device interface is not the usual USB A port, you need to use an adapter cable with OTG function to transfer.
- Power Supply: USB SUPPLY : 5V 100mA
SAVE/LOAD
Note:
Every time the DMK25 is turned on, the settings in the RAM registers will be read.
If you need to use the custom settings PROG1-PROG4, you need to use the [LOAD] function to load them.
Every time after editing DMK25, you need to use the [SAVE] function to save.
4 Program Presets, PROG1-PROG4.
- LOAD
- Press [PAD BANK] and [PROGRAM] at the same time to enter the Loading state, the LED of [PAD BANK] and [PROGRAM] blinking, press PROG1-PROG4 you want to load the program preset, the PROG you press will lights if this PROG is not empty.
- It will exit the loading state 3 seconds later after you press(or not press) one PROG, or you can press [PAD BANK] or [PROGRAM] to exit the loading state quickly.
- SAVE
- Press [K BANK] and [S BANK] at the same time to enter the Saving state, the LED of [K BANK] and [S BANK] blinking, press PROG1-PROG4 you want to save the parameter, the PROG you press will lights.
- It will exit the saving state 3 second later after you press(or not press) one PROG, or you can press [K BANK] or [S BANK] to exit the saving state quickly.
EDIT
Press {TRANSPOSE +] and [OCTAVE +] at the same time to enter the Edit state , the LED of {TRANSPOSE +/-] and [OCTAVE +/-] blinking.
After entering EDIT mode, the operation steps are:
First, select the content to be modified (CC, CN, MODE, CURVE, etc., the operation can be switched with each other, switching will save the previously entered value);
Then select the object to be modified (such as touch bar, strike pad, keyboard, knob, etc., the operation can be switched with each other, switching will save the previously entered value);
Then in the keyboard area, enter corresponding value in the keyboard area. When all edits are completed, click [EXIT] or [ENTER] to cancel or store the edits.
CC(ASSIGN):
- Assign each unit(Touch Bar, PAD, Button, Knob, Slider, Pedal, Keyboard)’s number of the CC(or Note, or PC) message.
- Press [CC] to enter CCAssignment state, choose one unit you want to assign, by the press or move it , the LED beside it will light):
- if you choose K1-K4, the | RANSPOSE +] blink;
- if S1-S4, the | RANSPOSE -] blink;
- if PEDAL, the [OCTAVE +] blink; if the Keyboard, the [OCTAVE -] blink
- Use the number key 0-9 to enter the number like this way: 000, 001, 002,…….127.
- Choose another unit you want to assign one by one before EXIT or ENTER
CN(CHANNEL):
- Assign each unit’s channel.
- Press [CN] to enter ChannelAssignment state, choose one unit you want to assign, the same as above.
- Press any blank key (the key without any function on it ) of the Keyboard to choose the Keyboard.
- Use the number key 0-9 to enter the number like this way: 00, 01, 01, …… 16.
- Choose another unit you want to assign one by one before EXIT or ENTER
MODE:
- Assign the mode of the Buttons.
- Press [MODE] to enter Mode Assignment state, choose one button you want to assign.
- Use the number key 0-1 to enter the number like this way: 0 or 1.0 for Toggle, 1 for Momentary.
- Choose another button you want to assign one by one before EXIT or ENTER
CURVE:
- Assign the touch curve of PAD or Keyboard.
- Press [CURVE] to enter Curve Assignment state, choose PAD or Keyboard you want to assign.
- Use the number key 0-4 to enter the number like this way: 0,1,. …..4.
Hitting Pad Strength Curve
Keyboard Force Curve
EXIT:
Exit the EDIT state without any change.
ENTER:
Exit the EDIT state with the change.
ASSIGNABLE UNIT LIST(Native)
The following table shows the default parameters for each module of the machine based on Standard MIDI, listing the range of settings available for each module CC and CN and their default values.
| Unit | Channel Range | Default Channel | Assign Range | Default Assign |
| PITCH | 0-16 | 0 (Global) | 0-128 | 128 (Pitch) |
| MODULATION | 0-16 | 0 (Global) | 0-128 | 1 (Modulation) |
| PAD1 (NOTE)(BANK A) | 0-16 | 10 (Drum) | 0-127 | 36 (Bass Kit) |
| PAD2 (NOTE)(BANK A) | 0-16 | 10 (Drum) | 0-127 | 38 (Snare) |
| PAD3 (NOTE)(BANK A) | 0-16 | 10 (Drum) | 0-127 | 42 (Closed Hi-Hat) |
| PAD4 (NOTE)(BANK A) | 0-16 | 10 (Drum) | 0-127 | 46 (Open Hi-Hat) |
| PAD5 (NOTE)(BANK A) | 0-16 | 10 (Drum) | 0-127 | 49 (Crash Cymbal) |
| PAD6 (NOTE)(BANK A) | 0-16 | 10 (Drum) | 0-127 | 45 (Low Tom) |
| PAD7 (NOTE)(BANK A) | 0-16 | 10 (Drum) | 0-127 | 41 (Floor Tom) |
| PAD8 (NOTE)(BANK A) | 0-16 | 10 (Drum) | 0-127 | 51 (Ride Cymbal) |
| PAD1 (NOTE)(BANK B) | 0-16 | 10 (Drum) | 0-127 | 36 (Bass Kit) |
| PAD2 (NOTE)(BANK B) | 0-16 | 10 (Drum) | 0-127 | 38 (Side Stick) |
| PAD3 (NOTE)(BANK B) | 0-16 | 10 (Drum) | 0-127 | 42 (Closed Hi-Hat) |
| PAD4 (NOTE)(BANK B) | 0-16 | 10 (Drum) | 0-127 | 46 (Open Hi-Hat) |
| PAD5 (NOTE)(BANK B) | 0-16 | 10 (Drum) | 0-127 | 49 (Crash Cymbal) |
| PAD6 (NOTE)(BANK B) | 0-16 | 10 (Drum) | 0-127 | 45 (Low Tom) |
| PAD7 (NOTE)(BANK B) | 0-16 | 10 (Drum) | 0-127 | 41 (Floor Tom) |
| PAD8 (NOTE)(BANK B) | 0-16 | 10 (Drum) | 0-127 | 51 (Ride Cymbal) |
| PAD1-PAD8(PC)(BANK A/B) | 0-16 | 0 (Global) | 0-127 | 0-15 |
| BUTTONS | 0-16 | 1 | 0-127 | 15-20 |
| K1 (BANK A) | 0-16 | 0 (Global) | 0-127 | 10 (Pan) |
| K2 (BANK A) | 0-16 | 0 (Global) | 0-127 | 91 (Reverb) |
| K3 (BANK A) | 0-16 | 0 (Global) | 0-127 | 93 (Chorus) |
| K4 (BANK A) | 0-16 | 0 (Global) | 0-127 | 73 (Attack) |
| K1 (BANK B) | 0-16 | 0 (Global) | 0-127 | 75 (Decay) |
| K2 (BANK B) | 0-16 | 0 (Global) | 0-127 | 72 (Release) |
| K3 (BANK B) | 0-16 | 0 (Global) | 0-127 | 74 (Cutoff} |
| K4 (BANK B) | 0-16 | 0 (Global) | 0-127 | 71 (Resonance) |
| S1-S4 (BANK A/B) | 0-16 | 1-8 | 0-127 | 7 (Volume) |
| PEDAL | 0-16 | 0 (Global) | 0-127 | 64 (Sustain) |
| KEYBOARD | 1-16 | 1 |
ASSIGNABLE UNIT LIST
The table below shows the menu corresponding to the CC value of the controller in the standard MIDI protocol.
For example, changing the CC of a control unit, such as knob K1, to 7 will allow knob K1 to perform the function of controlling the volume of its channel.
Or changing the CC of a control unit, such as knob K1, to 11 will allow knob K1 to control the expression output. Other similarly.
| NO. | DEFINITION | VALUE RANGE |
| 0 | (MSB) BANK SELECT | 0-127 |
| 1 | (MSB) MODULATION | 0-127 |
| 2 | (MSB) BREATH MSB | 0-127 |
| 3 | (MSB) UNDEFINED | 0-127 |
| 4 | (MSB) FOOT CONTROLLER | 0-127 |
| 5 | (MSB) PORTAMENTO TIME | 0-127 |
| 6 | (MSB) DATA ENTRY | 0-127 |
| 7 | (MSB) CHANNEL VOLUME | 0-127 |
| 8 | (MSB) BALANCE | 0-127 |
| 9 | (MSB) UNDEFINED | 0-127 |
| 10 | (MSB) PAN | 0-127 |
| 11 | (MSB) EXPRESSION | 0-127 |
| 12 | (MSB) EFFECT CONTROL 1 | 0-127 |
| 13 | (MSB) EFFECT CONTROL 2 | 0-127 |
| 14-15 | (MSB) UNDEFINED | 0-127 |
| 16 | (MSB) GENERAL PURPOSE CONTROLLER 1 | 0-127 |
| 17 | (MSB) GENERAL PURPOSE CONTROLLER 2 | 0-127 |
| 18 | (MSB) GENERAL PURPOSE CONTROLLER 3 | 0-127 |
| 19 | (MSB) GENERAL PURPOSE CONTROLLER 4 | 0-127 |
| 20-31 | (MSB) UNDEFINED | 0-127 |
| 32 | (LSB) BANK SELECT | 0-127 |
| 33 | (LSB) MODULATION | 0-127 |
| 34 | (LSB) BREATH | 0-127 |
| 35 | (LSB) UNDEFINED | 0-127 |
| 36 | (LSB) FOOT CONTROLLER | 0-127 |
| 37 | (LSB) PORTAMENTO TIME | 0-127 |
| 38 | (LSB) DATA ENTRY | 0-127 |
| 39 | (LSB) CHANNEL VOLUME | 0-127 |
| 40 | (LSB) BALANCE | 0-127 |
| 41 | (LSB) UNDEFINED | 0-127 |
| 42 | (LSB) PAN | 0-127 |
| 43 | (LSB) EXPRESSION | 0-127 |
| 44 | (LSB) EFFECT CONTROL 1 | 0-127 |
| 45 | (LSB) EFFECT CONTROL 2 | 0-127 |
| 46-47 | (LSB) UNDEFINED | 0-127 |
| 48 | (LSB) GENERAL PURPOSE CONTROLLER 1 | 0-127 |
| 49 | (LSB) GENERAL PURPOSE CONTROLLER 2 | 0-127 |
| 50 | (LSB) GENERAL PURPOSE CONTROLLER 3 | 0-127 |
| 51 | (LSB) GENERAL PURPOSE CONTROLLER 4 | 0-127 |
| 52-63 | (LSB) UNDEFINED | 0-127 |
| 64 | SUSTAIN PEDAL | •63OFF,•64ON |
| 65 | PORTAMENTO | <63 OFF, »64 ON |
| 66 | SOSTENUTO | <63 OFF, >64 ON |
| 67 | SOFT PEDAL | <63 OFF, >64 ON |
| 68 | LEGATO FOOTSWITCH | <63 NORMAL, >64 LEGATO |
| 69 | HOLD 2 | <63 OFF, >64 ON |
| 70 | VARIATION | 0127 |
| 71 | RESONANCE | 0-127 |
| 72 | RELEASE TIME | 0127 |
| 73 | ATTACK TIME | 0127 |
| 74 | CUTOFF | 0127 |
| 75 | DECAY TIME | 0127 |
| 76 | VIBRATO RATE | 0127 |
| 77 | VIBRATO DEPTH | 0127 |
| 78 | VIBRATO DELAY | 0127 |
| 79 | UNDEFINED | 0127 |
| 80 | GENERAL PURPOSE CONTROLLER 5 | 0127 |
| 81 | GENERAL PURPOSE CONTROLLER 6 | 0127 |
| 82 | GENERAL PURPOSE CONTROLLER 7 | 0127 |
| 83 | GENERAL PURPOSE CONTROLLER 8 | 0127 |
| 84 | PORTAMENTO CONTROL | 0127 |
| 85-90 | UNDEFINED | 0127 |
| 91 | REVERB DEPTH | 0127 |
| 92 | TREMOLO DEPTH | 0127 |
| 93 | CHORUS DEPTH | 0127 |
| 94 | CELESTE/DETUME DEPTH | 0127 |
| 95 | PHATSER DEPTH | 0127 |
| 96 | DATA INCREMENT | 0127 |
| 97 | DATA DECREMENT | 0127 |
| 98 | (LSB) NRPN | 0127 |
| 99 | (MSB) NRPN | 0127 |
| 100 | (LSB) RPN | 0127 |
| 101 | (MSB) RPN | 0127 |
| 102-119 | UNDEFINED | 0127 |
| 120 | ALL SOUND OFF | 0 |
| 121 | RESET ALL CONTROLLERS | 0 |
| 122 | LOCAL CONTROL | 0OFF,l27ON |
| 123 | ALL NOTES OFF | 0 |
| 124 | OMNI OFF | 0 |
| 125 | OMNI ON | 0 |
| 126 | MONO | 0 |
| 127 | POLY | 0 |
| 128 | PITCH BEND | 0127 |


