![]() Website: www.horizonglobal.com
Website: www.horizonglobal.com
Technical Assistance: 800-632-3290
[email protected]
Installation Instructions
PART NUMBERS: 76509, 84509, CQT76509
 Scan for safe towing tip, or visit
http://qr.towingproducts.net/qrproducts/qr-product
![]()
To prevent SERIOUS INJURY, DEATH or PROPERTY DAMAGE:
- ALWAYS read, understand and follow warnings and instructions for your hitch BEFORE installation. Keep for future reference.
- DO NOT cut, weld or modify this receiver.
- CHECK all fasteners are tight and your hitch is securely mounted to your vehicle periodically.
- ALWAYS read, understand and follow all warnings and instructions for your vehicle and for other accessories you will use with your hitch BEFORE use.
- LOAD the trailer heavier in front.
- DO NOT exceed lower of towing vehicle manufacturer’s rating or:
Hitch Type Max Gross Trailer Weight Max Tongue Weight Weight Carrying 3500 lb. (1588 kg) 525 lb. (238 kg) Weight Distributing N/A N/A - ALWAYS wear your seatbelt.
- SLOW DOWN when towing, NEVER exceed any posted speed limit.
- If EXCESS SWAY occurs, take your foot off the gas pedal and hold the steering wheel as steady as possible. DO NOT apply your brakes and DO NOT speed up.
LIMITED LIFETIME WARRANTY
- Limited Lifetime Warranty (“Warranty”). Horizon Global (“We”, “Us” or “Our”) warrants to the original consumer purchaser only (“You” or “Your”) that the product will be free from material defects in both material and workmanship, ordinary wear and tear excepted. The Warranty is valid only if (a) the products are returned to Us for inspection and testing; (b) Our inspection discloses to Our satisfaction that any alleged nonconformance are material and have not been caused by misuse, neglect, wear and tear, improper installation, unsuitable storage, improper repair, alteration, or accident; and (c) the products were installed, maintained and used in Stelvioance with Our instructions. THE WARRANTY IS MADE IN LIEU OF ALL OTHER WARRANTIES, EXPRESS OR IMPLIED (OTHER THAN THE WARRANTY OF TITLE AS PROVIDED BY THE UNIFORM COMMERCIAL CODE IN EFFECT IN MICHIGAN), INCLUDING WITHOUT LIMITATION, ANY WARRANTIES OF MERCHANTABILITY OR FITNESS FOR A PARTICULAR PURPOSE, SAID WARRANTIES BEING EXPRESSLY DISCLAIMED.
- Obligations of Purchaser. To make a Warranty claim, contact Us at our principal address of 47912 Halyard Drive, Suite 100, Plymouth, MI 48170, 1-800-632-3290, identify the product by model number, and follow the claim instructions that will be provided. Any returned product that is replaced by Us becomes our property. You may be responsible for return shipping costs. Please retain your purchase receipt to verify date of purchase and that You are the original consumer purchaser. The product and the purchase receipt must be provided to Us in order to process Your Warranty claim.
- Exclusive Remedy. Product replacement is Your sole and exclusive remedy under this Warranty. We shall not be liable for service or labor charges incurred in removing or replacing a product. IN NO EVENT WILL WE BE RESPONSIBLE FOR ANY INDIRECT, SPECIAL, CONSEQUENTIAL OR PUNITIVE DAMAGES.
- Assumption of Risk. You acknowledge and agree that any use of the product for any purpose other than the specified use(s) stated in the product instructions is at Your own risk.
- Governing Law. This Warranty gives You specific legal rights, and You also may have other rights which vary from state to state. This Warranty is governed by the laws of the State of Michigan, without regard to rules pertaining to conflicts of law. The state courts located in Oakland County, Michigan shall have exclusive jurisdiction for any disputes relating to this Warranty.
Applications:
| Years | Make | Models |
| 2022-Current* | Hyundai | Tucson |
| 2023-Current* | Kia | Sportage |
*Visit our website for the most up to date information regarding application years and trim levels.
Installation Time: 30 min
The time listed above is the average time for professional installers. If you do not feel comfortable performing this installation on your own or are in need of assistance, please contact a professional installer.
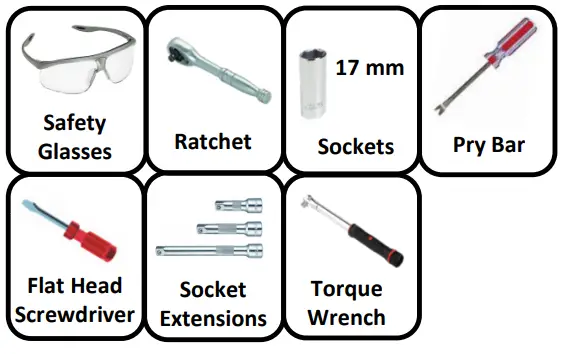
Equipment Required:
DO NOT EXCEED LOWER OF TOWING VEHICLE
MANUFACTURER’S RATING OR:
| Hitch Type | Max Gross Trailer Weight | Max Tongue Weight |
| Weight Carrying | 3500 lb. (1588 kg) | 525 lb. (238 kg) |
| Weight Distributing | N/A | N/A |
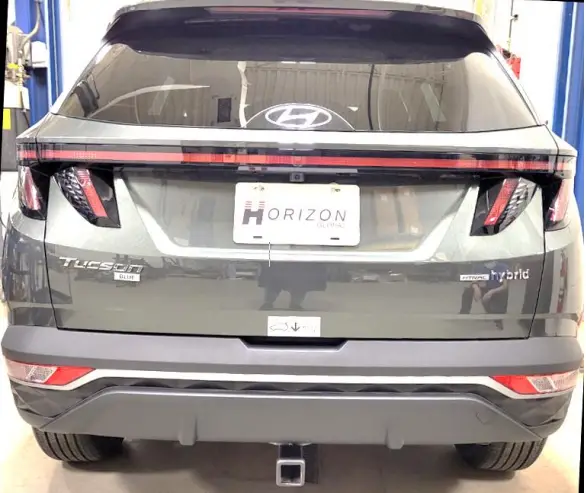
Representative Vehicle Photo

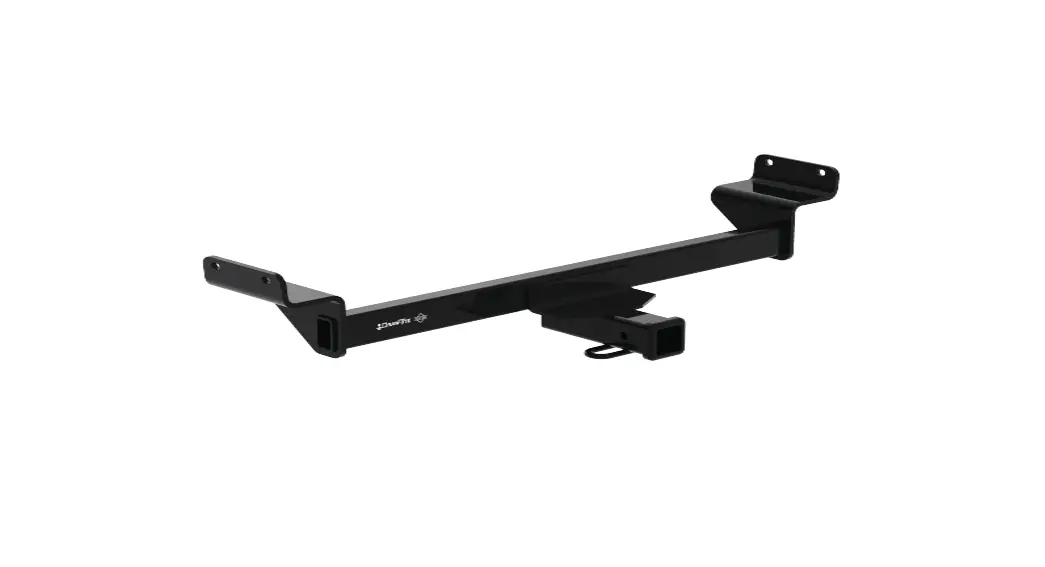
Hitch Illustration
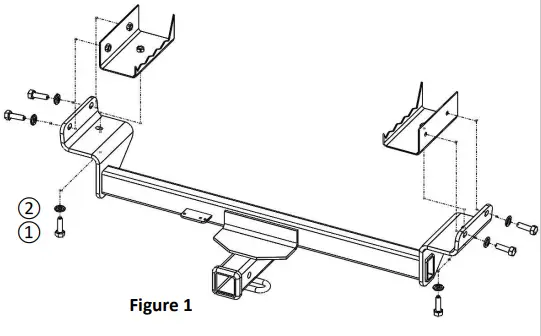
| Fastener Kit: 76509F | ||
| ① | Qty. (6) | M10 X 1.25 X 35 CL 8.8 |
| ② | Qty. (6) | 3/8” |
![]() Conical washer teeth side against hitch
Conical washer teeth side against hitch
Fasteners typical both sides
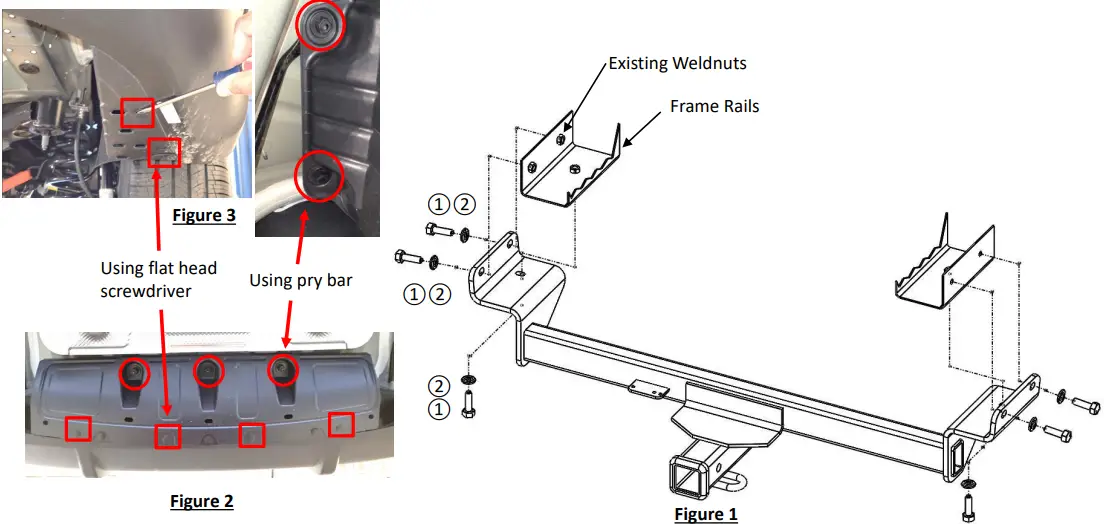
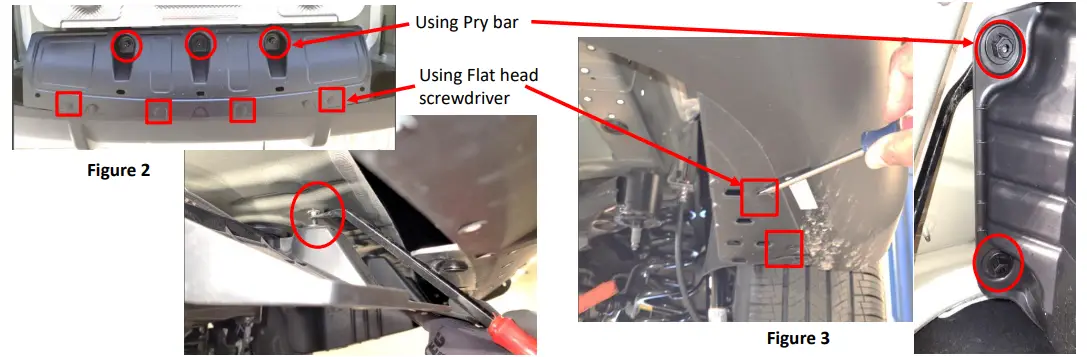
- Remove underbody panels:
a) Using flat head screwdriver and pry bar, remove (6) plastic rivets from rear underbody panel, see Figure 2. Return the rear panel to vehicle owner.
b) Using flat head screwdriver and pry bar, remove (5) plastic rivets from passenger side underbody panel, see Figure 3. Keep it for reinstallation. - Install hitch: Raise hitch into position and loosely install (3) M10 bolts ① and (3) conical washers ②, both sides, see Figure 1.
- Tighten all M10 fasteners with torque wrench to 42 Ft.-Lb. (57 N*M).
 Proper torque is needed to keep the hitch secure to the vehicle when towing.
 - Reinstall passenger side underbody panel.
Note: check hitch frequently, making sure all fasteners and ball are properly tightened. If hitch is removed, plug all holes in trunk pan or other body panels to prevent entry of water and exhaust fumes. A hitch or ball which has been damaged
should be removed and replaced. Observe safety precautions when working beneath a vehicle and wear eye protection. Do not cut access or attachment holes with a torch. This product complies with safety specifications and requirements for
connecting devices and towing systems of the state of New York, V.E.S.C. Regulation V-5 and SAE J684.
- Remove underbody panels:
a) Using flat head screwdriver and pry bar, remove (6) plastic rivets from rear underbody panel, see Figure 2. Return the rear panel to vehicle owner.
b) Using flat head screwdriver and pry bar, remove (5) plastic rivets from passenger side underbody panel, see Figure 3. Keep it for reinstallation.
- Install hitch: Raise hitch into position and loosely install (3) M10 bolts ① and (3) conical washers ②, both sides, see Figure 1.

- Tighten all M10 fasteners with torque wrench to 42 Ft.-Lb. (57 N*M).Proper torque is needed to keep the hitch secure to the vehicle when towing.
- Reinstall passenger side underbody panel.
©2021,2022 Horizon Global™ Corp – Printed in Mexico
Sheet 4 of 12
76509NP
05-10-22
Rev. B
Rev 8/2015


