AES GLOBAL MON-11-V2 Android Wall Mount Monitor User Manual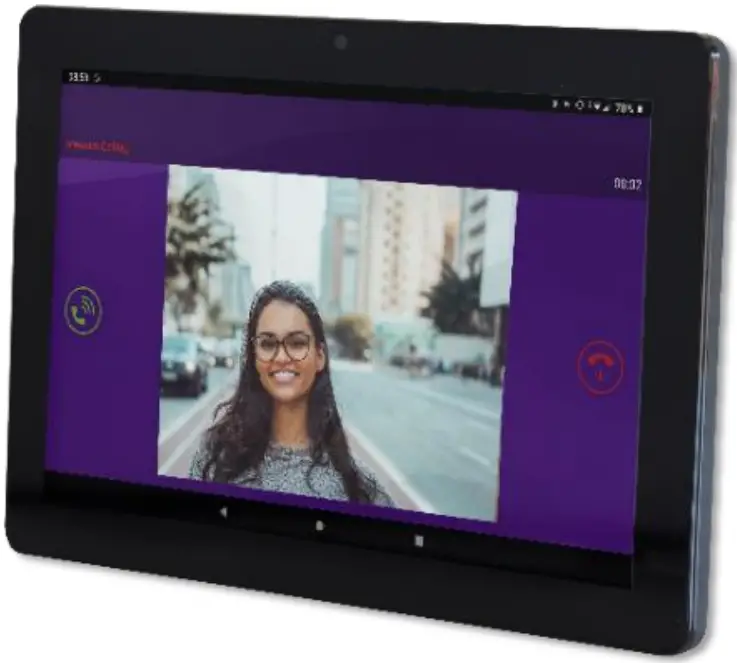
Important Notices
Since the monitor software updates regularly, the user manual may not cover all aspects of new features.
Copyright Information
All intellectual property rights in this publication are owned by and protected by applicable copyright laws and international treaty provisions. No part of this publication may be reproduced in any form whatsoever or used to make any derivative work without prior written approval by AES Global Ltd.
AES Global Ltd reserves the right to revise this publication, and/or make improvements or changes in the product(s) and/or the program(s) described in this documentation at any time without prior notice. The information in this document is provided in good faith, but without any representation or warranty whatsoever, whether it is accurate, or complete or otherwise, and on express understanding that shall have no liability whatsoever to other parties in any way arising from or relating to the information or its use.
All other trademarks are the property of their respective owners. Other company and brand products and service names are trademarks or registered trademarks of their respective holders.
- Do not push objects into holes and ventilation slots.
- Do not expose this product to moisture or place any objects filed with liquids on or near the product.
- Do not place a naked flame source, such as lighted candles, on or near this product.
- Do not store or operate the device in environments where the temperature is above 50 degrees Celsius or below -10 degrees Celsius.
- Do not intentionally hit the device or place heavy or sharp objects on the device.
- Only use accessories specified by the manufacturer.
- Keep the device away from benzene, diluents, and other chemicals.
- Do not attempt to repair this product yourself. Always use a qualified service agent to perform adjustments or repairs.
- While using earphones, if the volume is excessively high it may cause hearing damage.
Please adjust the volume to a safe level and moderate use. - Do not disconnect the monitor suddenly when formatting, uploading, or downloading.
- The monitor is not moisture and water resistant.
- Please do not use it in a damp environment.
- Do not upgrade the firmware by yourself. The monitor should be upgraded with the right firmware and right methods offered by us. If an upgrade is needed, please contact us.


Box Contents
Please make sure all the following are present when you unpack your monitor.
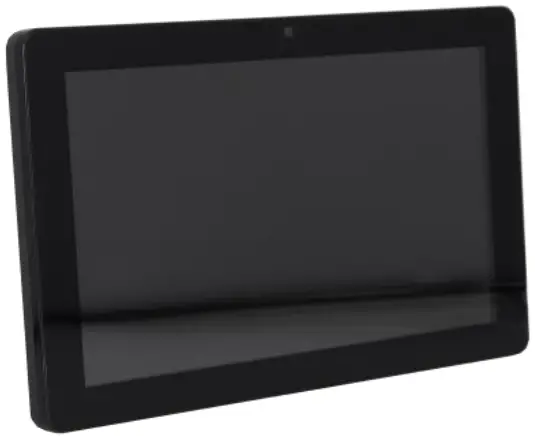
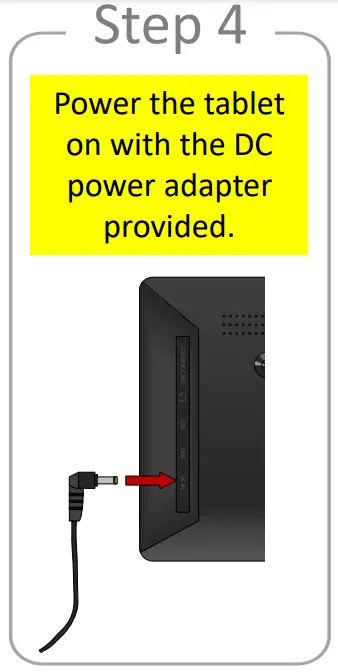
- 1 x Android Monitor

- 1 x DC Power Adapter (12v 2A)*

*Non-UK units will have an adapter included - 1 x Desk Mount Adapter

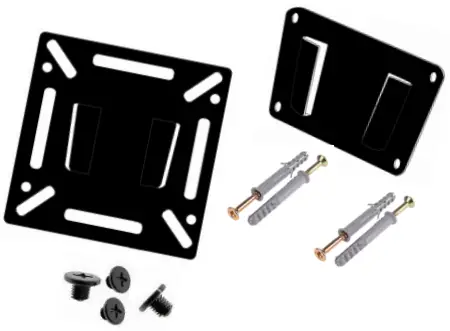
- 1 x Wall bracket
4 x Screws
4 x Wall Screws
4 x Wall Plugs
- 1 x Quick Start Guide


System Specifications
| System | |
| CPU | RK3288 quad core processor, clocked 2.0G |
| RAM | 2GB |
| Internal memory | 16GB |
| Operation system | Android 8.1 |
| Interface | |
| Card slot | 1 × SD card slot (max support 32GB) |
| USB | 3 × USB 2.0 interface |
| Micro | Micro USB OTG |
| RJ45 | IEEE802.3at |
| DC Power jack | 1 × 4.0mm power DC jack (12v 2A) |
| AUX | 1 × 3.5mm headphone jack |
| Network | |
| WiFi | 802.11b/g/n |
| Ethernet | Supports connection to the RJ45 network interface |
| Bluetooth | 4.0 |
| 3G/4G | Support external 3G/4G USB dongle |
| Panel | 10.1” LCD IPS panel |
| Resolution | 1280×800 |
| Active area | 216.96(H)x135.6mm(V) |
| Display Mode | Normally black IPS |
| Viewing angle | 85/85/85/85(L/R/U/D) |
| Contrast ratio | 800:1 |
| Brightness | 300 cd/m2 |
| Aspect Ratio | 6:10 / Display area: 215×135mm |
| Media play | |
| Video format | MPEG-1, MPEG-2, MPEG-4, H.263, H.264, RV, etc. (max support 1080P) |
| Audio format | MP3, WMA, AAC and more |
| Photo | JPEG |
| Other | |
| VESA | 75x75mm |
| Speaker | 2 × 2W speakers |
| Camera | 200W pixel camera |
| Working temp | 0—40 degree celcius |
| Certificate | CE/RoHS/FCC |
| Language | Multi-language |
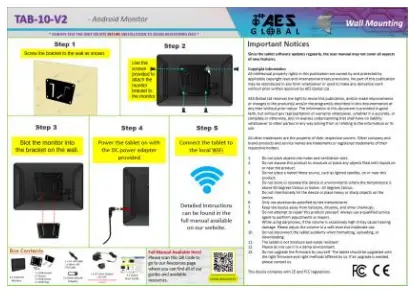
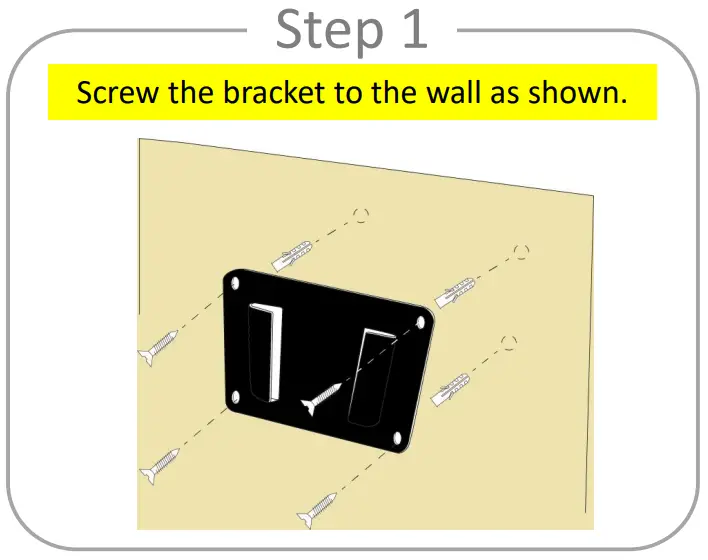
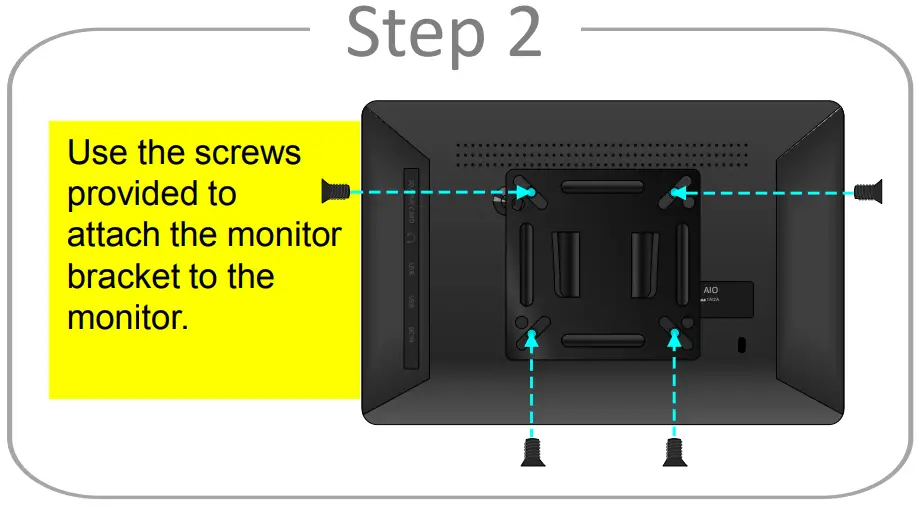
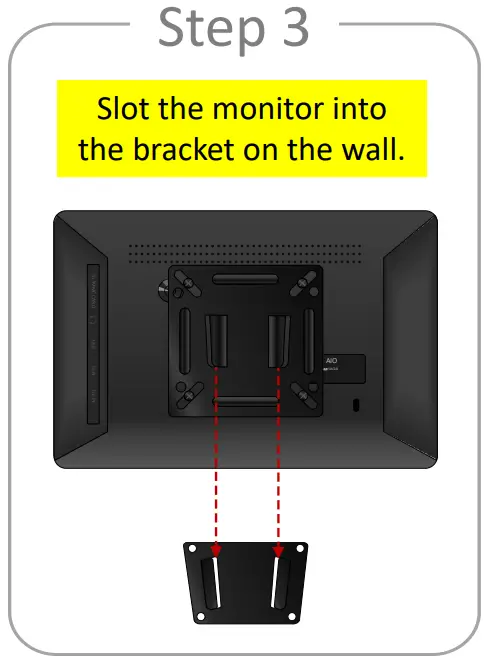
Wall Mounting
Touch Screen Basics
Tap the screen once to activate or open something.
Touch and hold to move an item by dragging.
In many apps touch and hold can offer more options.
Some apps allow you to zoom in and out by touching the screen with two fingers and pinching them together.
Tap a specific location on the screen where you would like to enter text. The on-screen keyboard will pop up.
Your Home Screen
Your MON-11-V2 will arrive with the Praetorian Guard app pre-installed and placed on the Home screen.
Due to ongoing updates to the app your app version may be outdated. You can check if there are any updates available by logging into or creating a Google account and signing into the play store.
You can fill the home screen with any combinations of additional shortcuts, widgets, and folders you like.
When you power up you will be greeted with an AES Global screen then your Home screen will appear once fully booted.
You can access additional apps by swiping up from the bottom of the screen.
 LAN Connection
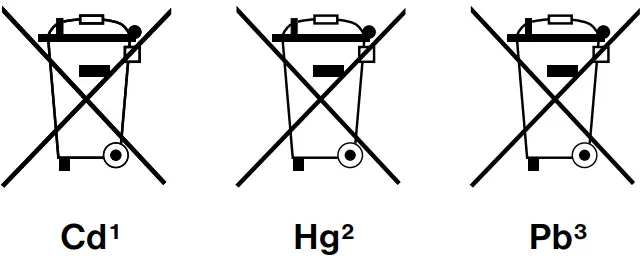 Wi-Fi Signal
 All Apps: Tap to view all apps.
![]() Back: Go back to the previous screen.
Back: Go back to the previous screen. Recent apps: Open a list of recent apps. Tap an app to open or swipe left/right to remove the thumbnail.
![]() Home: Go back to the home screen.
Home: Go back to the home screen.![]() Increase Volume
Increase Volume![]() Decrease Volume
Decrease Volume
Moving Apps
Adding Apps
Within the All Apps menu, choose an app or swipe right to choose a widget. Tap and hold desired app or widget for about 2 seconds until the Home screen appears. Slide it wherever you want and let go.
Moving Apps
- Touch & hold the icon.
- Slide your finger to the new position.
- Lift your finger to drop the icon into its new position.
(To move between Home screens, slide toward the edge of the screen. To bump another icon out of the way, slide slowly towards it.)
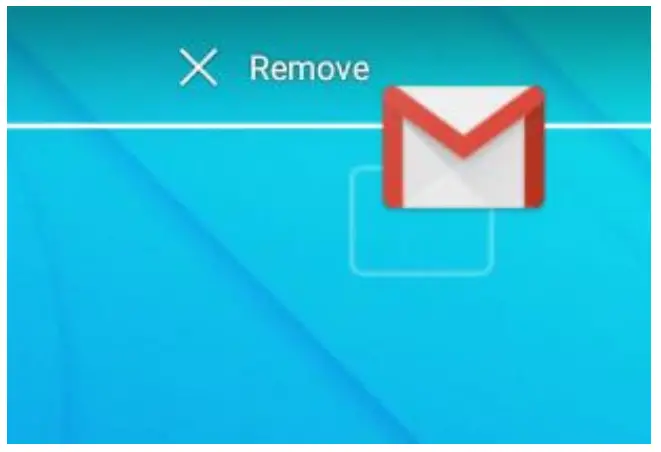
Removing/Uninstalling Apps
- Touch and hold the app or widget
- Drag to the X icon at the top of the screen to remove the app from the current screen or move to the Bin icon to uninstall the app.*

*Note: System apps cannot be uninstalled.
Quick Settings & Notifications
Swipe down from the top of your Home Screen to view your Notifications.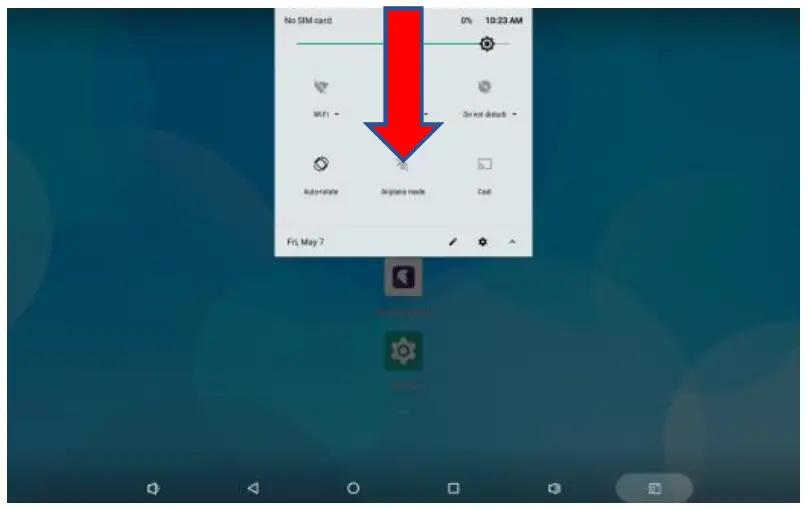
Use two fingers to swipe from the top of your Home Screen or swipe down again from notifications to view your Quick Settings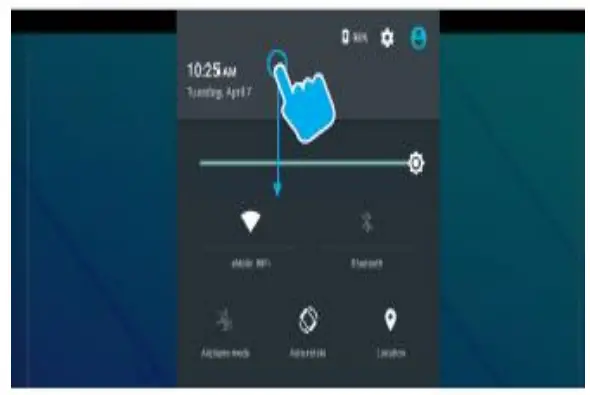
Manage Notifications and Interruptions
Tap on Sound & notification in the Settings Menu.
You can manage what notifications you see, set notification priority level by app, and see what apps have access to your notifications.
You can set up your device so that notifications only appear on at certain times, for certain types of notifications, and from specific contacts.
Ensure all notifications are enabled for the Praetorian Guard app if you are not receiving calls.
Changing the Wallpaper
Tap and hold your finger on any open space on your home screen. A list of options appears.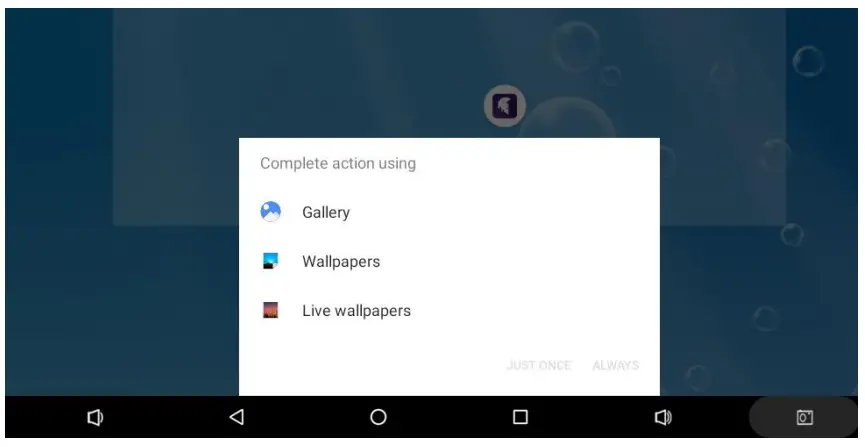
- Gallery: Choose a wallpaper from your personal gallery.
- Wallpapers: Choose from thumbnails of default images
- Live Wallpapers: Choose from a scrolling list of animated wallpapers
Network Connection
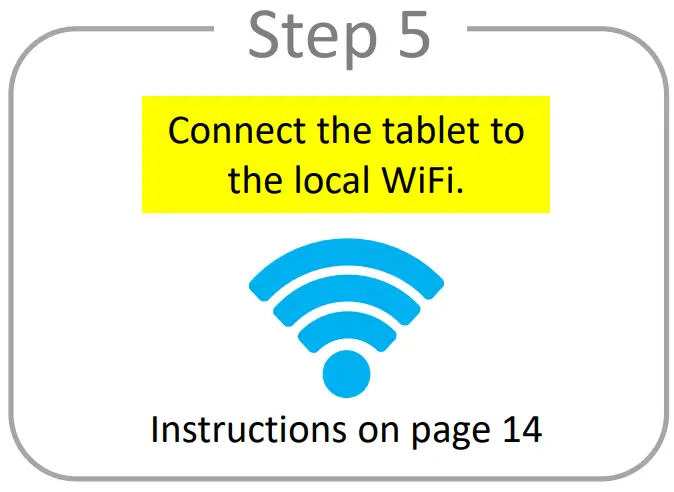
Turn on Wi-Fi
Within the All Apps menu, tap Settings.
Under Network & Internet, tap on Wi-Fi.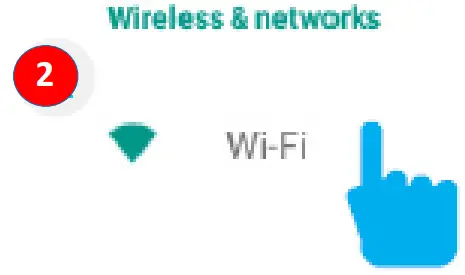
Your monitor will list the networks it finds within range. Switch the button at the top to on and scan for networks. Tap a network to connect.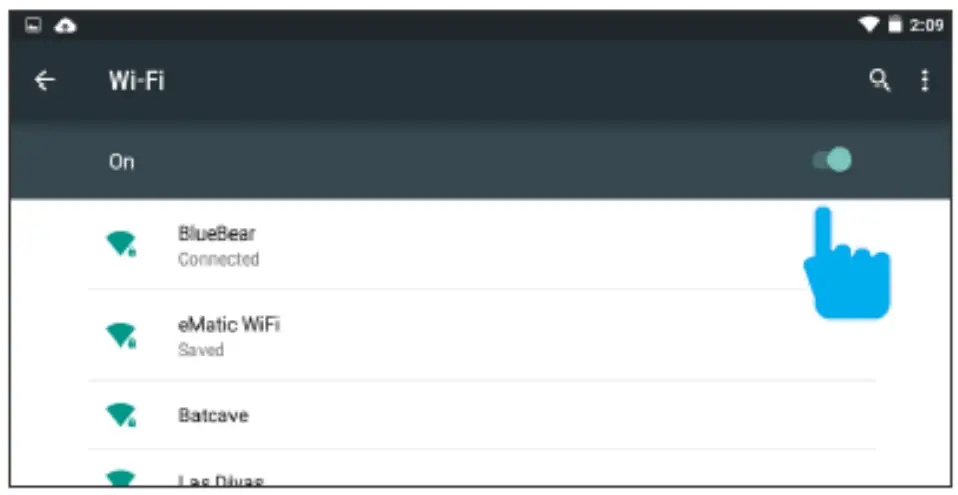
When connected, the wireless indicator appears in the status bar. The white lines indicate connection strength.
Turn off Wi-Fi
Tap the Wi-Fi ON switch under Wireless & Networks to toggle it OFF
Forget a Wi-Fi Network
In the Wi-Fi settings screen, tap the name of the network. Tap “Forget” in the dialog that opens.
Using the Keyboard
Entering text
Enter text using the onscreen keyboard. In most apps it will open automatically. In others, open the keyboard by touching where you want to type.
Depending on what you are doing, some of the keys on the keyboard may look different.
Keyboards A – appears when you are searching or browsing the net.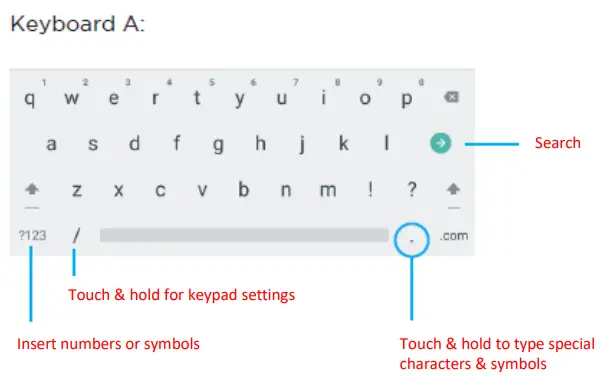
Keyboard C – appears when you are writing emails, documents, or messaging.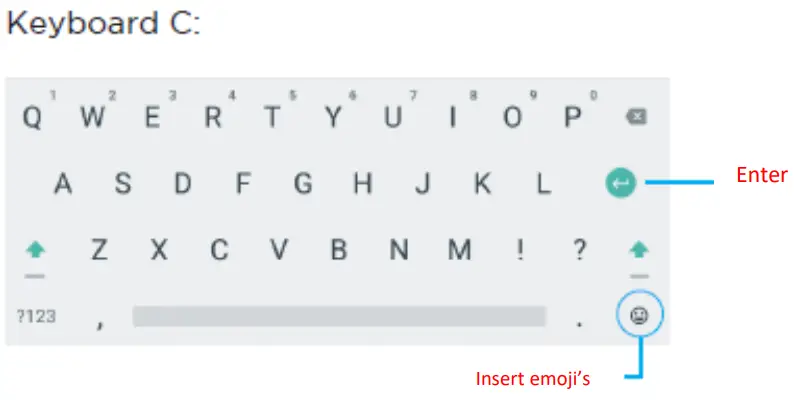
Monitor Settings
- Wi-Fi: Turn Wi-Fi on to see available networks and connect.
- Bluetooth: Turn on Bluetooth to sync to another device.
- Display: Adjust brightness, change your wallpaper, turn on/off screen rotation, sleep settings, and font size.
- Sound & notification: Adjust the volume, notifications, and alarm sounds.
- Battery: Provides battery usage data.
- Users: Add users & profiles with their own apps and content.
- Screenshots: Display or hide the screenshot button in the status bar.
- Storage: Provides storage use data.
- Apps: Tap an app to force stop, uninstall, clear data, move to SD card, or clear data.
- Location: Allow google to use data to determine your location for improved search results.
- Accounts: Tap to add or remove Email accounts.
- Backup & reset: Backup data and factory reset your monitor.
- Security: Adjust settings to make your monitor more secure. Allow installation of non-Market apps.
- Language & input: Set language, spelling correction, keyboard and voice settings.
- Date & time: Set the date, time, and time zone.
- Printing: Set up Google Cloud Print to connect your printer to the web.
- Accessibility: Adjust settings for users with poor vision and/or hearing.
- About monitor: Model number and general monitor information.
Using the Auto Power Off/On Feature
Warning: If the monitor is not powered on or connected to the internet it will not function correctly.
Open the app drawer and select the app:
Multifunction Clock: Setup timed power off/on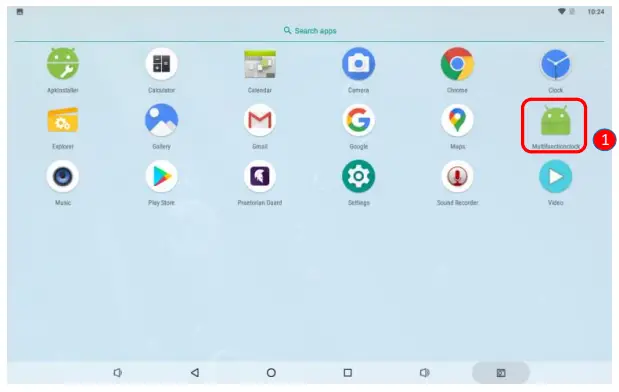
Adding a Reboot Schedule
Select Days to set times
e.g. Sunday, Friday & Saturday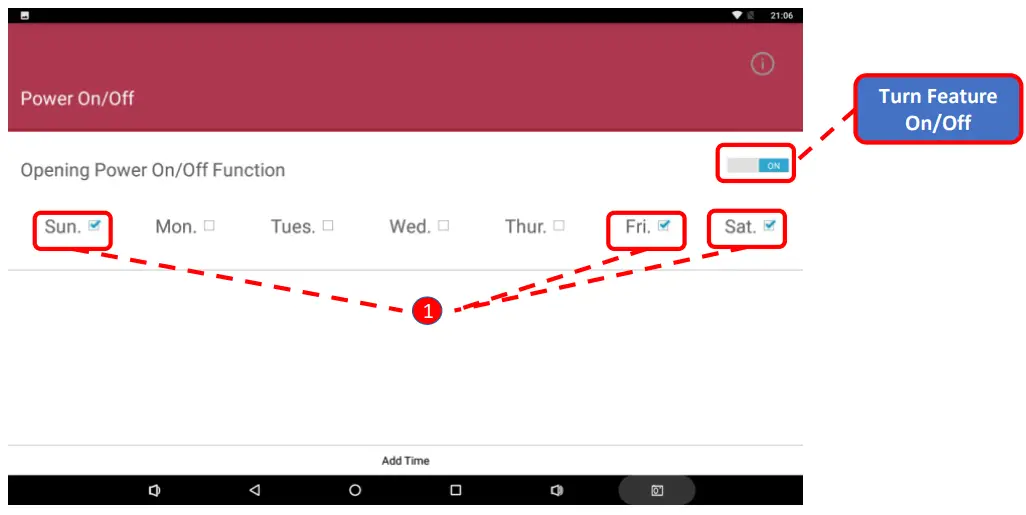
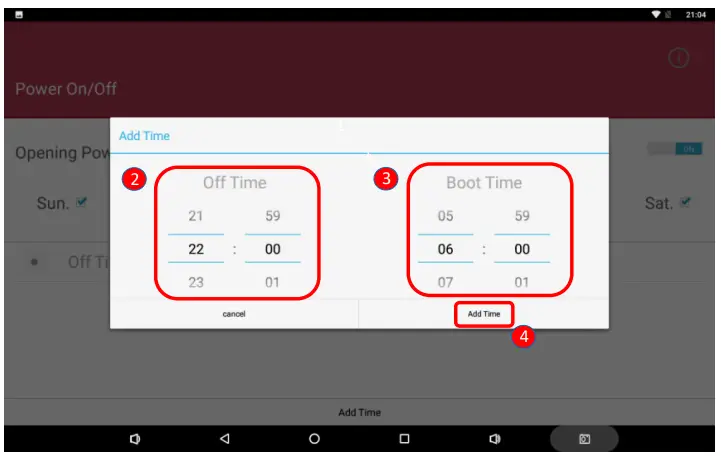
Select the ‘Off Time’ for the device.
Select the ‘Boot Time’ for the device.
Press ‘Add Time’
e.g. Off Time – 22:00 | Boot Time = 06:00
Delete a Reboot Schedule
- Swipe the schedule you wish to delete from the list to the left.
- Select ‘DELETE’


Adding your Intercom to Praetorian Guard app
Ensure you have completed the setup as per the intercom manual and is it showing ONLINE on your mobile device.
- Open the app from the home screen / app drawer.
- Select the Settings Icon.
- Select the ‘+’ icon.
- Input the login credentials created on the admin account.*
See intercom installation manual for more info.
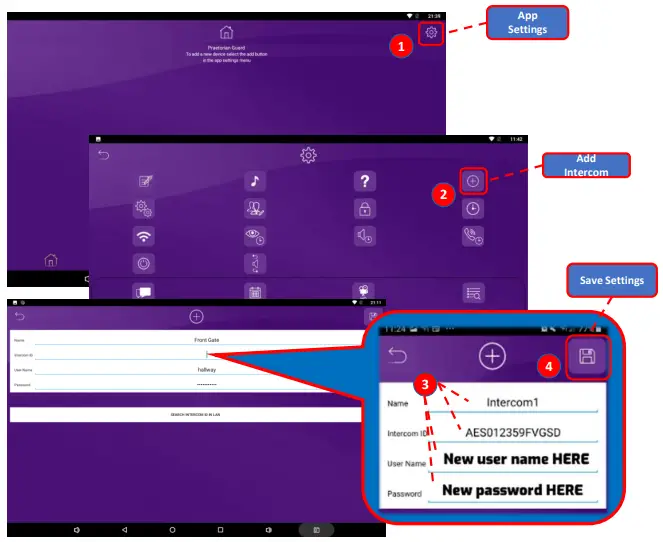
![]() Note: Maximum 8 separate users and devices. Each device connected must be logged in with their own user account for correct operation. Only ADMIN can change critical system settings of the intercom. We advise to use separate user accounts for additional monitors.
Note: Maximum 8 separate users and devices. Each device connected must be logged in with their own user account for correct operation. Only ADMIN can change critical system settings of the intercom. We advise to use separate user accounts for additional monitors.
The intercom is now added to your device and should show Online.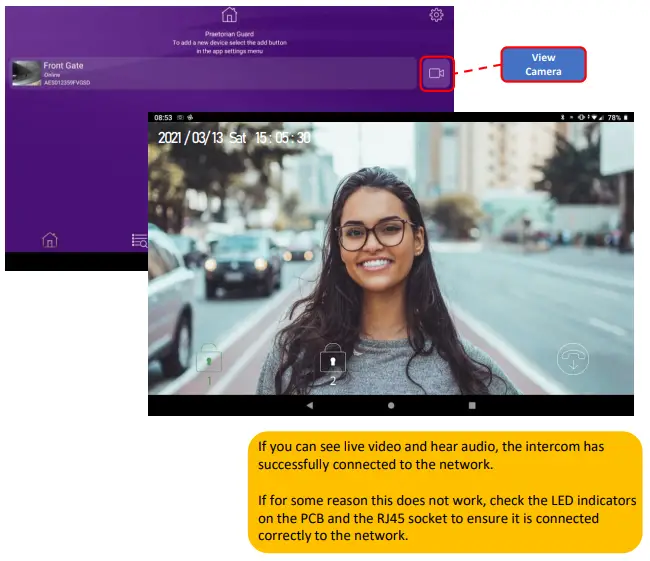
![]() Diagnostic Tips
Diagnostic Tips
- Intercom is showing online status, but the video feed shows “fetching”.
A: This can be caused by poor power cable extended to the intercom, weak Wi-Fi, or too many devices connected to the Wi-Fi network and the router is incapable of managing the workload. - Intercom is not showing online status.
A: This can be caused by incorrect Wi-Fi password created, or Wi-Fi dropping out due to weak signal. - I can see video but there is no audio on the phone or there is no audio at the intercom.
A: Possibly permissions for the app were not accepted during app install. Check microphone permissions for the app in the phone settings. - The status is showing online, then connecting, then online again.
A: This is normal when a phone roams between two Wi-Fi connections, or between Wi-Fi and data.
Answering a call from your Intercom
- Swipe down from the top of your Home Screen to view your
Notification panel - Select the Praetorian Guard notification.
- Once the app loads the call will be displayed. Select the Green answer logo to speak to the visitor.

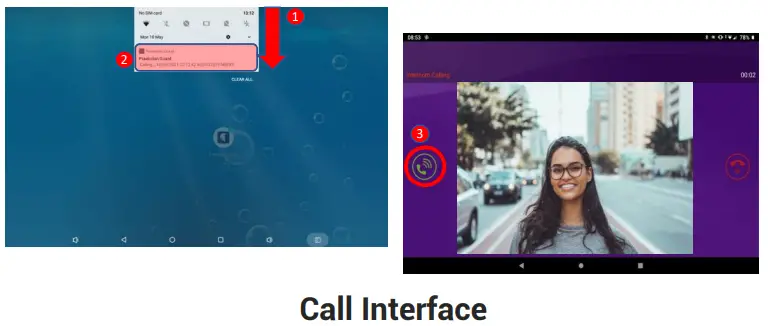
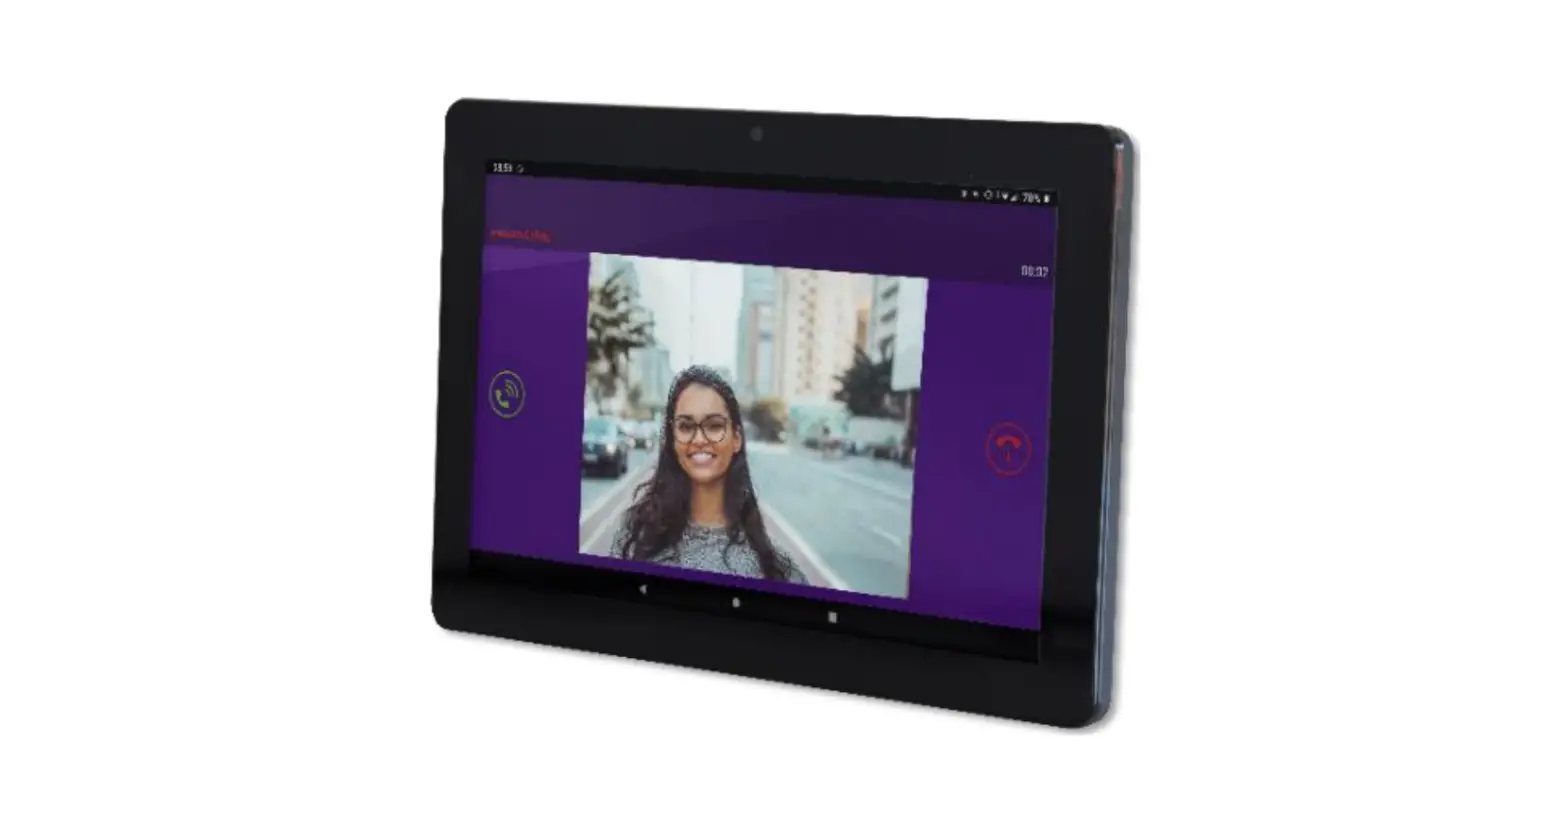
Call Interface
When the app opens and connects to the call panel it will then display the call to be answered with a snapshot from the camera when the button was pressed.*
Delays in the call loading is usually caused by poor upload speeds.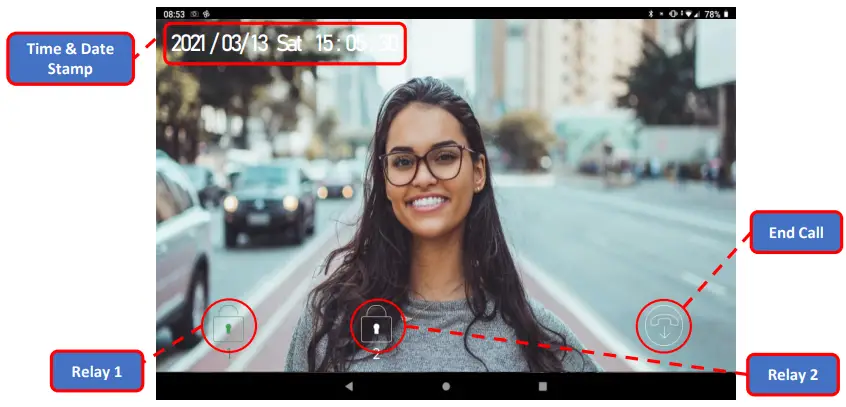
Time & Date Stamp: Press once to trigger the gate / entrance to open.
Relay Controls: Press once to trigger the gate / entrance to open.
Press and hold for 3 seconds to hold the gate / entrance open. Press again to release.
The padlock symbol will turn green when active.
End Call: Tap this to end the call.
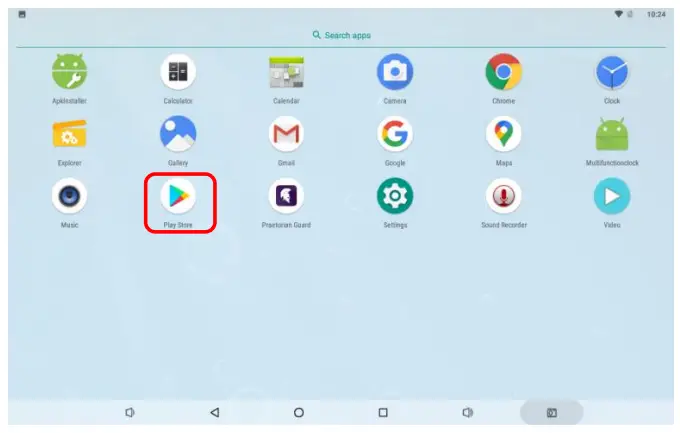
Google Play Store
Warning: If the monitor is not powered on or connected to the internet it will not function correctly.
To ensure you always have the most up to date version of the app we recommend logging into the Play store and switching on automatic updates.
- Open Play Store App and Login / Register:
- Change Update Settings:
- Once logged in tap the profile icon at the top right corner.
- Tap settings > Network Preferences > Auto-update apps
- Select Over Wi-Fi only to update apps as the monitor will only be operating over Wi-Fi.
FAQs
| Symptoms caused | Problem/error | Solution |
| App showing offline status, video image shows “fetching, long lag on calls, intermittently showing online/offline, delayed push notifications. | Wi-Fi too weak at gate / Upload speed to slow | Increase the height of the antenna if possible, install a Wi-Fi booster either inside the house near the front of the property, or a loft or eaves mounted external Wi-Fi booster, or install a CAT5 cable from the intercom to the router. If upload speed is less than 1.5mbps then you will need to speak with your internet provider |
| Delayed push notifications, video lag, voice problems, freezing, relays not opening the gate. | Wrong power cable (too thin) installed from 24v adaptor to the intercom, or power adaptor too far from intercom. | Change the power cable to specifications shown within this manual. |
| Lagging video or audio, delayed notifications, status showing intermittently online/offline, no or randomly operation of push notifications. | Too many devices on home network | Turn off as many other devices as possible, reboot the router and then try again. If the unit works, it proves to the customer that their router needs to be upgraded to handle the demand. |
| Intercom works well sometimes and not well other times. The Wi-Fi signal strength on the app Wi-Fi screen can sometimes be strong and other times is weak. | Several Wi-Fi networks using the same SSID | The intercom is jumping between networks depending on traffic and other devices connected to the same node. It is advisable to change the SSID name of the Wi-Fi network closest to the intercom to something individual. |
| Offline status. Will not connect to the network | Incorrect Wi-Fi password entered during setup | Try process again. Check the same Wi-Fi password works on your device (forget the network and re-connect using the same password). |
| Can randomly display status “id already in use” | Additional user added incorrectly. | When an additional user was being added, the process was done incorrectly. Additional users MUST be added by the admin device first, with separate usernames created for each. The new usernames and passwords must be used by the new devices as shown in this manual to logon to the intercom. |
| Intercom is online and working even through the application, but I am receiving no notifications even for calls! I have checked my Wi-Fi/Ethernet and the intercom meets minimum requirements | Incorrect time. | Cycle to the settings menu and navigate to the clock settings and press “sync device time” to sync the current time from the device. This should only ever need done once as the time is pulled from the server. |
| I think my intercom is not functioning correctly. | Potential conflict of interest/firmware/software bug. | This is not something that happens frequently and can only happen if a new firmware was pushed to the unit. Seldom instances can however occur resulting in a soft reboot needing done. Cycle to the settings menu and navigate to the power icon, pressing this will initiate a soft reboot. This soft reboot will remove any open communications or potential non- functioning features to be re-enabled. |
Disposal
 This symbol on the product or in the instructions means that your electrical and electronic equipment should be disposed of at the end of its life separately from your household waste.
There are separate collection systems for recycling in your country.
For more information, please contact the local authority or your retailer where you purchased the product.
The manufacturer cannot legally offer technical support to non-qualified gate or door installers. End users should employ the services of a professional install company to commission or support this product!
Support
Manufactured by AES GLOBAL:
Web: www.aesglobalonline.com
Tel UK Head Office: +44(0)288 639 0 693
Tel USA Head office: +1 (321) 900 4599
Unit 4C, Kilcronagh Business Park,
Cookstown, Co Tyrone, United Kingdom,
BT80 9HJ


