![]() USER GUIDE
USER GUIDE
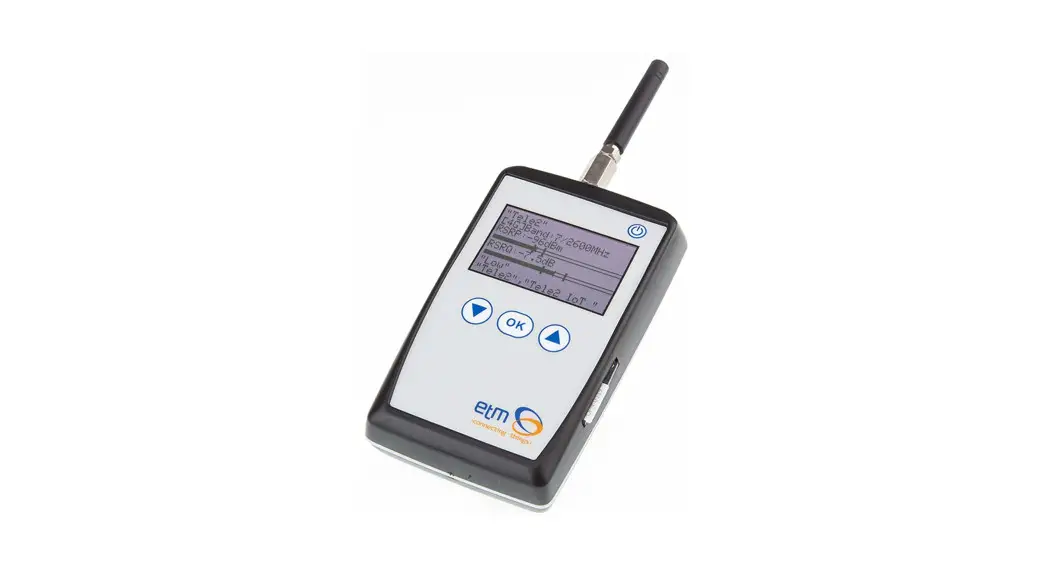
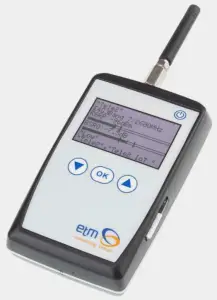
ETM770-LTE
CELLULAR NETWORK MONITORING TOOL 2G/3G/4G
Features:
|
|
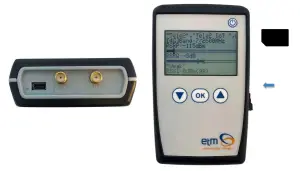
CONNECTING THE SIM CARD
GET STARTED SCANNING A SIGNAL WITH ETM 770
- Insert SIM card as shown in the picture above.
- Insert the charger into the mini-USB connector. The battery is charged with 5V.
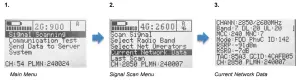
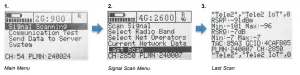
- To turn the device on, press the power button for a minimum of 3 seconds. When the device is turned on and the charger is successfully connected, the screen shall look as follows:
 The battery is almost fully charged. The network connection is 8/10 bars. We are connected to a 4G network with the frequency 2600 MHz R means that the device is logged into the home network.
 - Put on the chosen antenna.
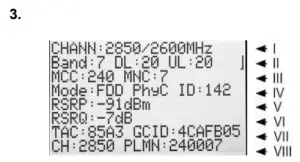
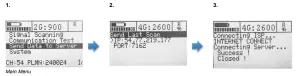
- The device will automatically scan the network signal once turning it on. If not, find your way to the main menu by pressing the up button several times. Once pressing “Signal Scanning” you will be redirected to the second menu. Press “Scan Signal”.
- Validate your result. The pictures below show a typical scan for a 2G, 3G, and 4G connection.
- By pressing the up button, you will jump to the next menu. If you press the up button multiple times you will finial enter the main menu.
- By pressing the down button multiple times, you will rotate back to the first row in the present menu.
- By pressing the power button for more than 5 seconds, the device will go into sleep mode.
- By pressing both the up and the down key for 5 seconds, the device will restart.
 The battery is almost fully charged. The network connection is 8/10 bars. We are connected to a 4G network with the frequency 2600 MHz R means that the device is logged into the home network.
2G Mode
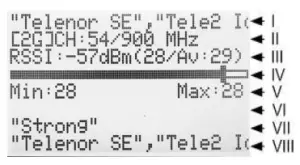 Scan Menu 2G mode
I. Scanned network.
II. The device is connected to a 2G band. The channel is 54 and the frequency is 900 MHz
III. Received Signal Strength Indicator (The signal strength including noise and interference) measured in dBm. The corresponding value is in the parenthesis.
IV. Signal Strength Bar. Measured in dBm.
V. Signal Quality Min and Max values
VI. Empty space
VII. Signal Quality (Weak, Low, Medium, High, or Strong)
VIII. Different data rolls in the bottom bar. CH, PLMN, the scanned network, and RSSI.
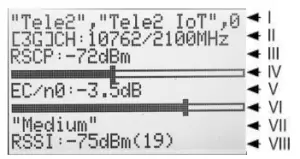
3G Mode
 Scan Menu 3G mode
I. Scanned network.
II. The device is connected to a 3G band. The channel is 10762 and the frequency is 2100 MHz.
III. Received Signal Code Power (RSCP) is -72 dBm.
IV. Signal Quality Bar.
V. Carrier to Noise Ratio (EC/n0) is -3.5 dB.
VI. Signal Quality Bar.
VII. Signal Quality (Weak, Low, Medium, High, or Strong)
VIII. Different data rolls in the bottom bar. CH, PLMN, the scanned network, and RSSI.
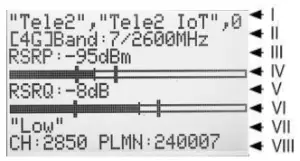
4G Mode
 Scan Menu 4G mode
I. Scanned network.
II. The device is connected to a 4G band. The band is 7 and the frequency is 2600 MHz.
III. Reference Signal Received Power (the signal strength without noise and interference) measured in dBm. The signal is visualized in the signal bar below the data.
IV. Signal Quality Bar.
V. Reference Signal Received Quality (how well the signal is coded) measured in dB.
The signal is visualized in the signal bar below the data.
VI. Signal Quality Bar.
VII. Signal Quality (Weak, Low, Medium, High, or Strong)
VIII. Different data rolls in the bottom bar. CH, PLMN, the scanned network, and RSSI.
ADDITIONAL SETTINGS
With ETM770 it is possible to make several additional settings.
Select Radio Band
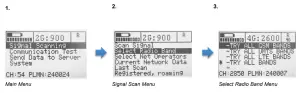
- Starting at the main menu, press “Signal Scanning”
- Press “Select Radio Band”
- Select the radio band you want to scan and press OK. By pressing the down button, more alternatives are visible.
Once the radio band is selected you will automatically be directed back to the Signalscan menu
Select which operator to scan amongst available operators
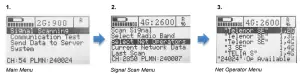
- Starting at the main menu, press “Signal Scanning”
- Press “Select Net Operators”
- A list of operators is shown. To see which operators are available please see the numbers on the right of the display. The first letter means Operator status and the second letter means Radio Access Technology (RAT). Operator Status: 0: Unknown, 1: Operator available, 2: Current operator, 3: Operator forbidden
View Current Network Data
- Starting at the main menu, press “Signal Scanning”
- At the Signal Scan menu, select “Current Network Data”
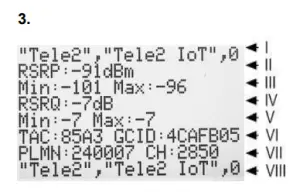
- The first view will look similar to the following:
 I. The channel is 2850 and the frequency is 2600 MHz.
II. E-UTRA frequency band: Download bandwidth: Upload bandwidth
III. Mobile Country Code (first part of the PLMN code): Mobile Network Code (second part of the PLMN code)
IV. FDD or TDD: Physical Cell ID
V. Reference Signal Received Power (RSRP) is -91 dBm.
VI. Reference Signal Received Quality (RSRQ) is -7 dB
VII. Tracking Area Code: Global Cell ID
VIII. The channel is 2850: Public Land Mobile Network (PLMN) is 240007 - If you press the down arrow once you will get a picture that looks similar to the one below:
Monitoring Neighbour Cells I. Number of Neighbour Cells found
II. Neighbour Cell 1
III. Neighbour Cell 2
IV. Neighbour Cell 3
V. Neighbour Cell 4
VI. Neighbour Cell 5
VII. Neighbour Cell 6
VIII. Different data rolls in the bottom bar. CH, PLMN, the scanned network and RSSI.
Syntax:
2G:
ARFCN1,rs1,dBm1,MCC1,MNC1,NCC1,BCC1,C11,C21,LAC1,cell1
ARFCN2,rs2,dBm2,MCC2,MNC2,NCC2,BCC2,C12,C22,LAC2,cell2
…
ARFCNn,rsn,dBmn,MCCn,MNCn,NCCn,BCCn,C1n,C2n,LACn,celln
3G:
UARFCN1,PSC1,EC/n01,RSCP1
UARFCN2,PSC2,EC/n02,RSCP2
…
UARFCNn,PSCn,EC/n0n,RSCPn
4G:
EARFCN1,RSRQ1,RSRP1,PCI1
EARFCN2,RSRQ2,RSRP2,PCI2
…
EARFCNn,RSRQn,RSRPn,PCIn - If you press the down arrow once again you will get the following:
 I. SIM status
II. Registration status
III. “Network provider(EONS):” (Info text string)
IV. Network provider - Press the down button again and you will have gotten all the network information available:
 I. “APN:” (Info text string)
II. APN
III. Local IP Address
IV. Local IP Address 4G/LTE - The table below shows a brief explanation of the 3G network abbreviations.
ABBREVIATION
FULL NAME FURTHER EXPLANATIONS
CHANN CHANNEL Shows the ARFCN (Absolute Frequency Channel Number) of the Radio Band Frequency. PSC Primary Synchronization Code Describe start and stop times for the time slot that the device has been allocated. MCC Mobile Country Code The first part of the PLMN code. MNC Mobile Network Code The second part of the PLMN code. EC/n0 Carrier to Noise Ratio LAC Local Area Code CELL CELL ID Cell identification number APN Access Point Name This will only be useful information if you have set up an ISP connection. UP Local IP This will only be useful information if you have set up an ISP connection. RSCP Received Signal Code Power Measured in dBm SQ Signal Quality Quality value for base station selection in dBm SRxL RX level value for base station selection indBm - The table below shows a brief explanation of the 4G network abbreviations.
 I. The channel is 2850 and the frequency is 2600 MHz.
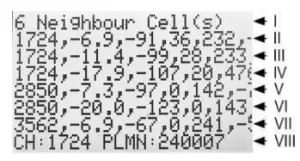 I. Number of Neighbour Cells found
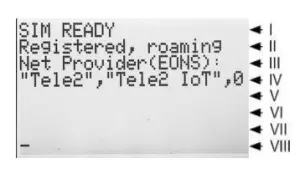 I. SIM status
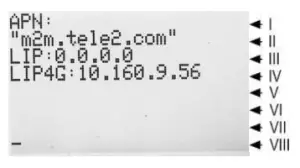 I. “APN:” (Info text string)
ABBREVIATION | FULL NAME | FURTHER EXPLANATIONS |
| EARFCN | CHANNFI | F-I ITRA Absolute Radio Frequency Channel Number |
| Band | Frequency Band | E-UTRA frequency band |
| DL | DL bandwidth | DL bandwidth |
| UL | UL bandwidth | UL bandwidth |
| Mode | Duplex Mode | TimeDivisionDuplex (TDD) or FrequencyDivisionDuplex (FDD) |
| MCC | Mobile Country Code | The first part of the PLMN code. |
| MNC | Mobile Network Code | The second part of the PLMN code. |
| TAC | Tracking Area Code | |
| GCID | Global Cell ID | Global Cell ID |
| PhyC ID | Physical Cell ID | Physical Cell ID |
| SG | Signal Quality | Quality value for base station selection in dBm |
| RSRP | Reference Signal Received Power | |
| RSRQ | Reference Signal Received Quality |
Note: A PLMN is identified by the Mobile Country Code (MCC) and the Mobile Network Code (MNC)
View last scan
- Starting at the main menu, press “Signal Scanning”
- At the Signal Scan menu, select “Last Scan”
I. Scanned network.
II. Referenced Signal Received Power (RSRP) is -91 dBm.
III. RSRP Min and Max values in -dBm
IV. Referenced Signal Received Quality (RSRQ) is -7dB.
V. RSRQ Min and Max values in -dBm
VI. Tracking Area Code: Global Cell ID
VII. Public Land Mobile Network (PLMN) is 240007: The channel is 2850
VIII. Scanned network.
Communication Test
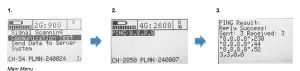
- Starting at the main menu, press “Communication Test”
- Press “PING: 8.8.8.8” This is the IP address to the Google server.
- See PING Result. It shows success or failure. Ping round trip time in ms (milliseconds) for three tests.
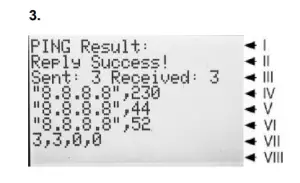
I. “PING Result:” (Info text string)
II. PING Reply result
III. No of packages Send: No of packages Received
IV. 1st package sent to IP address, round trip time in ms
V. 2nd package sent to IP address, round trip time in ms
VI. 3rd package sent to IP address, round trip time in ms
VII. Packet statistic: sent, received, lost, lost in Percent
In order to change the PING address, send an SMS with the following syntax to the device:
ET-IP3=” IP Address”:” Port”
Example:
ET-IP3=8.8.8.8:80
This will set the PING address to the Google server.
Send Data to Server
- Starting at the main menu, press “Send Data to Server”
- Press “Send Last Scan” The IP address 54.77.219.177 is the address to the ETM WEB Office server.
- Connecting ISP and Connecting Server.
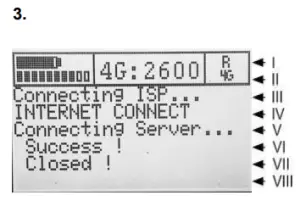
I. Display header line 1
II. Display header line 2
III. ISP Connection process Info
IV. ISP Connection result
V. Server Connection process Info
VI. Server Connection result
VII. Server Connection process Info
VIII. Empty space
In order to change the server address, send an SMS with the following syntax to the device:
ET-IP1=” IP Address”:” Port”
Example:
ET-IP1=54.77.219.177:7162
This will set the server address to the EWO server.
Device Data
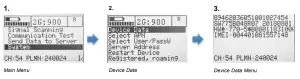
- Starting at the main menu, press “System”
- Select “Device Data”
- Device Data
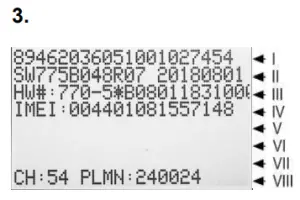
I. SIM card ID number (SCID)
II. Device FW ID number
III. Device HW number
IV. IMEI number
V. Empty space
VI. Empty space
VII. Empty space
VIII. Different data rolls in the bottom bar. CH, PLMN, the scanned network and RSSI
Select APN
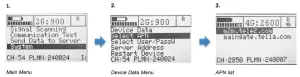
- Starting at the main menu, press “System”
- Choose an alternative in the menu.
In order to change the APN list, send SMS with the following syntax to the device:
ETSAPN=“List position”, “APN name”
Example:
++ETSAPN=1, m2m.tele2.com
ETSAPN=2, maingate.telia.se
This will result in the APN list shown in figure “APN list” above.
Select User/Password for ISP
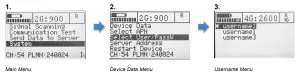
- Starting at the main menu, press “System”
- Press “Select User/PassW” in order to select username/password for the ISP
- Select Username in the menu.
In order to change the user/password list, send SMS with the following syntax to the device:
ETSUP=“List position”, “Username”, “Password”
Example:
ETSUP=1,username1,internet1
ETSUP=2,username2,internet2
Server Address
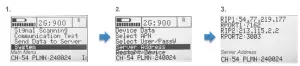
- Starting at the main menu, press “System”
- Press “Server Address”
- See Server Address

I. Remote IP address 1
II. Remote Port 1
III. Remote IP address 2
IV. Remote Port 2
V. Empty space
VI. Empty space
VII. Empty space
VIII. Different data rolls in the bottom bar. CH, PLMN, the scanned network and RSSI
Restart Device
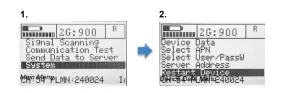
- Starting at the main menu, press “System”
- Press “´Restart Device”
- The ETM770 will restart.
To turn off the device, press the power button for 3 seconds.
Note: Pressing both the up and the down key for 5 seconds can also perform a restart of the device.
For Support Contact
+61 2 9956 7377,
[email protected]
ETM Mätteknik AB | ETM Pacific Pty Ltd |
![]()


