
soundstation 4LEDKIT-DJ LED Tricolor 4-PAR Lighting Kit
Dear customer,
First of all thanks far purchasing a SOUNDSATION® product. Our mission is to satisfy all possible needs of musical instrument and professional audio users offering a wide range of products using the latest technologies.
We hope you will be satisfied with this item and, if you want to collaborate, we are looking for a feedback from you about the operation of the product and possible improvements to introduce in the next future. Go to our website www.soundsation-music.com and send an e-mail with your opinion, this will help us to build instruments ever closer to customer’s real requirements.
One last thing: read this manual before using the instrument, an incorrect operation can cause damages to you and to the unit. Take care!
IMPORTANT SAFETY
- The symbol is used to indicate that some hazardous live terminals are involved within this apparatus, even under the normal operating conditions, which may be sufficient to constitute the risk of electric shock or death.
- The symbol is used in the service documentation to indicate that specific component shall be replaced only by the component specified in that documentation for safety reasons.
- Protective grounding terminal
- Alternating current/voltage
- Hazardous live terminal
- Denotes the apparatus is turned on
- Denotes the apparatus is turned off
- WARNING: Describes precautions that should be observed to prevent the danger
- CAUTION: Describes precautions that should be observed to prevent danger of the apparatus
TAKING CARE OF YOUR PRODUCT
- Read these instructions
- Keep these instructions
- Heed all warning
- Follow all instructions
Water / Moisture
The apparatus should be protected from moisture and rain and can not be used near water; for example near a bathtub, a kitchen sink, a swimming pool, etc.
Heat
The apparatus should be located away from heat sources such as radiators, stoves or other appliances that produce heat.
Ventilation
Do not block areas of ventilation opening. Failure to do could result in fire. Always install according to the manufacturer’s instructions.
Object and Liquid Entry
Objects do not fall into and liquids are not spilled into the inside of the apparatus for safety.
Power Cord and Plug
Protect power cord from being walked on or pinched particularly at plugs, convenience receptacles, and the point where they exit from the apparatus. Do not defeat the safety purpose of the polarized or grounding-type plug. A polarized plug has two poles; a grounding-type plug has two poles and a third grounding terminal. The third prong is provided for your safety. If the provided plug does not fit into your outlet, refer to an electrician for replacement.
Fuse
To prevent the risk of fire and damaging the unit, please use only of the recommended fuse type as described in the manual. Before replacing the fuse, make sure the unit turned off and disconnected from the AC outlet.
Electrical Connection
Always disconnect from the power source before servicing or replacing fuse and be sure to replace with same fuse size and type. Cut off power before moving, repairing and cleaning the unit. Improper electrical wiring may invalidate the product warranty.
To avoid electric shock, all fixtures must be connected to circuits with a suitable ground. Do not power on and power off the fixture in a short time.
DMX connection
When use DMX controller, please make sure that there is no interference sources (e.g. intercom, high-frequency radio waves and radiation source).
Cleaning
Clean only with a dry cloth. Do not use any solvents such as benzene or alcohol.
Servicing
Do not implement any servicing other than those means described in the manual. Refer all servicing to qualified service personnel only. Only use accessories/attachments or parts recommended by the manufacturer.
INTRODUCTION
Thank you for purchasing our 4LEDKIT-DJ lighting kit. Enjoy your new equipment and make sure to read this manual carefully before the operation!
This user manual is made to provide both an overview of controls, as well as information on how to use them. In order to help you to understand the connections between the various controls, we have gathered in groups according to their functions.
Unpacking
Your 4LEDKIT-DJ was carefully packed to ensure safe transport. Despite this, we recommend you to carefully examine the package and its contents for any signs of physical damage, which can occur during transport. It is composed by the following parts:
- 1x T-bar with Carrying bag
- 1x Pedal-board
- 1x Light stand with Carrying bag
- IEC power cable
- User manual
ATTENTION: A packaging bag is not a toy! Keep out of reach of children!!! Keep in a safe place the original packaging material for future use.
Accessories
SOUNDSATION can supply a wide range of quality accessories that you can use with your LED Kit, like Cables, Splitters, DMX controllers, and a wide range of fixtures. All products in our catalogue has been long tested with this device, so we recommend you to use Genuine SOUNDSATION Accessories and Parts. Ask your SOUNDSATION dealer or check out our website www.soundsationmusic.com for any accessories you could need to ensure best performance of the product.
OVERVIEW
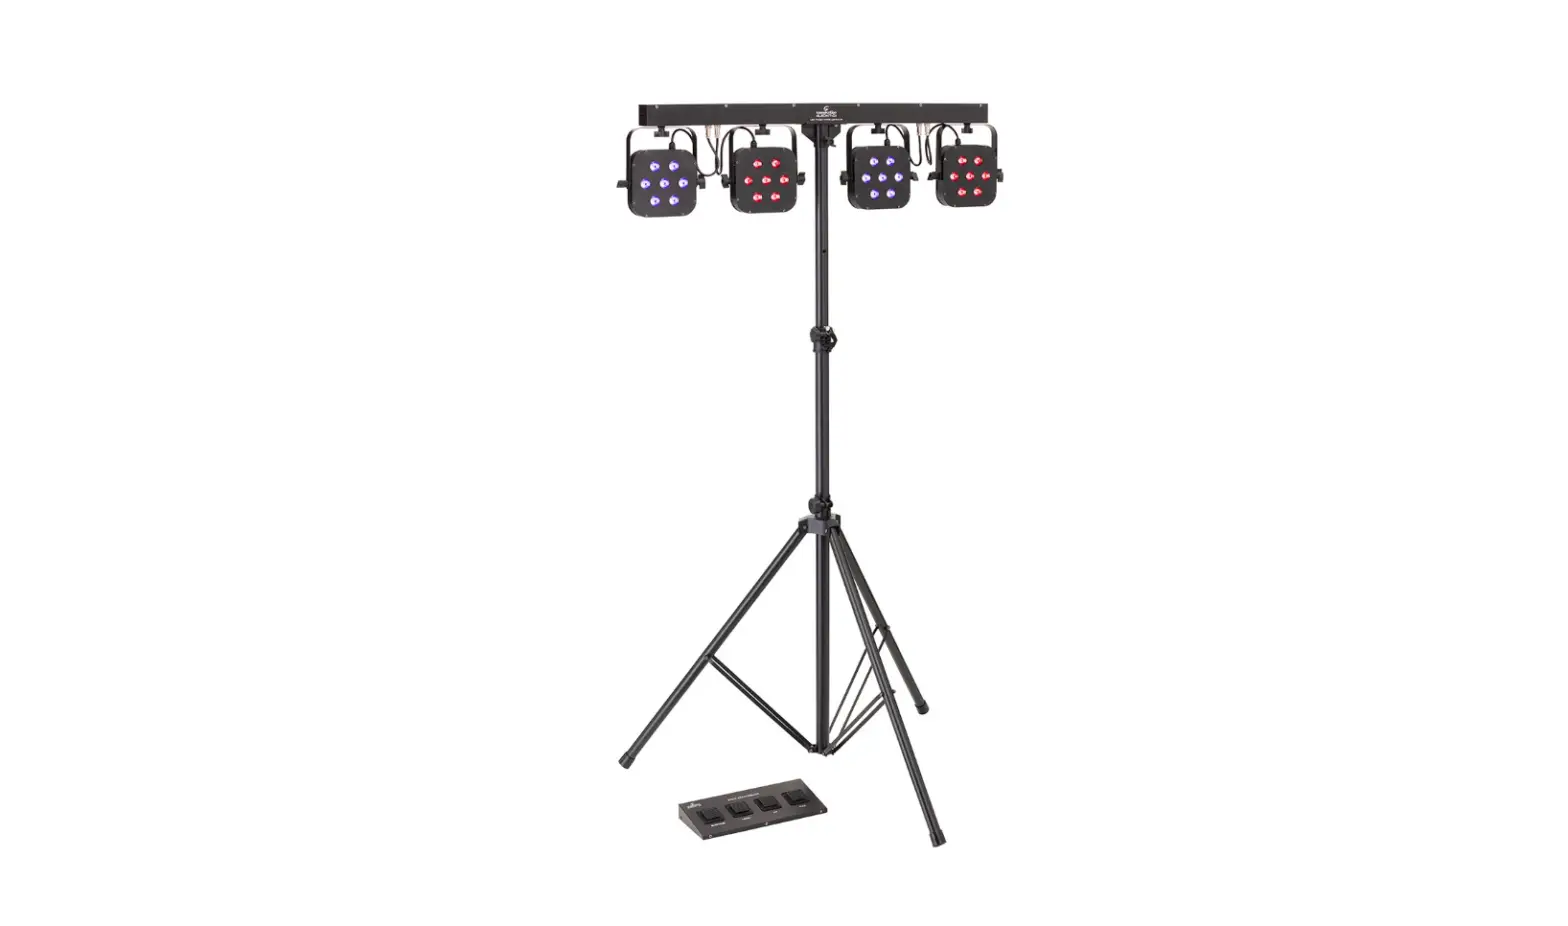
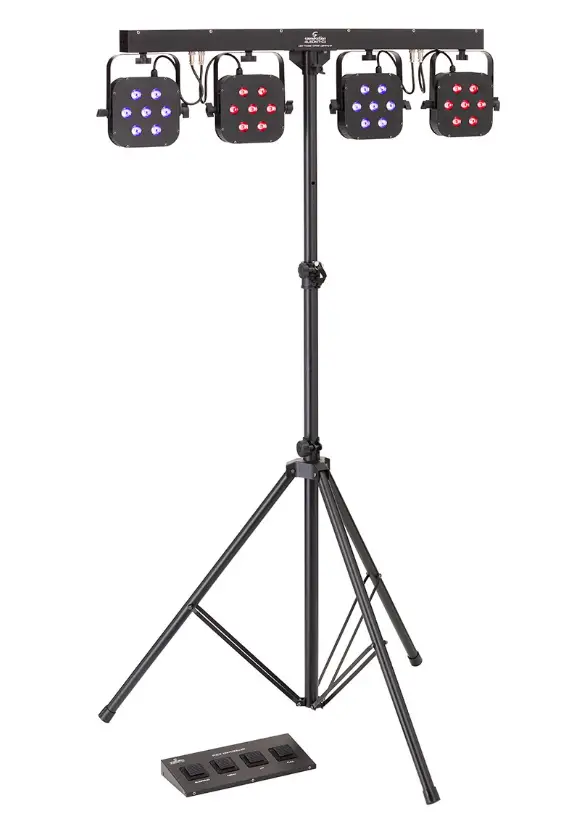
SOUNDSATION 4LEDKIT-DJ brings you a complete light system including all accessories in only one package. It is the smartest solution for all musicians, DJs, and small rental companies.
It comes complete with 4 compact LED spots. Each spot contains 7pcs 3Watt RGB 3in1 LEDs in order to create a complete color palette. The spots are mounted on a T-bar which has a built-in controller unit. The T-bar can be controlled by the included ped-al-board or by an external DMX controller (not included).
In addition to RGB color adjustment of all four PARs independently, the unit features 16 color change auto programs strobo and sound control, to let your lighting kit create wonderful effects even without a DMX controller.
Main Features
- 4 PARs with 7 high-brightness 3W LED each
- T-Bar with internal controller and power unit (carrying bag included)
- Tripod Stand with carrying bag included
- Operation Modes: Auto, Sound, DMX, Footswitch modes
- 8 Internal Programs, Sound Control and Strobo
- DMX: 16CH, 12CH, 7CH, 3CH and 1CH modes
- Lens Angle: 25° (per PAR)
- LED Display for easy navigation and programming
- Pedalboard with 4 footswitch
Front Panel
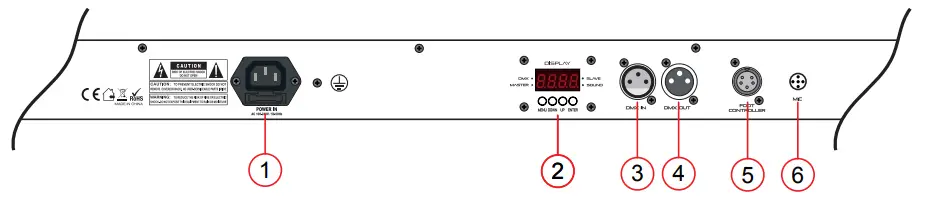
- POWER: Mains input with IEC socket and integrated fuse holder. Connect here the supplied mains cable.
- LED DISPLAY: It shows all menus and functions.
- DMX INPUT: 3PIN male XLR connector for DMX communication.
- DMX OUTPUT: 3PIN female XLR connection for DMX communication.
- FOOTSWITCH CONNECTOR: Connect here the supplied pedalboard.
- MICROPHONE: Turn the knob to adjust sound-activated sensitivity.
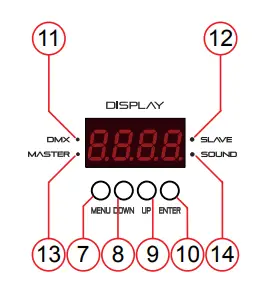
- MENU: Used to select different menu items.
- DOWN: To go back in the menu and to lower values shown on the display.
- UP: To go up in the menu and to increase values shown on the display.
- ENTER: Used to confirm your choice.

- DMX LED: It flashes during DMX operation
- SLAVE LED: When set Slave mode, it lights up
- MASTER LED: When set Master mode, it lights up
- SOUND LED: When Sound mode is active, it flashes according to incoming sound.
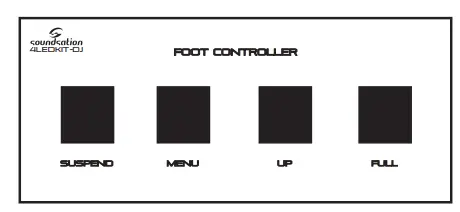
Foot controller
The pedalboard has 4 footswitch:
- SUSPEND – Left pedal is blackout / on. Pressing this pedal once will blackout the unit and all par cans will go off.
- MENU – By pressing menu pedal the unit will step through the built in programs.
- UP – To go up in the menu and increase values shown on the display.
- FULL – By long pressing this footswitch all LED PARs will light at maximum bright-ness. Use this function as blinder effect.

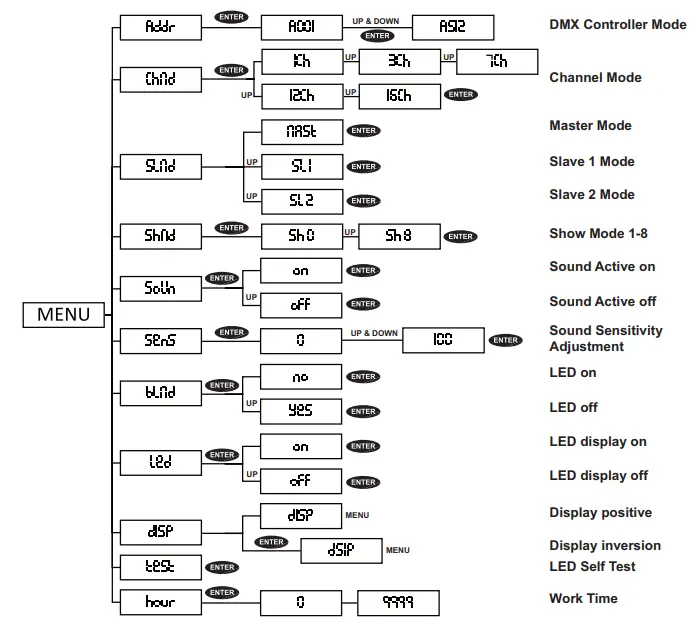
FUNCTIONS
The unit has several working modes:
- Auto mode – Built-in programs not controlled by foot pedal controller.
- Sound mode – automatic built-in programs Sound activated.
- Master mode – When active, the unit controls other T-Bars connected via DMX cables. The controlled units must be set to Slave mode.
- Slave mode – When active, the unit is controlled by another T-Bar via DMX cable. NOTE: Please note that the controller bar must be set as master unit. All slave units must be set on same DMX channel of the master and will follow the controls from it. Foot-pedal can be connected to the master unit to control all connected units.

- DMX512 mode – DMX512 control via controller.
- Footswitch mode – Hold, blackout, and control programs via the foot pedal.

Press the MENU button to select the required function.
- Once you have made a selection then press ENTER to confirm.
- Use DOWN and UP button to choose the desired menu option.
- To go back to previous menu wait 10 seconds, the menu structure will be shown in previous page.

DMX CHANNEL CHARTS
1CH Mode
|
CH1 (008-255 all affected by sound active) | 000-007 | No function |
| 008-037 | show1 | |
| 038-067 | show2 | |
| 068-097 | show3 | |
| 098-127 | show4 | |
| 128-157 | show5 | |
| 158-187 | show6 | |
| 188-217 | show7 | |
| 218-247 | show8 | |
| 248-255 | Random show1-8 |
3CH Mode

7CH Mode
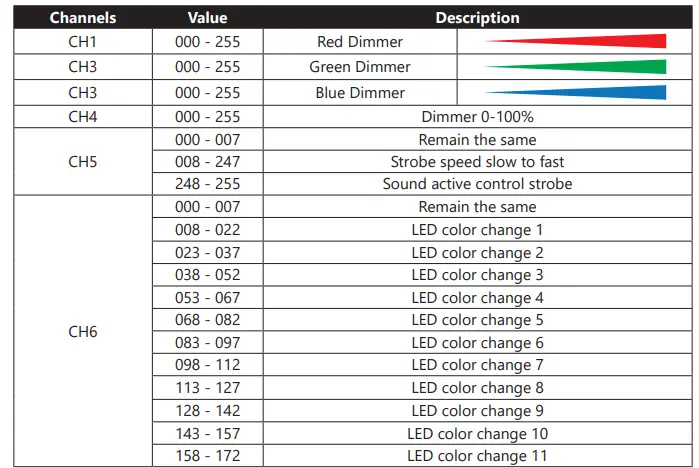
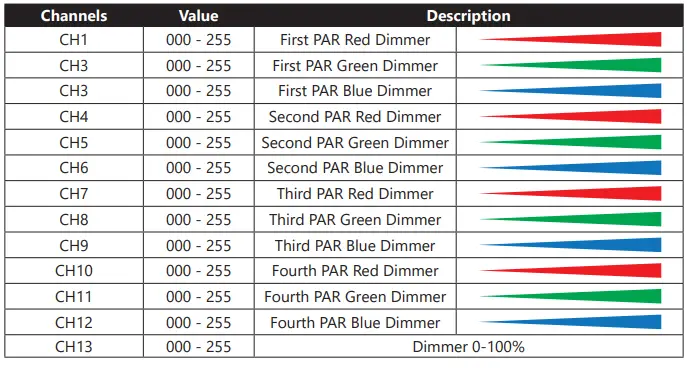
12CH Mode

16CH Mode
| CH14 | 000 – 007 | Remain the same |
| 008 – 247 | Strobe speed slow to fast | |
| 248 – 255 | Sound active control strobe | |
|
CH15 | 000 – 007 | Remain the same |
| 008 – 022 | LED color change 1 | |
| 023 – 037 | LED color change 2 | |
| 038 – 052 | LED color change 3 | |
| 053 – 067 | LED color change 4 | |
| 068 – 082 | LED color change 5 | |
| 083 – 097 | LED color change 6 | |
| 098 – 112 | LED color change 7 | |
| 113 – 127 | LED color change 8 | |
| 128 – 142 | LED color change 9 | |
| 143 – 157 | LED color change 10 | |
| 158 – 172 | LED color change 11 | |
| 173 – 187 | LED color change 12 | |
| 188 – 202 | LED color change 13 | |
| 203 – 217 | LED color change 14 | |
| 218 – 232 | LED color change 15 | |
| 233 – 247 | LED color change 16 | |
| 248 – 255 | LED color change, affected by sound active | |
| CH16 | 000 – 007 | Remain the same |
| 008 – 255 | Speed change, slow to fast |
MAINS CONNECTIONS
Connect the device to the mains with the power plug. The wire correspondence is as follow: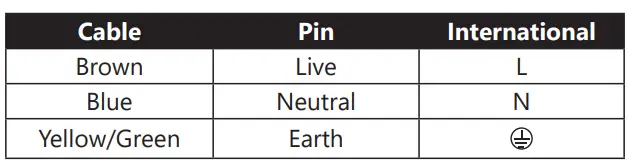
The earth must to be connected! Pay attention to the safety! Before taking into operation for the first time, the installation has to be approved by an expert.
DMX OPERATION
DMX fixtures are designed to receive data through a serial Daisy Chain. A Daisy Chain connection is where the DATA OUT of one fixture connects to the DATA IN of the next fixture. The order in which the fixtures are connected is not important and has no effect on how a controller communicates to each fixture. Use an order that provides for the
Connect fixtures using shielded 2-conductor twisted pair cable with 3-pin XLR male to female connectors. The shield connection is pin 1, while pin 2 is Data Negative (S-), and pin 3 is Data positive (S+).
CAUTION: Wires must not come into contact with each other; otherwise the fixtures will not work at all, or will not work properly.
DMX Terminator
DMX is a resilient communication protocol, however errors still occasionally occur. In order to prevent electrical noise from disturbing and corrupting the DMX control signals, a good habit is to connect DMX output of last fixture in the chain to a DMX terminator, especially over long signal cable runs.
The DMX terminator is simply an XLR connector with a 120Ω (ohm), 1/4 Watt resistor connected across Signal (-) and Signal (+), respectively, pins 2 and 3, which is then plugged into the output socket on last projector in the chain. The connections are illustrated below.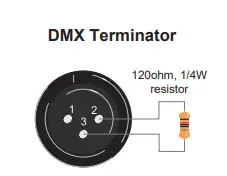
Complimentary signal cable can transmits signals to 20 unit fixtures at most. Signal amplifier is a must to connect more fixtures.
Pin vs 5-Pin DMX cables
DMX connection protocols used by controllers and fixtures manufacturers are not standardized around the world. However, two are the most common standards: 5-Pin XLR and 3-Pin XLR system. If you wish to connect SCENESPLIT 8 RACK to a 5-Pin XLR input fixture, you need to use an adapter cable or make it by yourself.
Following the wiring correspondence between 3-Pin and 5-Pin plug and socket standards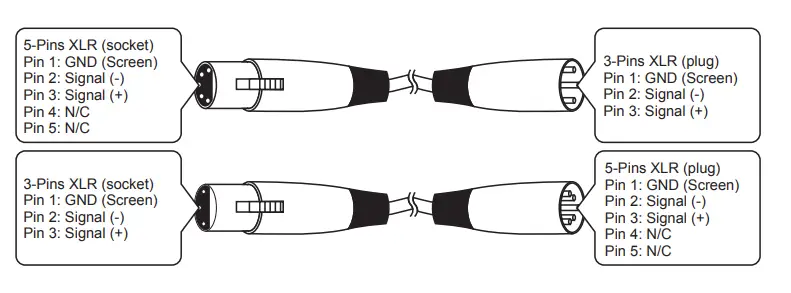
TROUBLESHOOTING
| Problems | Check LIst | Troubleshooting |
| No Output. The Prod- uct does not work | • Check if the power cord is connect in input mains socket of the party Bar. • Check if the ambient tempera- ture in a safe range | • Make sure there is mains present to cable. Check the fuse or replace the cable • After temperature is suit- able, protect function will cancel automatically |
| LED Dimmed | • Check if power cord is connect in the input mains socket of the 4LEDKIT-DJ | • Make sure mains input volt- age is the correct voltage |
|
No DMX input | • Check if cable is damaged or connections pin polarity is correct • Check if DMX mode is set properly • Check if there are 2 units set as master in the whole circuit | • Correct DMX polarity or change the cable. • Set up function mode as DMX • Set 1 unit in Slave Mode |
SPECIFICATIONS
| LED per single PAR | 7 RGB 3in1 LED on each PAR (28 LEDs in total) |
| Beam angle | 25° (per PAR) |
| DMX Channels | 1, 3, 7, 12, and 16CH modes |
| AC power | 100V-240V 50/60Hz Switching Power Supply |
| Power Consumption | 100W |
| Bar / Bar Bag / Pedal Size and Weight | Bar= 1170 x 160 x 60 mm, 7kg / Bar Bag= 1270 x 370 x 100 mm, 10 kg / Pedalboard= 380 x 60 x 200 mm, 1.4 kg |
| Tripod Height | 1240 mm (closed), 2240 mm (max.) |
| Packing (LxHxW) | 1290 x 160 x 530 mm |
| G.W | 14.5 kg |
WARRANTY AND SERVICE
All SOUNDSATION products feature a limited two-year warranty. This two-year warranty is specific to the date of purchase as shown on your purchase receipt.
The following cases/components are not covered from the above warranty:
- Any accessories supplied with the product
- Improper use
- Fault due to wear and tear
- Any modification of the product effected by the user or a third party
SOUNDSATION shall satisfy the warranty obligations by remedying any material or manufacturing faults free of charge at SOUNDSATION’s discretion either by repair or by exchanging individual parts or the entire appliance. Any defective parts removed from a product during the course of a warranty claim shall become the property of SOUNDSATION.
While under warranty period, defective products may be returned to your local SOUNDSATION dealer together with original proof of purchase. To avoid any damages in transit, please use the original packaging if available. Alternatively you can send the product to SOUNDSATION SERVICE CENTER – Via Enzo Ferrari , 10 – 62017 Porto Recanati – Italy . In order to send a product to service center you need an RMA number. Shipping charges have to be covered by the owner of the product.
For further information please visit www.soundsationmusic.com
WARNING
PLEASE READ CAREFULLY – EU and EEA (Norway, Iceland and Liechtenstein) only
This symbol indicates that this product is not to be disposed of with your household waste, according to the WEEE Directive (2202/96/EC) and your national law.
This product should be handed over to a designated collection point, e.g., on an authorized one-for-one basis when you buy a new similar product or to an authorized collection site for recycling waste electrical and electronic equipment (WEEE).
Improper handling of this type of waste could have a possible negative impact on the environment and human health due to potentially hazardous substances that are generally associated with EEE. At the same time, your cooperation in the correct disposal of this product will contribute to the effective usage of natural resources.
For more information about where you can drop off your waste equipment for recycling, please contact your local city office, waste authority, approved WEEE scheme or your household waste disposal service.


