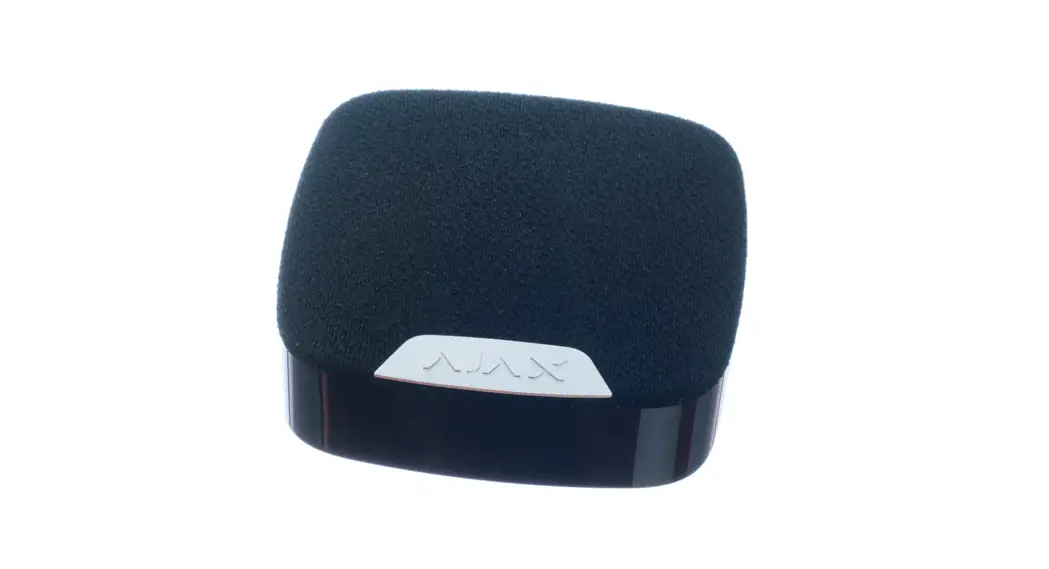
![]() HomeSiren User Manual
HomeSiren User Manual
Updated March 30, 2021

HomeSiren is a wireless home siren with a capacity of up to 105 dB. Developed only for indoor use. It can be quickly installed and set up, is furnished with a LED (plus allows connecting an external LED), and can operate up to 5 years from a battery.
HomeSiren operates within the Ajax security system, by connecting via the protected protocol to the Jeweller hub. The communication range is up to 2,000 meters if there are no obstacles.
The siren is set up via a mobile application for iOS and Android-based smartphones. The user insolvents through push negotiated).
 Operates only with Ajax hubs. Connection to ocBridge Plus and uartBridge integration modules is not provided.
The Ajax security system is self-sustaining, but the user can connect it to the central monitoring station of a private security company.
Buy home siren HomeSiren
Functional elements
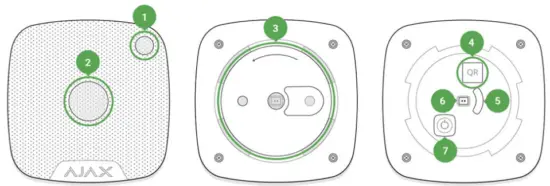
- Light indicator
- Siren buzzer covered with a fabric
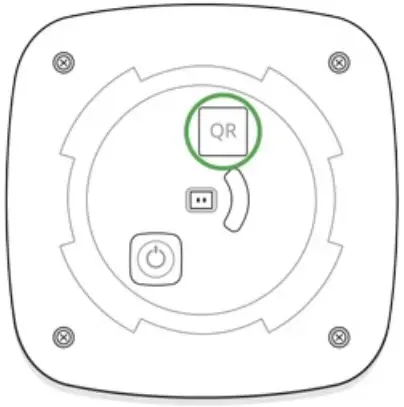
- SmartBracket attachment panel (perforated part is required for actuating the tamper in case of any attempt to tear off the siren from the surface)
- QR code
- Tamper button
- Socket for connecting an outside-mounted light indicator
- On/off button
Operating Principle
The siren signifies the national means of response to the intrusion into a room. With a high probability, its alarm signal will be suo frighten away the intruders.
The device is furnished with a loud buzzer – the sound of the siren can be heard from far.
Subject to correct installation, it would be hard to dismount and deactivate the actuated siren: the body is enormous, and the on/off button will be blocked when the security system is set in the guard mode.
Connecting the Siren to the hub
![]() The HomeSiren siren operates only with the Ajax security system. Up to 10 sirens may be connected to the Ajax hub
The HomeSiren siren operates only with the Ajax security system. Up to 10 sirens may be connected to the Ajax hub
Before starting the connection:
- Following the hub instruction recommendations, install the Ajax application on your smartphone. Create an account, add the hub to the application, and create at least one
room. - Go to the Ajax application.
- Switch on the hub and check the internet connection (via Ethernet cable and/or GSM network).
- Ensure that the hub is disarmed and does not start updates by checking its status in the mobile application.
Only users with administrative privileges can add the device to the hub
How to connect the siren to the hub:
- Select the Add Device option in the Ajax application.
- Name the device, scan/write manually the QR Code (located on the body and packaging), and select the location room.

- Select Add — the countdown will begin.
- Switch on the device (by pressing the on/off button for 3 seconds).


For the detection and interfacing to occur, the siren should be located within the coverage area of the wireless network of the hub (at a single protected object). If the device was already assigned to another hub, switch off HomeSiren and then perform the standard adding procedure.
Request for connection to the hub is transmitted for a short time at the time of switching on the device.
If the connection to the Ajax hub failed, the siren will switch off after 6 seconds. You may repeat the connection attempt then. To retry the connection, you do not need to turn off the device.
The siren connected to the hub will appear in the list of devices of the hub in the application.
Update of the siren statuses in the list depends on the device inquiry time set in the hub settings, with the default value — of 36 seconds.
States
- Devices

- HomeSiren
| Parameter | Value |
| Temperature | The temperature of the device. Measured on the processor and changes gradually |
| Jeweler Signal Strength | Signal strength between the hub and the siren |
| Connection | Connection status between the hub and the siren |
| Battery Charge | The battery level of the device. Two states are available: ОК Battery discharged How battery charge is displayed in Ajax apps |
| Lid | The tamper mode of the device, reacts to the detachment of or damage to the body |
| Alarm Volume | The volume level in case of alarm |
| Alarm Duration | Duration of the alarm sound |
| Armed Mode Indication | If active, the siren LED blinks once every 3 seconds when the security system is armed |
| Beep When Arming/Disarming | If active, the siren warns about the activation and deactivation of the guard mode by the LED, and a short sound signal |
| Beep on Entry/Exit delay | If activated, the siren will beep delays (available in devices with version 3.50 and later) |
| Temporary Deactivation | Shows the status of the device: active, completely disabled by the user, or only noti of the device tamper button are disabled |
| Firmware | Detector e version |
| Device ID | Device identi |
Setting Up the Detector
- Devices
- HomeSiren
- Settings

| Setting | Value |
| First | The device name can be edited |
| Room | Selecting the virtual room to which the device is assigned |
| Alarm Volume | The volume level in case of alarm:
|
| Alarm Duration | The setting determines how long the siren sounds if the alarm is activated (from 3 to 180 seconds per each actuation) |
| Armed Mode Indication | If active, the siren LED blinks once every 3 seconds when the security system is armed |
| Beep When Arming/Disarming | If active, the siren warns about the activation and deactivation of the guard mode by the LED, and a short sound signal |
| Beep on Entry/Exit delay | If active, the siren will beep delays (available in devices with version 3.50 and later) |
| Volume Test | Start a volume test of the siren |
| Jeweler Signal Strength Test | Switches the device to the signal strength test mode |
| Attenuation Test | Switches the siren to the signal fade test mode (available in devices with version 3.50 and later) |
| Temporary Deactivation | Allows the user to disconnect the device without removing it from the system. Two options are available: Entirely — the device will not execute system commands or participate in automation scenarios, and the system will ignore device alarms and other noti Lid only — the system will ignore only not about the triggering of the device tamper button Learn more about the temporary deactivation of devices |
| User Guide | Opens the siren User Manual |
| Unpair Device | Disconnects the siren from the hub and deletes its settings |
Setting up the processing of detector alarms
Through the Ajax app, you can cone which detector alarms can activate the siren. This can help to avoid situations when the security system notiotect a detector alarm or any
other device alarm. The parameter is adjusted in the detector or device settings:
- Sign in to the Ajax app.
- Go to the Devices menu.
- Select the detector or device.
- Go to its settings and set the necessary parameters for activating the siren.
Setting the tamper alarm response
The siren can respond to the tamper alarm of devices and detectors. The option is disabled by default. Note that the tamper reacts to the opening and closing of the body even if the system is not armed!
What is a tamper
For the siren to respond to tamper triggering, in the Ajax app:
- Go to the Devices menu.
- Select the hub and go to its settings .
- Select the Service menu.
- Go to Siren Settings.
- Enable the Alert with a siren if the hub or detector lid is an open option.
Setting the response to pressing the panic button in the Ajax app
The siren can respond by pressing the panic button in Ajax apps. Note that the panic button can be pressed even if the system is disarmed!
For the siren to respond to pressing the panic button:
- Go to the Devices menu.
- Select the hub and go to its settings .
- Select the Service menu.
- Go to Siren Settings.
- Enable the Alert with a siren if the in-app panic button is pressed option.
Setting the siren after-alarm indication
The siren can inform about triggerings in the armed system by means of LED indication.
The option functions as follows:
- The system registers the alarm.
- The siren plays an alarm (duration and volume depending on settings).
- The siren LED and external LED (if connected) blinks twice (about once every 3 seconds) until the system is disarmed.
Thanks to this feature, system users and security companies patrols can understand that the alarm has occurred.
![]() The siren after-alarm indication does not work for always active detectors if the detector was triggered when the system was disarmed.
The siren after-alarm indication does not work for always active detectors if the detector was triggered when the system was disarmed.
To enable the siren after-alarm indication, in the Ajax PRO app:
- Go to siren settings: Hub → Settings→ Service → Siren Settings
- Specify what events the sirens will inform about by double blinking before the security system is disarmed: Con Union Lid opening
- Select the sirens needed. Go back to Siren Settings. The set parameters will be saved.
- Click Back. All values will be applied.
HomeSiren with e 5.55.2 and later supports this function.
Indication
| Event | Indication |
| Alarm | Emits an acoustic signal (the duration depends on the settings) and all LED signaling ceases |
| An alarm was detected in the armed system (if after-alarm the indication is enabled) | The siren LED and external LED (if connected) blinks twice approximately every 3 seconds until the system is disarmed. The indication turns on after the siren has completely played the alarm signal coned in settings |
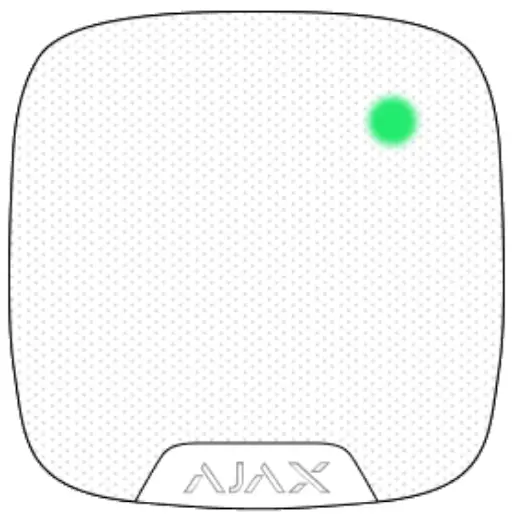
| Switching on the device | LED lights up once |
| Switching off the device | LED will light up for 1 second, then blink three times |
| Registration failed | LED lights up and goes out, then the siren switches off |
| Security system set in the armed mode (if the indication is activated) | Blinks once with a LED and emits a short sound signal |
| The security system is disarmed (if the indication is activated) | Blinks twice with a LED and emits two short sound signals |
| Siren in the armed mode (if the indication is activated) | LED lights up for a short time every 3 seconds |
| Battery low | LED smoothly lights up and goes out when the system is armed or disarmed (if the indication is activated), the tamper is actuated or an alarm is given |
Performance testing
The Ajax security system allows conducting tests for checking the functionality of connected devices.
The tests do not start straight away but within a period of 36 seconds when using the standard settings. The test time starts depending on the settings of the device’s scanning period (the paragraph on “Jeweller” settings in hub settings).
Volume Level Test
Jeweler Signal Strength Test
Attenuation Test
Installing the Siren
The location of the HomeSiren determines its remoteness from the hub and the presence of any obstacles between the devices, hindering the radio signal and sound transmission: walls, inserted ge-size objects located within the room.
The device was developed only for indoor use.Check the signal level at the installation location.
The communication range is up to 2000 meters if there are no obstacles. Please consider it when choosing an installation place for HomeSiren.
If the signal level is one division, we cannot guarantee the stable operation of the security system.
Take possible measures to improve the quality of the signal! As a minimum, move the device — even a 20 cm shift can signify the quality of reception.
If, after moving, the device still has a low or unstable signal strength, use a.
ReX radio signal range extender
Recommended installation height — 2.5 meters and more. This will complicate the access to the device for intruders in case of intrusion.
Installation process
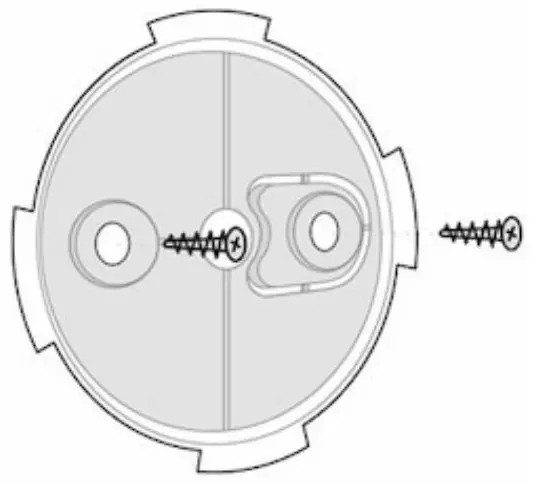
- Fix the SmartBracket panel on the surface using bundled screws. After selecting other attachment hardware, make sure that they do not damage or deform the panel.

 The double-sided adhesive tape may be only used for temporary attachment of the siren. The tape will run dry in course of time, which may result in the falling and damage of the device.
 - Put the siren on the SmartBracket panel and turn it clockwise. When installing in the attachment panel, the tamper will switch and the siren will blink with a LED.
If the light indicator of the siren is not actuated after installation in SmartBracket, check the tamper mode in the Ajax Security System application and then the vice on the panel.
In case of any attempt to dismount the siren, you will receive the notice
Do not install the siren:
- outside the premises (outdoors)
- in places where the acoustic signal will be attenuated (inside furniture, behind thick curtains, etc.)
- nearby any metal objects or mirrors causing attenuation and screening of the signal
- within any premises with the temperature and humidity beyond the range of permissible limits
- closer than 1 m from the hub.
External LED connection
The outside-mounted LED connected to the HomeSiren is paralleled with the built-in LED of the device and completely repeats its indication.
For connection, use the contact on the rear side of the siren body and observe the polarity during the connection. Black terminal wire — “+” contact.
Outlet power supply: 3 V, 10 mA.
Siren Maintenance and Battery Replacement
Check the operational capability of the HomeSiren on a regular basis.
Clean the siren body from dust, spider web, and other contaminations as they appear. Use a soft dry napkin suitable for equipment maintenance.
Do not use for cleaning the siren any substances containing alcohol, acetone, gasoline, and other active solvents.
The batteries installed in the siren ensure up to 5 years of autonomous operation (with the inquiry frequency by the hub of 1 minute) or at least 6 hours of the buzzer sound. If the battery is discharged, the security system will send respective notices and the LED will smoothly light up and goes out when the armed mode is activated.
How long do Ajax devices operate on batteries, and what affects this
Battery Replacement
Tech specs
| Type of notice | Acoustic and LED |
| Sound notiolume | 81 – 105 dB at a distance of 1 m (adjustable) |
| Operating frequency of the buzzer | 3.4 ± 0.5 kHz |
| Tamper protection | Yes |
| Frequency band | 868.0 – 868.6 MHz or 868.7 – 869.2 MHz depending on the region of sale |
| Compatibility | Operates only with all Ajax , and hubs range extenders |
| Maximum RF output power | Up to 25 mW |
| Radio signal modulation | GFSK |
| Radio signal range | Up to 2,000 m (any obstacles absent) |
| Battery supply | 2 × CR123A, 3 V |
| Battery life | Up to 5 years |
| Socket for connecting an external light indicator | Yes (power supply 3 V, 10 mA) |
| Body protection level | IP50 |
| Installation method | Indoors |
| Operating temperature range | From -10°С to +40°С |
| Operating humidity | Up to 75% |
| Overall dimensions | 75 × 76 × 27 mm |
| Weight | 97 g |
| Certi | Security Grade 2, Environmental Class II in conformity with the requirements of EN 50131-1, EN 50131-4, EN 50131-5-3 |
Complete Set
- HomeSiren
- SmartBracket mounting panel
- Battery CR123A (pre-installed) — 2 pcs
- LED connection clamp
- Installation Kit
- Quick Start Guide
Warranty
Warranty for the “AJAX SYSTEMS MANUFACTURING” LIMITED LIABILITY COMPANY products is valid for 2 years after the purchase and does not apply to the pre-installed battery.
If the device does not work correctly, you should t service — in half of the cases, technical issues can be solved remotely!
The full text of the warranty
User Agreement
Technical support:
[email protected]
References
 End user agreement - Ajax Systems
-
Jeweller radio technology | Ajax Systems
-
Current product lines of the Ajax security system
-
Current product lines of the Ajax security system
-
HomeSiren — Wireless indoor siren | Ajax Systems
-
ocBridge Plus — Module for Ajax devices integration with wired systems
-
ReX — Intelligent radio signal range extender | Ajax Systems
-
uartBridge — Module for Ajax devices integration with third-party wireless alarms systems
-
Software | Ajax Systems
-
Software | Ajax Systems
-
Warranty - Ajax Systems
-
How battery charge is displayed in Ajax apps | Ajax Systems Support
-
What is a tamper | Ajax Systems Support
-
What is Volume Level Test | Ajax Systems Support
-
How long Ajax devices operate on batteries, and what affects this | Ajax Systems Support
-
How to temporarily deactivate a device without removing it from the system | Ajax Systems Support
-
How to change batteries in the HomeSiren | Ajax Systems Support
-
What is Attenuation Test | Ajax Systems Support
-
What is Jeweller Signal Strength Test | Ajax Systems Support


