![]()
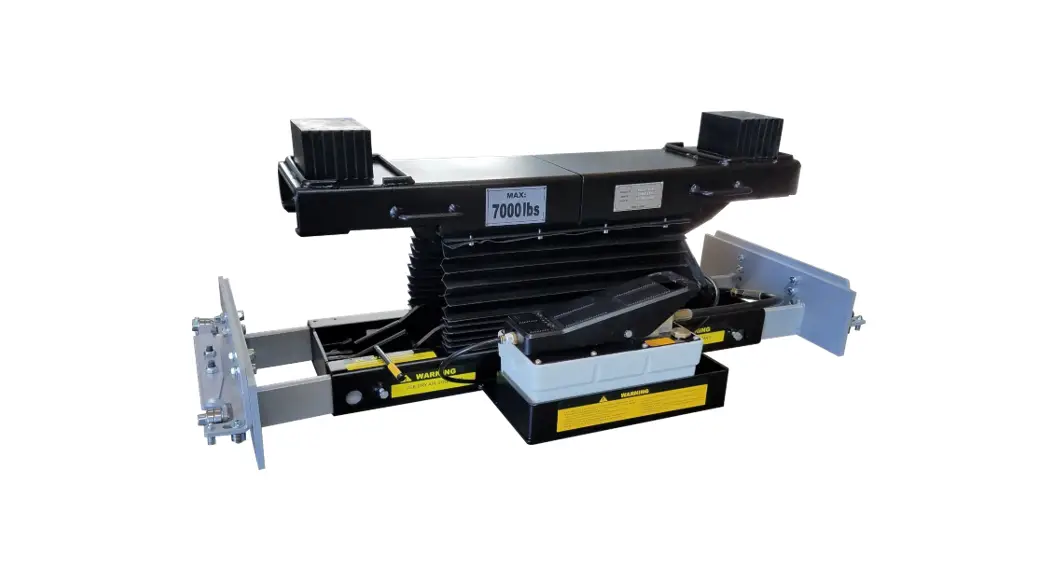
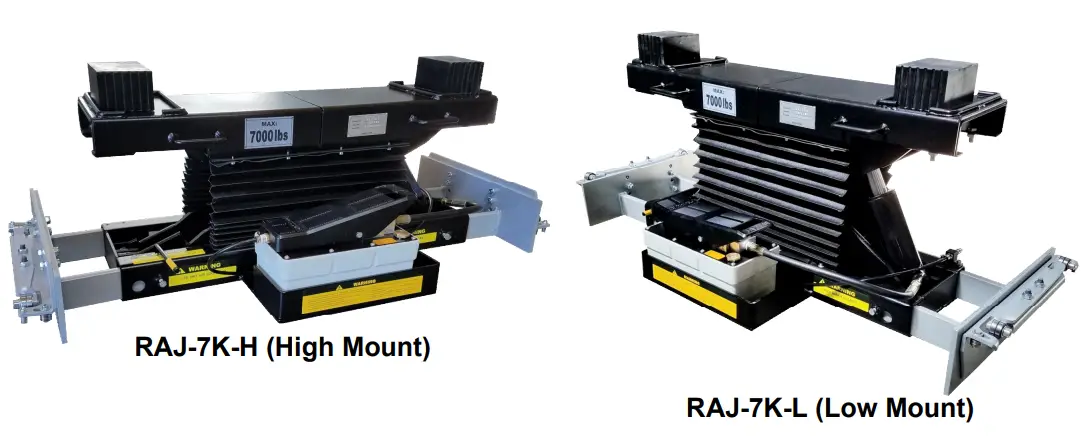
RAJ-7K Series
Rolling Bridge Jacks
7,000 lb. Capacity
(High Mount & Low Mount)
ASSEMBLY & OPERATION INSTRUCTION MANUAL
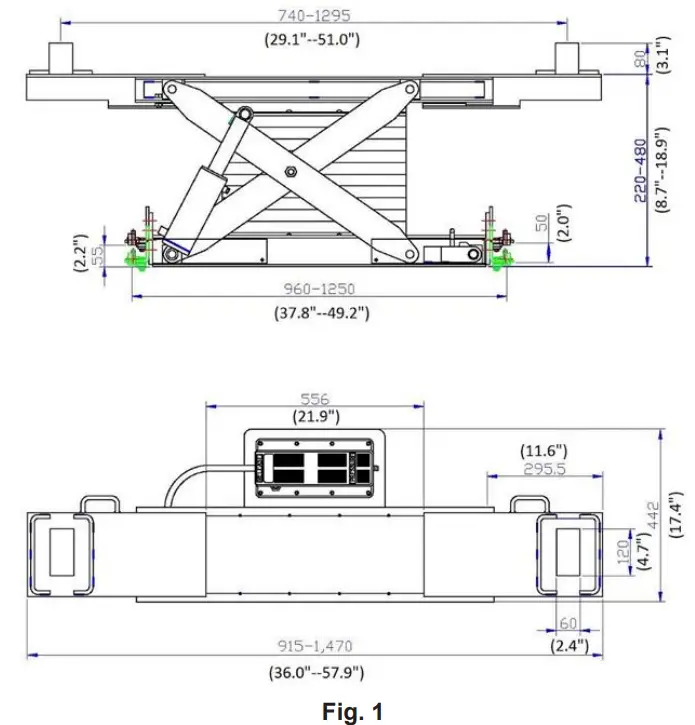
SPECIFICATIONS
Model Numbers: RAJ-7K-H & RAJ-7K-L
| Max Capacity | Size L x W x H | *Height (Min/Max) | Pad Width (Min/Max) | Roller Body Asy Width (Min/Max) |
| 7,000 lbs. | 34.25” x 37.8” x 8.7” | 8.7” – 18.9” | 29.1” – 51” | 37.8” – 49.2” |
* Height Adaptors not included
Net Weight: 300 lbs. / Gross Weight: 330 lbs.
DESCRIPTION
The RAJ-7K-H & RAJ-7K-L Rolling Bridge Jacks are 7,000 lb. capacity pneumatic / hydraulic operated, scissor-style rolling bridge jacks, designed to be mounted on four post or scissor lift’s jack rails, between runways. Both models are capable of lifting the wheels off runways to provide ‘wheels free’ service for brake, suspension, tire repairs and maintenance jobs. The universal adjustable roller body design comes in both high ‘H’ & low ‘L’ mount model configurations for low & high runway jack rail configurations. The RAJ-7K’s Roller Body Wheels are designed to ‘track’ on the top edge of the Jack Rails for smooth rolling operation.
FEATURES
A. Lifting capacity of the RAJ-7K Rolling Jacks are 7,000 lbs. (3,175 kgs).
B. The roller body assembly wheels are adjustable for an inside runway width of 37.8″ (960 mm) minimum to a 49.2” (1250 mm) maximum. (Fig.1)
C. The RAJ-7K Rolling Jacks are equipped with (1) pair of rubber contact pad adaptors that can be positioned at 2.75” to 4.75” for differ pad heights.
D. The RAJ-7K Rolling Jacks are equipped with a locking latch mechanism that will lock at full-rise as well as two other locking positions, which is released by actuating the lock release lever and release on pump.
E. The RAJ-7K Rolling Jacks are maneuvered on four (4) heavy duty rolling bearing wheels. Actual vehicle load is transferred to the jack’s roller body assembly’s spring bars, which engages the runways jack rails to secure jack from moving, while under load.
INSTALLATION INSTRUCTIONS
- Carefully remove rolling jack from crate package.
- Attach 1/4″ NPT male H-style air fitting (not supplied) into end of pump. Also replace shipping plug with the (supplied) vented type brass plug.
- The pneumatic / hydraulic pump will require 125 psi of air pressure for proper operation. A FLR (filter, lubricator & regulator) is recommended for the air supply line for proper & extended operation.
- Slide out the roller body assembly extensions on both sides to match the width between the runways.
- Carefully lift & position rolling jack on the rails of the runways, while ensuring to center the jack between runways. Ensure rollers are centered on top of jack rails & side rollers are adjusted to side of jack rails.
- Once jack rollers are properly aligned & centered to top of jack rails, ensure to secure the roller body ‘slider’ extensions in place by tightening the four hex bolts located at each corner of jack.
- Raise jack to full height using by the pneumatic / hydraulic pump. Check hydraulic oil level and hose connections for leaks; add oil and tighten hose connections, if required.
- Lower the jack by pressing the release lever on pump, while holding the release lever in an upward left position until lowered. (See Safety & Operation Instructions, next page.)
![]() Ensure jack can roll freely on jack rails and all side ‘guide’ rollers are adjusted to be in contact with jack rails.
Ensure jack can roll freely on jack rails and all side ‘guide’ rollers are adjusted to be in contact with jack rails.
SAFETY INSTRUCTIONS
- Never allow unauthorized or untrained persons to operate the rolling jack.
- Thoroughly train all employees in the use and care of rolling jack.
- Never overload rolling jack. Capacity of rolling jack is stated on the nameplate. Capacity should not be exceeded.
- Observe and avoid any pinch point areas of the linkage mechanism.
OPERATING INSTRUCTIONS
![]() To avoid personal injury and/or property damage, permit only trained personnel to operate jack.
To avoid personal injury and/or property damage, permit only trained personnel to operate jack.
After reviewing these instructions, get familiar with jack controls by running the jack through a few cycles before loading vehicle on jack. Observe and avoid any pinch point areas of the linkage mechanism.
- Before loading a vehicle onto lift, endure jack(s) are fully lowered. Make sure the rubber blocks are in their most inbound position. Also ensure the jack(s) is (are) pushed toward the center of lift before driving vehicle on or off lift. This will provide maximum vehicle clearance when loading and unloading vehicles.
- After vehicle has been loaded, chock tires on the opposite side in which the rolling jack is to be used. If two rolling jacks are to be used, chock the tires on the opposite side of the rolling jack to be raised first.
 Engage runway locks before raising vehicle on jacks! DO NOT operate lift while jacks are engaged with a vehicle!
 - Place jack under vehicle at manufacturer’s recommended pick-up points. Pull out the arms to the proper pick-up points. Take up clearance with rubber blocks.
 Allow 12” minimum clearance between vehicle and nearest overhead obstruction before raising vehicle above runways. Failure to comply could damage vehicle and/or cause personal injury.
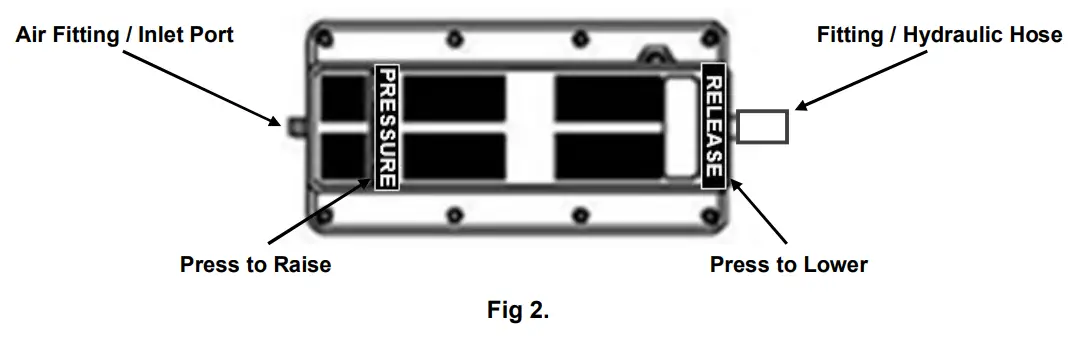
 - To Raise Rolling Jack: Press down on the pump’s ‘Pressure’ lever until the jack is raised to the desired lock position, followed by pressing the ‘Release’ lever on pump to lower jack onto locks.
- To Lower Rolling Jack: Slightly raise jack to release off locks, followed by moving the lock release lever to an upward left position, while carefully pressing down on the pump’s ‘Release’ lever until the jack lowers completely. Always fully lower jack to prevent damage to the vehicle or lift.
Pneumatic / Hydraulic Pump Diagram
MAINTENANCE INSTRUCTIONS
![]() If you are not completely familiar with automotive lift maintenance procedure, please contact your distributor for instructions before any practice.
If you are not completely familiar with automotive lift maintenance procedure, please contact your distributor for instructions before any practice.
TO AVOID PERSONAL INJURY, permit only qualified personnel to perform maintenance on this equipment.
Daily:
- Inspect rubber ‘lift’ blocks for damages or excessive wear.
- Inspect hydraulic system for leaks.
- Inspect for loose bolts, broken or damaged components.
- Inspect safety latches for proper operation.
- Inspect safety curtain guard for damage, wear, and tear.
Monthly:
- Inspect the roller body assemblies for damages or worn parts.
Six Months:
- Check fluid level in hydraulic reservoir.
Fluid Level Checking Procedure:
- Completely lower rolling jack.
- Wipe pump reservoir clean to prevent contamination of fluid.
- Remove fill plug and check fluid level. Fill as required to bottom of fill hole with AW32 hydraulic fluid. Take care to prevent contamination during filling operation.
- Reinstall vent plug, hand tight only.
![]() Repair or Replace as required with original equipment parts.
Repair or Replace as required with original equipment parts.
TROUBLE SHOOTING
| TROUBLE | CAUSE | REMEDY |
| Rolling Jack will not raise after contacting load | 1. Jack loaded beyond capacity. | 1. Use Jack only to rated capacity. |
| 2. External fluid leak at pump, hose, or cylinder. | 2.Repair leak, refill reservoir.* | |
| 3.Internal leakage. | 3. Have pump serviced by an authorized service center. | |
| 4. Release mechanism damaged or parts missing. | 4. Replace damaged or missing parts. | |
| 5. Pump low on fluid. | 5. Lower Jack and check fluid level. Fill with AW32 hydraulic fluid. Locate and correct leak.* | |
| 6. Pump malfunctioning. | 6. Have pump serviced by an authorized service center. | |
| Rolling Jack will not raise to full height. | 1. Pump low on fluid. | 1. Lower Jack and check fluid level. Fill with AW32 hydraulic fluid. Locate and correct leak.* |
| Jack drifts down – will not hold. | 1.Release mechanism damaged or parts missing | 1. Replace damaged or missing parts. |
| 2. External leakage. | 2.Locate leak and repair. Refill reservoir.* | |
| 3.Internal leakage. | 3. Have pump serviced by an authorized service center. | |
| Jack lowers slow or not at alt | 1. Release mechanism damaged or parts missing. | 1. Replace damaged or missing parts. |
| 2. Return flow of fluid restricted or blocked. | 2. Eliminate blockage. |
![]() Do not overfill reservoir. Jack must be completely lowered prior to adding hydraulic fluid.
Do not overfill reservoir. Jack must be completely lowered prior to adding hydraulic fluid.![]() If rolling jack is in the raised position, be sure to activate the mechanical locking device prior to attempting to service the unit. Failure to do so may cause jack to drop out of control.
If rolling jack is in the raised position, be sure to activate the mechanical locking device prior to attempting to service the unit. Failure to do so may cause jack to drop out of control.
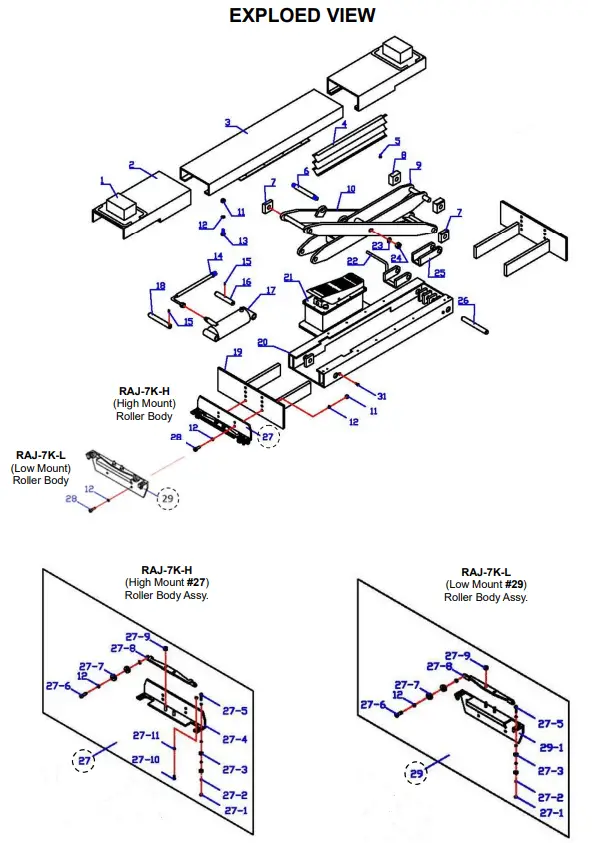
PARTS LIST
| ITEM | Tux P/N | M-Ref P/N | DESCRIPTION | QTY |
| 1 | RAJ7K-001 | LJ01-00007-000 | Rubber Block | 2 |
| 2 | RAJ7K-002 | LJ01-02000-000 | Sliding Arm | 2 |
| 3 | RAJ7K-003 | LJ01-08000-000 | Arm Weldment | 1 |
| 4 | RAJ7K-004 | LJ01-00005-000 | Side Curtain | 2 |
| 5 | RAJ7K-005 | LJ01-00004-000 | Screw, M6 x 8mm | 18 |
| 6 | RAJ7K-006 | LJ01-00009-000 | Shaft #3 | 1 |
| 7 | RAJ7K-007 | LJ01-00001-000 | Slide Block #1 | 4 |
| 8 | RAJ7K-008 | LJ01-00006-000 | Slide Block #2 | 2 |
| 9 | RAJ7K-009 | LJ01-07000-000 | Inner scissor | 1 |
| 10 | RAJ7K-010 | LJ01-03000-000 | Outer scissor | 1 |
| 11 | RAJ7K-011 | 5202-00010-000 | Nut, M10 | 10 |
| 12 | RAJ7K-012 | 5301-00010-000 | Flat Washer, D10 | 18 |
| 13 | RAJ7K-013 | 5101-10024-000 | Bolt, M10 x 24mm | 2 |
| 14 | RAJ7K-014 | LJ01-00011-000 | Hydraulic Hose | 1 |
| 15 | RAJ7K-015 | LJ01-00003-000 | Threaded Pin, M6 x 10mm | 2 |
| 16 | RAJ7K-016 | LJ01-00002-000 | Shaft #1 | 1 |
| 17 | RAJ7K-017 | LJ01-04000-000 | Hydraulic Cylinder | 1 |
| 18 | RAJ7K-018 | LJ01-00012-000 | Shaft #4 | 1 |
| 19 | RAJ7K-019 | LJ01-01100-001 | Roller Body Frame | 2 |
| 20 | RAJ7K-020 | LJ01-09000-000 | Base Weldment | 1 |
| 21 | AP-10K | QY030S-00 | Air-Hydraulic Pump | 1 |
| 22 | RAJ7K-022 | LJ01-06000-000 | Safety Latch & Handle (A) | 1 |
| 23 | RAJ7K-023 | 5301-00016-000 | Flat Washer, D16 | 2 |
| 24 | RAJ7K-024 | 5202-00016-000 | Nut, M16 | 2 |
| 25 | RAJ7K-025 | LJ01-05000-000 | Safety Latch (B) | 1 |
| 26 | RAJ7K-026 | LJ01-00008-000 | Shaft #2 | 1 |
| 27 | RAJ-H-SLDRASY | LJ04-01000-H00 | High Mount) Roller Body Assy. | 2 |
| 29 | RAJ-L-SLDRASY | LJ04-02000-H00 | Low Mount) Roller Body Assy. | 2 |
| 31 | RAJ7K-031 | 5104-08016-000 | Bolt, M8 x 16mm | 4 |
RAJ-7K-H (High Mount) Roller Body Assembly Parts (#27)
| ITEM | Tux P/N | M-Ref P/N | DESCRIPTION | QTY |
| 27-1 | RAJ7K-027.1 | 5206-00006-000 | Lock Nut, M6 | 8 |
| 27-2 | RAJ7K-027.2 | 5301-00006-000 | Flat Washer, D6 | 16 |
| 27-3 | RAJ7K-027.3 | LJ04-01001-000 | Small, Side Bearing | 8 |
| 27-4 | RAJ7K-027.4 | LJ04-01003-000 | (High Mount) RB Support Frame | 2 |
| 27-5 | RAJ7K-027.5 | 5104-06030-000 | Bolt, M6 x 30mm | 4 |
| 27-6 | RAJ7K-027.6 | 5105-10030-000 | Socket Head Bolt, M10 x 30mm | 4 |
| 27-7 | RAJ7K-027.7 | LJ04-01002-000 | Large, Wheel Bearing | 8 |
| 27-8 | RAJ7K-027.8 | LJ04-01004-000 | Spring Support Bar | 2 |
| 27-9 | RAJ7K-027.9 | 5206-00010-000 | Lock Nut, M10 | 4 |
| 27-10 | RAJ7K-027.10 | 5105-06016-000 | Socket Head Bolt, M6 x 16mm | 4 |
| 27-11 | RAJ7K-027.11 | LJ04-01005-000 | Bushing | 4 |
| 28 | RAJ7K-028 | 5104-10035-000 | Bolt, M10 x 35mm | 8 |
RAJ-7K-L (Low Mount) Roller Body Assembly Parts (#29)
| ITEM | Tux P/N | M-Ref P/N | DESCRIPTION | QTY |
| 27-1 | RAJ7K-027.1 | 5206-00006-000 | Lock Nut, M6 | 4 |
| 27-2 | RAJ7K-027.2 | 5301-00006-000 | Flat Washer, D6 | 16 |
| 27-3 | RAJ7K-027.3 | LJ04-01001-000 | Small, Side Bearing | 8 |
| 29-4 | RAJ7K-029.4 | LJ04-02001-000 | (Low Mount) RB Support Frame | 2 |
| 27-5 | RAJ7K-027.5 | 5104-06030-000 | Bolt, M6 x 30mm | 4 |
| 27-6 | RAJ7K-027.6 | 5105-10030-000 | Socket Head Bolt, M10 x 30mm | 4 |
| 27-7 | RAJ7K-027.7 | LJ04-01002-000 | Large, Wheel Bearing | 8 |
| 27-8 | RAJ7K-027.8 | LJ04-01004-000 | Spring Support Bar | 2 |
| 27-9 | RAJ7K-027.9 | 5206-00010-000 | Lock Nut, M10 | 4 |
| 28 | RAJ7K-028 | 5104-10035-000 | Bolt, M10 x 35mm | 8 |
LIMITED WARRANTY
Structural Warranty:
The following parts and structural components carry a five-year warranty:
| Columns Legs Tracks | Arms Carriages Cross Rails | Uprights Overhead Beam Top Rail Beam | Swivel Pins |
Limited One-Year Warranty:
Tuxedo Distributors, LLC (iDEAL) offers a limited one-year warranty to the original purchaser of Lifts and Wheel Service equipment in the United States and Canada. Tuxedo will replace, without charge, any part found defective in materials or workmanship under normal use, for a period of one year after purchase. The purchaser is responsible for all shipping charges. This warranty does not apply to equipment that has been improperly installed or altered or that has not been operated or maintained according to specifications.
Other Limitations:
This warranty does not cover:
- Parts needed for normal maintenance
- Wear parts, including but not limited to cables, slider blocks, chains, rubber pads and pulleys
- Replacement of lift and tire changer cylinders after the first 30 days. A seal kit and installation instructions will be sent for repairs thereafter.
- On-site labor
Upon receipt, the customer must visually inspect the equipment for any potential freight damage before signing clear on the shipping receipt. Freight damage is not considered a warranty issue and therefore must be noted for any potential recovery with the shipping company.
The customer is required to notify Tuxedo of any missing parts within 72 hours. Timely notification must be received to be covered under warranty.
Tuxedo will replace any defective part under warranty at no charge as soon as such parts become available from the manufacturer. No guarantee is given as to the immediate availability of replacement parts.
Tuxedo reserves the right to make improvements and/or design changes to its lifts without any obligation to previously sold, assembled, or fabricated equipment.
There is no other express warranty on the Tuxedo lifts and this warranty is exclusive of and in lieu of all other warranties, expressed or implied, including all warranties of merchantability and fitness for a particular purpose.
To the fullest extent allowed by law, Tuxedo shall not be liable for loss of use, cost of cover, lost profits, inconvenience, lost time, commercial loss or other incidental or consequential damages.
This Limited Warranty is granted to the original purchaser only and is not transferable or assignable.
Some states do not allow exclusion or limitation of consequential damages or how long an implied warranty lasts, so the above limitations and exclusions may not apply. This warranty gives you specific legal rights and you may have other rights, which may vary from state to state.
8320 E Hwy 67, Alvarado, TX 76009
Ph. 817-558-9337 / Fax 817-558-9740


