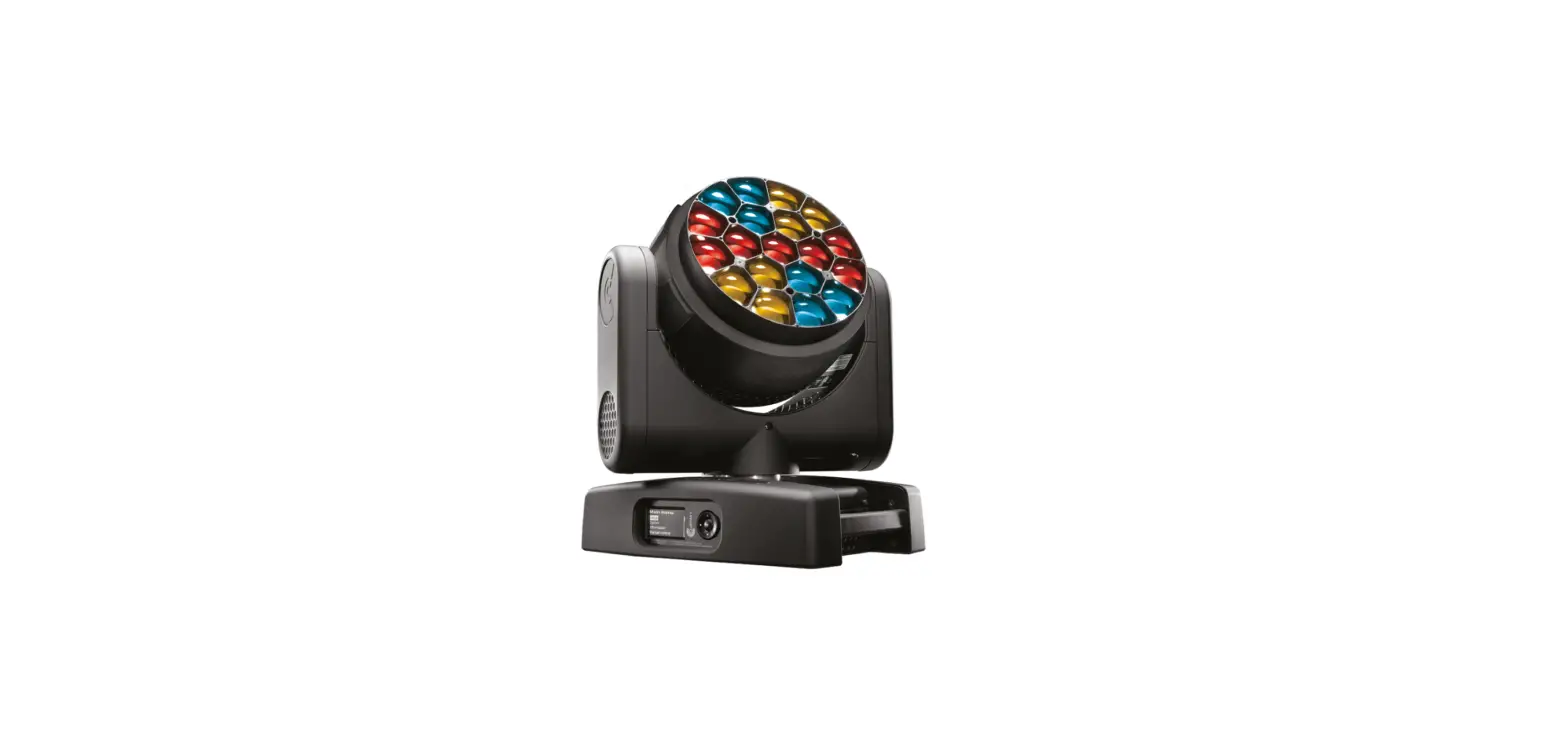

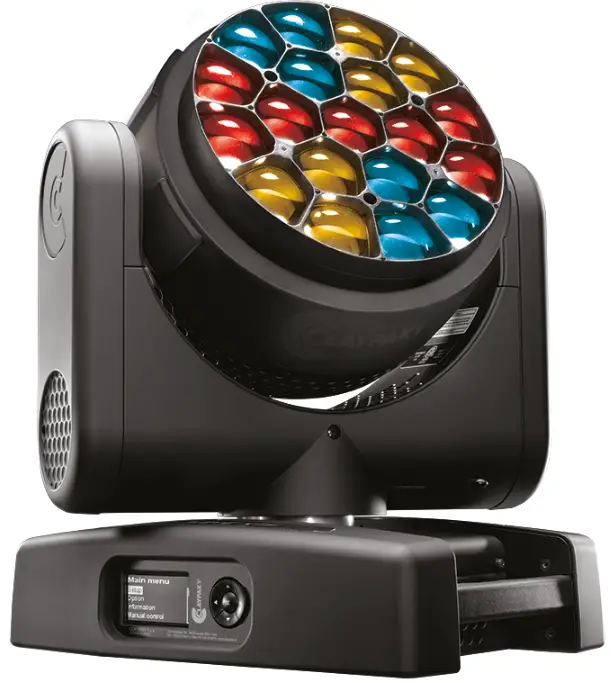
CLAY PAKY B-EYE K15 IP LED Moving Head Wash Light
Thank you for choosing B EYE K15 IP. This device is a lighting effect for professional use on stages, TV, in discotheques, theaters, etc. Please read this user manual carefully before installing the device to ensure correct installation, operation and maintenance of the lighting safety.
Product General Guidelines
- This fixture is designed for indoor use only.
- Consistent operation breaks may ensure that the device will serve you for a long time without defects.
- Please use the original packaging if the device is to be transported.
- All modifications on the device are forbidden for safety reasons.
- If this device will be operated in any way different to the one described in this manual, the product may suffer damages and the guarantee becomes void. Furthermore, any other operation may lead to short-circuit, burns, electric shock, crash, etc.
Product Safety Instructions
- Please do not put the device in damp places or environments over 60 degrees Celsius to guarantee the product’s life.
- Always mount this unit in a safe and stable manner.
- The qualified professionals are allowed to carry out the lamp installation, operation and maintenance, but they must guarantee to operate in strict accordance with the instructions referred to.
- If the device has been exposed to temperature changes due to environmental changes, do not switch it on immediately. The arising condensation could damage the device. Leave the device switched off until it has reached room temperatures.
- This device falls under protection-class. Therefore it is essential that the device be earthed.
- The electric connection must be carried out by a qualified person.
- Make sure the power cord is never crimped or damaged by sharp edges. If this would be the case, replacement of the cable must be done by an authorized dealer.
- Be careful with your operations. With a dangerous voltage you can suffer a dangerous electric shock when touching wires!
CAUTION! Keep this device away from rain and moisture! Unplug mains lead before device’s installation, cleaning and maintenance!
Important: Damages caused by the disregard of this user manual are not subject to warranty. The dealer will not accept liability for any resulting defects or problems.
Thank you for your patronage!
- We are confident that our excellent products and service can satisfy you.
- For your own safety, please read this user manual carefully before installing the device.
- In order to install, operate, and maintain the lighting safety correctly.
- We suggest that the installation and operation should be done by the verified technician and follow the instruction strictly.
CAUTION!
Keep this device away from rain and moisture!
CAUTION!
Unplug mains lead before device’s installation,cleaning and maintenance!
Every person involved with the installation, operation and maintenance of this device has to:
- be qualified
- follow carefully the instructions of this manual
INTRODUCTION
Thank you for having chosen this professional moving head. You will see you have acquired a powerful and versatile device. Unpack the device. Inside the carton box you should find:
- One power in cable
- One 3 Pin DMX cable(5 Pin optional)
- Two mounted brackets
- One safety rope
- One English user manual(Flight case, Clamps are optional, please contact your dealer)
Please check carefully that there is no damage caused by transportation. Should there be any questions, please consult your dealer and don’t install this device.
GENERAL GUIDELINES
- This device is a lighting effect for a professional use on stages, TV, in discotheques, theaters, etc., The device was designed for indoor use only.
- This fixture is only allowed to be operated with the max alternating current which stated in the technical specifications in 6th page of this manual.
- Lighting effects are not designed for permanent operation. Consistent operation breaks may ensure that the device will serve you for a long time without defects.
- Do not shake the device. Avoid brute force when installing or operating the device.
- While choosing the installation-spot, please make sure that the device is not exposed to extreme heat, moisture or dust. Please don’t project the beam onto combustible substances. The minimum distance between light-output from the projector and the illuminated surface must be more than 0,5 meter.
- If you use the quick lock cam in hanging up the fixture, please make sure the quick lock fasteners turned in the quick lock holes correctly.
- Operate the device only after having familiarized with its functions. Do not permit operation by persons not qualified for operating the device. Most damages are the result of unprofessional operation.
- Please use the original packaging if the device is to be transported.
- For safety reasons, please be aware that all modifications on the device are forbidden. If this device will be operated in any way different to the one described in this manual, the product may suffer damages and the guarantee becomes void. Furthermore, any other operation may lead to short-circuit, burns, electric shock, crash, etc.
SAFETY INSTRUCTIONS
CAUTION!
Be careful with your operations. With a dangerous voltage you can suffer a dangerous electric shock when touching wires!
This device has left the factory in perfect condition. In order to maintain this condition and to ensure a safe operation, it is absolutely necessary for the user to follow the safety instructions and warning notes written in this user manual.
- In order to guarantee the product’s life, please don’t put it in the damp places or even the environment over 60degress.
- Always mount this unit in safe and stable matter.
The qualified professionals are allowed to carry out the lamp installation, operation and maintenance, but they must guarantee to operate in strict accordance with the instructions referred to.
Important:
Damages caused by the disregard of this user manual are not subject to warranty. The dealer will not accept liability for any resulting defects or problems.
If the device has been exposed to temperature changes due to environmental changes, do not switch it on immediately. The arising condensation could damage the device. Leave the device switched off until it has reached room temperatures.
This device falls under protection-classⅠ. Therefore it is essential that the device be earthed.
The electric connection must carry out by qualified person.
Make sure the power cord is never crimped or damaged by sharp edges. If this would be the case, replacement of the cable must be done by an authorized dealer.
Always disconnect from the mains, when the device is not in use or before cleaning it. Only handle the power cord by the plug. Never pull out the plug by tugging the power cord.
During initial start-up some smoke or smell may arise. This is a normal process and does not necessarily mean that the device is defective, it should decrease gradually.
Please don’t project the beam onto combustible substances.
If the external flexible cable or cord of this luminaire is damaged, it shall be exclusively replaced by the manufacturer or his service agent or a similar qualified person in order to avoid a hazard.
CAUTION!
Never touch the device during operation!
In order to make the lights in good condition and extend the life time, we suggest a regular cleaning to the lights.
- Clean the inside and outside lens each week to avoid the weakness of the lights due to accumulation of dust.
- Clean the fan each week.
- A detailed electric check by approved electrical engineer each three month, make sure that the circuit contacts are in good condition, prevent the poor contact of circuit from overheating.
We recommend a frequent cleaning of the device. Please use a moist, lint-free cloth. Never use alcohol or solvents.
DRAWING(mm)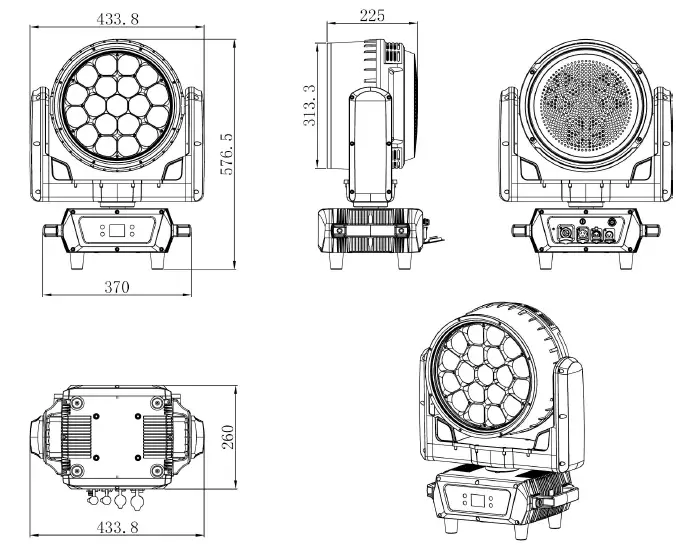
TECHNICAL PARAMETERS
Power supply
- AC100V-240V/50-60Hz
- Power consumption: 850W
Optic
- Osram 19*40W RGBW 4 in1 High bright LEDs
- Individual LED control
- Average life: 50,000 hrs
- Color temperature:2500~10000K
- PMMA Lens with glass lighting pipe
Effect
- Zoom angle: 4-45°;
- Wash/Beam/Graphic/Effects function
- Front lens can rotated infinity
- LED halo ring with rainbow effect
- With“vortex”and “kaleidoscope” effects
- Variable built-in dynamic effects
- 4 Liner dimming curves
- 2 color mode (RGBW)
- Strobe: 1-25 hz, random and pulse flash
Control
- Pan/Tilt: 540/216°
- Control mode: DMX512/RDM/Master Slave
- DMX channels: 22/26/36/97
Body
- Alumininum die casting with fire-proof housing in IP65
- Intelligent cooling system with overheating protection and speed adjustable fans 1.77 inch OLED display avoiding signal bothering with display flip, the password: 1111 Magnetic code for highest precision positioning
- Software updating by DMX connector
- Seetronic powercon ture1 IP
- XLR in & out: 3-pin & optional 5-pin
- Optional folding clamp for easy installation
Weight&Size
- Net weight: 22kg
- Gross weight: 26kg
- Fixture size: 432*333*485mm
- Cartbox size: 610*530*450mm
MOUNTING AND INSTALLATION
Cautions:
- For added protection mount the fixtures in areas outside walking paths, seating areas, or in areas were the fixture might be reached by unauthorized personnel.
- Before mounting the fixture to any surface, make sure that the installation area can hold a minimum point load of 10 times the device’s weight.
- Fixture installation must always be secured with a secondary safety attachment, such as an appropriate safety cable.
- Never stand directly below the device when mounting, removing, or servicing the fixture from a periodic safety inspection of all installation material and the fixture. If you lack these qualifications, do not attempt the installation yourself. Improper installation can result in bodily injury.
- Be sure to complete all rigging and installation procedures before connecting the main power cord to the appropriate wall outlet.
- Clamp Mounting: The B-Eye provides a unique mounting bracket assembly that integrates the bottom of the base, the included “Omega Bracket,” and the safety cable rigging point in one unit (see the illustration below). When mounting this fixture to truss be sure to secure an appropriately rated clamp to the included omega bracket using a M10 screw fitted through the center hole of the “omega bracket”. As an added safety measure be sure to attached at least one properly rated safety cable to the fixture using on of the safety cable rigging point integrated in the base assembly
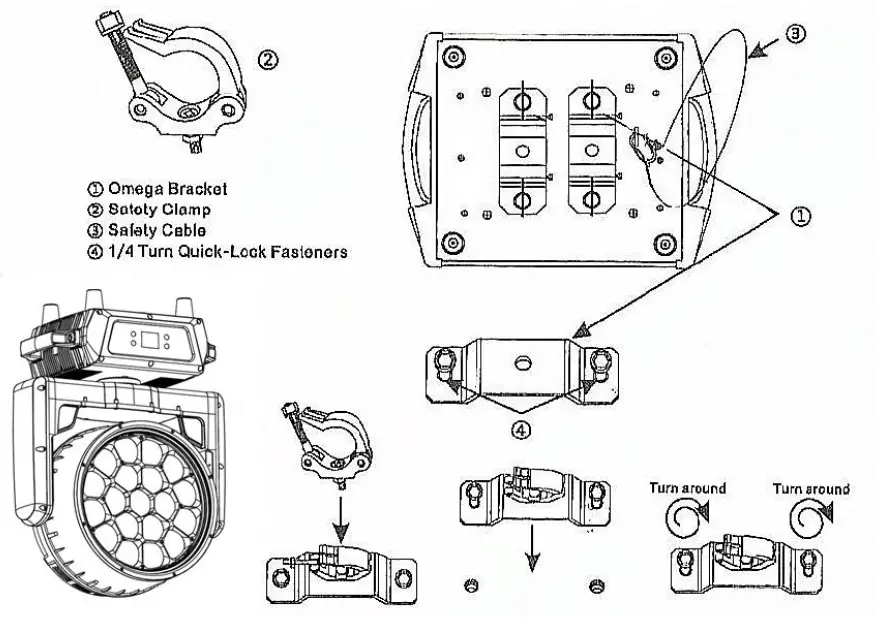
Regardless of the rigging option you choose for your B-Eye, always be sure to secure your fixture with a safety cable. The fixture provides a built-in rigging point for a safety cable on the hanging bracket as illustrated above. Be sure to only use the designated rigging point for the safety cable and never secure a safety cable to a carrying handle.
DMX-512 CONTROL CONNECTIONS
Connect the provided XLR cable to the female 3-pin XLR output of your controller and the other side to the male 3-pin XLR input of the moving head. You can chain multiple Moving heads be connected together through serial linking. The cable needed should be two core, screened cable with XLR input and output connectors. Please refer to the diagram below.
DMX-512 connection with DMX terminator: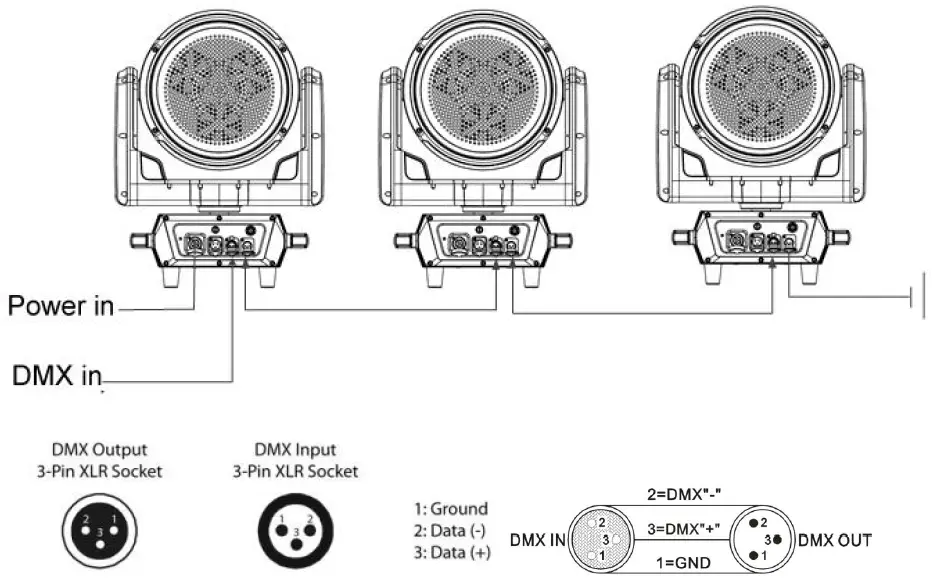
For installations where the DMX cable has to run a long distance or is in an electrically noisy environment, such as in a discotheque, it is recommended to use a DMX terminator. This helps in preventing corruption of the digital control signal by electrical noise. The DMX terminator is simply an XLR plug with a 120 Ω resistor connected between pins 2 and 3,which is then plugged into the output XLR socket of the last fixture in the chain. Please see illustrations below.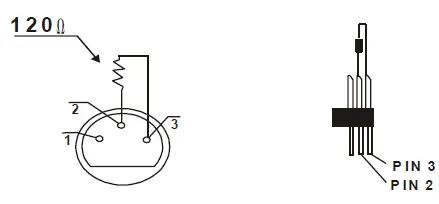
MENU FUNCTION: Press menu for 3seconds to unlock
| Address | 001-255 | |
|
Run Mode | DMX 22CH/26CH/36CH/97CH | |
| Auto Test | ||
| Manual | ||
| Auto | ||
| Sound | ||
|
Setup | Pan Reverse | OFF/ON |
| Tilt Reverse | OFF/ON | |
| Screen Reverse | OFF/ON | |
| Screen Lock | OFF/ON(PASSWORD 1111) | |
| Pan Angle | 540/360/180 | |
| Tilt Angle | 216/180/90 | |
| Arefaction Time | 085 | |
| Language | EN/CH | |
| Dimmer Speed | Linear/Square/I Sequare/Scurve | |
| Dimmer Curve | ||
| Reset | ||
| Factory Set | ||
| Sys Info | Ver:V1.0 | |
| Running Mode: DMX | ||
| Dmx Address: 001 | ||
| Temperature: Open | ||
|
Manual | Pan | 128 |
| Tilt | 128 | |
| Focus | 0 | |
| Rotate | 0 | |
| Color | 0 | |
| Red | 255 | |
| Green | 255 | |
| Blue | 255 | |
| White | 255 | |
| Dimmer | 255 | |
| Shutter | 255 |
| When the temperature resistance problem is expected, the screen will have the following prompts: |
| Thermistor Open |
| Thermistor Short |
| Thermistor Hot |
CHANNEL MODE
| CH | STRIP- 22 | CH | STRIP RGBW- 26 | CH | SHAPE-36 | CH | EXTENDED RGBW-97 |
| 1 | Pan | 1 | Pan | 1 | Red | 1 | Red |
| 2 | Pan fine | 2 | Pan fine | 2 | Red fine | 2 | Red fine |
| 3 | Tilt | 3 | Tilt | 3 | Green | 3 | Green |
| 4 | Tilt fine | 4 | Tilt fine | 4 | Green fine | 4 | Green fine |
| 5 | Pan/Tilt Speed | 5 | Pan/Tilt Speed | 5 | Blue | 5 | Blue |
| 6 | Zoom | 6 | Zoom | 6 | Blue fine | 6 | Blue fine |
| 7 | Lens Rotation | 7 | Lens Rotation | 7 | White | 7 | White |
| 8 | Dimmer | 8 | Dimmer | 8 | White fine | 8 | White fine |
| 9 | Strobe | 9 | Strobe | 9 | Linear CTO | 9 | Linear CTO |
| 10 | Red | 10 | Red | 10 | Marco color | 10 | Marco color |
| 11 | Green | 11 | Green | 11 | Strobe | 11 | Strobe |
| 12 | Blue | 12 | Blue | 12 | Dimmer | 12 | Dimmer |
| 13 | White | 13 | White | 13 | Dimmer fine | 13 | Dimmer fine |
| 14 | Linear CTO | 14 | Linear CTO | 14 | Pan | 14 | Pan |
| 15 | Marco color | 15 | Marco color | 15 | Pan fine | 15 | Pan fine |
| 16 | Static effect | 16 | Static effect | 16 | Tilt | 16 | Tilt |
| 17 | Dynamic effect | 17 | Dynamic effect | 17 | Tilt fine | 17 | Tilt fine |
| 18 | Dynamic effect speed | 18 | Dynamic effect speed | 18 | Function | 18 | Function |
| 19 | Strip strobe | 19 | Background R | 19 | Reset | 19 | Reset |
| 20 | Strip macro | 20 | Background G | 20 | Zoom | 20 | Zoom |
| 21 | Strip macro speed | 21 | Background B | 21 | Lens Rotation | 21 | Lens Rotation |
| 22 | Reset | 22 | Background W | 22 | Shape selection | 22 | Red Led 1 |
| 23 | Strip strobe | 23 | Shape speed | 23 | Green Led 1 | ||
| 24 | Strip macro | 24 | Shape fade | 24 | Blue Led 1 | ||
| 25 | Strip macro speed | 25 | Shape R | 25 | White Led 1 | ||
| 26 | Reset | 26 | Shape G | 26 | Red Led 2 | ||
| 27 | Shape B | 27 | Green Led2 | ||||
| 28 | Shape W | 28 | Blue Led2 | ||||
| 29 | Shape dimmer | … | White Led2 | ||||
| 30 | Background dimmer | … | Red Led… | ||||
| 31 | Shape transition | … | Green Led… | ||||
| 32 | Shape offset | … | Blue Led… | ||||
| 33 | Foreground strobe | 93 | White Led… | ||||
| 34 | Background strobe | 94 | Red Led19 | ||||
| 35 | Background select | 95 | Green Led19 | ||||
| 36 | Frequency | 96 | Blue Led19 | ||||
| 97 | White Led19 | ||||||
STRIP 22CH
| CH | FUNCTION | DMX VALUE | DESCRIPTION |
| 1 | Pan | 0-255 | 0-540 degree |
| 2 | Pan Fine | 0-255 | 16bit |
| 3 | Tilt | 0-255 | 0-205 degree |
| 4 | Tilt Fine | 0-255 | 16bit |
| 5 | Pan/Tilt speed | 0-255 | from fast to slow |
| 6 | Zoom | 0-255 | From small to big linear adjust |
|
7 |
Lens Rotation | 0-127 | 0~60 degree |
|
128-191 |
Reverse clockwise from fast to slow infinite rotate | ||
| 200-255 | Clockwise from slow to fast infinite rotate | ||
| 8 | All dimmer | 0-255 | From dark to bright linear dimmer |
|
9 |
Strobe | 0-3 | Light on |
| 4-200 | Synchronous strobe from slow to fast | ||
| 201-215 | Low -speed random strobe | ||
| 216-234 | Mid -speed random flashing | ||
| 235-255 | High -speed random flashing | ||
| 10 | R dimmer | 0-255 | From dark to bright linear dimmer |
| 11 | G dimmer | 0-255 | From dark to bright linear dimmer |
| 12 | B dimmer | 0-255 | From dark to bright linear dimmer |
| 13 | W dimmer | 0-255 | From dark to bright linear dimmer |
| 14 | CTO | 0-255 | Color temperature linear adjustment |
| 15 | Macro color | 0-255 | Built -in color gradient |
| 16 | Static effect | 0-255 | 5 value each effect |
| 17 | Dynamic effect | 0-255 | 5 value each effect |
|
18 |
Dynamic effect speed | 0-127 | Positive direction effect from fast to slow |
| 128-255 | Opposite direction effect from slow to fast | ||
| 19 | Led stripe strobe | 0-3 | off |
| 4-255 | Synchronous strobe | ||
| 251-255 | on | ||
|
20 |
Led stripe Macro | 0-51 | Built -in color |
| 52-55 | Effect 1 | ||
| 56-59 | Effect 2 | ||
| … | 4 value each effect | ||
| 252-255 | Effect 51 | ||
| 21 | Led stripe effect speed | 0-255 | Slow to fast |
| 22 | Reset | 0-239 | No function |
| 240-255 | 5s reset |
STRIP 26CH
| CH | FUNCTION | DMX VALUE | DESCRIPTION |
| 1 | Pan | 0-255 | 0-540 degree |
| 2 | Pan Fine | 0-255 | 16bit |
| 3 | Tilt | 0-255 | 0-205 degree |
| 4 | Tilt Fine | 0-255 | 16bit |
| 5 | Pan/Tilt speed | 0-255 | from fast to slow |
| 6 | Zoom | 0-255 | From small to big linear adjust |
|
7 |
Lens Rotation | 0-127 | 0~60 degree |
| 128-191 | Reverse clockwise from fast to slow infinite rotate | ||
|
200-255 |
Clockwise from slow to fast infinite rotate | ||
| 8 | All dimmer | 0-255 | From dark to bright linear dimmer |
|
9 |
Strobe | 0-3 | Light on |
| 4-200 | Synchronous strobe from slow to fast | ||
| 201-215 | Low -speed random strobe | ||
| 216-234 | Mid -speed random flashing | ||
| 235-255 | High -speed random flashing | ||
| 10 | R dimmer | 0-255 | From dark to bright linear dimmer |
| 11 | G dimmer | 0-255 | From dark to bright linear dimmer |
| 12 | B dimmer | 0-255 | From dark to bright linear dimmer |
| 13 | W dimmer | 0-255 | From dark to bright linear dimmer |
| 14 | CTO | 0-255 | Color temperature linear adjustment |
| 15 | Macro color | 0-255 | Built -in color gradient |
| 16 | Static effect | 0-255 | 5 value each effect |
| 17 | Dynamic effect | 0-255 | 5 value each effect |
| 18 | Dynamic effect speed | 0-127 | Positive direction effect from fast to slow |
| 128-255 | Opposite direction effect from slow to fast | ||
| 19 | Background R | 0-255 | From dark to bright linear dimmer |
| 20 | Background G | 0-255 | From dark to bright linear dimmer |
| 21 | Background B | 0-255 | From dark to bright linear dimmer |
| 22 | Background W | 0-255 | From dark to bright linear dimmer |
| 23 | Led stripe strobe | 0-3 | off |
| 4-255 | Synchronous strobe | ||
| 251-255 | on | ||
|
24 |
Led stripe Macro | 0-51 | Built -in color |
| 52-55 | Effect 1 | ||
| 56-59 | Effect 2 | ||
| … | 4 value each effect | ||
| 252-255 | Effect 51 | ||
| 25 | Led stripe effect speed | 0-255 | Slow to fast |
| 26 | Reset | 0-239 | No function |
| 240-255 | 5s reset |
SHAPE 36CH
| CH | FUNCTION | DMX VALUE | DESCRIPTION |
| 1 | R | 0-255 | R Dimming |
| 2 | R Fine | 0-255 | G Fine adjust |
| 3 | G | 0-255 | G Dimming |
| 4 | G Fine | 0-255 | G Fine adjust |
| 5 | B | 0-255 | B Dimming |
| 6 | B Fine | 0-255 | B Fine adjust |
| 7 | W | 0-255 | B Dimming |
| 8 | W Fine | 0-255 | W Fine adjust |
| 9 | Linear color temperature | 0-255 | Linear color temperature regulation |
| 10 | Macro | 0-255 | Color macro function |
|
11 |
Strobe | 0-3 | lighting-off |
| 4-103 | Sync strobe speed is from slow to fast(1HZ-25HZ) | ||
| 104-107 | light up | ||
| 108-207 | The split strobe speed varies from slow to fast | ||
| 208-212 | light up | ||
| 213-225 | Low speed random flash | ||
| 226-238 | Medium speed random flash | ||
| 239-251 | High-speed random flash | ||
| 252-255 | light up | ||
| 12 | Total dimming | 0-255 | Linear dimming occurs from dark to bright |
| 13 | Dimming fine | 0-255 | Dimming fine-tuning control |
| 14 | Pan | 0-255 | Tilt |
| 15 | Pan fine | 0-255 | Tilt fine-tuning control |
| 16 | Tilt | 0-255 | Pan control |
| 17 | Tilt fine | 0-255 | Pan fine-tuning control |
| 18 | Function | 0-255 | Reserved |
| 19 | Reset | 0-239 | No function |
| 240-255 | Keep 5S reset | ||
| 20 | Zoom | 0-255 | Zoom |
| 21 | Lens rotation | 0-127 | 0~60 degrees |
| 128-191 | Clockwise infinite rotation | ||
| 192-255 | Counterclockwise and infinite rotation | ||
| 22 | Shape selection | 0-255 | Gobo rotation |
| 23 | Shape speed | 0-255 | Gobo effect speed control |
| 24 | Shape fade | 0-255 | Gobo effect fade |
| 25 | Shape R | 0-255 | R |
| 26 | Shape G | 0-255 | G |
| 27 | Shape B | 0-255 | B |
| 28 | Shape W | 0-255 | W |
| 29 | Shape dimmer | 0-255 | Pattern 0-100% dimming |
| 30 | Background dimming | 0-255 | Background 0-100% dimming |
| 31 | Shape transition | 0-255 | Pattern change control |
| 32 | Shape offset | 0-255 | Pattern translation |
| 33 | Foreground strobe | 0-255 | Foreground strobe(same as 11 CH ) |
| 34 | Background strobe | 0-255 | Background strobe(same as 11 CH ) |
| 35 | Background selection | 0-255 | Background selection |
| 36 | Frequency | 0-255 | Shape and frequency patterns can be selected |
EXTENDED RGBW-97
| CH | FUNCTION | DMX VALUE | DESCRIPTION |
| 1 | R | 0-255 | R Dimming |
| 2 | R Fine | 0-255 | G Fine adjust |
| 3 | G | 0-255 | G Dimming |
| 4 | G Fine | 0-255 | G Fine adjust |
| 5 | B | 0-255 | B Dimming |
| 6 | B Fine | 0-255 | B Fine adjust |
| 7 | W | 0-255 | B Dimming |
| 8 | W Fine | 0-255 | W Fine adjust |
| 9 | CTO | 0-255 | Linear color temperature regulation |
| 10 | Macro | 0-255 | Color macro function |
|
11 |
Strobe | 0-3 | lighting-off |
| 4-103 | Sync strobe speed is from slow to fast(1HZ-25HZ) | ||
| 104-107 | light up | ||
| 108-207 | The split strobe speed varies from slow to fast | ||
| 208-212 | light up | ||
| 213-225 | Low speed random flash | ||
| 226-238 | Medium speed random flash | ||
| 239-251 | High-speed random flash | ||
| 252-255 | light up | ||
| 12 | Total dimming | 0-255 | Linear dimming occurs from dark to bright |
| 13 | Dimming fine | 0-255 | Dimming fine-tuning control |
| 14 | Pan | 0-255 | Tilt |
| 15 | Pan fine | 0-255 | Tilt fine-tuning control |
| 16 | Tilt | 0-255 | Pan control |
| 17 | Tilt fine | 0-255 | Pan fine-tuning control |
| 18 | Function | 0-255 | Reserved |
| 19 | Reset | 0-250 | No function |
| 251-255 | Keep 5S reset | ||
| 20 | Zoom | 0-255 | Zoom |
| 21 | Lens rotation | 0-127 | 0~60 degree |
| 128-191 | Clockwise infinite rotation | ||
| 192-255 | Counterclockwise infinite rotation | ||
| 22 | R1 LED dimmer | 0-255 | R1 LED dimmer |
| 23 | G1 LEDdimmer | 0-255 | G1 LED dimmer |
| 24 | B1 LED dimmer | 0-255 | B1 LED dimmer |
| 25 | W1 LED dimmer | 0-255 | W1 LEDdimmer |
| … | … | 0-255 | …… |
| 94 | R19 LED dimmer | 0-255 | R19 LED dimmer |
| 95 | G19 LED dimmer | 0-255 | G19 LED dimmer |
| 96 | B19 LEDdimmer | 0-255 | B19 LED dimmer |
| 97 | B19 LEDdimmer | 0-255 | B19 LED dimmer |
SHAPE MODE DESCRIPTION
CONCEPTS: FOREGROUND AND BACKGROUND
The powerful shapes engine allows the user to set all the possible parameters relating to the pixels of the light in an organic way, with a distinction between the pixels affected by a selected “image” and the ones that are not affected by that specific image (more properly called SHAPE from now on).
The macro called “ring 2″ will, as an example, involve all the pixels that compose the ring of the unit, while the middle pixel and the 1 smaller ring will not be affected by the shape. The involved pixels will belong to the”Foreground” layer, while all the remaining pixels will belong to the “Background” layer.
Pixels on the foreground take the colour the user will select specifically for them using the dedicated channels, while the remaining pixels will all maintain the colours related to the washlight.
SHAPE PARAMETERS DESCRIPTION
| SHAPE SELECTION | Allows to choose the kind of shape to be visualized amongst the 63 available ones. Each shape can be composed of a multitude of frames or be a single, static image. |
| SHAPE SPEED | Allows to set the speed at which the different frames of the selected shape are played by the unit. |
| SHAPE FADE | In case of shapes with multiple frames, it allows to select a snap or faded variation from frame to frame of the same shape. |
| SHAPE RGBW | Allows to select the colour of the pixels composing the selected shape, if all are left at 000 no shape will be visualized (unless the background dimmer and normal RGBW attributes of the unit are given a value, in which case a “negative” of the macro will be shown) |
| SHAPE DIMMER | Allows to select the overall brightness of the pixels involved in the selected shape. |
| BACKGROUND DIMMER | Allows to select the overall brightness of the pixels NOT involved by the selected shape. The relevant colour is set using the normal RGBW channels of the washlight. |
| SHAPE TRANSITION | Internal fade time between a shape and another one set via DMX. Using this “channel” when you change from a shape to a different one as if it was the console fade time will avoid the scrolling effect normally visible when having fades between eg. gobo changes is traditional lights. Fade time on the console should be set to 0. |
| SHAPE OFFSET | Depending on the selected shape the channel sets the “density” of the involved pixels (few random pixel, many random pixels) or enables an internal algorithm that will distribute the macro between a multitude of lights on a specific DMX line basing on their DMX starting address. |
| FOREGROUND STROBE | Allows to set a strobe rate for the pixels involved in a macro. |
| BACKGROUND STROBE | Allows to set a strobe rate for the pixels NOT involved in a macro. |
| BACKGROUND SELECT | Allows to reduce, if needed, the background to a lower amount of “rings”. With selected macros this allows to mirror the image between the two halves of the fixture’s head (in this case the RGBW channels of the washlight will set the colour of the mirrored half and the background will remain black. |
Note of Foreground Shape Effect:
- Shapes will be available while (Dimmer CH12),(Strobe CH11), (Shape dimmer CH29), (Foreground strobe CH33),(Shape color CH25/26/27/28) turned on then selecting the Shapes on (Shape Selection CH22) with different speed on (Shape Speed CH23).
- Background Effect: Meanwhile the (BG dimmer CH30), (BG strobe CH34), (Color RGBW CH1/3/5/7) turned on.
(CH value mentioned above is based on SHAPE MODE L10Rotation) - Vortex effect: With Shape slot 3(Ring 2 on Shape Selection Value 10) and Zoom rotation turned on.
SHAPE SELECTION*SHAPE SPEED*SHAPE OFFSET*SHAPE FADE*BACKGROUND SELECT
REMARK
- The product has perfect performance and intergrity packing. All users should be strictly comply with the warning and operating instructions as stated. Or we aren’t in charge of any result by misusing.
- Any damage resulting by misuse is not within the Company’s warranty.
- Any fault or problem caused by neglecting the manual is also not in the charge of dealers.
- Errors and omissions for every information given in this manual excepted.
- All information is subject to change without prior notice.


