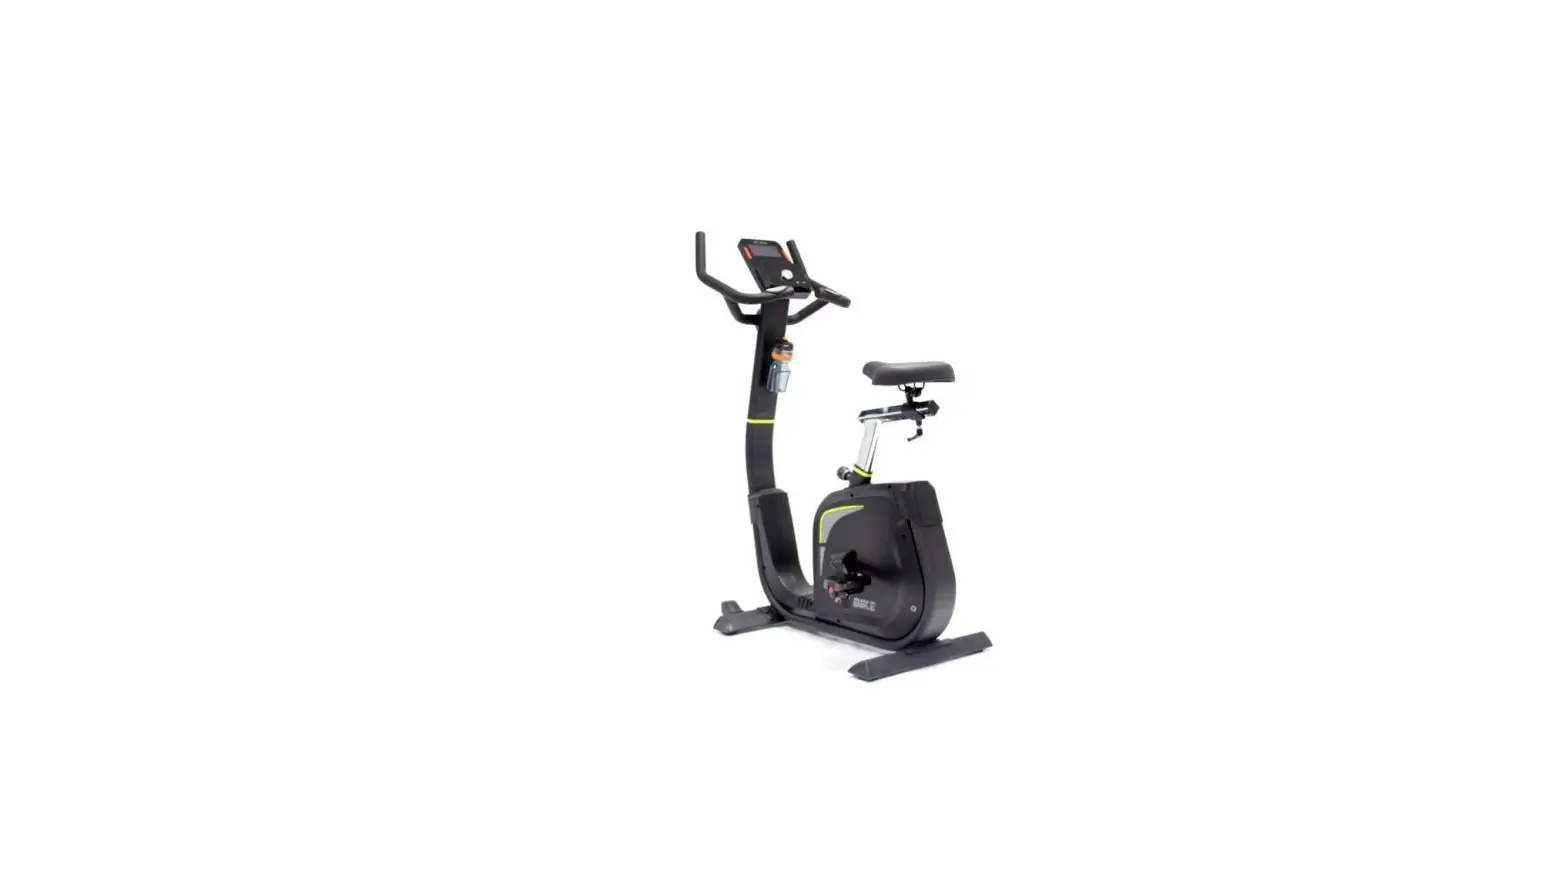
Hometrainers Fit Bike Senator Instruction Manual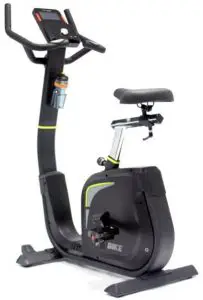
Safety instructions / Maintenance
ATTENTION: First read the entire manual before you install and use the devices!
To ensure optimum safety, you must check the device for damage and wear sensitive parts on a regular basis. You must also follow the instructions below.
- As the owner of the device, you are responsible for providing each user with clear safety instructions as described below.
- The device must be used by a maximum of 1 person at the same time.
- Check the construction, screws, bolts, and connections before using the machine for the first time, and then you must check it on a regular basis. Check if all parts are properly connected and properly secured before using the machine.
- Incorrect or excessive training can result in health damage. Before you start training, consult your doctor about whether your health permits training with this device. The doctor’s advice serves as the basis for the development of your training program.
- Before you begin your exercise, ensure that all sharp parts are removed around the machine.
- In case of regular use, we recommend to check all parts and fastening parts every 1 to 2 months, especially the screws and bolts. In order to maintain the structural safety level of the device, damaged parts must be replaced immediately.
- The device is designed for use by adults. If you still allow children to use the device, remind them to use it correctly and monitor them at all times. If you allow children to use the device, always consider their mental and physical abilities.
- The device is under no circumstances suitable as a toy. Remember that due to the natural need to play, the temperament of children in handling this device may respectively involve unforeseen situations and dangers that are not the responsibility of the manufacturer.
- Ensure sufficient space around the device during the installation and during use.
- Make sure that the machine is stable and horizontal at all times. Use a smooth subfloor for the placement of the machine.
- Always wear appropriate clothing during training. The clothing should be designed so that it can not get stuck between the machine. Also ensure proper shoes with a good anti-slip footbed. This also minimizes wear and increases safety.
- The device must be protected against humid conditions at all times.
- To protect your floor from pressure points, always use a mat.
- Keep body parts away from movable parts of the device during use.
- If you have adjusted the adjustable parts, make sure they are properly attached before using the machine.
- Never make your own adjustments to the device.
- Never start an exercise directly after consuming a meal.
- Always take a good position on the device before starting the training.
- Stop the training session immediately if you suffer from any of the following symptoms: dizziness or nausea, chest pain or other physical symptoms and contact your doctor.
- This product contains small parts that can be easily swallowed by children. Therefore, keep children away of the area during the assembly of the product.
- ATTENTION: the heart beat measurement of the product can specify an inaccurate value. Excessive training can have serious consequences, stop immediately if you feel dizzy or weak and consult a doctor.
- The manufacturer can not be held liable for damage through inefficient use of the product.
- Adjust the device in such a way that it meets a comfortable training position and that it does not unnecessarily burden the body.
- Do not use the device with exceptional forces for which such a device is not designed for.
- If the device has a power cable, the socket must always be earthed. If the power cable is damaged, it must be replaced in order to prevent danger.
- In case of a defect, always contact the supplier.
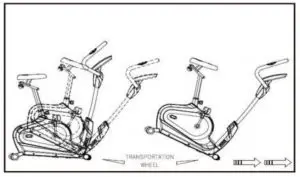
- Cross trainer: getting on and off should be done with one foot following the other foot, and should not be done at the same time. Reduce speed at the same time to prevent injuries.
- Treadmill: a diagonal stripe runs across the running mat. This is not a defect, this is the weld seam with which the running mat is fixed. Without a ‘safety key’ the treadmill does not work, make sure that it is always attached to the clothing in case of an emergency.
- Spinning bike: many spinning bikes use a pedal system. Therefore, brake evenly or use the brake.
ATTENTION: Proper maintenance of your device is crucial to optimize the lifespan.
- To avoid an electric shock, before every cleaning or service / repair, ensure that the device is switched off and the power cable is unplugged.
- Never clean the device with strong or corrosive detergents to avoid damage to the display. Use a damp cloth when cleaning. Do not place the device in clear sunlight.
- Wipe the display and all other surfaces of the device with a clean, slightly damp cloth to remove all sweat residues.
- Place a mat to protect the device against dirt and wear during the installation. Vacuum once a week under the training device.
- Clean your device after the training session to prevent sweat acids from absorbing the device. Make sure that the floor on which the device is located on is dust-free.
- Check all parts of the device regularly and also tighten the screws regularly. Also pay attention to fatigue resistance and replace the defective parts immediately.
- Lubricate all rotating parts every 2 to 3 months with a maintenance spray and check regularly if the screws are tight.
- If the device has a ‘rails’, make sure that it remains well lubricated.
- Treadmill:
- If the treadmill slips, it must be tightened. Install the treadmill on 6 km / h and turn clockwise at both ends of the treadmill.
- If the running mat is crooked, turn the left or right end to straighten it again.
- Lubricating the treadmill should be done by spraying the silicone oil
under the running mat and then you must install the treadmill at 1km / h for 3 minutes. - Disassemble the bonnet to periodically remove the dust.
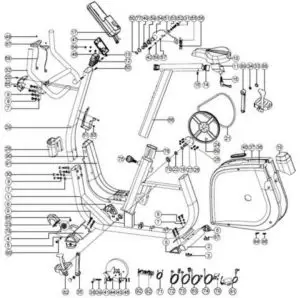
Parts list
| Part no | Description | Spec | Qty |
| 1 | Main frame | 1 | |
| 2 | Rear stabilizer | 1 | |
| 3 | Adjustable round wheel | 4 | |
| 4 | Front stabilizer | 1 | |
| 5 | Tri-angle end cap(left) | 2 | |
| 6 | Tri-angle end cap(right) | 2 | |
| 7 | Flat washer | D16*D8.5*1.2T | 16 |
| 8 | Spring washer | D15.4 XD8.2x2T | 16 |
| 9 | Allen bolt | M8x1.25x20L | 12 |
| 10 | Seat | 1 | |
| 11 | Seat adjustment tube | 1 | |
| 12 | Allen screw | M8*1.25*45L | 1 |
| 13 | Nylon nut | M8*1.25*8T | 1 |
| 14 | Square cap | 2 | |
| 15 | Knob | 1 | |
| 16 | Screw | M5*0.8*10L | 2 |
| 17 | Computer | 1 | |
| 18 | C-clip | D22.5*D18.5*1.2T | 2 |
| 19 | Rear cover | 1 | |
| 20 | Bolt | M5x0.8x15L | 2 |
| 21 | Belt | 1 | |
| 22 | Waved washer | D27*D20.3*0.5T | 1 |
| 23 | Cover for wheel | 2 | |
| 24 | Belt wheel | 1 | |
| 25 | Hex bolt | M6x1.0x15L | 4 |
| 26 | Nylon nut | M6x1.0x6T | 4 |
| 27 | Crank axle | 1 | |
| 28 | Upper protective cover | 1 | |
| 29 | Handlebar post | 1 | |
| 30 | Allen bolt | M8*1.25*50L | 4 |
| 31 | Screw cover | D29*21(M8) | 1 |
| 32 | Fixed handlebar | 1 | |
| 33 | Screw cover | D26*11L | 2 |
| 34 | Anti-loosen nut | M10*1.25*10T | 2 |
| 35 | Left crank | 1 | |
| 36 | Left chain cover | 1 | |
| 37 | Right chain cover | 1 | |
| 38 | Nut | M6*1*6T | 2 |
| 39 | Adjustable screw | M6*1.0*46 | 1 |
| 40 | Chain cover gasket | 1 | |
| 41 | EMS | 1 | |
| 42 | Allen bolt | M8x1.25x50L | 1 |
| 43 | Flat washer | D13*D6.5*1.0T | 4 |
| 44 | Spring washer | D10.5*D6.1*1.3T | 4 |
| 45 | Allen screw | M6*1.0*15L | 1 |
| 46 | Computer bracket | 1 | |
| 47 | Fixing plate for computer | 1 | |
| 48 | Screw | ST4*25L | 2 |
| 49 | Waved washer | D21xD16.2×0.3T | 1 |
| 50 | Screw | ST4.2×1.4x15L | 2 |
| 51 | Plastic washer | D50*D10*1.0T | 1 |
| 52 | Nylon nut | M8*1.25*8T | 2 |
| 53 | Nut | M8*1.25*6T | 2 |
| 54 | Fixing plate for idle wheel | 1 | |
| 55 | Plastic cover | 2 | |
| 56 | Spring | D2.2*D14*65L | 1 |
| 57 | Plastic washer | D10*D24*0.4T | 1 |
| 58 | Flat washer | D28*D8.5*3T | 1 |
| 59 | Bearing | #99502 | 2 |
| 60 | C-clip | S-16(1T) | 1 |
| 61 | Water bottle holder | 1 | |
| 62 | Left pedal | 1 | |
| 63 | Electrical cable | 1 | |
| 64 | Bolt | M5x10L | 4 |
| 65 | Protective cover | 1 | |
| 66 | Seatpost | 1 | |
| 67 | Handle pulse | 2 | |
| 68 | Handle pulse cable | 2 | |
| 69 | Round magnet | 1 | |
| 70 | Bearing | #6004-2RS(C0) | 2 |
| 71 | Connecting cable | 1 | |
| 72 | Upper computer cable | 1 | |
| 73 | Lower computer cable | 1 | |
| 74 | Sensor cable | 1 | |
| 75 | Knob | 1 | |
| 76 | Inner tube | 1 | |
| 77 | Flat washer | D24*D16*1.5T | 1 |
| 78 | Round wheel | 2 | |
| 79 | Bolt | M5x0.8x12L | 1 |
| 80 | Allen bolt | M8*1.25*40L | 2 |
| 81 | Adaptor | 1 | |
| 82 | Controller | 1 | |
| 83 | Bolt | M5x0.8x15L | 2 |
| 84 | Screw | ST4.2×1.4x20L | 13 |
| 85 | Nylon nut | M8*1.25*8T | 2 |
| 86 | Pin | 3 | |
| 87 | Screw | ST4*1.41*12L | 8 |
| 88 | Right pedal | 1 | |
| 89 | Right crank | 1 | |
| 90 | Front decorative cover (left) | 1 | |
| 91 | Front decorative cover (right) | 1 | |
| 92 | Screw | ST4.2×1.4x15L | 2 |
| / | Allen spanner | M6 | 1 |
Hardware and tools list

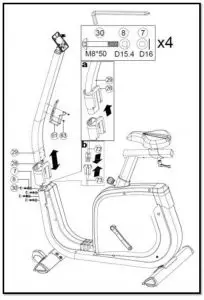
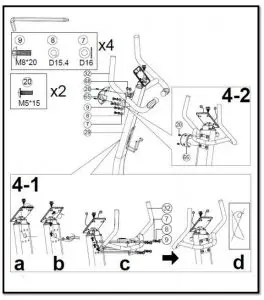
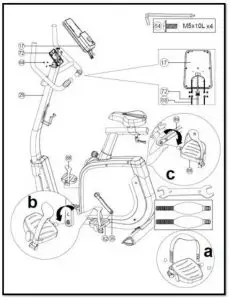
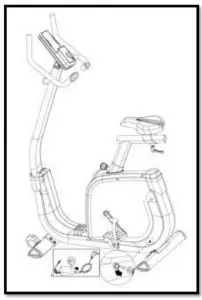
Overview drawing
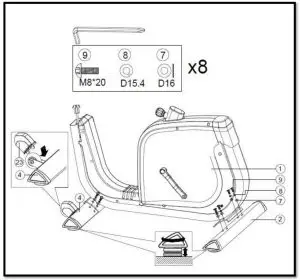
Assembly

User instructions
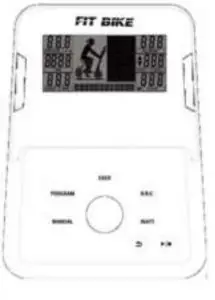
- ENTER (ROTARY KNOB): Confirm
- ARROW BACK: Return to the previous screen
- START/STOP Start or stop the current training.
- UP (ROTARTY KNOB): The filling in of data or the increase of the immune system.
- DOWN (ROTARY KNOB): The filling in of data or the decrease of the immune system.
| DISPLAY | DISPLAY | SETTINGS | FUNCTION |
| TIME | 00:00 – 99:59 | 00:00 – 99:00 | Current training time |
| DISTANCE | 00.00 – 99.99 | 00.00 – 99.00 | Current training distance |
| CALORIES | 0 – 9999 | 0 – 9990 | Current burned calories |
| PULSE | 0 – 230 | 30 – 230 | Current heartbeat |
| WATTAGE | 0 – 999 | 10 – 350 | Current wattage |
| SPEED | 0 – 99.9 | – | Current speed |
| RPM | 0 – 999 | – | Current rotations per minute |
General usage:
- Insert the plug into the socket (often found at the rear legs of the device), the display will now be activated. After this, you can enter all personal data (gender, age, height and weight) for different users (USER).
- After entering all personal data, the display will switch over to the main menu.
- The first program will start blinking in the main menu: MANUAL. By means of the UP / DOWN keys you can switch between the various programs, namely MANUAL, PROGRAM, USER PROGRAM, H.R.C., WATT, RECOVERY and BODY FAT.
Programs:
- Manual
In the manual program, you can enter your own training data, namely maximum time, distance or calories. With this, the training will be based on your own settings. You can also press START directly to start the workout without data. After this, the resistance with the UP / DOWN keys can be increased or decreased. - Program
By means of the UP / DOWN keys you can choose between the various preprogrammed programs, with MODE / ENTER you can select the program and you can install a desired time or distance. You can also immediately press START to start the workout without a set time or distance. - User program
By means of the UP / DOWN keys you can install a resistance, with the MODE / ENTER key you confirm the resistance and you will proceed to the next column in order to program an entire training yourself. By pressing the MODE key for 2 seconds, the installation will stop. - H.R.C.
Before the training, you will be asked about your age (AGE) and then calculate a target (TARGET) heartbeat. With the UP / DOWN keys you can change the desired heart beat target to 55% (weight loss), 75% (fitness), 90% (intensive) and TARGET (personal interpretation). - Watt
By default, a wattage is shown, when it blinks you can increase or decrease it with the UP / DOWN buttons. Press MODE / ENTER to confirm the selection. - Recovery
When you are at the end of the training, you can test your fitness with the RECOVERY button (for this you have to hold the heart beat sensors on the steering wheel). All data will stop and the time will count down from 00:60 to 00:00. After this, a code will be shown, F1 (very good), F2 (good), F3 (average), F4 (sufficient), F5 (bad) and F6 (very bad). - Body fat
If you chose the BODY FAT training, you must put both hands on the hand sensors, so that the exercise bike can measure your heart beat. After a few seconds (8 to 10) the fat percentage and BMI will be shown on the display. A symbol is also displayed if the score is above or below average.
Other information:
- If you have chosen the device with the iPlus module, this display offers the possibility to pair with a smartphone/ tablet. Applications can then be used. View: www.betersport.nl/fitness-apps
- Use the standard supplied adapter.
- If the device is not used for a few minutes, the sleep mode will be activated.
- In case of a defect, the plug must be pulled out and inserted again.


