![]()
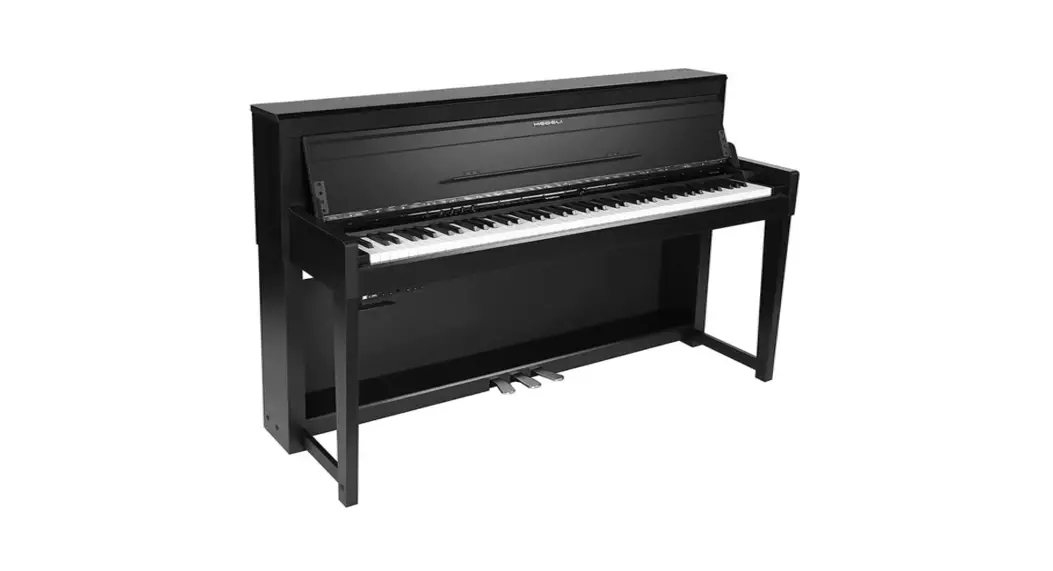
COMPACT PIANO
OWNER’S MANUAL
THE FCC REGULATION WARNING (for the USA)
NOTE: This equipment has been tested and found to comply with the limits for a Class B digital device, pursuant to Part 15 of the FCC Rules. These limits are designed to
provide reasonable protection against harmful interference in a residential installation. This equipment generates, uses, and can radiate radio frequency energy and, if not installed and used in accordance with the instructions, may cause harmful interference to radio communications. However, there is no guarantee that interference will not occur in a particular installation. If this equipment does cause harmful interference to radio or television reception, which can be determined by turning the equipment off and on, the user is encouraged to try to correct the interference by one or more of the following measures:
- Reorient or relocate the receiving antenna.
- Increase the separation between the equipment and receiver.
- Connect the equipment into an outlet on a circuit different from that to which the receiver is connected.
- Consult the dealer or an experienced radio/TV technician for help.
If items such as cables are included with this equipment, you must use those included items.
Unauthorized changes or modifications to this system can void the user’s authority to operate this equipment.
CAUTION
The normal function of the product may be disturbed by Strong Electro-Magnetic Interference. If so, simply reset the product to resume normal operation by following the owner’s manual. In case the function could not resume, please use the product in another location.
Keep this manual
After reading this manual, please keep it for later reference.
PRECAUTIONS
Location
Using the unit in the following locations can result in a malfunction.
- Indirect sunlight
- Locations of extreme temperature or humidity
- Excessively dusty or dirty locations
- Locations of excessive vibration
- Close to magnetic fields
Power Supply
Please connect the designated AC adapter to an AC outlet of the correct voltage. Do not connect it to an AC outlet of voltage other than that for which your unit is intended.
Interference with other electrical devices
Radios and televisions placed nearby may experience reception interference. Operate this unit at a suitable distance from radios and televisions.
Care
If the exterior becomes dirty, wipe it with a clean, dry cloth. Do not use liquid cleaners such as benzene or thinner, cleaning compounds, or flammable polishes.
Handling
To avoid breakage, do not apply excessive force to the switches or controls.
Keeping foreign matter out of your equipment
Never set any container with liquid in it near this equipment. If liquid gets into the equipment, it could cause a breakdown, fire, or electrical shock. Be careful not to let metal objects get into the equipment.
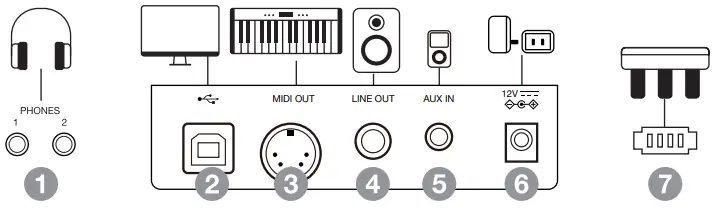
- PHONE Jacks
For connecting to headphones. When headphones are connected, to PHONES 2, the internal speakers will be muted. - USB Jack
For connecting to a computer or a mobile device via cable. An additional adapter may be needed to connect to mobile devices. - MIDI OUT Jack
For connecting to an external MIDI device. - LINE OUT Jack
For connecting to the INPUT jack of external audio equipment such as a stereo sound system. - AUX IN Jack
For connecting to the OUTPUT jack of an external audio source such as an MP3 player. - DC IN Jack
For connecting the specified power adapter. - Unit Pedal Jack
For connecting an optional unit pedal (Soft Pedal, Sostenuto Pedal and Sustain Pedal) to the pedal jack located on the bottom of the instrument.
Specifications
| Keyboard 88 Weighted, graded hammer action Touch Response 5 types, Off Polyphony 192 notes (max) Sound 30 Layer Left, Right 1, Right 2 Split Yes Twinova Yes | Metronome / Rhythm 50 Metronome / Rhythm Control Start / Stop Metronome / Rhythm volume Tempo 5 – 320 Effect D.A.S. Reverb (2 types) Chorus (1 type) Song 100 Sequencer 1 User song (1 melody track) | Connectivity 2 Headphones, Unit Pedal, MIDI Out, USB MIDI, Aux-In, Line Out Power 12V Amplifier 20W x 2 Speaker 12cm x 2 5.8cm x 2 Dimension (WDH) 135.6 x 29.8 x 78.8 cm Weight 40.5 kg |
Setup Guide
Before you proceed to assemble the piano, prepare Philip’s screwdriver (not supplied). Make sure you have the following parts, which are supplied in the package.
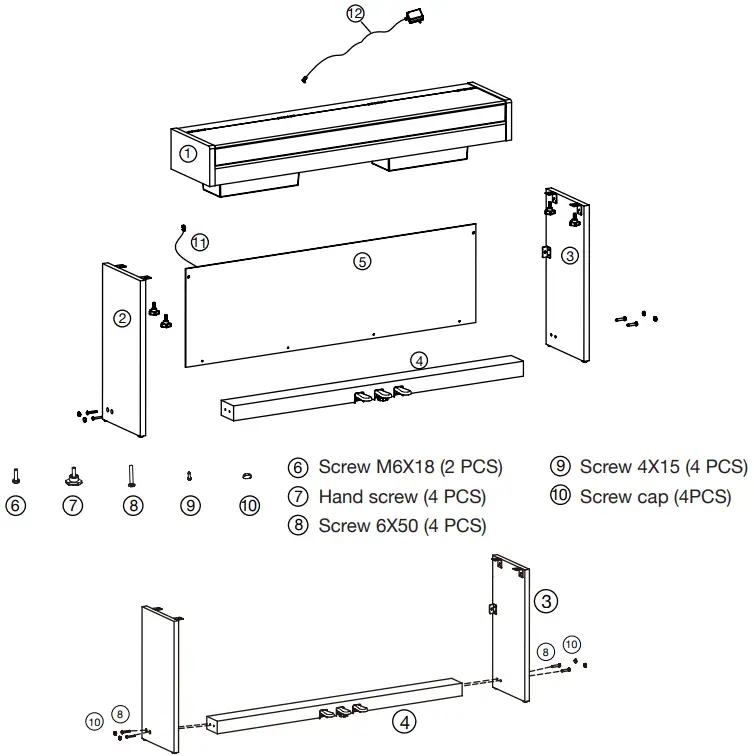
A. Put the pedal box (4) in between the left and right leg components (2&3), use 4 pieces of screws (8) (2 on each side) to fix the legs onto the foot pedal unit, then cover the screw caps (10) on top (2 on each side) (Make sure the components are in the right direction before installing.).
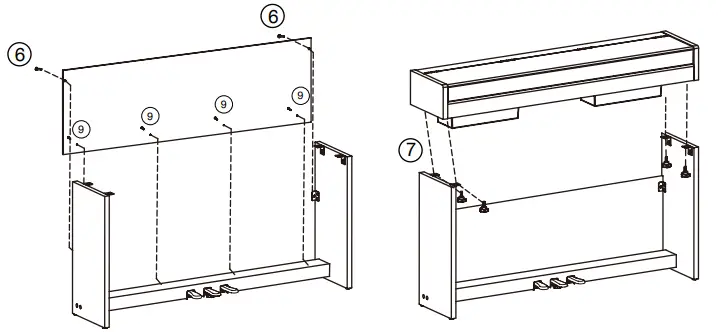
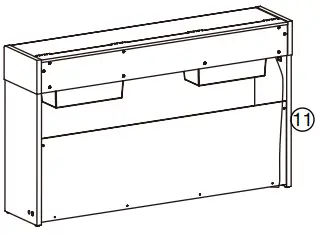
B. Place the backboard against the stand completed in Step A, then use screw (9) and screw (6) to fix it to the stand.
C. Put the piano body on the top of the stand assembled in Step B, then, use a hand screw(7) to fix it.
D. Connect the pedal cable to the pedal jack at the rear bottom of the piano. The setup is completed, now the piano is ready to connect to the power supply.
| Sound List | |
| 1 | German Grand |
| 2 | Bright German Grand |
| 3 | Japanese Grand |
| 4 | Warm Grand |
| 5 | Electric Grand |
| 6 | Honky Tonk |
| 7 | Vintage EP |
| 8 | Warm EP |
| 9 | Reed EP |
| 10 | Dark EP |
| 11 | FM EP |
| 12 | Crystal EP |
| 13 | Clavinet |
| 14 | Harpsichord |
| 15 | Tonewheel Organ |
| 16 | Classic Organ |
| 17 | Church Organ |
| 18 | Accordion |
| 19 | Synth Pad |
| 20 | Strings |
| 21 | Choir |
| 22 | Square Lead |
| 23 | Saw Lead |
| 24 | FM Pad |
| 25 | Bell |
| 26 | Celesta |
| 27 | Nylon Guitar |
| 28 | Electric Bass |
| 29 | Acoustic Bass |
| 30 | Synth Bass |
| Metronome / Rhythm List | Song List | ||||
| 1 | Simple Count | 1 | Sonata No.17 | 51 | Sweet Remember |
| 2 | 4/4 Beat | 2 | Sonata No.14 | 52 | May Breezes |
| 3 | 2/4 Beat | 3 | Sonata No.8 | 53 | Spring Song |
| 4 | 3/4 Beat | 4 | Sonata No.25 | 54 | Venetianisches |
| 5 | 3/8 Beat | 5 | Sonata No.20 | 55 | Lost Illusions |
| 6 | 6/8 Beat | 6 | Fur Elise | 56 | Barcarolle |
| 7 | 5/4 Beat | 7 | Menuett G-Dur 4 | 57 | Christmas |
| 8 | 5/8 Beat | 8 | Prelude C Major | 58 | Italian Polka |
| 9 | 7/8 Beat | 9 | Prelude No.2 | 59 | Traumerei |
| 10 | 10/8 Beat | 10 | Gavotte No.5 | 60 | The Happy Farmer |
| 11 | 8Beat 1 | 11 | Minuet G Major | 61 | May, Sweet May |
| 12 | 8Beat 2 | 12 | Prelude C-Sharp | 62 | Winter Time I |
| 13 | 16Beat 1 | 13 | Prelude E Major | 63 | Intermezzo |
| 14 | 16Beat 2 | 14 | Prelude C Minor | 64 | Brahms Waltz |
| 15 | Rock | 15 | Invention No.13 | 65 | Arabesques No.1 |
| 16 | Ska | 16 | Invention No.1 | 66 | Clair De Lune |
| 17 | Slow Rock | 17 | Sonata K.545 1st | 67 | Preludes No.8 |
| 18 | 70’s Rock | 18 | Sonata K.333 1st | 68 | Doctor |
| 19 | Texas Rock | 19 | Sonata K.333 3rd | 69 | Reverie |
| 20 | Sweet Ballad | 20 | Rondo alla Turca | 70 | Cakewalk |
| 21 | 6/8 Soul | 21 | Ah, Vous Dirai-je | 71 | Arietta |
| 22 | Fusion Shuffle | 22 | Perpetuum Mobile | 72 | Butterfly |
| 23 | Adult Ballad | 23 | Impromptu | 73 | Lyric Waltz |
| 24 | Organic Ballad | 24 | Moments Musicaux | 74 | Schools Gavotte |
| 25 | Tango | 25 | Serenade | 75 | School Doll’s |
| 26 | Slow Waltz | 26 | Arabesque | 76 | Gymnopedies |
| 27 | Cha Cha | 27 | La Chevaleresque | 77 | Je Te Veux |
| 28 | Rumba | 28 | Tarantella | 78 | Fast Dance |
| 29 | Samba | 29 | La Gracieuse | 79 | Gypsy Rondo |
| 30 | Techno 1 | 30 | Sonatina Op.36-1 | 80 | Liebestraum |
| 31 | Hip Hop | 31 | Sonatina Op.36-2 | 81 | The Sapin |
| 32 | Techno 2 | 32 | Sonatina Op.36-3 | 82 | Lyric Rondo |
| 33 | Classic Disco | 33 | Sonatina Op.36-4 | 83 | Humoresque |
| 34 | Funk 1 | 34 | Etude C Major | 84 | La Prairie |
| 35 | Funk 2 | 35 | Etude E Major | 85 | To A Wild Rose |
| 36 | Swing 1 | 36 | Black Key | 86 | Fontaine, La |
| 37 | Swing 2 | 37 | Revolutionary | 87 | Blumenlied |
| 38 | Funky Jazz | 38 | Etude A-Flat | 88 | Le Coucou |
| 39 | Bernard Shuffle | 39 | Etude F Minor | 89 | Minuet |
| 40 | Bluegrass | 40 | Nocturne B-Flat | 90 | Warblings |
| 41 | Country Step | 41 | Nocturne E-Flat | 91 | Gavotte |
| 42 | Country Folk | 42 | Nocturne F Minor | 92 | Dance Steps |
| 43 | Bossa Nova | 43 | Impromptu A Flat | 93 | Salut D’ Amour |
| 44 | Latin | 44 | Fantaisie-Improv | 94 | Le Cygne |
| 45 | Mambo | 45 | Raindrop | 95 | Paloma, La |
| 46 | Waltz | 46 | Preludes C Minor | 96 | Rialto Ripples |
| 47 | Vienna Waltz | 47 | Waltz E-Flat | 97 | Chicken Pecking |
| 48 | Polka | 48 | Waltz C-Sharp | 98 | Maple Leaf Rag |
| 49 | March | 49 | Minute Waltz | 99 | Entertainer |
| 50 | 6/8 March | 50 | Mazurkas F Major | 100 | Peacherine |
Turning the Power On or Off
- Make sure the instrument is properly connected to the power supply.
- Press the [POWER] switch. The panel LED’s light up. The power is turned on.
- Rotate the [VOLUME] knob to set the volume to the desired level.
- When you are ready to turn off the power, press the [POWER] switch for a second. The panel LEDs will turn off.
Note:
In order to save energy, the instrument will automatically shut down after 30 minutes of not being used. You can turn off the power protection by using a keyboard command,
holding SHIFT, and pressing C1, C#1 at the same time. Please unplug the instrument when it is not in use or during a thunderstorm.
Playing Sounds
- Press one of the [SOUND] buttons. The corresponding sound LED lights up.
- Press the same [SOUND] button repeatedly to circulate through the selected sound group and select a sound. (Refer to Sound List for details.)
- Play the keyboard to use the selected sound for performance.
Layer Mode / Split Mode
Turn on the Layer function.
Hold a [SOUND] button and then press another to turn on the Layer function. The corresponding sound LEDs light up. The first sound you press will be set as the upper sound “SOUND R1”, and the second sound you press will be set as the Layer sound “SOUND R2”.
Turn on the split function.
Press two [SOUND] buttons respectively and hold them, then press a key on the keyboard to assign as the split point. The corresponding sound LEDs light up after releasing the buttons. The first sound you press will be set as the upper sound “SOUND R1”, and the second sound you press will be set as the lower sound “SOUND L”.
Select sounds.
Press a [SOUND] button repeatedly to circulate through this sound group and select a sound.
Turn off the layer/split function.
Long-press either the upper or the second [SOUND] button to disengage the targeted sound. The corresponding sound LED is unlit. The layer/split function is turned off. Alternatively, press a [SOUND] button other than the upper or second [SOUND] buttons. The layer/split function will be turned off. The pressed sound will be selected and the corresponding LED lights up.
Notes:
- Please quickly press the second [SOUND] button after you press the first [SOUND] button. Otherwise, your operation may be recognized as long-press and the layer/split
the function will be turned off. - If you press a few keys when assigning the split point, it will set the last key you press as the split point.
- The layer and the split functions cannot be used at the same time.
Twinova
Twinova function splits the keyboard into two areas with the same sound and octave range, for the convenience of playing together with a friend or an instructor.
Turn Twinova on or off.
Press and hold the [SHIFT] button, then press the key [C#6] to turn Twinova on or off. The split point is E4/F4.
Select a sound for Twinova.
The upper sound selected before entering Twinova will become the default sound for both areas. But you can press the sound buttons to select the desired sound.
Note:
The Twinova mode and layer/split functions cannot be used at the same time. During song playback, Twinova mode is not selectable.
Piano Parameters
- Press and hold the [SHIFT] button, then use the keyboard to turn the piano parameters on or off, or set the corresponding effect depth. Piano Parameters (String Resonance, Damper Resonance, Damper Noise, Hammer Noise, Lid) apply to Piano Sound no.1 to no.4 only. These parameters are not available when using other sounds.
- When a piano parameter is turned on, it will revert to the previously set level.
- When a piano parameter is turned off, pressing the corresponding [-] key will not respond. But the effect depth will increase from 1 (except the Lid depth which will change from 2/4 Open to Full Open) when you press the corresponding [+] key.
Playing Metronome / Rhythms
Press the [MODE] button to select Metronome mode. The corresponding mode LED lights up. The instrument will enter Metronome mode by default every time the power is
turned on.
- Start playing Metronome/Rhythms.
In Metronome mode, press the [START/ STOP] button to start playing metronome/ rhythms. The [START/STOP] button LED will blink according to the metronome/rhythm tempo. - Select a metronome/rhythm pattern.
Press the [<] [>] button to select a desired metronome/rhythm pattern. Press and hold the [<] or [>] button to quickly jump to the nearest eleventh. For example, if the current pattern is No.5, long-press the [>] button and it will quickly select No.11. Alternatively, press and hold the [SHIFT] button, then use the keys [C3 – A3] to enter a metronome/rhythm pattern number. When using the keyboard to enter a number, you will need to press two keys total. For example, press A3, C3 in sequence to select Metronome/Rhythm no.1. (Refer to Metronome/ Rhythm List for details) - Stop playing Metronome/Rhythm.
When metronome/rhythm is playing, press the [START/STOP] button to stop the playback. Alternatively, press the [MODE] button to move to Song mode. Metronome/rhythm playback will be stopped.
Playing Songs
Press the [MODE] button to select Song mode. The corresponding mode LED lights up.
- Start playing a song.
In Song mode, press the [START/STOP] button to start playing a song. The [START/ STOP] button LED will blink according to the song tempo. - Select a Song.
Press the [<] [>] button to select the desired song. Press and hold the [<] or [>] button to quickly jump to the nearest eleventh. For example, if the current song is No.1, long-press the [>]button and it will quickly select No.11. Alternatively, press and hold the [SHIFT] button, then use the keys [C3 – A3] to enter a song number. When using the keyboard to enter a number, you always need to press three keys total. For example, press A3, A3, C3 (001) in sequence to select Song no.1. (Refer to Song List for details) - Stop playing the song.
When a song is playing, press the [START/ STOP] button to stop the playback. Alternatively, press the [MODE] button to enter other modes. The song playback will be stopped.
Adjusting the Tempo
- Press the [MODE] button to select metronome/rhythm mode or Song mode.
- Press and hold the [SHIFT] button, then press the [<] [>] buttons to change the tempo. Pressing both [<] and [>] buttons at the same time will reset to the default tempo of the current metronome/rhythm or song. Hold [SHIFT] and long-press the [<] or [>] button to quickly adjust the value to the nearest tens. For example, if the current tempo s 126, long-press the [>] button and it will jump to 130. Alternatively, hold [SHIFT], press the [TEMPO] key, then use the keys [C3 – A3] to enter a value. Please press three number keys total to enter a tempo value.
Note:
In Metronome mode, when playback stops, changing the metronome/rhythm pattern will reset the tempo. However, changing the metronome/rhythm pattern during playback will not result in tempo change.
Recording
Press the [MODE] button to select Record mode. The corresponding mode LED lights up.
- Prepare and start recording.
In Record mode, hold the [SHIFT] button, then press the [REC] button to put the recorder on standby. The mode button LED will blink. Play the keyboard to start recording. During recording, the [REC] button LED will blink. - Stop recording.
Press the [REC] button to stop recording. The [REC] button LED stops blinking. The recorded data will be saved automatically.
Note:
The saved recorded data will not be lost after power off. - Playback the recording.
In Record mode, press the [START/STOP] button to playback the recorded song. During playback, the [START/STOP] button LED will blink. But if there is no recorded data, pressing the [START/STOP] button will not respond.
Troubleshooting
The speakers produce a pop sound whenever the power is turned ON/OFF.
- This is normal and is no cause for alarm.
Speakers do not produce sound when the
the keyboard is played. - Check if the master volume is set too low.
- Check if headphones are plugged into the PHONES Jacks.
The speakers produce noise when a mobile phone is put near them. - Using a mobile phone in close proximity to the instrument may produce interference. To prevent this, turn off the mobile phone or use it farther away from the instrument.
Certain notes seem to be in the wrong pitch - Make sure tuning is reset to the default setting. Restart the instrument to reset to the default settings.
When connecting to a computer, the instrument cannot be recognized. - Check if the USB cable is firmly connected. Try connecting another USB port on the computer. This instrument is plug and play which should work without installing a driver.
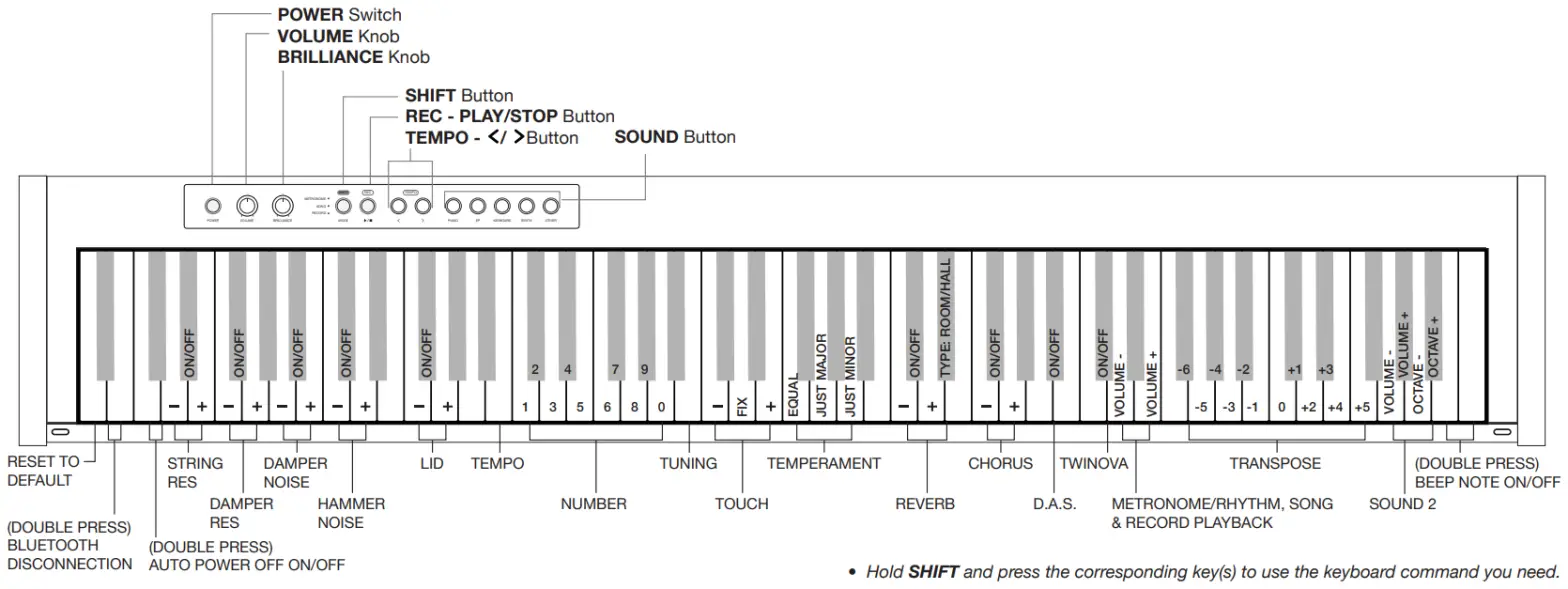
It shuts down after a period of time. - The auto power-off function will turn off the instrument after a preset period of time when the instrument is not in use.


