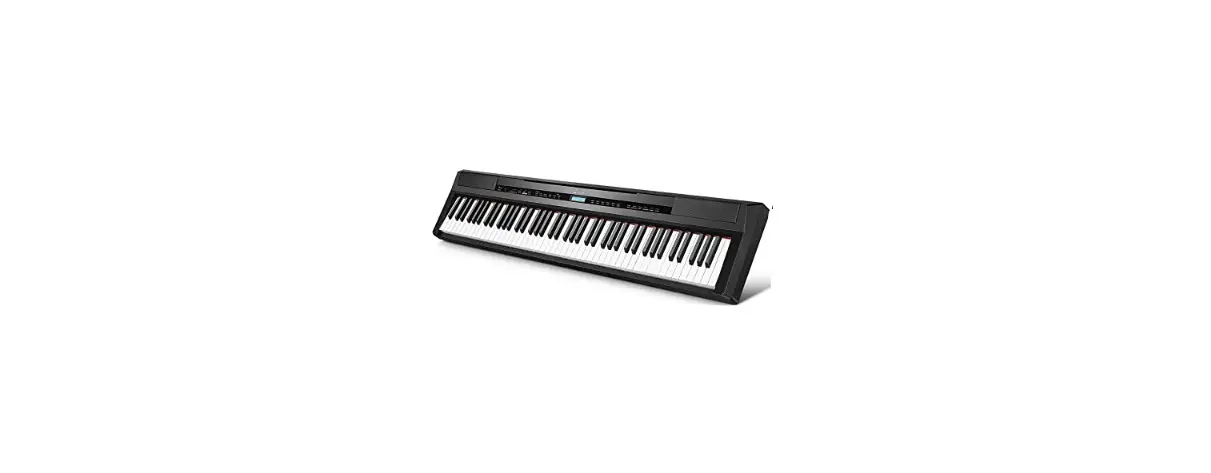
DONNER SE-1 Portable Digital Piano

IMPORTANT ITEMS
Before using this product, please read the following important items.
- Before using the AC transformer to power the product, you must check whether the AC transformer has any damage.
- Please check the power code carefully to see if it is broken, bare or has other damage. Do not let children use seriously damaged AC transformer.
- Children under 3 years old are not allowed to use the product.
- AC transformer is not a toy.
- Before cleaning, you must remove the AC transformer.
PREFACE
Dear users:
Congratulations on your new SE-1 digital piano. It has advanced functions and good acoustic quality. With its help, you will start your musical journey. SE-1 electronic piano will bring you a new playing experience. Please read the instructions carefully, so that you can make better use of it and play its performance. Please keep it in a safe place, so that you can use it in the future.
PRODUCT PARAMETERS
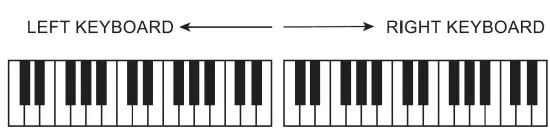
Imported 88-key progressive keyboard with hammer touch
200 kinds of voice
100 kinds of rhythm
The maximum polyphony 128
Metronome
Key separation
Dual
Reverb
Automatic temperament stabilization system (tuning-free)
Split
USS/MIDI interface
Audio input/output
Stereo dual headphone jack
Record/Play
Connect to Apple products/ Android products/ Windows products
Transpose
Bluetooth
Touch curve
60 pieces of demonstration music
Output power 15Wx2
Accessories: host, piano rack, three-pedal instructions, power adapter
Color: Black
Dimension: Length 1280mm x Width 330mm x Height 120mm
PACKING LIST
Dear users.please check whether the following items are complete after choosing.
HOST SINGLE-PEDAL INSTRUCTIONS
POWER ADAPTER PIANO RACK/ THREE-PEDAL (CHOOSABLE)
NOTES
Before using, please read the following items carefully, and keep the document in a safe place for future reference.
warning
- When using the product, please comply with the following items to operate, so as to avoid serious injuries or death to users due to
electric shock, short circuit, accident, fire or other dangers.
The items that users need to pay attention to: - Do not open the electric piano or attempt to disassemble the components, and do not make any changes to the inside. This product does not have the parts that users can repair themselves.(lf there is dysfunction, please contact qualified repairers for checking and maintenance.)
- Avoid exposing the electronic piano to rain, or using it near watery and humid places. Do not place containers with water on the electronic piano, because moisture may flow into the interior of the electronic piano
- If the power cord or plug is worn or damaged, or if power is suddenly cut off during use, and you smell a strange odor or the electronic piano emits smoke, you should tum off the power immediately, remove the power plug, and ask a qualified repairer to check and maintain.
- Please ensure that the power supply voltage is 220 V ± 10% AC, too high or too low voltage will cause damage to the piano.
- Before cleaning the electronic piano, you should tum off the power, remove the power plug. Do not operate with wet hands while the electricity is used. Do not wipe and clean the electronic piano with corrosive solvents.
- Regularly check the power switch and the power cord. When changing the fuse, be sure that you have removed the power plug, and ensure the use of the same fuse with the original specifications.
warning
- Users should also obey the following rules during use, which can avoid the damage to the users or others, and the electronic piano or other external devices. The items that users need to pay attention to:
- Do not place the AC power cord near heat sources, such as a heater. Do not over-bend the power cord, put heavy objects on the power cord, place the power cord in a place where people go and wrap other things on the power cord to avoid damaging the power cord.
- When removing the power plug of the product, please take the plug itself, instead of pulling the cord. Please remove the power plug if the electronic piano will not be used for a long time or when it thunders.
- Do not place this electronic piano in a dusty, vibrating, cold or hot environment (such as under the impact of direct sunlight, near the heating device or in the transportation tool in the sun) to avoid damaging the appearance of the electronic piano and the internal components.
- Before moving the electronic piano, you should remove the power cord and the wires connected to other equipment.
- When cleaning the electronic piano, please wipe it with a dry and soft cloth. Do not use paint thinner, organic solvents, detergents, or
other chemicals with erosion effect to wipe the electronic piano, so as not to discolor the panel or keyboard. - When the user connects the electronic piano to other devices, firstly, please tum off all the power switches. Before turning off the power switch, please set the volume to its minimum. When using the instrument, first set the electronic piano’s volume to its minimum then gradually increase the volume until it fits.
- Do not place the electronic piano near other appliances, such as TV, radios, speakers, etc. Placing it nearo ther appliances may cause interference between electrical appliances.
- Do not place the electronic piano in an unstable place so as not to cause the electric piano to fall down.
- Do not put heavy objects on the electronic piano, do not use excessive force to press the keys and toggle the control switch.
- In order to apply to the classroom, auditorium and other occasions, this electronic piano has been designed to have enough volume redundancy. The volume can be adjusted. You should adjust it to the proper value. If you use unreasonable excessive volume for a long time, this doesn’t conform to the common sense of music, but also may cause hearing loss.
- Avoid the electronic piano encounter a strong collision. Collisions may cause damage to the electronic piano and cause personal injury.
PREPARE BEFORE USE
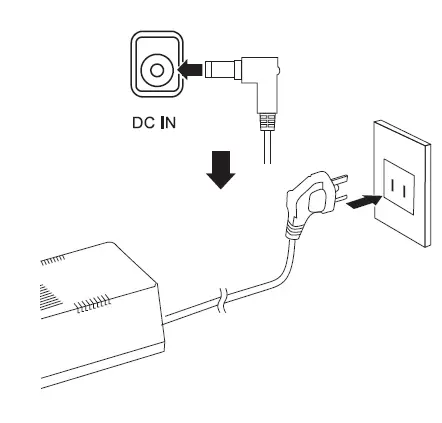
POWER CONNECTION
As shown in the picture, Connect the AC power adapter, if do not use it for a long time, please unplug the AC power plug from the socket.
1. Press the[ POWER ] button to connect the power supply, the button light on, default voice is grand piano.
2. Long press [ POWER ] for 2 seconds to turn off the power.
3. Without any operation, it will turn off after 30 minutes.
VOLUME ADJUSTMENT
Adjust [ VOLUME ] on the control panel to set the volume.
Clockwise turns up, anticlockwise turns down.
warning
When you don’t use the digital piano or it thunders, please unplug the plug.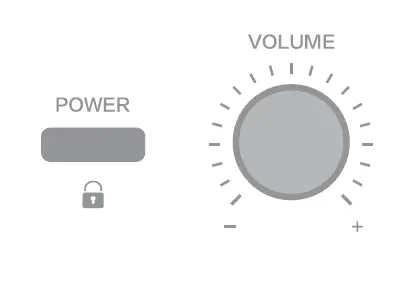
SOCKETS ON THE BACK OF THE HOST
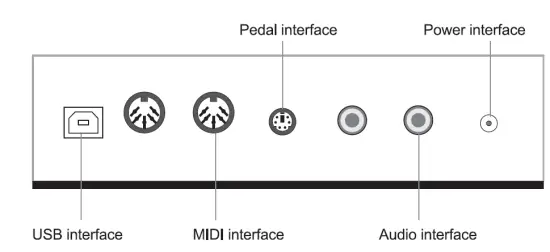
SINGLE PEDAL (STANDARD)
Connect standard single-pedal to PEDAL interface, press the pedal can extend the notes.
THREE-PEDAL (CHOOSABLE)
According to the traditional grand piano, the digital piano use the same damper pedal, sostenuto pedal and soft pedal as the traditional grand piano. press the pedal to turn on; Release the pedal to turn off.
Please connect the pedal wire to the pedal socket of the bottom of the host.
DAMPER PEDAL
(Right} After pressing the damper pedal, notes will be extended; Release the pedal to turn off.
damper pedal illustration
If you press the damper pedal there, the note and the note that you played before releasing the pedal will extend longer.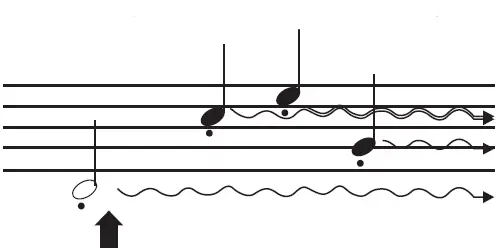
SOSTENUTO PEDAL
(Middle} Press and hold the note key while pressing the pedal, which can extend the pressed note (as if pressing the damper pedal) but the subsequent notes will not be extended.
Sostenuto pedal illustration
If you press and hold the note, while pressing the sostenuto pedal, this can extend the note until the pedal is released.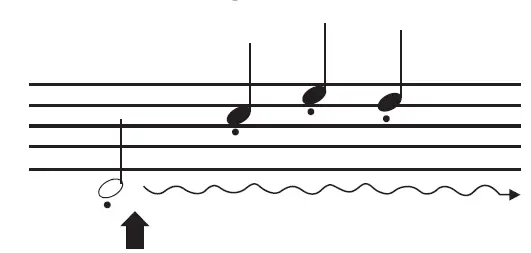
SOFT PEDAL
(Left) Press the soft pedal to down the volume of the note that you are playing, at this time, the voice changes. The notes played before pressing the pedal are not affected.
Before depressing the pedal,be sure that you have installed the pedal support screw and it is fully grounded. 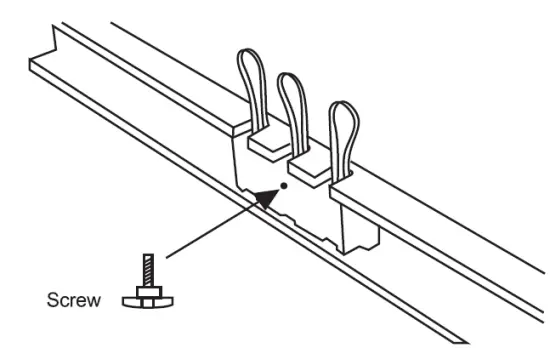
CHORD
1. Press [ CHORD ON / OFF ], indicator light on, tum on Automatic chords.
2. Press [ CHORD ON / OFF ] again ,indicator light off, tum off Automatic chords.
START/ STOP SYNC START
1. Press [ START/STOP, SYNC START] to tum on automatic accompaniment, start to play the selected accompaniment at present.
2. Press [ START/STOP, SYNC START] for 2 seconds, indicator light shine, enter SYNC state.
How to use SYNC function
a. Press [ CHORD ON /OFF] to enter the state of chords, long press [ START/STOP, SYNC START] to enter the state of SYNC, enter the standby mode of synchronous start.
b. Play chord and the accompaniment starts automatically.
c. Press [ START/STOP, SYNC START] to cancel the state of SYNC.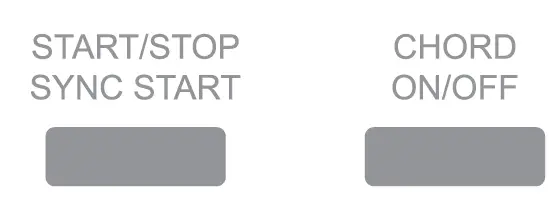
MENU
1. Press [menu+] to enter function menu, selcet to adjust or quit different functions circularly by pressing [ menu + ), [ menu -].
2. In the function menu state, press [VOICE/ RHYTHM ] to quit and get back to the original piano voice.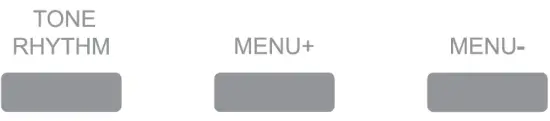
| Adjust the content | LCD Display | Adjust extent |
| Rhythm volume | Rhythm Volume | 000-127 |
| Transpose | Transpose | +/-12 |
| Touch | Touch | 001-003 |
| Balance | Balance | 000-127 |
| Split note | Split note | 045-096 |
| Reverb level | Reverb level | 001-008 |
| Chorus level | Chorus level | 001-008 |
| Beat selection | Singnature | 1/4,2/4,3/4,4/4,5/4,6/4,3/8,6/8,12/8 |
- Rhythm volume adjustment
After selecting the rhythm volume, adjust the volume by “T DATA_..”. Adjust extent: 000-127. - Transpose
This can make notes to be moved up or down 12 semitones within an octave extent by pressing “T DATA_..”. Adjust extent: -12 to +12. - Touch
The digital piano has three touch curves. Adjust it by “TDATA _..,,. Adjust extent: 001-003. - Balance
Adjust the dual voice by pressing “T DATA _..” under the balance state. Adjust extent: 001-127. - Split note
Adjust the split note by pressing “T DATA _.. .. _ Adjust extent: 045-096. - Reverb level
Adjust reverb level by pressing “T DATA _.. .. _ Adjust extent: 001-008. - Chorus level
Select the chorus level by pressing “T DATA _.. .. _ Adjust extent: 001-008. - Beat selection
Select the beat by pressing “T DATA _..”.There are nine kinds of beat can be selected:1/4,2/4,3/4,4/4,5/4,6/4,3/8,6/8, 12/8.
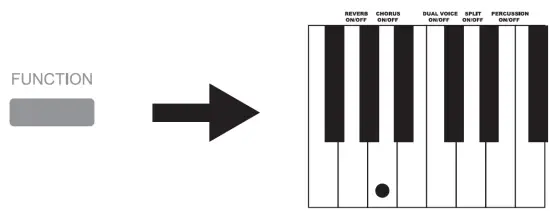
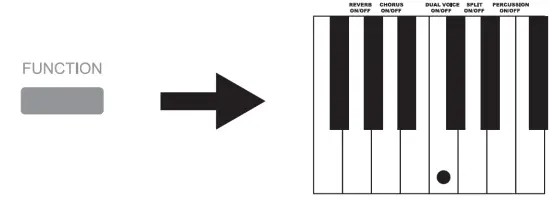
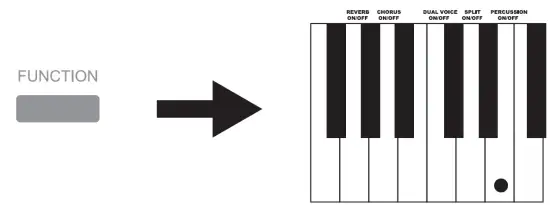
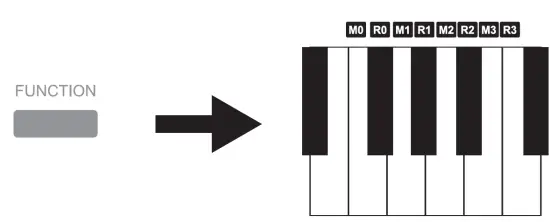
FUNCTION CONTROL
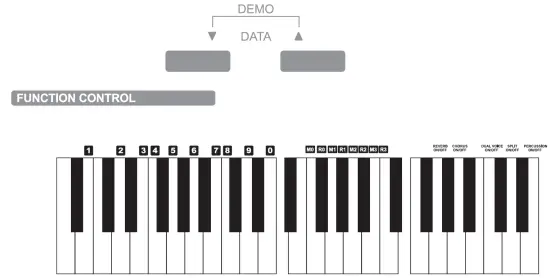
1. Press [ FUNCTION ],the indicator light shine. Press the corresponding key on the keyboard in 6 seconds to select the corresponding function.
2. Press [ FUNCTION ] again, the indicator off or without any operation in 6 seconds, the function state quits.
Attention:
The selected function will be displayed on the LCD screen . When entering the function setting state, the key is silent.
REVERS LEVEL SETTING
- Press [ FUNCTION ], the indicator light shine. Press corresponding [ REVERS ON/OFF ] on the keyboard in 6 seconds to activate the reverb level. The sound of playing a digital piano has a reverberation effect.
- Press [ FUNCTION ], the indicator light shine. Press corresponding [ REVERS ON/OFF ] on the keyboard again in 6 seconds to turn off reverb level.
- Select [ Reverb level ] from [ MENU ], and then adjust the reverb level 001-008(8 kinds) by” TDATA
Attention: We can recognize whether the reverb function is off or not from the icon symbol on the screen.
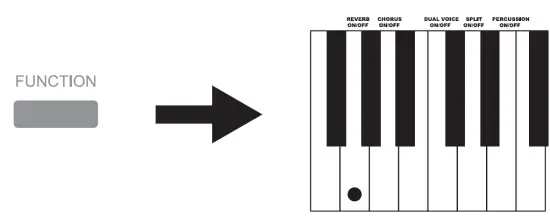
CHORUS LEVEL SETTING
- Press [FUNCTION], the indicator light shine. press corresponding [CHORUS ON/OFF] on the keyboard in 6 seconds to activate the chorus level;
- Press [FUNCTION], the indicator light shine. press corresponding [CHORUS ON/OFF] on the keyboard again in 6 seconds to turn off chorus level.
- Select [Chorus level] from [MENU],and then adjust the chorus level 001-008(8 kinds} by” T DATA_.. “.

DUAL VOICE
- Press [ FUNCTION ], the indicator light shines. press corresponding [ DUAL VOICE ON/OFF ] on the keyboard in 6 seconds to activate Dual Voice;
- Press [ FUNCTION ], the indicator light shines. press corresponding [ DUAL VOICE ON/OFF ] on the keyboard again in 6 seconds to turn off Dual Voice.
How to use dual-voice
- Enter voice mode and select an instrument as the main voice;
- Press [ DUAL VOICE ON/OFF ]
- Select another instrument by [ DATA ] or number keys and then dual voice can be played.
- Select [ Balance ] from [ MENU ], and then adjust the dual by [T DATA.A ].
SPLIT NOTE
- Press [ FUNCTION ] , the indicator light shine. press corresponding [ SPLIT ON/OFF] on the keyboard in 6 seconds to activate the Split note;
- Press [ FUNCTION ] , the indicator light shine. press corresponding [ SPLIT ON/OFF] on the keyboard again in 6 seconds to tum off Split note.

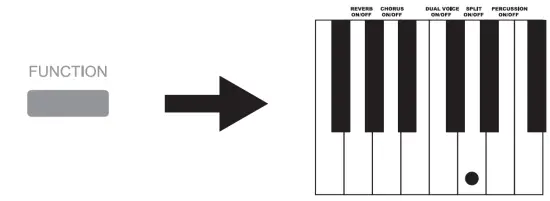
How to use Split note
- Enter voice mode and select an instrument as the main voice;
- Press [SPLIT ON/OFF] to enter the second kind of split voice selection, the default second kind of voice is 049 STRINGS2 ® Select another instrument by [TDATAA] or number keys
- Select [Split note] from [ME NU],and then adjust the split note by [TDATAA ].
PERCUSSION SETTING
- Press [ FUNCTION] , the indicator light shines. press corresponding [ PERCUSSION ON/OFF ]on the keyboard in 6 seconds to activate percussion;
- Press [ FUNCTION ], the indicator light shines. press corresponding [ PERCUSSION ON/OFF ] on the keyboard again in 6 seconds to turn off Percussion.
MEMORY SET OF VOICE / RHYTHM
- Select the voice/rhythm you need, press [ FUNCTION ], the indicator light shine, press any of the keys from [ M0-M3 ], the screen display “Save” , means save successfully;
- The instrument saves the current panel function at present on the setting key, press corresponding [ R0-R3 ] to use next time.
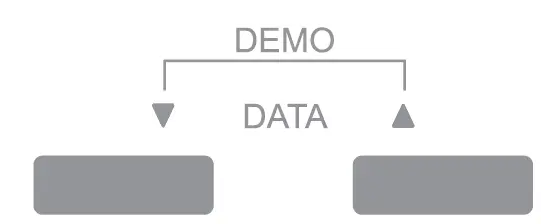
DATA SELECTION
Select voice/rhythm/demo and so on by [ ‘Y DATA.A.], press [ ‘Y DATA.A.] at the same time to enter demo state.
DEMO SONG
60 demo songs
- Press [ ‘Y DATA A] at the same time to enter demo state, press at the same time again to stop playing demo songs;
- Press [ FUNCTION ], the indicator light shine, input 3 digits to display “000-059” and select the corresponding number on the keyboard, the selected demo song will be displayed on the screen, press [ FUNCTION] again or without any operation in 6 seconds to play demo song.

TONE/ RHYTHM
1.Voice selection(200 kinds of voice)
- Press [ TONE RHYTHM ], LCD displays corresponding voice icon, select the voice by [ T DATA … ];
- Press [ FUNCTION ], the indicator light shine, input 3 digits to display “000-199” and select the corresponding number on the keyboard, the selected voice will be displayed on the screen, press [FUNCTION] again or without any operation in 6 seconds to enter the selected voice.

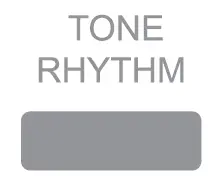
2.Rhythm selection
- Press [ TONE RHYTHM ] again, LCD displays corresponding rhythm icon, select the rhythm by [T DATA;
- Press [ FUNCTION ], the indicator light shine, input 3 digits to display “000-099” and select the corresponding number on the keyboard, the selected rhythm will be displayed on the screen, press [ FUNCTION ] again or without any operation in 6 seconds to enter the selected rhythm.

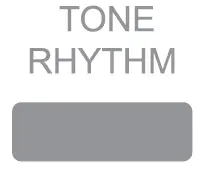
Attention: long press [TONE RHYTHM] for 2 seconds to get back the grand piano interface.
INTRO/ END
- Press [ INTRO/END] to enter intro state;
- Press [ INTRO/END] again to enter end state.
How to use Intro /End
CD Press [ TONE /RHYTHM ] first to select the rhythm you need;
- Press [ INTRO/END] to enter intro state, and then press [ START/STOP SYNC START ] to insert intro for rhythm;
- Press [ INTRO/END] when the rhythm is playing, the indicator light shine, insert finished end for the being used rhythm.


A/FILL 1 B/FILL2
- Press [ VOICE/RHYTHM ] first to select the rhythm you need;
- And then press [ START / STOP SYNC START ] to start to play rhythm;
- 2 kinds of interlude, insert interlude for the being used rhythm by [A/FILL 1 ][ B / FILL 2].


METRONOME/ TEMPO
- Press [METRONOME /TEMPO] to start metronome, default tempo is the tempo of the first rhythm, press [ METRONOME /TEMPO ] again to quit.
Attention: Restarting the digital piano will restore the default tempo. - Long press [METRONOME /TEMPO], the indicator light shine to enter metronome tempo, adjust the tempo by [T DATA …i. Adjust extent:20-280 beat/minute;
Attention: Restarting the digital piano will restore the default beat.

RECORD / PLAY
- Press [ RECORD], the indicator light on, default to start the metronome to record. press [ METRONOME/ TEMPO] to turn off. after recording , press [ RECORD], the indicator light off, quit the record state.
- Press [ PLAY] , the indicator light on, play the recorded the audio frequency;
- Automatically quits after playing, the indicator off.


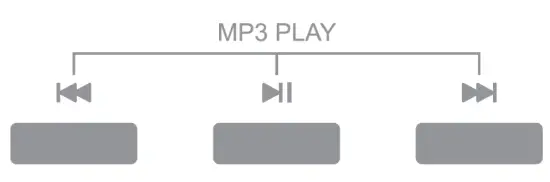
USB / BLUETOOTH
- Insert the USB flash drive to enter read state, select music by [ MP3 PLAY] this moment.
- After the digital piano is turned on, it is in Bluetooth standby state by default. After using the phone to search and match the Bluetooth device ( PIANO AUDIO ) successfully, the music can be played;
- Select music by [ 141111 ],[ I ], press [ I ] to stop playing.Long press [ 141111 ] to turn down the volume; long press [ a.I ] to turn up the volume.
HEADPHONE JACK

VOICE LIST
| N/A | LCD Display |
| Piano | |
| 000 | GrandPno |
| 001 | BritePno |
| 002 | E.G.Pno |
| 003 | HnkyTonk |
| 004 | ElecPno1 |
| 005 | ElecPno2 |
| 006 | Harpschd |
| 007 | Clavi |
| Mallet | |
| 008 | Celesta |
| 009 | Glacken |
| 010 | MusicB□x |
| 011 | VbPhone |
| 012 | Marimba |
| 013 | Xylophon |
| 014 | TubBells |
| 015 | Dulcimer |
| Organ | |
| 016 | HamndOrg |
| 017 | PercOrg |
| 018 | Rock Org |
| 019 | ChrchOrg |
| 020 | ReedOrgn |
| 021 | Acordion |
| 022 | Harmnica |
| 023 | TgAccord |
| Guitar | |
| 024 | GtrNylon |
| 025 | GtrSteel |
| 026 | Gtr Jazz |
| 027 | GtrClean |
| 028 | GtrMu ted |
| 029 | GtrOvrdr |
| 030 | GtrDist |
| 031 | GtrHarmo |
| Bass | |
| 032 | Aco Bass |
| 033 | Fig Bass |
| 034 | PickBass |
| 035 | Fre Bass |
| 036 | SlapBas1 |
| 037 | SlapBas2 |
| 038 | SynBass1 |
| 039 | SynBass2 |
| String | |
| 040 | Violin |
| 041 | Viola |
| 042 | Cello |
| 043 | Cnt Bass |
| 044 | Str trem |
| 045 | Str Pizz |
| 046 | Harp |
| 047 | Timpani |
| Ensemble | |
| 048 | Strings1 |
| 049 | Strings2 |
| N/A | LCD Display |
| 050 | Str Syn1 |
| 051 | Str Syn2 |
| 052 | ChoirAah |
| 053 | VoiceD□o |
| 054 | VoiceSyn |
| 055 | OrchHit |
| Brass | |
| 056 | Trumpet |
| 057 | Trombone |
| 058 | Tuba |
| 059 | MuteTpt |
| 060 | Fr Horn |
| 061 | BrassSec |
| 062 | BrasSyn1 |
| 063 | BrasSyn2 |
| Reed | |
| 064 | SopraSax |
| 065 | Alto Sax |
| 066 | Teno Sax |
| 067 | Blan Sax |
| 068 | Oboe |
| 069 | Eng Horn |
| 070 | Bassoon |
| 071 | Clarinet |
| Pipe | |
| 072 | Piccolo |
| 073 | Flute |
| 074 | Recorder |
| 075 | PanFlute |
| 076 | BIi Blow |
| 077 | ShkHachi |
| 078 | Whistle |
| 079 | Ocarina |
| Leed | |
| 080 | SqurWave |
| 081 | SawTooth |
| 082 | Calliope |
| 083 | Chiff |
| 064 | Charang |
| 085 | VoicLead |
| 086 | 5th Lead |
| 087 | BassLead |
| Pad | |
| 088 | New Age |
| 089 | Warm Pad |
| 090 | PlySynth |
| 091 | ChoirPad |
| 092 | BowGlass |
| 093 | MetalPad |
| 094 | HaloPad |
| 095 | Sweep |
| Effects | |
| 096 | Rain |
| 097 | SoundTrk |
| 098 | Crystal |
| 099 | Atmosph |
| 100 | Brighi |
| N/A | LCD Display |
| 101 | Goblin |
| 102 | Echo |
| 103 | Sci- Fi |
| Ethnic | |
| 104 | Sitar |
| 105 | BanJ□ |
| 106 | Shamisen |
| 107 | Kato |
| 108 | Kalimba |
| 109 | Bagp ipe |
| 110 | Fiddle |
| 111 | Shana i |
| Percussive | |
| 112 | TinkBell |
| 113 | Agog □ |
| 114 | SteelDrm |
| 115 | WoodBlk |
| 116 | TaikoDrm |
| 117 | Melod Tm |
| 118 | SynthDrm |
| 119 | RevrsCym |
| Sound Effects | |
| 120 | GtrNoise |
| 121 | Breath |
| 122 | SeaShore |
| 123 | BrdTweet |
| 124 | TelPhone |
| 125 | Helicptr |
| 126 | Applause |
| 127 | GunShot |
| Folk Percussive | |
| 128 | Luo 1 |
| 129 | Luo 2 |
| 130 | Luo 3 |
| 131 | Luo4 |
| 132 | Pai Gu |
| 133 | Qin |
| 134 | BianZho |
| 135 | Yang Qin |
| Folk Plucked | |
| 136 | Liu Qin |
| 137 | Pi Pa |
| 138 | Zho Ruan |
| 139 | Oa Ruan |
| 140 | Yue Qin |
| 141 | San Xian |
| 142 | Gu Zheng |
| 143 | Gu Qin |
| Folk Win d | |
| 144 | Shen 1 |
| 145 | Shen 2 |
| 146 | NaZi 1 |
| 147 | Na Zi 2 |
| 148 | Bi Li |
| 149 | Guan Zi1 |
| 150 | Guan Zi2 |
| 151 | Ba Wu |
| N/A | LCD Display |
| Folk Wind 2 | |
| 152 | DiZi 1 |
| 153 | DiZi2 |
| 154 | Hu Lu Si |
| 155 | Pai Xiao |
| 156 | S Xiao |
| 157 | Xiao |
| 158 | Kou Di |
| 159 | Xun |
| Folk Bowed String | |
| 160 | Gao Hu |
| 161 | Er Hu |
| 162 | Zhong Hu |
| 163 | MaTouQin |
| 164 | Ban Hu |
| 165 | Jing Hu |
| 166 | Hu Ense1 |
| 167 | Hu Ense2 |
| Piano Group 2 | |
| 168 | PianoW |
| 169 | Piano D |
| 170 | HnkTk W |
| 171 | DetunEP |
| Orga n 2 | |
| 172 | DetunOr |
| 173 | Orga n |
| 174 | Bandoneo |
| Guitar 2 | |
| 175 | Ukulele |
| 176 | Mandolin |
| 177 | MellowGI |
| 178 | HawaiiGI |
| 179 | ChorusGt |
| 180 | Funk Gt |
| 181 | Feed Gt |
| Bass & Electronic Music | |
| 182 | Synlh 1 |
| 183 | Synth 2 |
| 184 | Synth 3 |
| 185 | Synth 4 |
| 186 | Synth 5 |
| Synthetic | |
| 187 | SpacVioc |
| 188 | Syn Mall |
| 189 | EchoBell |
| 190 | Echo Pan |
| Percussive 2 | |
| 191 | Castanet |
| 192 | ConcerBD |
| 193 | 808 Tom |
| 194 | ElecPerc |
| Sound Effects | |
| 195 | Wind |
| 196 | Stream |
| 197 | Dog |
| 198 | Horse |
| 199 | Doorv |
RHYTHM LIST
| N/A | Name |
| 000 | 8BEAT1 |
| 001 | 8BEAT2 |
| 002 | 8BEAT3 |
| 003 | 8BEAT4 |
| 004 | SBEAT5 |
| 005 | SBEAT6 |
| 006 | 8BEAT7 |
| 007 | SBEATS |
| 008 | 16BEAT1 |
| 009 | 16BEAT2 |
| 010 | 16EAT3 |
| 011 | 16BEAT 4 |
| 012 | 16BEAT5 |
| 013 | 16BEAT6 |
| 014 | 16BEAT7 |
| 015 | 16BEATS |
| 016 | POP1 |
| 017 | POP2 |
| 018 | POP3 |
| 019 | POP4 |
| 020 | BALLAD 1 |
| 021 | BALLAD2 |
| 022 | BALLAD3 |
| 023 | BALLAD4 |
| 024 | SWINJAZZ |
| 025 | JAZZ1 |
| 026 | JAZZ2 |
| 027 | LANGE |
| 028 | SWING |
| 029 | RAGTIME |
| 030 | 68BLUES |
| 031 | 4.4BLUES |
| 032 | 5.4BEAT |
| 033 | BOOGIE |
| N/A | Name |
| 034 | SOULSHFF |
| 035 | BEBOP |
| 036 | GOSPLE |
| 037 | SWWALTZ |
| 038 | BBOOGIE |
| 039 | ROCK1 |
| 040 | ROCK2 |
| 041 | ROCK3 |
| 042 | ROCK4 |
| 043 | ROCK5 |
| 044 | ROCK6 |
| 045 | ROCK? |
| 046 | FUNK1 |
| 047 | FUNK2 |
| 048 | FUNK3 |
| 049 | FUNK4 |
| 050 | FUNK5 |
| 051 | FUNK6 |
| 052 | EDANCE1 |
| 053 | EDANCE2 |
| 054 | DANCE1 |
| 055 | DANCE2 |
| 056 | DANCE3 |
| 057 | DISCO |
| 058 | R&B1 |
| 059 | R&B2 |
| 060 | R&B3 |
| 061 | R&B4 |
| 062 | RAP1 |
| 063 | RAP2 |
| 064 | FOXTROT1 |
| 065 | FOXTROT2 |
| 066 | FOXTROT3 |
| 067 | FOXTROT4 |
| N/A | Name |
| 068 | FOXTROT5 |
| 069 | LATIN1 |
| 070 | LATIN 2 |
| 071 | REGGAE |
| 072 | MODERN |
| 073 | SAMBA |
| 074 | CHACHA |
| 075 | TANGO |
| 076 | RUMBA |
| 077 | MAMBO |
| 078 | SALSA |
| 079 | ARABIAN1 |
| 080 | MACARENA |
| 081 | MUSETTE |
| 082 | XINJIANG |
| 083 | YUNNAN |
| 084 | XIZANG |
| 085 | COUNTRY1 |
| 086 | COUNTRY2 |
| 087 | CBALLAD |
| 088 | CBROTHER |
| 089 | CON POP |
| 090 | SHUFFLE |
| 091 | CSWING |
| 092 | CTWOSTEP |
| 093 | CWALTZ |
| 094 | WALTZ1 |
| 095 | WALTZ2 |
| 096 | TR WALTZ |
| 097 | VNWALTZ |
| 098 | MARCH |
| 099 | POLKA |
DEMO SONG LIST
| N/A | Name |
| 000 | 2- INVENT |
| 001 | PIZZPOLK |
| 002 | ARABE |
| 003 | UNDERSEA |
| 004 | HAVANERA |
| 005 | MUSICBOX |
| 006 | HGRDANC E |
| 007 | SLAMOUR |
| 008 | LEAF RAG |
| 009 | ANNIELAU |
| 010 | JUNESMBA |
| 011 | MACARENA |
| 012 | FUNK |
| 013 | WALTZ |
| 014 | ARIRANG |
| 015 | BINGO |
| 016 | HOME TOWN |
| 017 | WEELSBUS |
| 018 | REGGAE |
| 019 | TEMPANI |
| 020 | LEMON TR |
| 021 | GISLAND |
| 022 | OCSUITE |
| 023 | DERRYAIR |
| 024 | RONDO BR |
| 025 | NUTCRACK |
| 026 | JMFLOWER |
| 027 | ROSESONG |
| 028 | CHILDBOR |
| 029 | DANSENP |
| N/A | Name |
| 030 | WIGNLIED |
| 031 | MERCY |
| 032 | DRMINSMR |
| 033 | MINUET |
| 034 | JTTWORLD |
| 035 | HOLYHALL |
| 036 | SONG SPR |
| 037 | JAMBALAY |
| 038 | AVEMARIA |
| 039 | DUCKS |
| 040 | PLSDANCE |
| 041 | LONDONHON |
| 042 | GRENSLEV |
| 043 | HORSERAC |
| 044 | SOMALI |
| 045 | SUNNYDAY |
| 046 | LAZYBIRD |
| 047 | CHRYSAN |
| 048 | SATNDOLL |
| 049 | DSYPUPPY |
| 050 | SOMEW HER |
| 051 | DONNALEE |
| 052 | CHERRY |
| 053 | EARLYAUT |
| 054 | BLUES |
| 055 | RUNSUMER |
| 056 | DANCEYOU |
| 057 | GRAYMARE |
| 058 | SYMPHONY |
| 059 | TURKEY |
TROUBLESHOOTING
| Problem | Reasons / Solution |
| When the power is turned on or turned off, a sound calling “pu”is produced. | This is normal and there is no need to worry. |
| When the power is turned on, pressing the keys do not make any sound. | Make sure that the main volume is in the appropriate position and no devices connect to the output jack. Both can cause the speaker system disconnects. |
| Note quality is slightly different from note quality under the same voice. | This is normal. This is because the voice samples from different range and produces different sound quality. |
| While using the damper function, some notes sustain long but some sustain short. | This is normal. The damper of different voice of this instrument has been set to the best length. |
| Low volume | Make sure that the main volume control button is set in the appropriate position. |
| Some MIDI data can not be send exactly (eventhough MIDI oonnection is absolutely righO | This is normal. It is related to the initial setting state of the instrument. |
| When using a phone or the phone is near, there will be some noises from the horn of the instrument. | Phones can cause interference. To avoid the noise, turn off the phone or stay away from the instrument to use it. |
| The pitch does not match the position of the key on the keyboard when you are playing. | Maybe you have turned on split or transpose. If so, you can turn off split or transpose; or you can turn off the power to restart. |
| The voice can not be changed and the pitch does not match the position of the key on the keyboard when you are playing. | Maybe you have turned on split. If so, you can turn off split or turn off the power to restart. |
| Playing demo songs, sound distortion or discontinuous. | Maybe you have played loudly for a long time. The power amplifier is too hot to start the self protection system. Turn down or turn off for a while. |
| Two kinds of voice sound at the same time, when playing. | Maybe you have turned on dual. If so, turn off dual, it will be OK. |
Attention:
The equipment has been tested. Conform to national safety regulations and EMC and so on. Radio communications may interfere with the device, or the device may interfere with radio or television reception, Users may take one or more of the following measures to correct interference:
• Reposition or change the receiving antenna.
• Increase direct isolation between the equipment and receiver.
• Try to change a socket.
• Consult dealers or experienced radio and television technicians.
FCC Warning
Changes or modifications not expressly approved by the party responsible for compliance could void the user’s authority to operate the equipment.
NOTE: This equipment has been tested and found to comply with the limits for a Class B digital device, pursuant to part 15 of the FCC Rules. These limits are designed to provide reasonable protection against harmful interference in a residential installation. This equipment generates uses and can radiate radio frequency energy and, if not installed and used in accordance with the instructions, may cause harmful interference to radio communications. However, there is no guarantee that interference will not occur in a particular installation. If this equipment does cause harmful interference radio or television reception, which can be determined by turning the equipment off and on, the user is encouraged to try to correct the interference by one or more of the following measures:
- Reorient or relocate the receiving antenna.
- Increase the separation between the equipment and receiver.
- Connect the equipment into an outlet on a circuit different from that to which the receiver is connected.
- Consult the dealer or an experienced radio/TV technician for help.
Radiation Exposure Statement
The device has been evaluated to meet general RF exposure requirement. The device can be used in portable exposure condition without restriction.


