![]() BC-B399 Magnetic Belt Drive Indoor Cycling Bike
BC-B399 Magnetic Belt Drive Indoor Cycling Bike
User Manual
www.onebancon.com
IMPORTANT! Please retain the owner’s manual for maintenance and adjustment instructions. Your satisfaction is very important to us, PLEASE DO NOT RETURN UNTIL YOU HAVE CONTACTED US: [email protected]
IMPORTANT SAFETY INFORMATION
We thank you for choosing our product. To ensure your safety and health, please use this equipment correctly. It is important to read this entire manual before assembling and using the equipment. Safe and effective use can only be achieved if the equipment is assembled, maintained, and used properly. It is your responsibility to ensure that all users of the equipment are informed of all warnings and precautions.
- Before starting any exercise program, you should consult your physician to determine if you have any medical or physical conditions that could put your health and safety at risk or prevent you from using the equipment properly. Your physician’s advice is essential if you are taking medication that affects your heart rate, blood pressure, or cholesterol level.
- Be aware of your body’s signals. Incorrect or excessive exercise can damage your health. Stop exercising if you experience any of the following symptoms: pain, tightness in your chest, irregular heartbeat, shortness of breath, lightheadedness, dizziness, or feelings of nausea. If you do experience any of these conditions, you should consult your physician before continuing with your exercise program.
- Keep children and pets away from the equipment. The equipment is designed for adult use only.
- Use the equipment on a solid, flat level surface with a protective cover for your floor or carpet. To ensure safety, the equipment should have at least 2 feet (60 CM) of free space all around it.
- Ensure that all nuts and bolts are securely tightened before using the equipment. The safety of the equipment can only be maintained if it is regularly examined for damage and/or wear and tear.
- Always use the equipment as indicated. If you find any defective components while assembling or checking the equipment, or if you hear any unusual noises coming from the equipment during exercise, discontinue use of the equipment immediately and do not use until the problem has been rectified.
- Wear suitable clothing while using the equipment. Avoid wearing loose clothing that may become entangled in the equipment.
- Do not place fingers or objects into the moving parts of the equipment.
- The maximum weight capacity of this unit is 242 pounds (110 KG).
- The equipment is not suitable for therapeutic use.
- To avoid bodily injury and/or damage to the product or property, proper lifting and moving are required.
- Your product is intended for use in cool and dry conditions. You should avoid storage in extreme cold, hot or damp areas as this may lead to corrosion and other related problems.
- This equipment is designed for indoor and home use only; it is not intended for commercial use.
- Put your foot in the toe clip on the pedal and fasten the strap when exercising. The bike is safe with a built-in flywheel design. Do not dismount the bike until Pedals have come to a complete stop. Please push down on the red resistance adjustment handle to enforce the brake and stop the bike immediately.
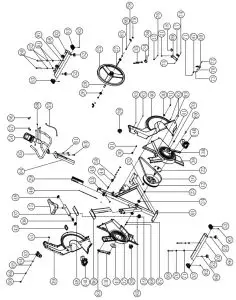
EXPLODED DIAGRAM
PARTS LIST
| NO. | Description | Spec. | Qty | NO. | Description | Spec. | Qty |
| 1 | Main Frame | 1 | 27 | Flywheel Axle | 810’107’2-M10’1.OP | 1 | |
| 2 | Front Stabilizer | 1 | 28 | Flywheel Spacer | e15.e10.1*40.6 | 1 | |
| 3 | Rear Stabilizer | 1 | 29 | Bushing | 2 | ||
| 4 | Adjustable Handlebar Tube | 1 | 30 | Bottom Upright Cover Fixed Base | 30’30’20 | 4 | |
| 5 | Handlebar | 1 | 31 | Top Upright Cover Fixed Base | 815’14 | 4 | |
| 6 | Adjustable Seat Tube | 1 | |||||
| 32 | Magnetic Snap-fit Base | 918. | 1 | ||||
| 7 | Seat Slider | 1 | |||||
| 8 | Seat Slider Fixed Plate | 1 | 33 | Column Reed Switch | 86’38 | 1 | |
| 9 | Magnet Base | 1 | 34 | Potentiometer | 1 | ||
| 10 | Spring Fixed Plate | 1 | 35 | Spring Wire | 400mm | 1 | |
| 11 | Connection Plate | 53″14″t2.0 | 1 | 36 | Copper Nut Stud | 13mm | 2 |
| 12 | Crank Cover | 8260’20-5 | 1 | 37 | Left Protective Cover | 589’576.7’61.2 | 1 |
| 13L | Left Crank | 199.5’31’35 | 1 | ||||
| 38 | Right Protective Cover | 589’576.7’61.2 | 1 | ||||
| 13R | Right Crank | 199.5’31’35 | 1 | ||||
| 39 | Left Decorative Cover | 800.5’427.3’80 | 1 | ||||
| 14L | Left Pedal | 1 | |||||
| 14R | Right Pedal | 1 | 40 | Right Decorative Cover | 800.5’427.3’80 | 1 | |
| 15 | Seat Cushion | 1 | |||||
| 41 | Crank Decorative Cover | 8109.6’3.6 | 1 | ||||
| 16 | Belt | 1 | |||||
| 42 | Rubber Cap | 83’53.6’6.7 | 1 | ||||
| 17 | High-intensity Magnet | 25’12’6 | 3 | ||||
| 43 | Resistance Adjustment Handle | 89.5’60.2’13.4 | 1 | ||||
| 18 | Woolen Felt | 32430″8 | 1 | ||||
| 44 | VhbeleelHanging | e30*40 | 1 | ||||
| 19 | Plum Knob | 853’20-M10’29 | 1 | ||||
| 20 | Adjustment Knob | 857*M16-1.5P | 2 | ||||
| 45 | Hexagon Sleeve | 11.5410’40*M6 | 1 | ||||
| 21 | Tension Spring | 16’88’81 | 1 | ||||
| 46 | Wire | 85’195 | 1 | ||||
| 22 | Bearing Axle | 820’165*M10-1.25P | 1 | ||||
| 47 | Magnetic Base Rotation Sleeve | 812’86.1’25 | 1 | ||||
| 23 | Spacer | 825’820.1’6 | 1 | ||||
| 24 | Bearing | 6004-ZZ | 2 | 48 | Rubber Spacer | 169.6’56.5’15.5 | 1 |
| 25 | Flywheel | 8430’63.5, 6.5kg | 1 | 49 | Round Cap | 50’2511.5 | 2 |
| 26 | Bearing | 6300-2RS | 2 | 50 | Bolt Cap | en.s.s Red | 2 |
| NO. | Description | Spec. | Qty | NO. | Description | Spec. | Qty |
| 51 | Bolt Cap | 020.5’5 Black | 2 | 70 | Hexagon Flange Nut | M10*1.25r9H | 2 |
| 52 | Adjustment Foot Pad | 043’17-M8’20PU+Q235A | 4 | ||||
| 71 | C-clip | 1 | |||||
| 53 | End Cap | 80*45’48.7 | 4 | 72 | Hexagon Nut | M8’35 | 1 |
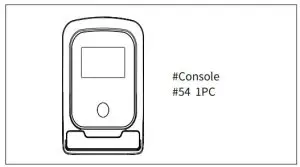
| 54 | Console | 1 | 73 | Hexagon Lock Nut | M8 | 1 | |
| 74 | Hexagon Socket Nut | M6’72 | 1 | ||||
| 55 | Console Wire | SPIN 450mm | 1 | ||||
| 75 | Hexagon Lock Nut | M6 | 1 | ||||
| 56 | Battery Cover | 57*51.5*11.5 | 1 | ||||
| 76 | Flat Phillips Screw | M6’10 | 1 | ||||
| 57 | Battery | 5# | 2 | ||||
| 77 | Hexagon Nut | M6 | 3 | ||||
| 58 | Transportation Wheel | 065’23-08 | 2 | ||||
| 78 | Chain Screw Set | M6’42’010.2 | 2 | ||||
| 59 | Flange Ball Cap | M4*10 | 2 | ||||
| 79 | Hexagon Flange Nut | M10″1.0r9H | 2 | ||||
| 60 | Pan Hexagon Socket Bolt | M8,55 | 4 | ||||
| 80 | Hexagon Thin Nut | M10*1.0P*5H | 2 | ||||
| 61 | Washer | 88.4116″t1.6 | 9 | ||||
| 81 | Flat Washer | 010.2″017″t1.5 | 2 | ||||
| 62 | Spring Washer | 08.1*812.3″t2.1 | 8 | ||||
| 82 | Flat Phillips Slef Tapping Screw | ST4.2415 | 15 | ||||
| 63 | Pan Hexagon Socket Bolt | M8*15 | 4 | ||||
| 83 | Flat Phillips Slef Tapping Screw | ST4.2’15 | 24 | ||||
| 64 | Washer | B6.4’81811.6 | 2 | ||||
| 84 | Pan Phillips Slef Tapping Screw | ST4.2’10 | 6 | ||||
| 65 | Spring Washer | 86.1’89.3-t1.6 | 2 | ||||
| 66 | Hexagon Socket Bolt | M6’15 | 2 | ||||
| 85 | Pan Phillips Screw | M4’10 | 1 | ||||
| 67 | Wave Washer | 820.7″027.1q0.3 | 2 | 86 | Hexagon Nut | M8 | 4 |
| 68 | C-clip | 1 | |||||
| 87 | Nut | M8 | 2 | ||||
| 69 | Pan Hexagon Socket Bolt | M10’15 | 4 | ||||
| 88 | Flat Phillips Screw | M5’15 | 4 |
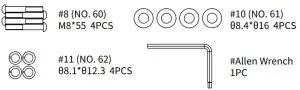
HARDWARE PACKAGE
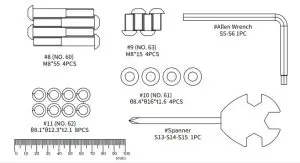
NOTE: #8(NO. 60)is number 8 in “HARDWARE PACKAGE” refers to number 60 in “PARTS LIST” and “EXPLODED DIAGRAM”. The rest may be deduced in the same manner.
Ordering Replacement Parts
Please provide the following information in order for us to accurately identify the part(s) needed:
- The model number (found on the cover of manual)
- The product name (found on the cover of manual)
- The part number found on the “EXPLODED DIAGRAM” and “PARTS LIST” (found near the front of the manual)
Please contact us at [email protected]
ASSEMBLY INSTRUCTIONS
We value your experience using Bancon Health and Fitness products. For assistance with parts or troubleshooting, please contact us at [email protected].
NOTE: We recommend having 2 people to assemble the product.
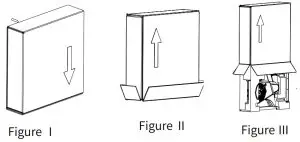
STEP 1
- Place the box on 2 square meters of free space to assemble the equipment.
- Turn the box upside down and open flaps. As shown in Figure Ⅰ.
- Keeping the flaps open, turn the box right side up as shown in FigureⅡ.
- Pull the box up and take out all the parts of box as shown in Figure Ⅲ.
 STEP 2
Attach Front & Rear Stabilizer (NO. 2 & NO. 3) to Main Frame (NO. 1) using 4 Pan Hexagon Socket Bolts (NO. 60), 4 Washers (NO. 61) and 4 Spring Washers (NO. 62) as shown in the diagram. Make sure the bolts have been tightly fastened. Tighten with Allen Wrench.
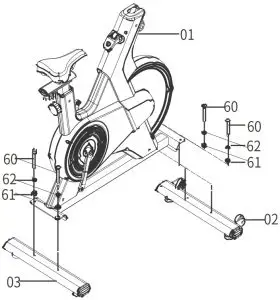
STEP 3
NOTE: #8 (NO. 60) is number 8 in “HARDWARE PACKAGE” refers to number 60 in the “PARTS LIST” and “EXPLODED DIAGRAM”. The rest may be deduced in the same manner.
Let the Communication Wire A from Main Frame (NO. 1) through Adjustable Handlebar Tube (NO. 4) by tying L-Shaped Wire. Loosen and pull out Adjustment Knob (NO. 20), insert Adjustable Handlebar Tube (NO. 4) into Main Frame (NO. 1) and adjust to the desired height. Secure it in place by reinserting and tightening the Adjustment Knob (NO. 20). Be sure not to pinch the Communication Wire A. Connect Communication Wire A with Communication Wire B on Handlebar (NO. 5) and put the wires into Adjustable Handlebar Tube (NO.4).
Attach Handlebar (NO. 5) onto Adjustable Handlebar Tube (NO.4) with 4 Pan Hexagon Socket Bolts (NO. 63) and 4 Spring Washers (NO. 62). Secure and tighten with Allen Wrench.
NOTE: Do not pull out Communication Wire A with force while assembling. Communication Wire C should not be put in Adjustable Handlebar Tube (NO. 4). Pay attention to the direction when connecting wires. Be sure not to pinch Communication Wire A and connector should be placed in Adjustable Handlebar Tube (NO.4).
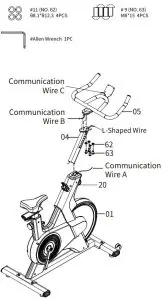
NOTE: #11 (NO. 62) is number 11 in “HARDWARE PACKAGE” refers to number 62 in the “PARTS LIST” and “EXPLODED DIAGRAM”. The rest may be deduced in the same manner.
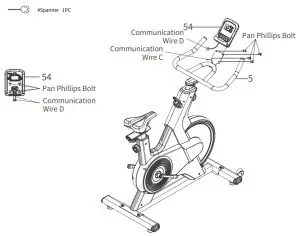
STEP 4
Use Spanner to remove 4 Pan Phillips Bolts on the Console (NO. 54), the Bolts should be kept in good condition.
Connect Communication Wire D from Console (NO. 54) with Communication Wire C on Handlebar (NO. 5), insert the connected wires into the Handlebar (NO. 5).
Secure the Console (NO. 54) to Handlebar (NO. 5) using 4 Pan Phillips Bolts that were removed, tighten with Spanner.
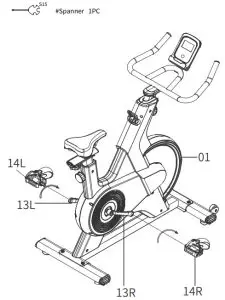
STEP 5
WARNING! Read instructions carefully as improper assembly may cause permanent damage to your bike.
NOTE: The Pedals (NO. 14L & NO. 14R) are marked “C and “Ir for Left and Right.
Connect the Left & Right Pedal (NO. 14L & NO. 14R) onto the Left & Right Crank (NO. 13L & 13R).
Left Pedal: Align the Left Pedal (NO. 141) with the Left Crank (NO. 131) at 90 degrees and gently insert the pedal into the crank arm. Turn the pedal counter-clockwise as tightly as you can with your hand. Secure with Spanner.
Right Pedal: Align the Right Pedal (NO. 14R) with the Right Crank (NO. 13R) at 90 degrees and gently insert the pedal into the crank arm. Turn the pedal clockwise as tightly as you can with your hand. Secure with Spanner.
The assembly is complete!
BATTERY INSTALLATION & REPLACEMENT
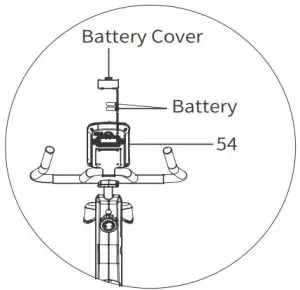
BATTERY INSTALLATION:
- Take out 2 AA batteries from the plastic bag for
- Press the buckle of Battery Cover (NO. 56) on the back of Console (NO. 54), then remove the Battery Cover (NO. 56).
- Install 2 AA batteries into the battery case on the back of the Console (NO. 54). Pay attention to the battery + and – ends before installing.
- Press the buckle of Battery Cover (NO. 56), then put the Battery Cover (NO. 56) to the back of Console (NO. 54).
The installation is complete!
BATTERY REPLACEMENT:
- When the display becomes dim or illegible, press the buckle of the Battery Cover (NO. 56) on the back of the Console (NO. 54), then remove the Battery Cover (NO. 56).
- Remove the 2 old M batteries in the battery case and install 2 new AA batteries into the battery case on the back of the Console (No. 54). Pay attention to the battery + and -ends before installing.
- Press the buckle of the Battery Cover (NO. 56), then put the Battery Cover (NO. 56) back to the back of the Console (No. 54).
The replacement is complete!
NOTE:
- Always change both batteries at the same time. Do not mix battery types and do not mix old and new batteries.
- Be sure to remove the batteries to prevent corrosion damage if you are not going to use the machine for an extended period of time.
- Dispose of batteries according to your state and region Please do not throw it into fire or use as a toy for children.
ADJUSTMENTS & USAGE GUIDE
| ADJUSTING THE BALANCE In order to achieve a smooth and comfortable ride, you must ensure that the stability of the bike is secured. If you notice that the bike is unbalanced during use, adjust the Adjustment Foot Pad (No. 52), located beneath the Front & Rear Stabilizers (No. 2 & No. 3) of the bike. To do so, use Spanner to loosen Hexagon Nut (No. 86) by turning it clockwise. With the nut loosened, rotate the Adjustment Foot Pad (No. 52) until it sits level with the surface that the bike is on. When you have finished adjusting the Adjustment Foot Pad (No. 52), re-tighten the Hexagon Nut (No. 86) by turning it counter-clockwise to complete the balance adjustment of the bike. If needed, repeat this process to adjust the remaining adjustment foot pad. | 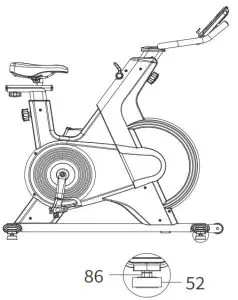 |
| ADJUSTING THE RESISTANCE & EMERGENCY STOP Adjusting Resistance Adjustment Handle (NO. 43) Upwards to decrease the level of resistance. Adjusting Resistance Adjustment Handle (NO. 43) Downwards to increase the level of resistance. Pushing down on the Resistance Adjustment Handle (NO. 43) to enforce the brake and stop the bike immediately. | 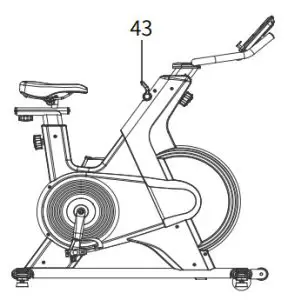 |
| ADJUSTING THE SEAT CUSHION The seat of this bike is fully adjustable as it moves Up, Down, Fore (forward), Aft (backward). | 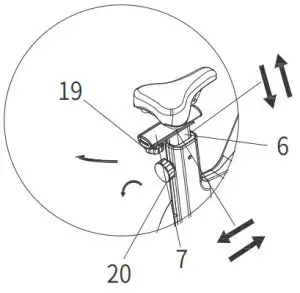 |
| PEDAL STRAP ADJUSTMENT Your feet should be secured in the toe clips during exercise. Place your feet as far forward into the toe clips as you can. With your feet in place, turn the crank to bring one foot to within arm’s reach, grasp the pedal strap and pull it upward to tighten the toe clip cage. Then insert the strap back into the hoop of the toe clip. Repeat this process to secure your other foot. | 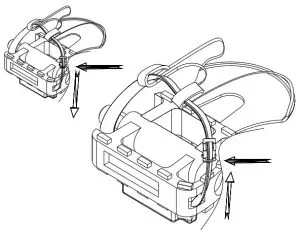 |
| ADJUSTING THE HANDLEBAR It is important that the handlebar and seat are both set to the correct height to your body. To adjust the handlebar height, loosen and pull the Adjustment Knob (NO. 20) outward, then slide the Adjustable Handlebar Tube (NO. 4) up or down to the desired height. Once adjusted, re-insert and tighten the Adjustment Knob (No. 20) to secure the handlebar in place. | 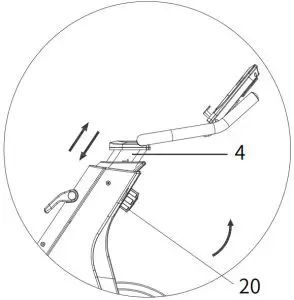 |
| TRANSPORTING THE BIKE To move the bike, first ensure that the Handlebar (NO. 5) is properly secured. If the handlebar is loose, tighten the Adjustment Knob (No. 20) to secure it. Next, stand at the front of the bike so that you’re directly in front of the handlebar. Firmly grasp and hold each side of the Handlebar (NO. 5), place one foot on the Front Stabilizer (No. 2), and tilt the bike towards you until the transportation wheels on the Front Stabilizer (No. 2) touch the ground. With the transportation wheels on the ground, you can transport the bike to the desired location with ease. Note: Always use caution when moving the bike. Unexpected impacts, such as dropping the bike, may cause injury and affect the bike s operation. | 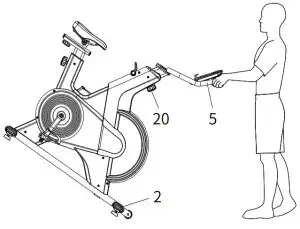 |
MAINTENANCE INSTRUCTIONS
Read all maintenance instructions fully before you start any repair work. In some conditions, an assistant is required to do the necessary tasks.
Daily
Before each use, examine the exercise machine for loose, broken, damaged, or worn parts. Do not use if found in this condition. Repair or replace all parts at the first sign of wear or damage. Make sure adjustment knobs are tight. Tighten as necessary. After each workout, use a damp cloth to wipe your machine and Console free of moisture.
NOTICE: If necessary, only use mild dish soap with a soft cloth to clean the Console. Do not clean with a petroleum-based solvent, automotive cleaner, or any product that contains ammonia. Do not clean the Console in direct sunlight or at high temperatures. Be sure to keep the Console free of moisture.
Weekly
Clean the machine to remove any dust, dirt, or grime from the surfaces.
Check for smooth seat operation. If needed, sparingly apply a thin coating of silicone lube to ease operation.![]() Silicone lubricant is not intended for human consumption. Keep out of reach of children. Store in a safe place.
Silicone lubricant is not intended for human consumption. Keep out of reach of children. Store in a safe place.
Note: Do not use petroleum-based products.
Monthly or after 20 hours
Check pedals and crank arms and tighten as necessary. Make sure all bolts and screws are tight.
Tighten as necessary.
Check the drive belt tension.
EXERCISE METER
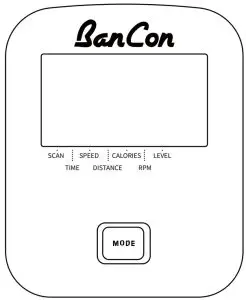
FUNCTIONS
SCAN: Press the MODE button until “SCAN” appears, meter will rotate through all the functions: SCAN, TIME, SPEED, DISTANCE, CALORIES, RPM, LEVEL. Each display will be held for 6 seconds.
TIME: Count the time from the exercise start to the end. When the exercise pauses, the TIME will stop.
SPEED: Displays the current speed being obtained.
DISTANCE: Counts the total distance of an exercise from start to finish.
CALORIES: Counts the total number of calories burned during an exercise from start to finish.(The data is a rough guide that can not be used in medical treatment.)
RPM: Displays the frequency per minute from 0 to 999.
LEVEL: Displays the current level of resistance.
SLEEP MODE: Without any signal of exercise or operation for 1 minute, the power will automatically shut off. Meter will power on when you press a button or when you start to pedal.
Note:
- If the meter display is abnormal, please re-install the batteries and try again.
- Battery Spec: 1.5V UM-3 or AA (2PCS).
- The batteries must be removed from the appliance before it is disposed.
SPECIFICATIONS
FUNCTION | SCAN | Every 6 seconds |
| TIME | 0:00 ~ 99:59 MIN:SEC | |
| SPEED | 0 ~ 99.9 MPH | |
| DISTANCE | 0 ~ 999.9 MILE | |
| CALORIES | 0 ~ 9999 KCAL | |
| RPM | 0 ~ 999 R/MIN | |
| LEVEL | 1 ~ 8 | |
| BATTERY TYPE | 2 pcs of SIZE -AA | |
| OPERATING TEMPERATURE | 0℃ ~ +40℃ | |
| STORAGE TEMPERATURE | -10℃ ~ +60℃ | |
![]() WWW.ONEBANCON.COM
WWW.ONEBANCON.COM
CONNECT WITH US FOR FITNESS ARTICLES, VIDEOS & WORKOUTS![]()
This device complies with Part 15 of the FCC Rules. Operation is subject to the following two conditions: (1) this device may not cause harmful interference, and (2) this device must accept any interference received, including interference that may cause undesired operation
NOTE: This equipment has been tested and found to comply with the limits for a Class B digital device, pursuant to Part 15 of the FCC Rules. These limits are designed to provide reasonable protection against harmful interference in a residential installation. This equipment generates, uses, and can radiate radio frequency energy and, if not installed and used in accordance with the instructions, may cause harmful interference to radio communications. However, there is no guarantee that
interference will not occur in a particular installation.
If this equipment does cause harmful interference to radio or television reception, which can be determined by turning the equipment off and on, the user is encouraged to try to correct the interference by one or more of the following measures:
- Reorient or relocate the receiving antenna.
- Increase the separation between the equipment and receiver.
- Connect the equipment into an outlet on a circuit different from that to which the receiver is connected.
- Consult the dealer or an experienced radio/TV technician for help.
Warning: Changes or modifications not expressly approved by the party responsible for compliance could void the user’s authority to operate the equipment
The devices has been evaluated to meet general RF exposure requirement the device can be used in portable exposure condition without restriction


